ENGINE UNIT > INSPECTION |
| 1. INSPECT CAMSHAFTS |
|
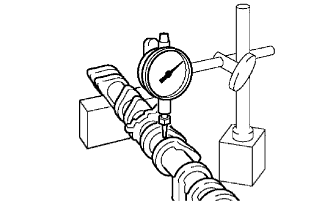
Inspect the camshaft for runout.
Place the camshaft on V-blocks.
Using a dial indicator, measure the circle runout at the center journal.
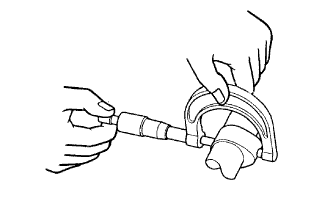 |
Inspect the cam lobes.
Using a micrometer, measure the cam lobe height.
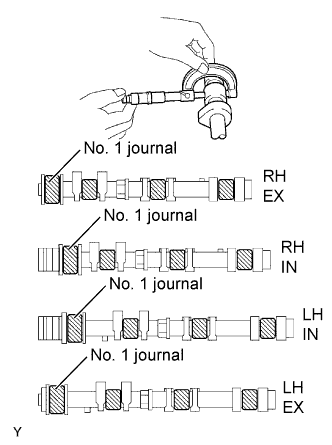 |
Inspect the camshaft journals.
Using a micrometer, measure the journal diameter.
| 2. INSPECT CAMSHAFT TIMING GEAR ASSEMBLY |
Fix the intake camshaft in a vise.
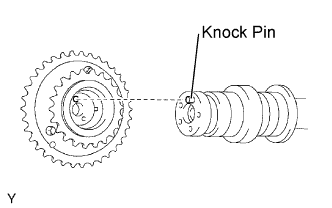 |
Align the knock pin hole in the camshaft timing gear assembly with the knock pin of the camshaft, and install the camshaft timing gear assembly with the bolt.
Confirm that the camshaft timing gear assembly is locked.
 |
Release that lock pin.
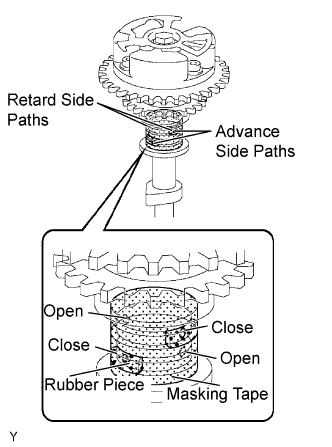
Cover 4 oil paths of cam journal with masking tape as shown in the illustration.
Puncture the tape covering the advance oil path and retard oil path on the opposite side of the groove as shown in the illustration.
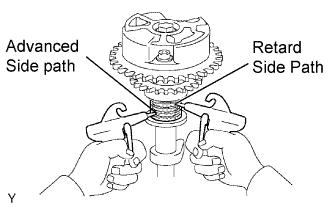 |
Apply air pressure into two broken paths (the advance side path and the retard side path) of about 200 kPa (2.0 kgf/cm2).
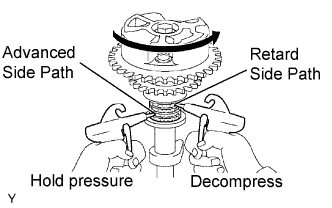 |
Confirm that the camshaft timing gear assembly rotates in the timing advance direction when reducing the air pressure on the timing retard path.
When the camshaft timing gear comes to the most advanced position, release the air pressure on the timing retard side path, and release that of the timing advance side path.
Check the smooth revolution.
Rotate the camshaft timing gear several times within the movable range except for the most retarded position and check it rotates smoothly.
Check that the lock is in the most retarded position.
Confirm that the camshaft timing gear assembly is locked in the most retarded position.
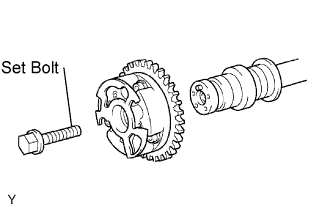 |
Remove the set bolt, then remove the camshaft timing gear assembly.
| 3. INSPECT CYLINDER HEAD SET BOLT |
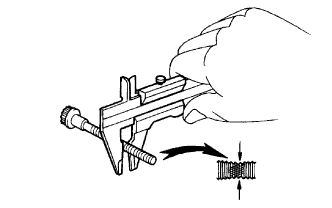 |
Using vernier calipers, measure the outer diameter of the bolt thread.
| 4. INSPECT CHAIN SUB-ASSEMBLY |
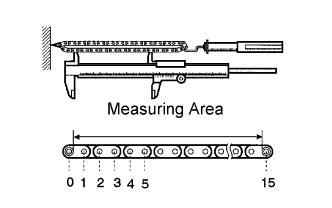 |
Using a spring scale, apply 147 N (15.0 kgf, 33.1 lbf) to the chain and measure the length.
| 5. INSPECT NO.2 CHAIN SUB-ASSEMBLY |
|
Using a spring scale, apply 147 N (15.0 kgf, 33.1 lbf) to the chain and measure the length.
| 6. INSPECT CAMSHAFT TIMING GEAR ASSEMBLY |
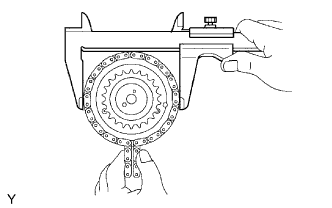 |
Wrap the No. 1 chain around the larger gear of timing gear assembly.
Using vernier caliper, measure the timing gear with the chain wrapped.
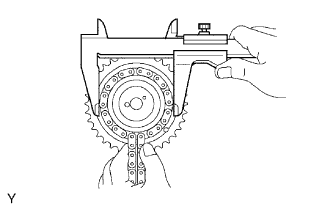 |
Wrap the No. 2 chain around the smaller gear of timing gear assembly.
Using vernier calipers, measure the timing gear with the chain wrapped.
| 7. INSPECT CAMSHAFT TIMING GEAR OR SPROCKET |
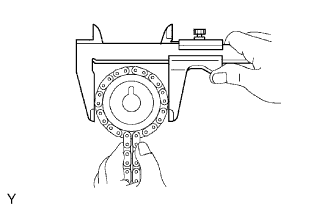 |
Wrap the No. 2 chain around the timing gear.
Using vernier calipers, measure the camshaft timing gear diameter with the chain wrapped.
| 8. INSPECT CRANKSHAFT TIMING GEAR OR SPROCKET |
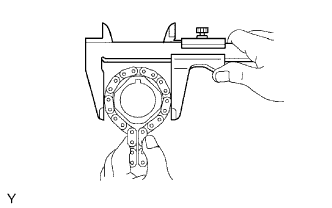 |
Wrap the No. 1 chain around the timing gear.
Using vernier calipers, measure the timing gear diameter with the chain wrapped.
| 9. INSPECT IDLE SPROCKET ASSEMBLY |
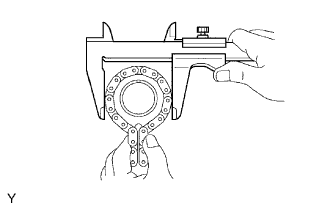 |
Wrap the No. 1 chain around the idle sprocket.
Using vernier caliper, measure the idle sprocket with the chain wrapped.
| 10. INSPECT NO.1 IDLE GEAR SHAFT |
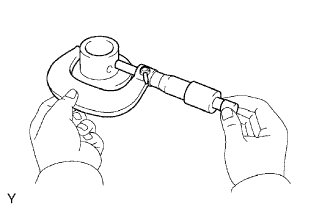 |
Using a micrometer, measure the idle gear shaft diameter.
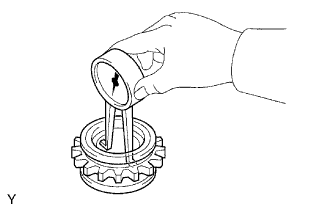 |
Using a caliper gauge, measure the internal diameter of the idle gear.
Subtract the idle gear shaft diameter measurement from the idle gear internal diameter measurement.
| 11. INSPECT NO.1 CHAIN TENSIONER ASSEMBLY |
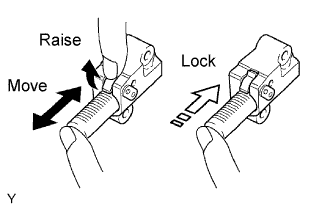 |
Check that the plunger moves smoothly when the ratchet pawl is raised with finger.
Release the ratchet pawl, then check that the plunger is locked in place by the ratchet pawl and does not move when pushing it with finger.
| 12. INSPECT NO.2 CHAIN TENSIONER ASSEMBLY |
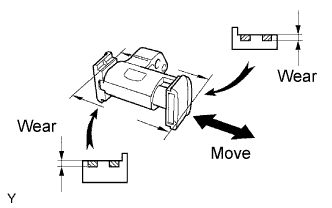 |
Check that the plunger moves smoothly.
Measure the wear of the chain tensioner slipper.
| 13. INSPECT NO.3 CHAIN TENSIONER ASSEMBLY |
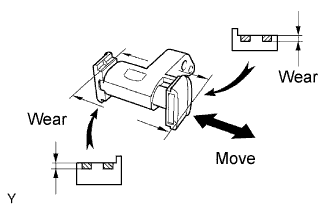 |
Check that the plunger moves smoothly.
Measure the wear of the chain tensioner slipper.
| 14. INSPECT CHAIN TENSIONER SLIPPER |
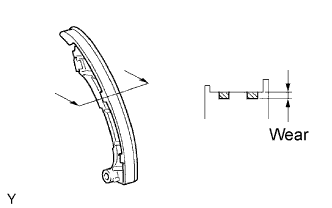 |
Measure the wear of the tensioner slipper.
| 15. INSPECT NO.1 CHAIN VIBRATION DAMPER |
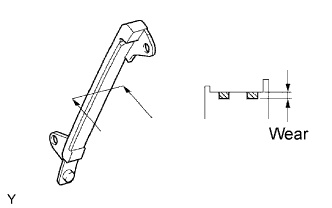 |
Measure the wear of the vibration damper No. 1.
| 16. INSPECT NO.2 CHAIN VIBRATION DAMPER |
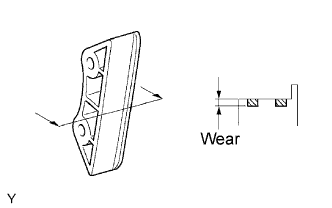 |
Measure the wear of the vibration damper No. 2 .
| 17. INSPECT CYLINDER HEAD SUB-ASSEMBLY |
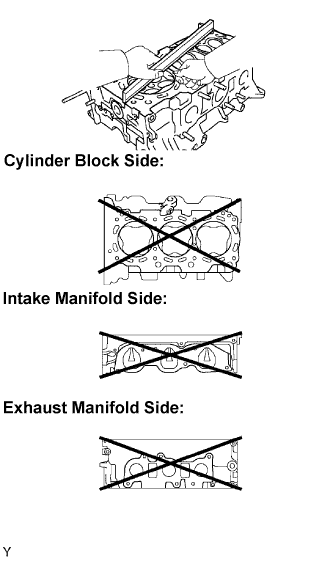 |
Inspect the cylinder head for warpage.
Using a precision straight edge and feeler gauge, measure the warpage on the cylinder block side and the intake and exhaust sides.
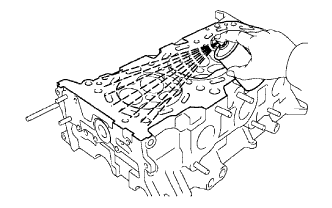 |
Inspect the cylinder head for crack.
Using a dye penetrant, check the combustion chamber, intake ports, exhaust ports and cylinder block surface for cracks.
If cracked, replace the cylinder head.
| 18. CLEAN VALVE |
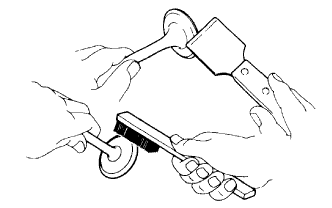 |
Using a gasket scraper, chip off any carbon from the valve head.
Using a wire brush, thoroughly clean the valve.
| 19. INSPECT VALVE |
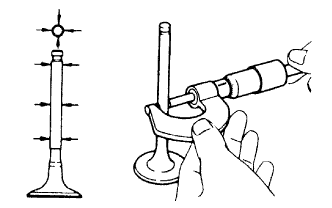 |
Inspect valve stem diameter.
Using a micrometer, measure the diameter of the valve stem.
| Intake | 5.470 to 5.485 mm (0.2154 to 0.2159 in.) |
| Exhaust | 5.465 to 5.480 mm (0.2152 to 0.2158 in.) |
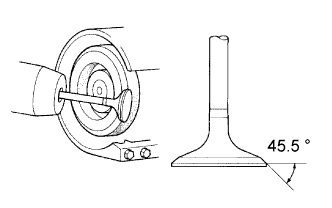 |
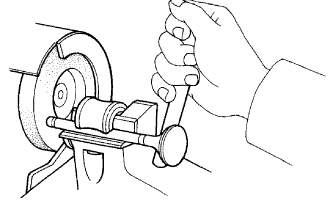
Inspect valve face angle.
Grind the valve enough to remove any pits and carbon.
Check that the valve is ground to the correct valve face angle.
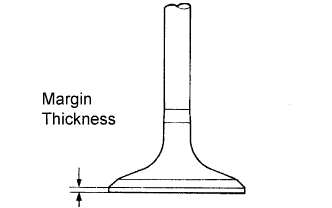 |
Inspect valve head margin thickness.
Using vernier calipers, check the valve head margin thickness.
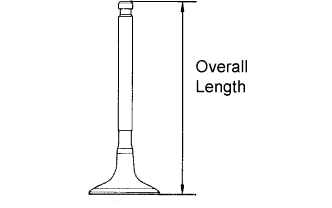 |
Inspect overall length.
Using vernier calipers, check the overall length.
| Intake | 106.95 mm (4.2106 in.) |
| Exhaust | 105.80 mm (4.1654 in.) |
| Intake | 106.70 mm (4.2008 in.) |
| Exhaust | 105.55 mm (4.1555 in.) |
 |
Inspect valve stem tip.
Check the surface of the valve stem tip for wear.
| 20. CLEAN VALVE SEAT |
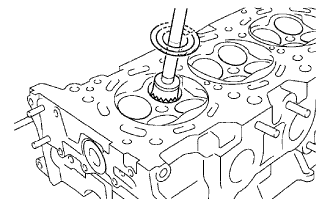 |
Using a 45° carbide cutter, resurface the valve seats.
Clean the valve seats.
| 21. INSPECT VALVE SEAT |
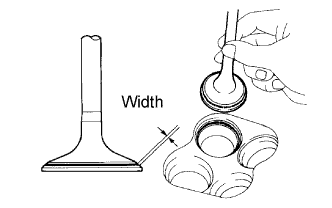 |
Apply a light coat of prussian blue (or white lead) to the valve face.
Lightly press the valve against the valve seat.
Check the valve face and seat according to the following procedure.
If blue appears 360° around the face, the valve is concentric.
If not, replace the valve.
If the blue appears 360° around the valve seat, the guide and face are concentric.
If not, resurface the valve seat.
Check that the seat is in contact with the middle of the valve face with the following width.
| 22. INSPECT INNER COMPRESSION SPRING |
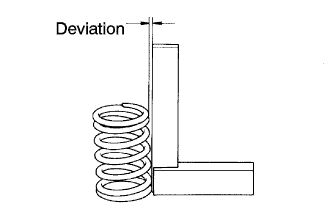 |
Inspect the deviation.
Using steel squares, measure the deviation of the inner compression spring.
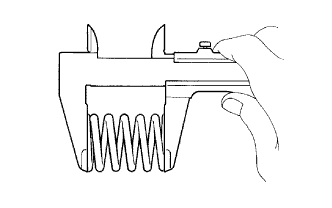 |
Inspect the free length.
Using vernier calipers, measure the free length of the inner compression spring.
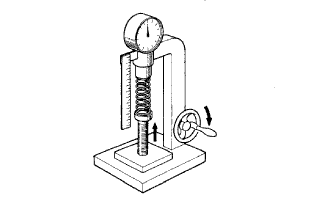 |
Inspect the tension.
Using a spring tester, measure the tension of the inner compression spring at the specified installed length.
| 23. INSPECT VALVE GUIDE BUSH OIL CLEARANCE |
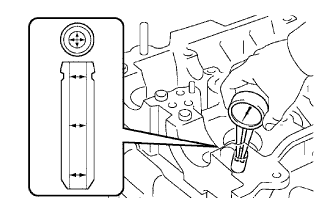 |
Using a caliper gauge, measure the internal diameter of the valve guide bush.
Subtract the valve stem diameter measurement (Step 8) from the valve guide bush internal diameter measurement.
| Intake | 0.025 to 0.060 mm (0.0010 to 0.0024 in.) |
| Exhaust | 0.030 to 0.065 mm (0.0012 to 0.0026 in.) |
| Intake | 0.08 mm (0.0031 in.) |
| Exhaust | 0.10 mm (0.0039 in..) |
| 24. INSPECT VALVE LIFTER |
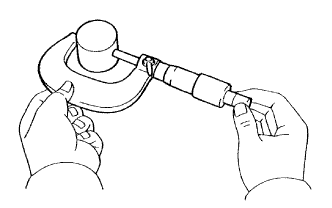 |
Using a micrometer, measure the valve lifter diameter.
| 25. INSPECT VALVE LIFTER OIL CLEARANCE |
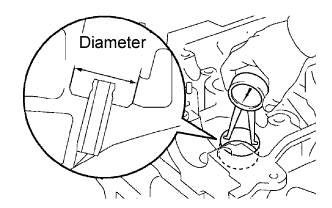 |
Using a caliper gauge, measure the lifter bore diameter of the cylinder head.
Subtract the valve lifter diameter measurement (Step 16) from the lifter bore diameter measurement.
| 26. INSPECT CAMSHAFT OIL CLEARANCE |
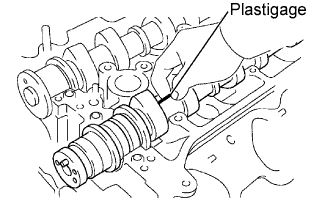 |
Clean the camshaft bearing caps, camshaft bearings and camshaft journals.
Install the camshaft bearing (Click here or Click here).
Place the camshaft on the cylinder head.
Lay a strip of Plastigage across each camshaft journal.
Install the camshaft bearing caps (Click here or Click here).
Remove the camshaft bearing caps (Click here or Click here).
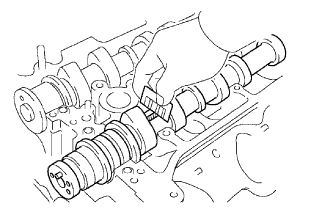 |
Measure the Plastigage at its widest point.
| No. 1 (Intake) | 0.008 to 0.038 mm (0.0003 to 0.0015 in.) |
| No. 1 (Exhaust) | 0.040 to 0.079 mm (0.0016 to 0.0031 in.) |
| Others | 0.025 to 0.062 mm (0.0010 to 0.0024 in.) |
| No. 1 | 0.040 to 0.079 mm (0.0016 to 0.0031 in.) |
| Others | 0.025 to 0.062 mm (0.0010 to 0.0024 in.) |
| No. 1 (Intake) | 0.07 mm (0.0028 in.) |
| Others | 0.10 mm (0.0039 in.) |
| Cylinder head journal bore diameter | 40.009 to 40.017 mm (1.5752 to 1.5755 in.) |
| Camshaft bearing center wall thickness (Mark "2") | 2.004 to 2.008 mm (0.0789 to 0.0791 in.) |
| Camshaft journal diameter | 35.971 to 35.985 mm (1.4165 to 1.4167 in.) |
Remove the Plastigage completely.
Remove the camshafts.
Remove the camshaft bearing.
| 27. INSPECT CAMSHAFT THRUST CLEARANCE |
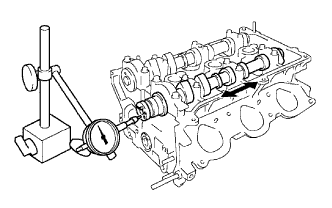 |
Install the camshafts. (Click here or Click here).
Using a dial indicator, measure the thrust clearance while moving the camshaft back and forth.
| 28. INSPECT CONNECTING ROD THRUST CLEARANCE |
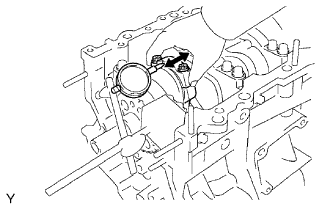 |
Using a dial indicator, measure the thrust clearance while moving the connecting rod back and forth.
| 29. INSPECT CONNECTING ROD OIL CLEARANCE |
Check the matchmarks on the connecting rod and cap are aligned to ensure correct assembly.
Using SST, remove the 2 connecting rod cap bolts.
Clean the crank pin, bearing and connecting rod.
Check the crank pin and bearing for any pits and scratches.
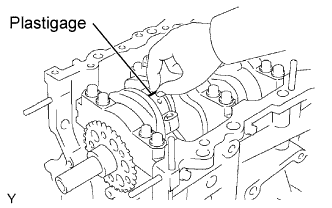 |
Lay a strip of plastigage across the crank pin.
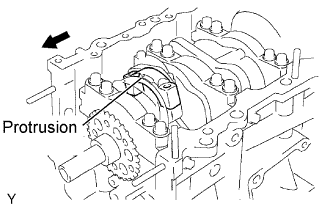 |
Check that the protrusion of the connecting rod cap is facing in the correct direction.
Apply a light coat of engine oil to the threads of the connecting rod cap bolts.
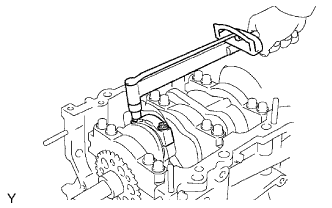 |
Using SST, tighten the bolts alternately to the specified torque.
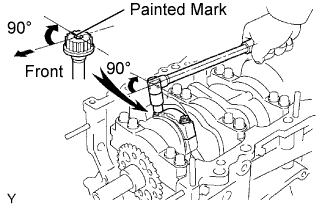 |
Mark the front side of the each connecting cap bolt with paint.
Retighten the cap bolts 90° as shown in the illustration.
Remove the 2 bolts, connecting rod cap and lower bearing.
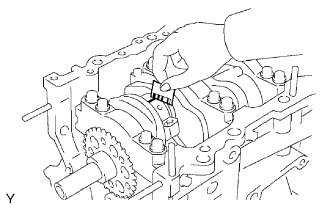 |
Measure the plastigage at its widest point.
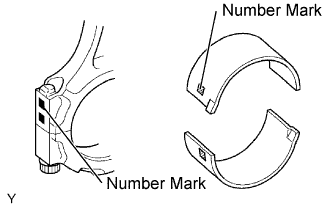 |
When replacing the bearing, replace it with one with the same number as marked on the connecting rod. There are 4 sizes of standard bearings, marked "1 ", "2", "3" and "4" accordingly.
| Mark | mm (in.) |
| "1" | 1.484 to 1.487 (0.0584 to 0.0585) |
| "2" | 1.487 to 1.490 (0.0585 to 0.0587) |
| "3" | 1.490 to 1.493 (0.0587 to 0.0588) |
| "4" | 1.493 to 1.496 (0.0588 to 0.0589) |
| 30. CHECK CYLINDER BLOCK FOR WARPAGE |
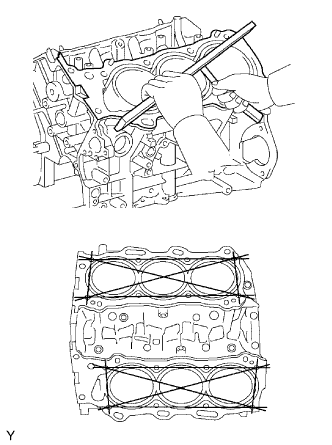 |
Using a precision straight edge and feeler gauge, measure the warpage of the contact surface of the cylinder head gasket.
| 31. INSPECT CYLINDER BORE |
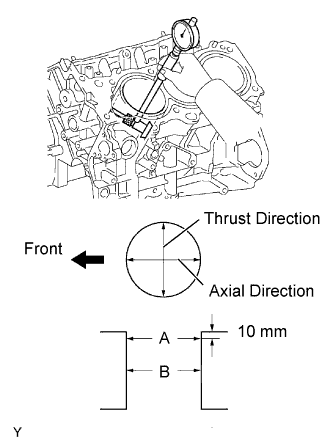 |
Using a cylinder gauge, measure the cylinder bore diameter at positions A and B in the thrust and axial directions.
| 32. INSPECT WITH PISTON SUB-ASSEMBLY |
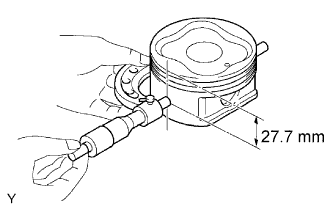 |
Using a micrometer, measure the piston diameter at right angles to the piston pin center line, 27.7 mm (1.091 in.) from the piston head.
| 33. INSPECT PISTON OIL CLEARANCE |
Subtract the piston diameter measurement from the cylinder bore diameter measurement.
| 34. INSPECT CONNECTING ROD SUB-ASSEMBLY |
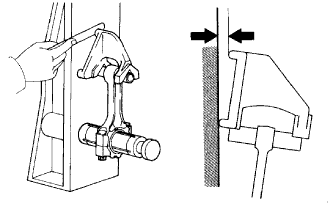 |
Using a rod aligner and feeler gauge, check the connecting rod alignment.
Check for misalignment.
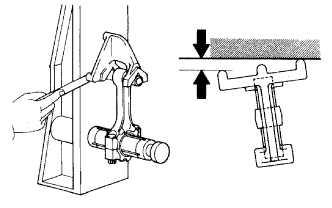 |
Check the twist.
| 35. INSPECT PISTON PIN OIL CLEARANCE |
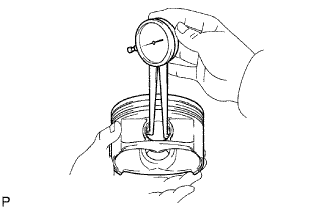 |
Using a caliper gauge, measure the internal diameter of the piston pin hole.
| Mark | mm (in.) |
| A | 22.001 to 22.004 (0.8662 to 0.8663) |
| B | 22.005 to 22.007 (0.8663 to 0.8664) |
| C | 22.008 to 22.010 (0.8665 to 0.8665) |
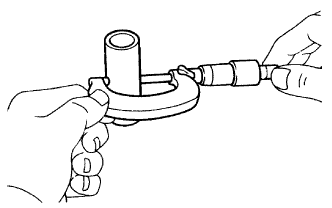 |
Using a micrometer, measure the piston pin diameter.
| Mark | mm (in.) |
| A | 21.997 to 22.000 (0.8660 to 0.8661) |
| B | 22.001 to 22.003 (0.8661 to 0.8663) |
| C | 22.004 to 22.006 (0.8663 to 0.8664) |
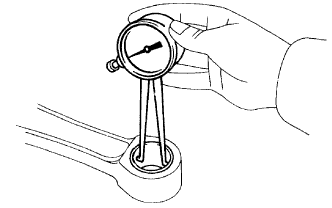 |
Using a caliper gauge, measure the internal diameter of the connecting rod bushing.
| Mark | mm (in.) |
| A | 22.005 to 22.008 (0.8663 to 0.8665) |
| B | 22.009 to 22.011 (0.8665 to 0.8666) |
| C | 22.012 to 22.014 (0.8666 to 0.8667) |
Subtract the piston pin diameter measurement from the piton pin hole diameter measurement.
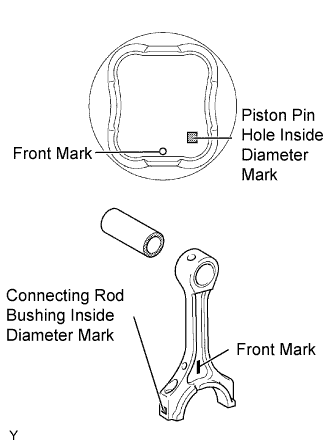 |
If the oil clearance is greater than the maximum, replace the bushing. If necessary, replace the piston and piston pin together.
Subtract the piston pin diameter measurement from the bushing inside diameter measurement.
If the oil clearance is greater than the maximum, replace the bushing. If necessary, replace the connecting rod and piston pin together.
| 36. INSPECT RING GROOVE CLEARANCE |
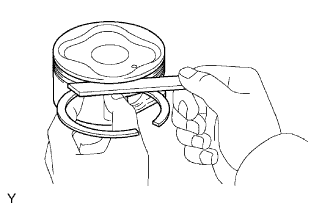 |
Using a feeler gauge, measure the clearance between a new piston ring and the wall of the ring groove.
| 37. INSPECT PISTON RING END GAP |
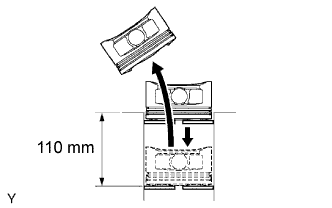 |
Using a piston, push the piston ring a little beyond the bottom of the ring travel, 110 mm (4.33 in.) from the top of the cylinder block.
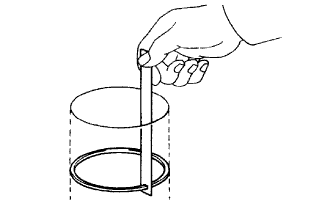 |
Using a feeler gauge, measure the end gap.
| 38. INSPECT CONNECTING ROD BOLT |
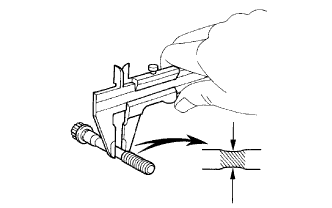 |
Using vernier calipers, measure the tension portion diameter of the bolt.
| 39. INSPECT CRANKSHAFT BEARING CAP SET BOLT |
|
Using vernier calipers, measure the tension portion diameter of the bolt.
| 40. INSPECT CRANKSHAFT |
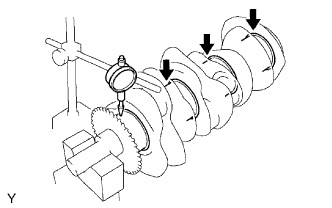 |
Using a dial indicator and V-blocks, measure the runout as shown in the illustration.
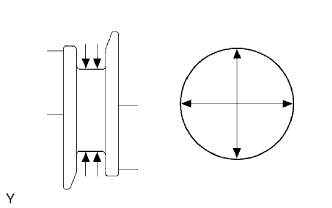 |
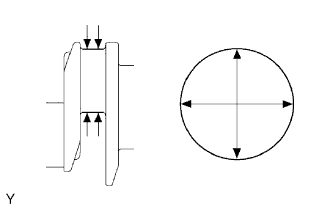
Using a micrometer, measure the diameter of each main journal.
Check each main journal for taper and out-of-roundness as shown.
 |
Using a micrometer, measure the diameter of each crank pin.
Check each crank pin for taper and out-of-roundness as shown.
| 41. INSPECT CRANKSHAFT OIL CLEARANCE |
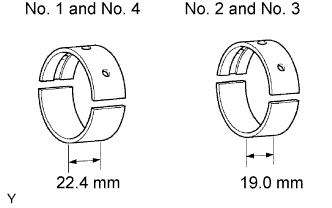 |
Clean each main journal and bearing.
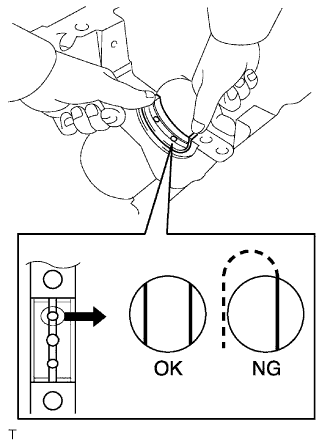 |
Install the 4 upper bearings.
Install the upper bearing near the center of the cylinder block.
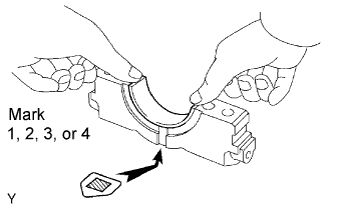 |
Install the 4 lower bearings.
Install the lower bearing near the center of the cylinder block.
Place the crankshaft on the cylinder block.
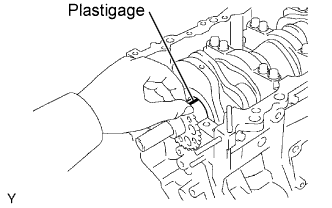 |
Lay a strip of plastigage across each journal.
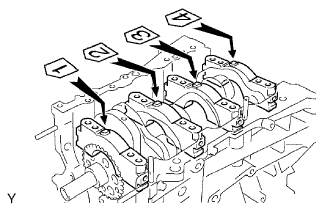 |
Examine the front marks and numbers, check the sequence order is as shown and install the bearing caps onto the cylinder block.
Apply a light coat of engine oil to the threads of bearing cap bolts.
Temporarily install the 8 main bearing cap bolts in the inside positions.
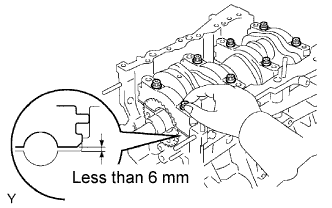 |
Install the main bearing caps. Tighten the 2 bolts for each bearing cap until the clearance between the bearing cap and the cylinder block is under 6 mm (0.23 in.).
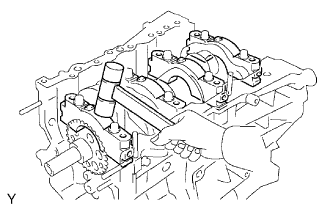 |
Using a plastic-faced hammer, lightly tap the bearing cap to ensure a proper fit.
Apply a light coat of engine oil to the threads of main bearing cap bolts.
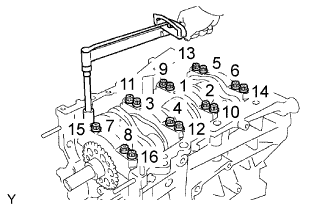 |
Install the 16 main bearing cap bolts. Using several steps, tighten the bolts uniformly in the sequence shown in the illustration.
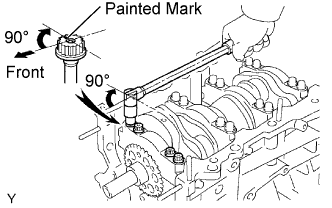 |
Mark the front side of the bearing cap bolts with paint.
Retighten the bearing cap bolts 90° in the sequence as shown.
Check that the painted mark is now at a 90° angle from the front.
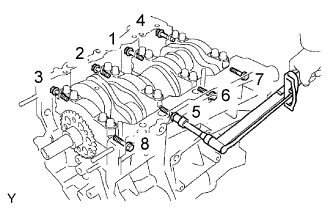 |
Install the 8 main bearing cap bolts. Using several steps, tighten the bolts uniformly in the sequence shown in the illustration.
Remove the main bearing caps.
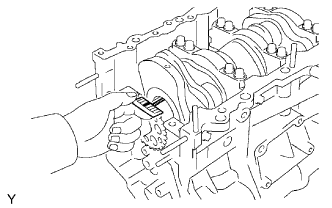 |
Measure the Plastigage at its widest point.
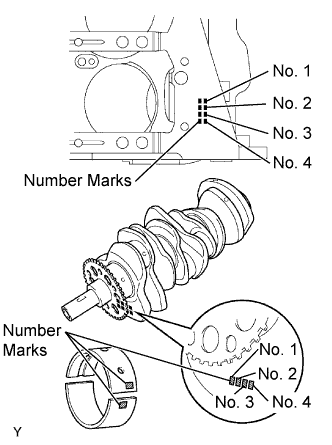 |
Replace the bearing with the same number. If the number of the bearing cannot be determined, select the correct bearing by adding together the numbers imprinted on the cylinder block and crankshaft, then refer to the table below for the appropriate bearing number. There are 5 size of standard bearings, marked "1", "2", "3", "4" and "5" accordingly.
| Cylinder block (A) + Crankshaft | 0 -5 | 6 -11 | 12 -17 | 18 - 23 | 24 - 28 |
| Use Bearing | "1" | "2" | "3" | "4" | "5" |
| Item | Mark | mm (in.) |
| Cylinder block main journal bore diameter (A) | "00" "01" "02" "03" "04" "05" "06" "07" "08" "09" "10" "11" "12" "13" "14" "15" "16" | 77.000 (3.0315) 77.001 (3.0315) 77.002 (3.0316) 77.003 (3.0316) 77.004 (3.0317) 77.005 (3.0317) 77.006 (3.0317) 77.007 (3.0318) 77.008 (3.0318) 77.009 (3.0319) 77.010 (3.0319) 77.011 (3.0319) 77.012 (3.0320) 77.013 (3.0320) 77.014 (3.0320) 77.015 (3.0321) 77.016 (3.0321) |
| Crankshaft main journal diameter (B) | "00" "01" "02" "03" "04" "05" "06" "07" "08" "09" "10" "11" | 71.999 to 72.000 (2.8346 to 2.8346) 71.998 to 71.999 (2.8346 to 2.8346) 71.997 to 71.998 (2.8345 to 2.8346) 71.996 to 71.997 (2.8345 to 2.8346) 71.995 to 71.996 (2.8344 to 2.8345) 71.994 to 71.995 (2.8344 to 2.8344) 71.993 to 71.994 (2.8343 to 2.8344) 71.992 to 71.993 (2.8343 to 2.8343) 71.991 to 71.992 (2.8343 to 2.8343) 71.990 to 71.991 (2.8343 to 2.8343) 71.989 to 71.990 (2.8342 to 2.8343) 71.988 to 71.989 (2.8342 to 2.8342) |
| Standard bearing center wall thickness | "1" "2" "3" "4" "5" | 2.488 to 2.491 (0.0980 to 0.0981) 2.491 to 2.494 (0.0981 to 0.0982) 2.494 to 2.497 (0.0982 to 0.0983) 2.497 to 2.500 (0.0982 to 0.0984) 2.500 to 2.503 (0.0984 to 0.0985) |