ENGINE UNIT > REASSEMBLY |
| 1. INSTALL TIGHT PLUG |
|
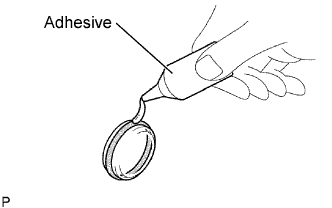
Apply adhesive around the tight plugs.
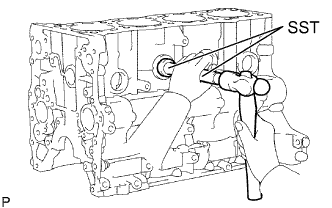 |
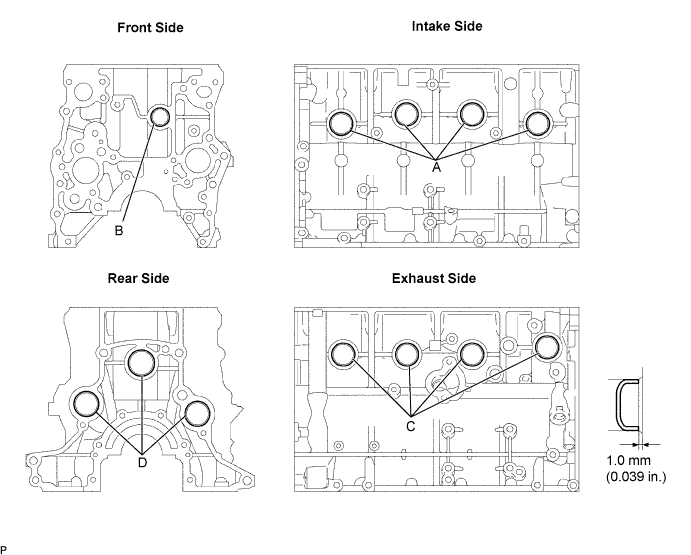
Using SST and a hammer, tap in new tight plugs as shown in the illustration.
Using SST, tap in the 8 tight plugs A and C.
Using SST, tap in the tight plug B.
Using SST, tap in the 3 tight plugs D.
| 2. INSTALL STUD BOLT |
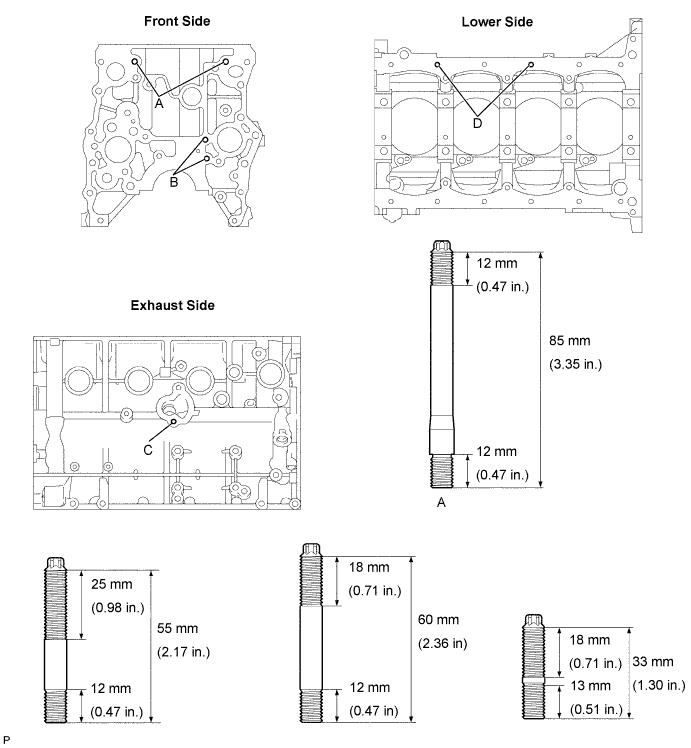
Using an E7 "torx" socket wrench, install the stud bolts B and D.
Using an E8 "torx" socket wrench, install the stud bolts A.
Apply adhesive to the hole for the stud bolt C on the cylinder block. Using an E7 "torx" socket wrench, install the stud bolts C.
| 3. INSTALL STRAIGHT PIN |
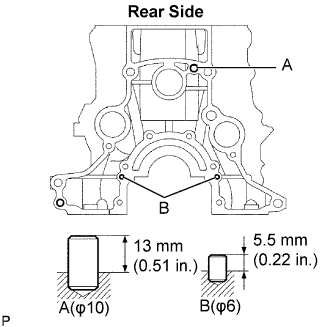 |
Using a plastic-faced hammer, tap in new straight pins to the cylinder block.
| 4. INSTALL RING PIN |
Using a plastic-faced hammer, tap in new ring pins to the cylinder block.
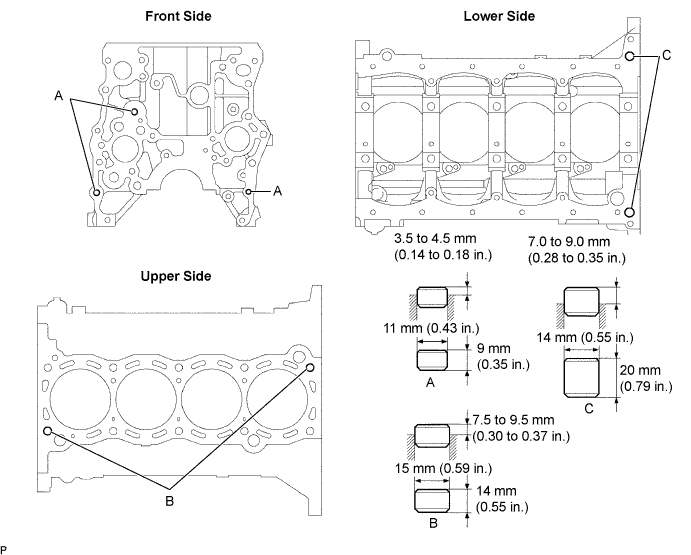
| 5. INSTALL NO. 2 BALANCESHAFT DRIVEN GEAR |
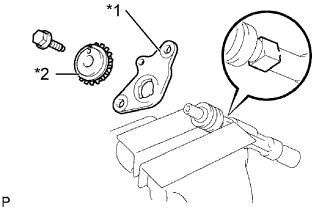 |
Mount the head portion of the balanceshaft in a vise.
Install the balanceshaft thrust washer No.2 (* 1) and balanceshaft driven gear No.2 (* 2).
Install and torque the bolt.
| 6. INSTALL NO.2 BALANCESHAFT |
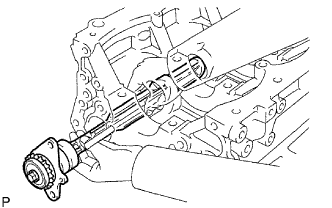 |
Install the balanceshaft to the cylinder block.
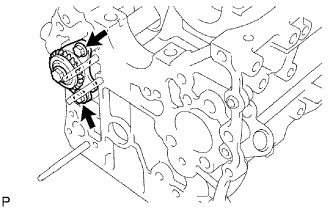 |
Install and torque the 2 bolts.
| 7. INSTALL NO. 1 BALANCESHAFT DRIVEN GEAR |
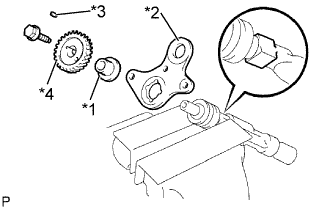 |
Mount the head portion of the balanceshaft in a vise.
Install the balanceshaft thrust spacer (* 1), balanceshaft thrust washer No.1 (* 2), sliding key (* 3) and balanceshaft driven gear No.1 (* 4).
Install and torque the bolt.
| 8. INSTALL NO.1 BALANCESHAFT |
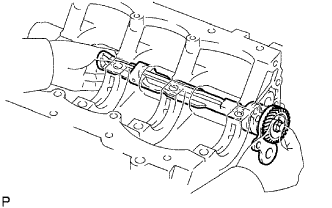 |
Install the No.1 balanceshaft to the cylinder block.
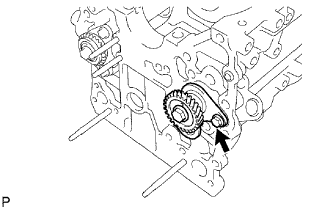 |
Install and torque the bolt.
| 9. INSTALL CYLINDER BLOCK WATER DRAIN COCK SUB-ASSEMBLY |
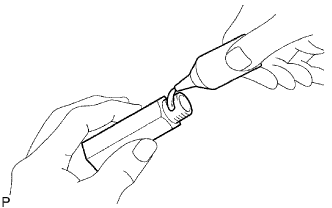 |
Apply adhesive around the drain cock.
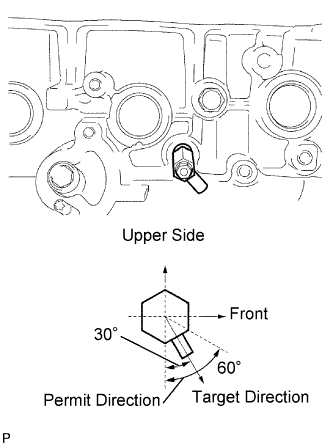 |
Install the cylinder block water drain cock as shown in the illustration.
Install the water drain cock plug to the water drain cock sub-assembly.
| 10. INSTALL NO. 1 OIL NOZZLE SUB-ASSEMBLY |
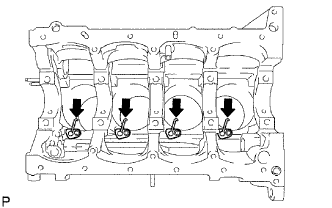 |
Using an E7 "torx" socket wrench, install the oil nozzles.
| 11. INSTALL WITH PIN PISTON SUB-ASSEMBLY |
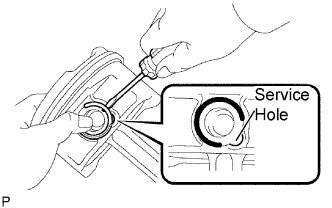 |
Assemble the piston and connecting rod.
Using a screwdriver, install a new snap ring at one end of the piston pin hole.
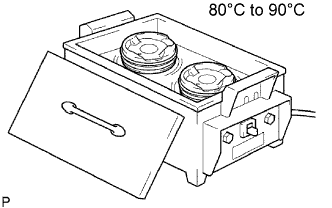 |
Gradually heat the piston to approximately 80 to 90°C (176 to 194°F).
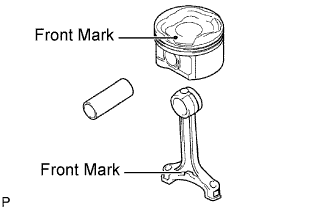 |
Coat the piston pin with engine oil.
Align the front marks of the piston and connecting rod, and push in the piston pin with your thumb.
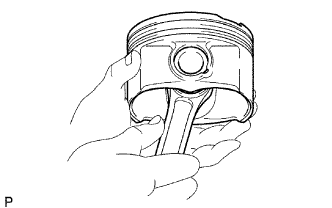 |
Check the fitting condition between the piston and piston pin by trying to move the piston back and forth on the piston pin.
|
Using a screwdriver, install a new snap ring at the other end of the piston pin hole.
| 12. INSTALL PISTON RING SET |
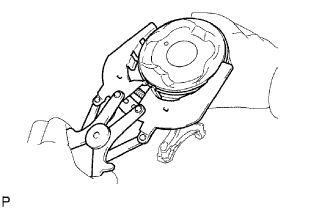 |
Install the oil ring expander by hand.
Using a piston ring expander, install the oil ring rail.
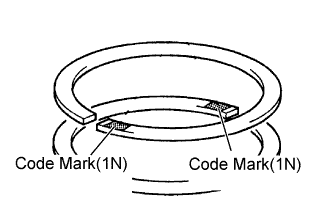 |
Using a piston ring expander, install the 2 compression rings so that the painted marks are positioned as shown in the illustration.
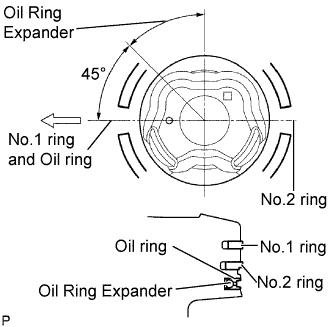 |
Position the piston rings so that the ring ends are as shown in the illustration.
| 13. INSTALL CRANKSHAFT BEARING |
Clean the main journal, and the both surfaces of the bearing.
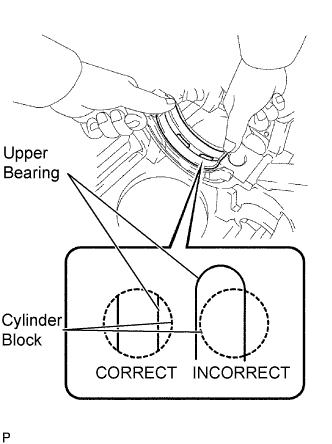 |
Install the upper bearing.
Install the upper bearing to the cylinder block as shown in the illustration.
 |
Install the lower bearing.
Install the lower bearing to the bearing cap.
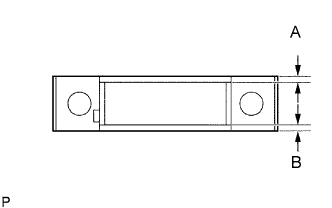
Using vernier calipers, measure the distance between the bearing cap's edge and the lower bearing's edge.
| Journal | Dimension (A) |
| #1, 5 | 3.75 mm (0.1476 in.) |
| #3 | 1.75 mm (0.0689 in.) |
| #2, 4 | 2.75 mm (0.1083 in.) |
With the upper bearing and lower bearing installed, use a plastic-faced hammer to install the bearing caps to the cylinder block.
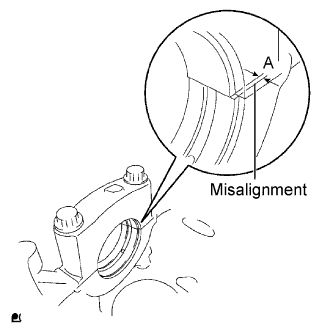 |
Using vernier calipers, measure the amount of misalignment between the upper bearing and lower bearing, as shown in the illustration.
Remove the bearing cap.
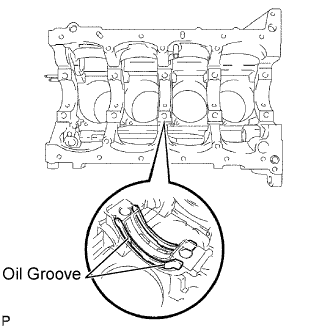 |
Install the crankshaft thrust washer upper to the cylinder block.
Install the 2 thrust washers under the No.3 journal position of the cylinder block with the oil grooves facing outward.
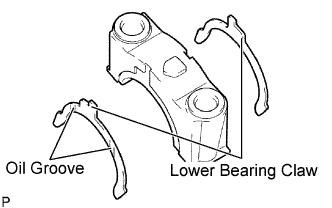 |
Install the 2 thrust washers on the No.3 bearing cap with the grooves facing outward.
Apply engine oil to the lower bearing.
| 14. INSTALL CRANKSHAFT |
Apply engine oil to the upper bearing, then place the crankshaft on the cylinder block.
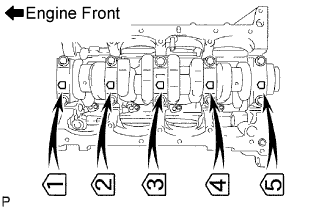 |
Install the 5 crankshaft bearing caps in their proper locations.
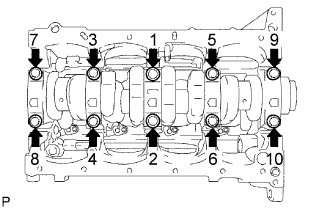 |
Install the crankshaft bearing cap bolts.
Step 1
Install and uniformly tighten the 10 main bearing cap bolts in the sequence shown in the illustration.
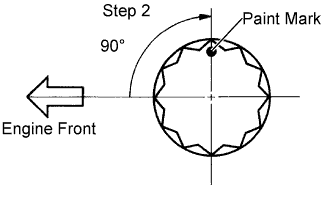 |
Step 2
Mark the front of the bearing cap bolts with paint.
Retighten the bearing cap bolts by 90° in the order above.
Check that the painted mark is now at a 90° angle to the front.
Check that the crankshaft turns smoothly.
Check the crankshaft thrust clearance (see step 5).
| 15. INSTALL CONNECTING ROD BEARING |
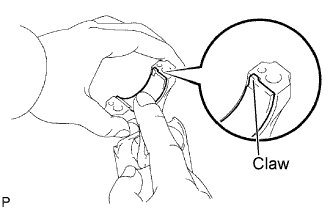 |
Align the bearing claw with the groove of the connecting rod or connecting cap.
Install the bearings in the connecting rod and connecting rod cap.
| 16. INSTALL PISTON SUB-ASSEMBLY WITH CONNENTING ROD |
Apply engine oil to the cylinder walls, the pistons, and the surfaces of connecting rod bearings.
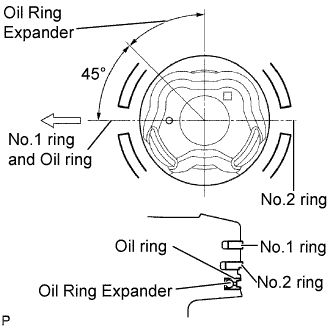 |
Position the piston rings so that the ring ends are as shown in the illustration.
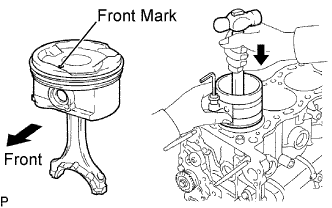 |
Using a piston ring compressor, push the correctly numbered piston and connecting rod assembly into the cylinder with the front mark of the piston facing forward.
Match the numbered connecting rod cap with the connecting rod.
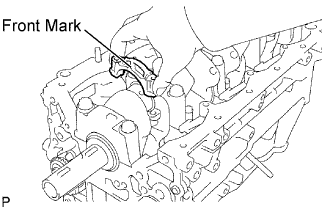 |
Check that the front mark of the connecting rod cap is facing forward.
Apply a light coat of engine oil to the threads and under the heads of the connecting rod cap bolts.
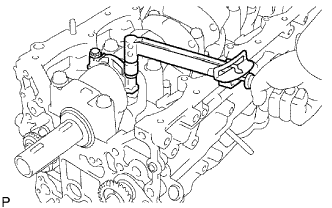 |
Install and alternately tighten the bolts of the connecting rod cap in several steps.
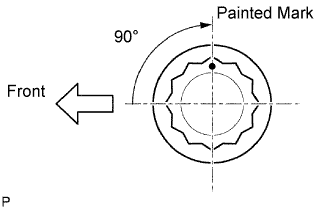 |
Mark the front side of each connecting cap bolt with paint.
Retighten the cap bolts by 90° as shown.
Check that the painted mark is now at a 90° angle to the front.
Check that the crankshaft turns smoothly.
Check the connecting rod thrust clearance (see step 1).
| 17. INSTALL CAMSHAFT BEARING CAP SETTING RING PIN |
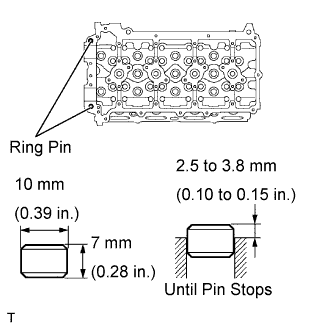 |
Using a plastic-faced hammer, tap in a new ring pin until the pin stops.
| 18. INSTALL NO. 1 TIGHT PLUG |
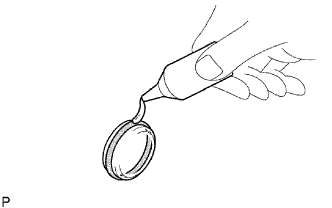 |
Apply adhesive to the tight plug hole of the cylinder head.
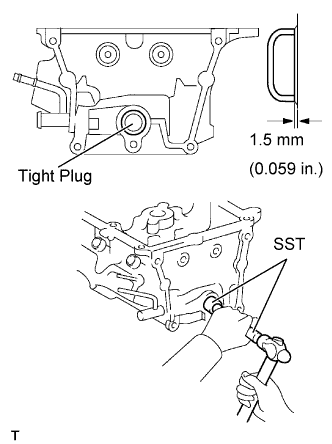 |
Using SST, tap in a new tight plug to the cylinder head as shown in the illustration.
| 19. INSTALL STUD BOLT |
Using E6 and E7 "torx" socket wrenchs, install the stud bolts.
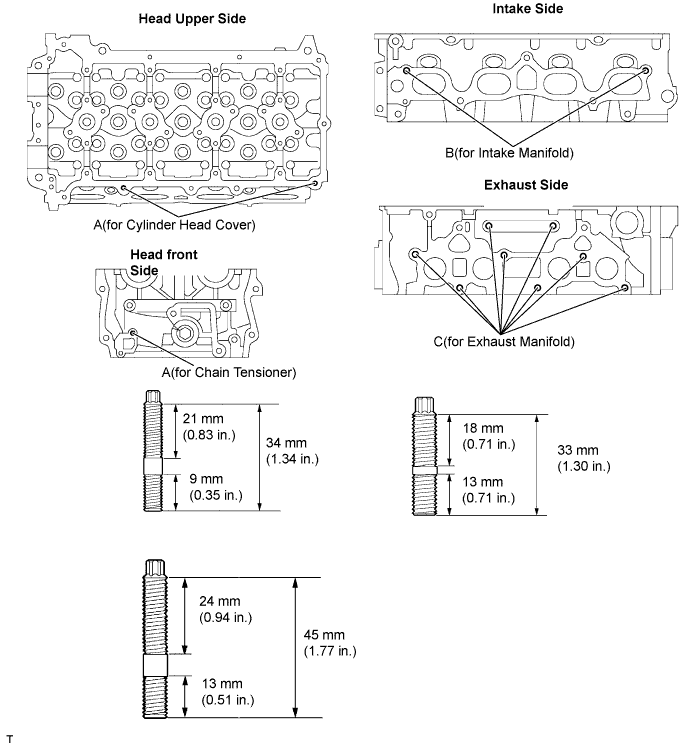
| 20. INSTALL NO. 1 WITH HEAD STRAIGHT SCREW PLUG |
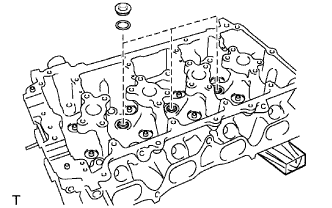 |
Using a 10 mm hexagon wrench, install 3 new gaskets and the straight screw plugs.
| 21. INSTALL NO. 2 WITH HEAD STRAIGHT SCREW PLUG |
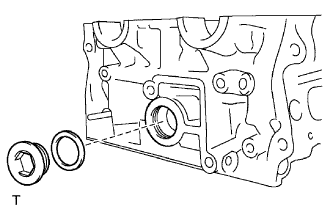 |
Using a 19 mm hexagon wrench, install a new gasket and the straight screw plug.
| 22. INSTALL OIL CONTROL VALVE FILTER |
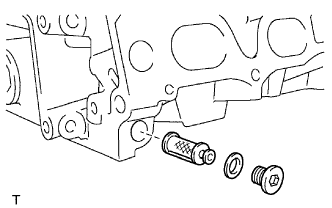 |
Check that no foreign matter is on the mesh part of the filter.
If foreign objects are present, clean the part thoroughly.
Using a 8 mm hexagon wrench, install a new gasket and the oil control valve filter with the screw plug.
| 23. INSTALL VALVE SPRING SEAT |
Install the valve spring seats to the cylinder head.
| 24. INSTALL VALVE STEM OIL SEAL |
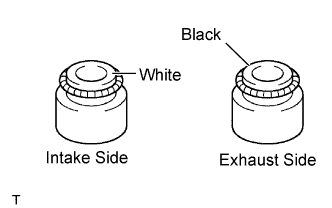 |
Apply a light coat of engine oil to new oil seals.
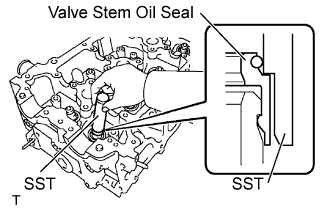 |
Using SST, push in the oil seals.
| 25. INSTALL INTAKE VALVE |
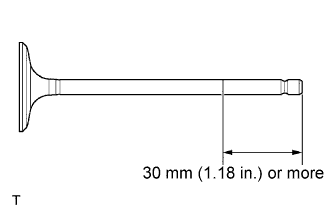 |
Apply plenty of engine oil to the tip area of the intake valve shown in the illustration.
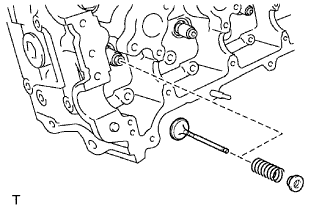 |
Install the valve, compression spring and spring retainer to the cylinder head.
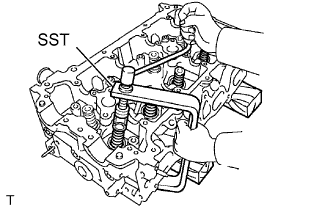 |
Using SST and wooden blocks, compress the spring and install the 2 retainer locks.
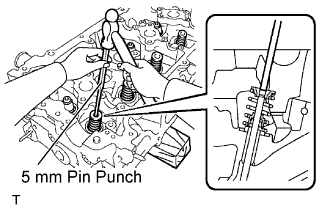 |
Using a 5 mm pin punch and plastic-faced hammer, lightly tap the valve stem tip to ensure a proper fit.
| 26. INSTALL EXHAUST VALVE |
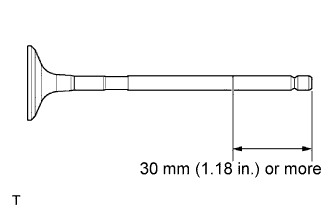 |
Apply plenty of engine oil to the tip area of the intake valve shown in the illustration.
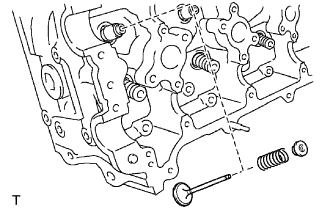 |
Install the valve, compression spring and spring retainer to the cylinder head.
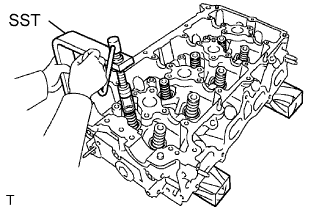 |
Using SST and wooden blocks, compress the spring and install the 2 retainer locks.
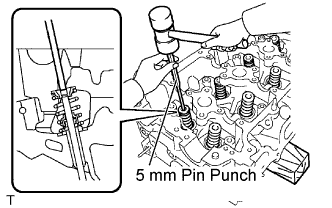 |
Using a 5 mm pin punch and plastic-faced hammer, lightly tap the valve stem tip to ensure a proper fit.
| 27. INSTALL VALVE LASH ADJUSTER ASSEMBLY |
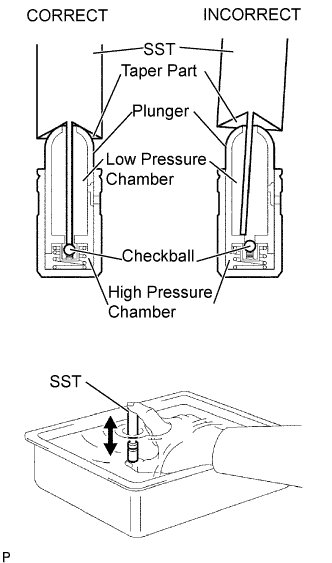 |
Place the lash adjuster into a container full of engine oil.
Insert SST's tip into the lash adjuster's plunger and use the tip to press down on the checkball inside the plunger.
Squeeze the SST and lash adjuster together to move the plunger up and down 5 to 6 times.
Check the movement of the plunger and bleed the air.
After bleeding the air, remove the SST. Then quickly and firmly press the plunger with a finger.
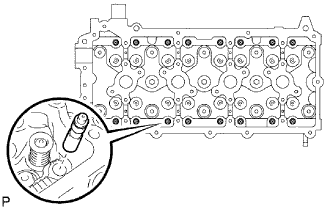 |
Install the lash adjusters.
| 28. INSTALL VALVE STEM CAP |
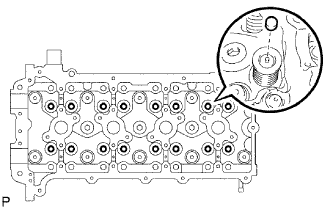 |
Apply a light coat of engine oil to the valve stem caps.
Install the valve stem caps to the cylinder head.
| 29. INSTALL CRANKSHAFT PULLEY SET CRANKSHAFT KEY |
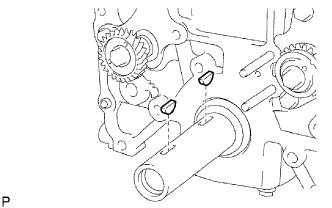 |
Install the 2 pulley keys to the crankshaft.
| 30. INSTALL NO. 4 CHAIN VIBRATION DAMPER |
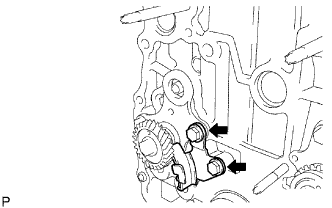 |
Install the vibration damper No.4 with the 2 bolts.
| 31. INSTALL NO.2 CHAIN SUB-ASSEMBLY |
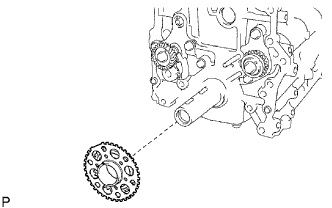 |
Install the timing sprocket No.2 as shown in the illustration.
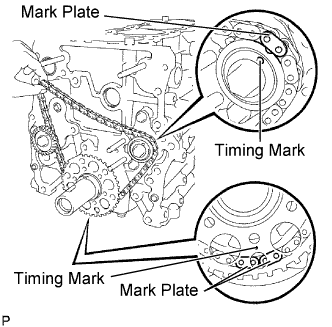 |
As shown in the illustration, install the chain on the sprocket and gear with the painted marks aligned with the timing marks on the sprocket and gear.
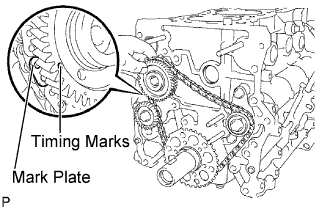 |
Fit the other mark link of the crankshaft timing sprocket behind the large timing mark of the balanceshaft drive gear.
Insert the balanceshaft drive gear shaft through the balanceshaft drive gear so that it fits into the thrust plate hole.
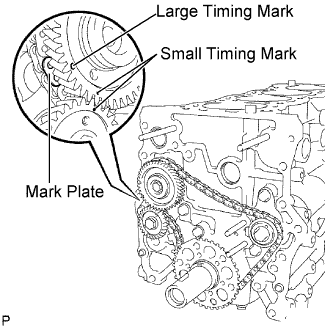 |
Align the small timing mark of the balanceshaft drive gear with the timing mark of the balanceshaft timing gear.
Install the bolt to the balanceshaft drive gear and tighten it.
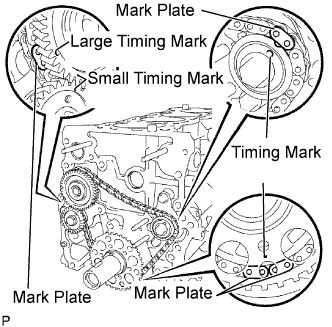 |
Check that each timing mark is matched with the corresponding mark link.
| 32. INSTALL NO. 2 CHAIN TENSIONER ASSEMBLY |
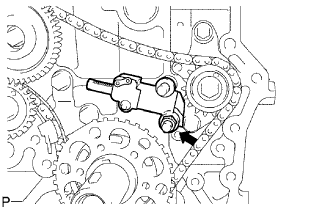 |
Install the chain tensioner assembly No.2 with the nut.
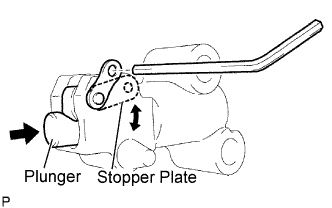 |
Move the stopper plate downward to release the lock, and push the plunger deep into the tensioner.
Move the stopper plate upward to set the lock, and insert a hexagon wrench into the stopper plate's hole.
| 33. INSTALL NO. 3 CHAIN VIBRATION DAMPER |
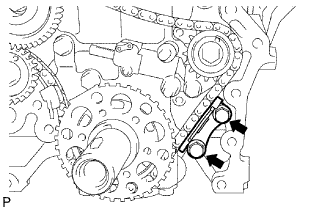 |
Install the chain vibration damper No.3 with the 2 bolts.
| 34. INSTALL NO. 2 CHAIN VIBRATION DAMPER |
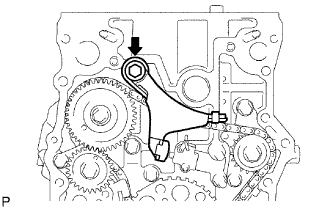 |
Install the chain vibration damper No.2 with the bolt.
Remove a pin from the chain tensioner assy No.2 and release the plunger.
| 35. INSTALL NO. 1 WITH HEAD TAPER SCREW PLUG |
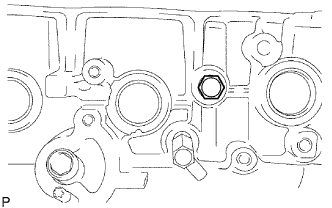 |
Install the screw plug No.1 to the cylinder block.
| 36. INSTALL OIL FILTER BRACKET SUB-ASSEMBLY |
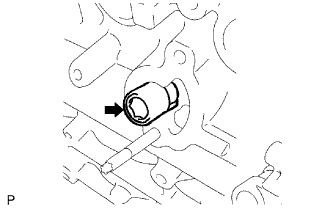 |
Using a hexagon wrench, install the oil filter bracket union.
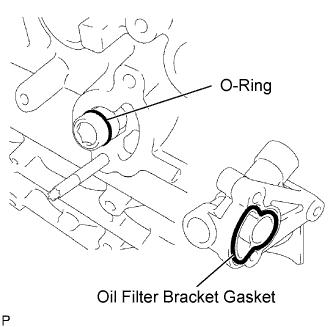 |
Install a new oil filter bracket gasket to the oil filter bracket.
Install a new O-ring to the oil filter bracket union.
Install 2 new gaskets and the 2 screw plugs to the oil filter bracket.
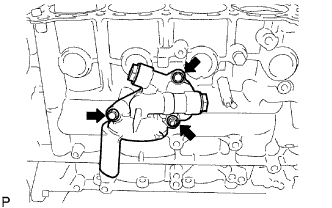 |
Install the oil filter bracket with the 2 bolts and nut.
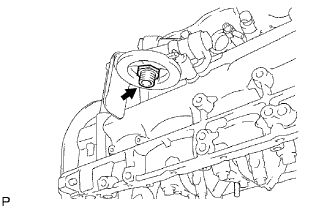 |
Using a 27 mm socket wrench, install the oil filter union.
| 37. INSTALL OIL FILTER SUB-ASSEMBLY |
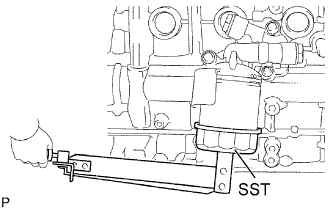 |
Check and clean the oil filter installation surface.
Apply clean engine oil to the gasket of a new oil filter.
Lightly screw the oil filter into place, and tighten it until the gasket contacts the seat.
Using SST, tighten the oil filter.
When using a torque wrench:
Using a torque wrench, tighten the oil filter.
When not using a torque wrench:
Tighten it an additional 3/4 turn.
| 38. INSTALL ENGINE REAR OIL SEAL RETAINER |
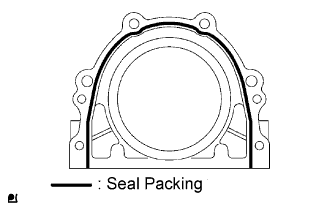 |
Apply seal packing in a continuous bead as shown in the illustration.
Install the oil seal retainer with the 6 bolts.
| 39. INSTALL CYLINDER HEAD GASKET |
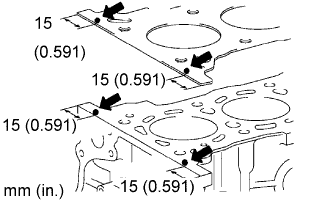 |
Apply a continuous bead (seal width: 4 to 7 mm (0.15 to 0.28 in.)) of seal packing to the cylinder block upper side and cylinder head gasket upper side as shown in the illustration.
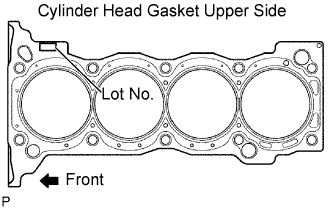 |
Install a new cylinder head gasket on the cylinder block surface with the Lot No. stamp upper side facing upward.
| 40. INSTALL CYLINDER HEAD SUB-ASSEMBLY |
Place the cylinder head on the cylinder block.
Apply a light coat of engine oil to the threads and under the heads of the cylinder head bolts.
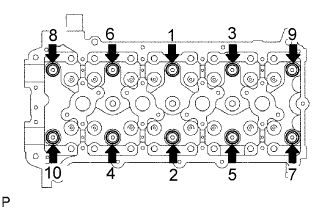 |
Step 1
Install and uniformly tighten the 10 cylinder head bolts with the plate washers, in several steps, in the sequence shown.
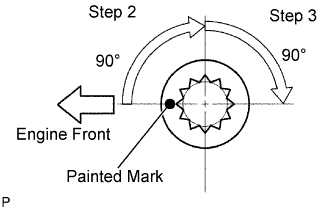 |
Step 2
Mark the cylinder head bolt head with paint as shown in the illustration.
Retighten the cylinder head bolts by 90°.
Step 3
Retighten the cylinder head bolts by an additional 90°.
Check that the painted mark is now facing rearward.
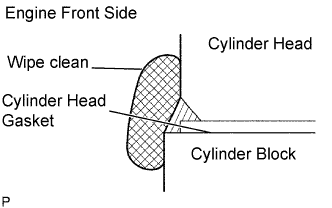 |
Seal packing will seep out on the engine's front side. Thoroughly wipe clean any seal packing.
| 41. INSTALL CAMSHAFT TIMING SPROCKET |
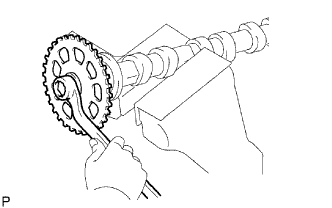 |
Clamp the camshaft in a vise and then install the camshaft timing sprocket to the camshaft with the sprocket bolt.
| 42. INSTALL CAMSHAFT TIMING GEAR ASSEMBLY |
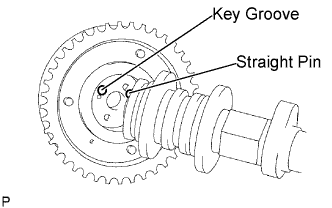 |
Put the camshaft timing gear and camshaft together by aligning the key groove and straight pin.
Lightly press the gear against the camshaft, and turn the gear. Push further at the position where the pin enters the groove.
Check that there is no clearance between the gear's fringe and the camshaft.
Tighten the fringe bolt with the camshaft timing gear fixed.
Check that the camshaft timing gear can move in the retard direction (the right angle), and is locked at the most retarded position.
| 43. INSTALL NO. 1 VALVE ROCKER ARM SUB-ASSEMBLY |
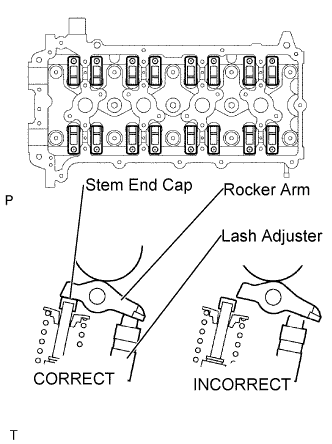 |
Set the 16 rocker arms to the lash adjusters.
| 44. INSTALL CAMSHAFTS |
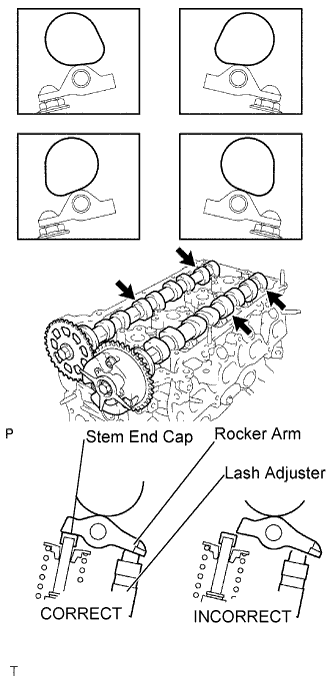 |
Apply clean engine oil to the camshaft's cam portion and the cylinder head journals.
Set the camshaft and No.2 camshaft as shown in the illustration.
| 45. INSTALL CAMSHAFT BEARING CAP |
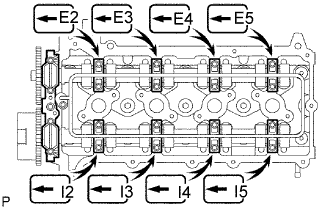 |
Temporarily install the camshaft bearing cap No.1.
Check the proper location of each camshaft bearing cap No.2 and install them.
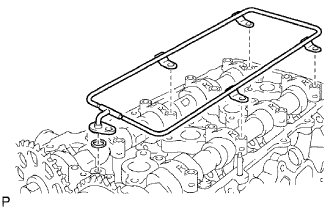 |
Install a new O-ring to the camshaft bearing cap No.1.
Temporarily install the oil delivery pipe.
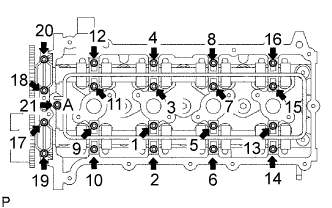 |
Tighten the 21 bolts and 20 washers in the order shown in the illustration.
| 46. INSTALL CRANKSHAFT TIMING SPROCKET |
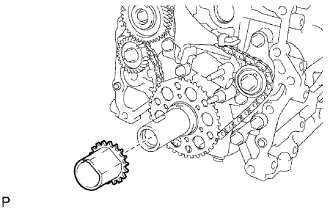 |
Install the timing sprocket as shown in the illustration.
| 47. INSTALL NO. 1 CHAIN VIBRATION DAMPER |
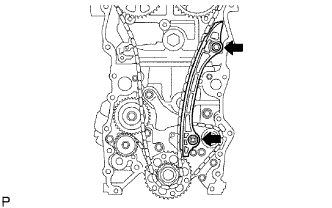 |
Install the vibration damper with the bolt and nut.
| 48. INSTALL CHAIN SUB-ASSEMBLY |
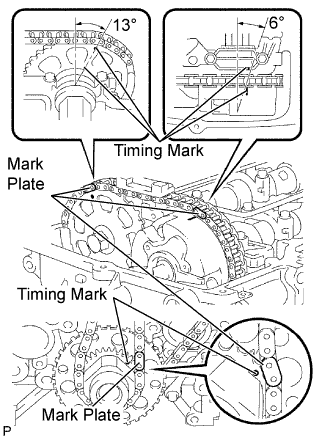 |
As shown in the illustration, install the chain on the sprocket and gear with the painted marks aligned with the timing marks on the sprocket and gear.
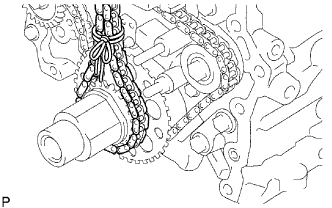 |
Use a rope to tie the chain of the crankshaft timing sprocket. Tie the rope near the sprocket.
| 49. INSTALL CHAIN TENSIONER SLIPPER |
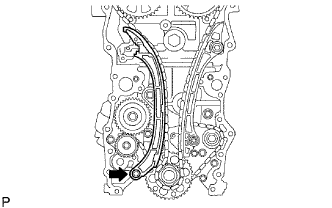 |
Install the tensioner slipper with the bolt.
| 50. INSTALL NO. 1 CHAIN TENSIONER ASSEMBLY |
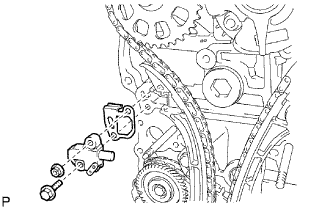 |
Install a new gasket and the chain tensioner No.1 with the bolt and nut.
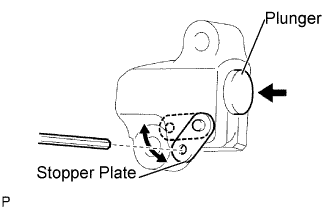 |
Move the stopper plate upward to release the lock, and push the plunger deep into the tensioner.
Move the stopper plate downward to set the lock, and insert a hexagon wrench into the stopper plate's hole.
| 51. INSTALL TIMING CHAIN GUIDE |
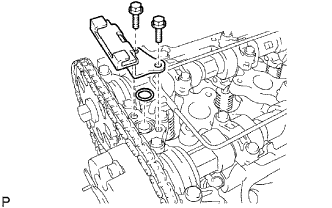 |
Install a new O-ring and the chain guide with the 2 bolts.
| 52. INSTALL WATER PUMP ASSEMBLY |
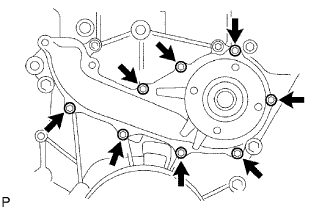 |
Install a new gasket and the water pump with the 8 bolts.
| 53. INSTALL TIMING CHAIN COVER |
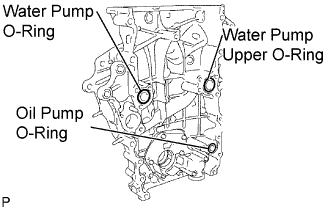 |
Install 3 new O-rings to the timing chain cover as shown in the illustration.
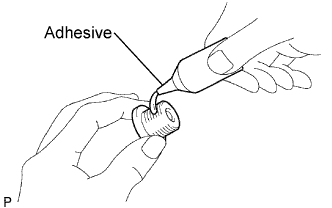 |
Apply adhesive to the timing gear case plug.
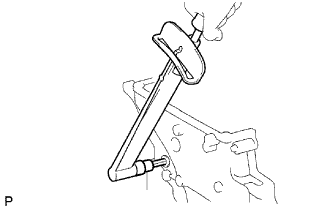 |
Using a 10 mm socket hexagon wrench, install the timing chain cover plug.
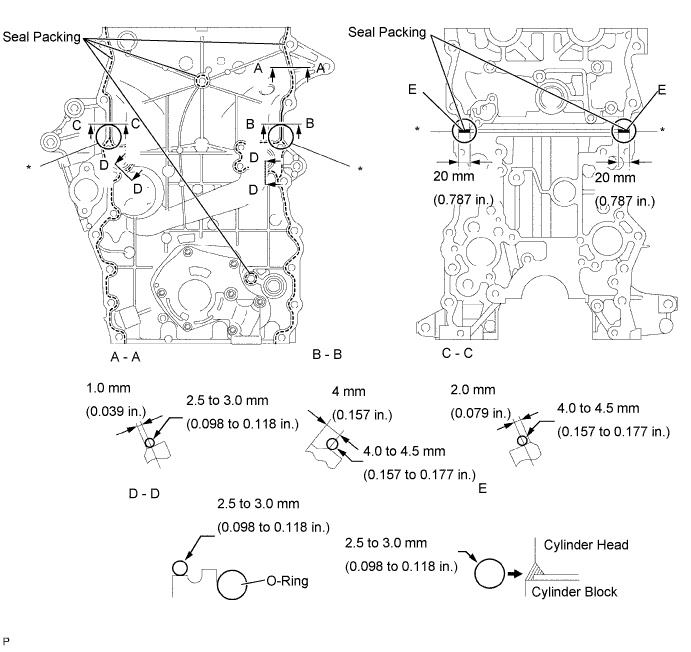
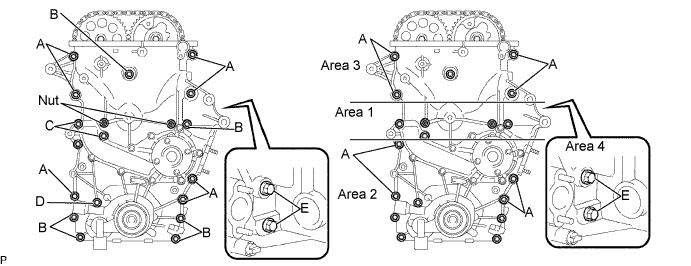
Apply seal packing in a continuous bead to the timing chain cover as shown in the following illustration.
| Position | Specified Condition |
| A - A, | 2.5 to 3.0 mm (0.098 to 0.118 in.) |
| B - B, C - C | 4.0 to 4.5 mm (0.157 to 0.177 in.) |
| D - D | 2.5 to 3.0 mm (0.098 to 0.118 in.) |
| E | 2.5 to 3.5 mm (0.098 to 0.138 in.) |
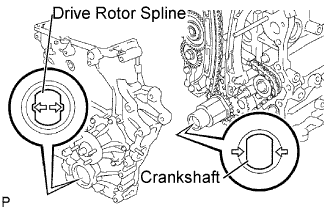 |
Align the oil pump's drive rotor spline and the crankshaft as shown in the illustration. Install the spline and chain cover to the crankshaft.
Temporarily install the the timing chain cover with the 19 bolts and 2 nuts, but do not tighten the bolts and nuts yet.
Excluding bolts A, fully tighten the bolts and nuts in this order: Area 1, Area 2 and Area 3.
Fully tighten the bolts labeled A in this order: Area 2 and Area 3.
Fully tighten the bolts labeled E in Area 4.
| 54. INSTALL OIL PAN SUB-ASSEMBLY |
Install the stud bolt.
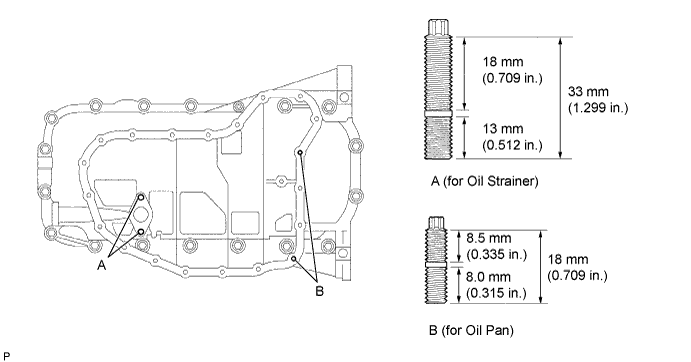
Using an E5 "torx" socket wrench, install the stud bolts labeled A for the oil pan as shown in the illustration.
Using an E7 "torx" socket wrench, install the stud bolts labeled B for the oil strainer as shown in the illustration.
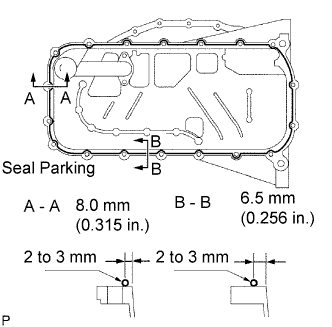 |
Apply seal packing in a continuous bead as shown in the illustration.
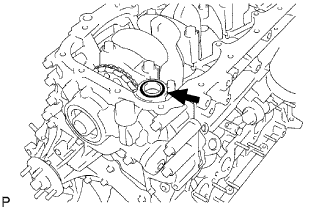 |
Install a new O-ring.
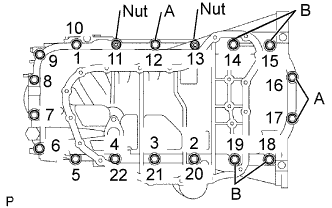 |
Temporarily install the oil pan with the 16 bolts and 2 nuts.
Uniformly tighten the 16 bolts and 2 nuts in the sequence shown in the illustration.
| 55. INSTALL OIL STRAINER SUB-ASSEMBLY |
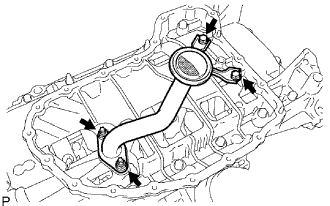 |
Install a new gasket and the oil strainer with the 2 bolts and 2 nuts.
| 56. INSTALL NO. 2 OIL PAN SUB-ASSEMBLY |
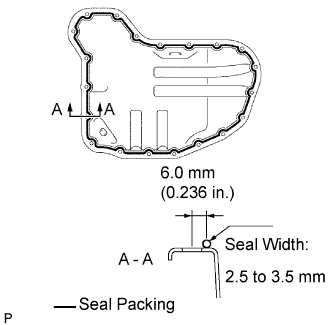 |
Apply seal packing in a continuous bead as shown in the illustration.
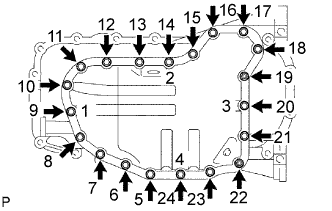 |
Temporarily install the oil pan with the 18 bolts and 2 nuts.
Uniformly tighten the 18 bolts and 2 nuts in the sequence shown in the illustration.
Install a new gasket and the drain plug.
| 57. INSTALL CRANKSHAFT PULLEY |
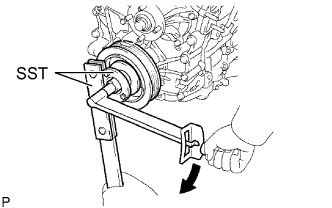 |
Align the pulley set key with the key groove of the pulley, and slide on the pulley.
Using SST, install the new pulley bolt.
| 58. INSTALL CYLINDER HEAD COVER SUB-ASSEMBLY |
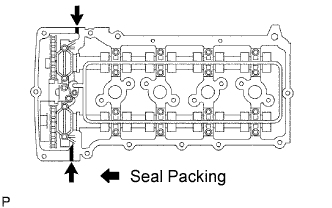 |
Apply seal packing as shown in the illustration.
Install the 2 gaskets to the head cover.
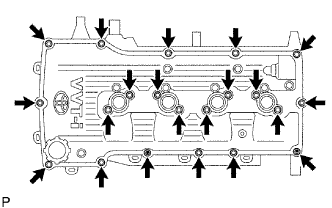 |
Temporarily install the cover with the 19 bolts and 2 nuts.
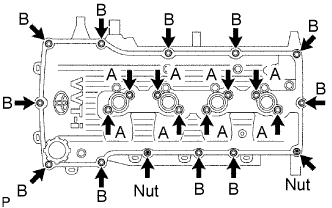 |
Fully tighten the bolts (A) shown in the illustration.
Fully tighten the bolts (B) shown in the illustration.
| 59. INSTALL CAMSHAFT TIMING OIL CONTROL VALVE ASSEMBLY |
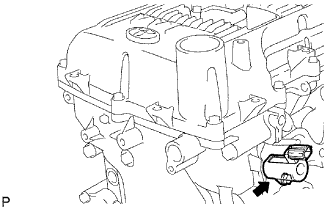 |
Install the camshaft timing oil control valve assembly with the bolt.
| 60. INSTALL CRANKSHAFT POSITION SENSOR |
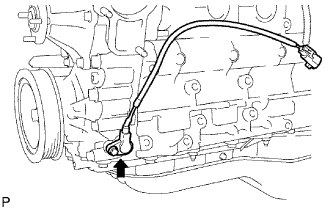 |
Apply engine oil to the O-ring.
Install the crankshaft position sensor with the bolt.
| 61. INSTALL CAMSHAFT POSITION SENSOR |
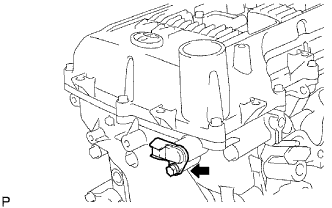 |
Apply engine oil to the O-ring.
Install the camshaft position sensor with the bolt.
| 62. INSTALL VENTILATION VALVE SUB-ASSEMBLY |
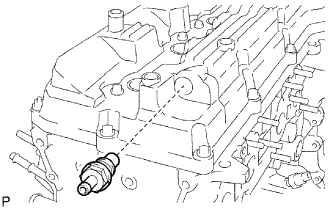 |
Install the ventilation valve sub-assembly.
| 63. INSTALL OIL FILLER CAP SUB-ASSEMBLY |
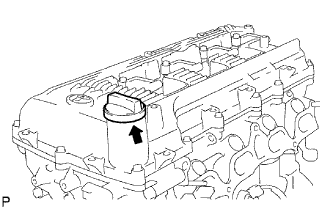 |
Install the oil filler cap assembly.