TIRE PRESSURE WARNING RECEIVER > REMOVAL |
| 1. DISCONNECT CABLE FROM NEGATIVE BATTERY TERMINAL |
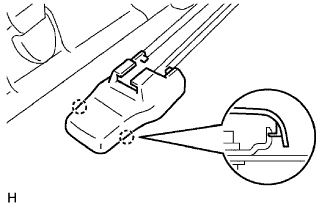
| 2. REMOVE SEAT TRACK COVER LH (for Double Cab) |
|
Disengage the 2 claws and remove the seat track cover.
| 3. REMOVE SEAT TRACK COVER RH (for Double Cab) |
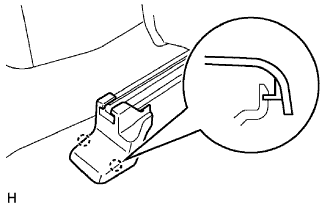 |
Disengage the 2 claws and remove the seat track cover.
| 4. REMOVE FRONT SEAT ASSEMBLY LH (for Double Cab) |
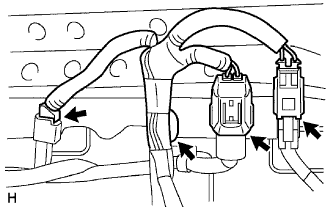 |
Disconnect the 2 connectors.
w/ Front Seat Side Airbag:
Disconnect the connector.
Using a clip remover, remove the wire harness clamp.
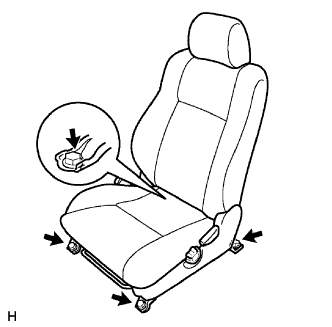 |
Remove the 4 bolts and front seat.
| 5. REMOVE FRONT SEAT ASSEMBLY RH (for Double Cab) |
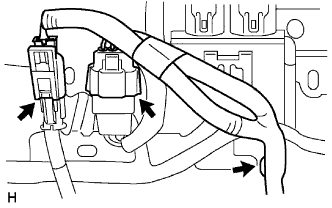 |
Disconnect the connector.
w/ Front Seat Side Airbag:
Disconnect the connector.
Using a clip remover, remove the wire harness clamp.
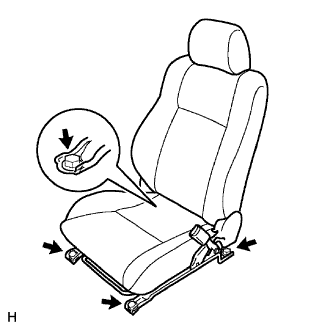 |
Remove the 4 bolts and front seat.
| 6. REMOVE REAR SEAT CUSHION ASSEMBLY LH (for Double Cab) |
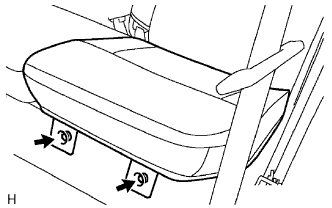 |
Remove the 2 bolts and rear seat cushion.
| 7. REMOVE REAR SEAT CUSHION ASSEMBLY RH (for Double Cab) |
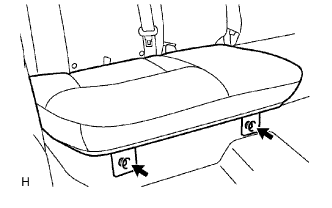 |
Remove the 2 bolts and rear seat cushion.
| 8. REMOVE REAR SEAT BACK HINGE COVER (for Double Cab) |
for LH Side:
Remove the rear seat back hinge cover .
for RH Side:
Remove the rear seat back hinge cover .
| 9. REMOVE REAR SEAT BACK ASSEMBLY LH (for Double Cab) |
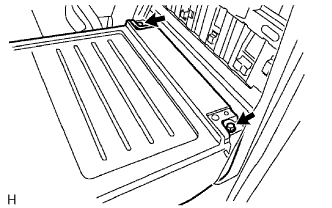 |
Remove the 2 bolts and rear seat back.
| 10. REMOVE REAR SEAT BACK ASSEMBLY RH (for Double Cab) |
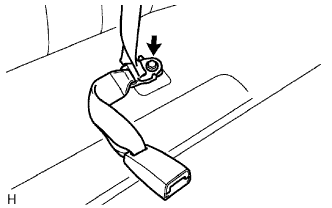 |
Remove the bolt, rear seat belt outer center and floor anchor of the rear seat belt inner.
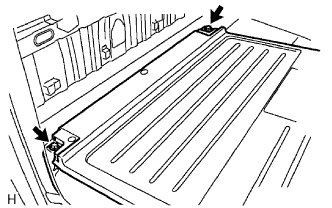 |
Remove the 2 bolts and rear seat back.
| 11. REMOVE REAR SEAT BACK HINGE SUB-ASSEMBLY LH (for Double Cab) |
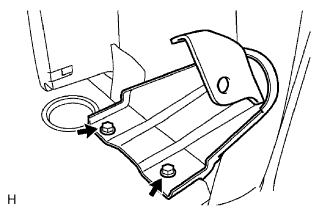 |
Remove the 2 bolts and rear seat back hinge.
| 12. REMOVE REAR SEAT BACK HINGE SUB-ASSEMBLY RH (for Double Cab) |
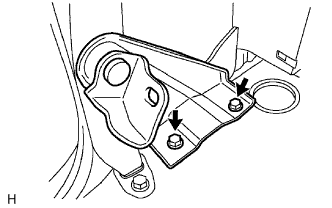 |
Remove the 2 bolts and rear seat back hinge.
| 13. REMOVE REAR SEAT BACK CENTER HINGE SUB-ASSEMBLY (for Double Cab) |
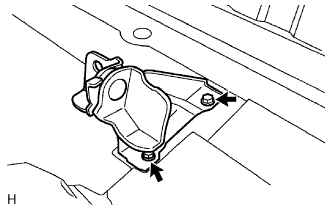 |
Remove the 2 bolts and rear seat back center hinge.
| 14. REMOVE LUGGAGE COMPARTMENT SIDE TRAY LH (for Double Cab) |
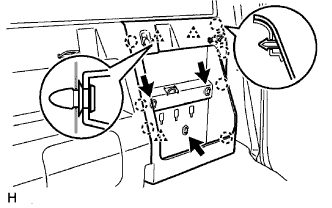 |
Remove the 3 bolts.
Disengage the 8 claws and 3 clips, and remove the luggage compartment side tray.
| 15. REMOVE LUGGAGE COMPARTMENT SIDE TRAY RH (for Double Cab) |
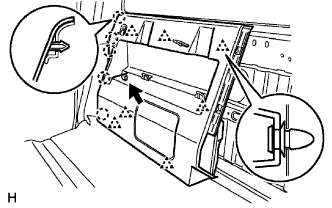 |
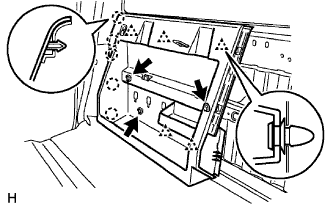
w/ Woofer:
Remove the bolt.
Disengage the 5 claws and 7 clips, and remove the luggage compartment side tray.
 |
w/o Woofer:
Remove the 3 bolts.
Disengage the 5 claws and 5 clips, and remove the luggage compartment side tray.
| 16. REMOVE BACK PANEL TRIM COVER (for Regular Cab) |
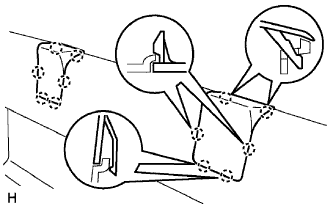 |
for Separate Seat Type and Bench Seat Type:
Disengage the 6 claws and remove the back panel trim cover.
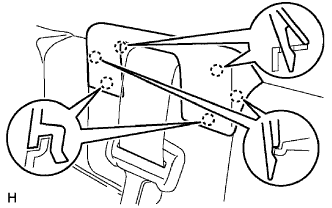 |
for Bench Seat Type:
Disengage the 6 claws and remove the back panel trim cover.
| 17. REMOVE BACK PANEL TRIM COVER (for Access Cab) |
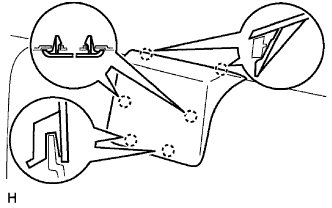 |
Disengage the 6 claws and remove the back panel trim cover.
| 18. REMOVE BACK PANEL UPPER GARNISH (for Regular Cab) |
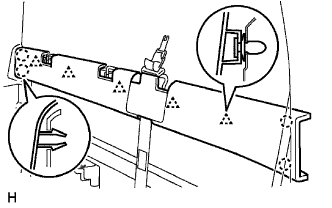 |
Disengage the 4 claws and 5 clips, and remove the back panel upper garnish.
| 19. REMOVE JACK ASSEMBLY (for Regular Cab on Separate Seat Type) |
| 20. REMOVE BACK PANEL TRIM COVER (for Regular Cab on Separate Seat Type) |
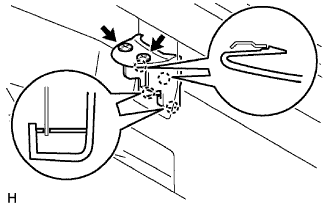 |
Remove the 2 clips.
Disengage the 4 claws and remove the back panel trim cover.
| 21. REMOVE REAR SEAT INNER BELT ASSEMBLY (for Access Cab) |
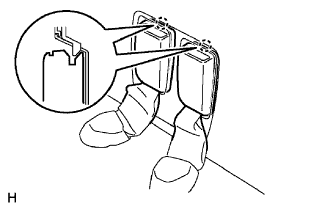 |
Disengage the claw and remove the buckle of the rear seat belt inner.
| 22. REMOVE BACK PANEL TRIM (for Regular Cab on Separate Seat Type) |
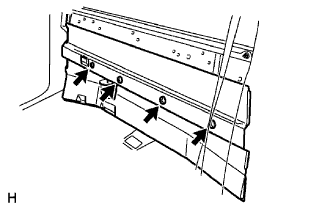 |
Remove the 4 clips and back panel trim.
| 23. REMOVE BACK PANEL TRIM (for Access Cab) |
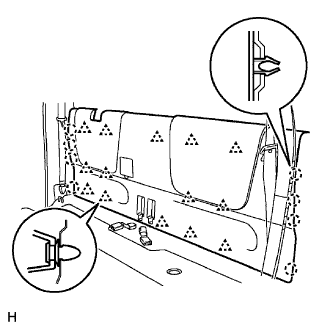 |
Disengage the 8 claws and 14 clips, and remove the back panel trim.
| 24. REMOVE FRONT FLOOR FOOTREST |
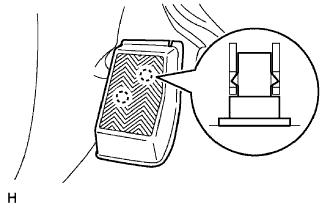 |
Disengage the 2 clips and remove the front floor footrest.
| 25. REMOVE FRONT DOOR SCUFF PLATE LH (for Double Cab) |
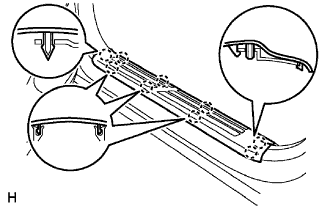 |
Disengage the 9 claws and remove the front door scuff plate.
| 26. REMOVE FRONT DOOR SCUFF PLATE LH (for Regular Cab) |
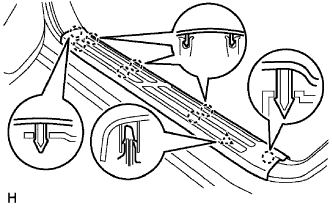 |
Disengage the 8 claws and clip, and remove the front door scuff plate.
| 27. REMOVE FRONT DOOR SCUFF PLATE LH (for Access Cab) |
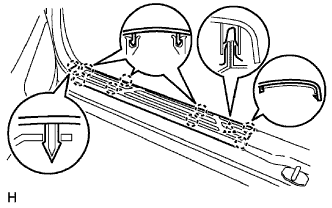 |
Disengage the 9 claws and clip, and remove the front door scuff plate.
| 28. REMOVE FRONT DOOR SCUFF PLATE RH (for Double Cab) |
| 29. REMOVE FRONT DOOR SCUFF PLATE RH (for Regular Cab) |
| 30. REMOVE FRONT DOOR SCUFF PLATE RH (for Access Cab) |
| 31. REMOVE REAR DOOR SCUFF PLATE LH (for Double Cab) |
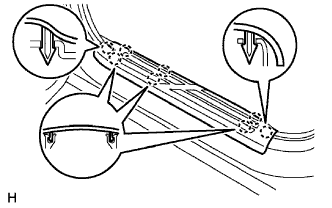 |
Disengage the 8 claws and remove the rear door scuff plate.
| 32. REMOVE REAR DOOR SCUFF PLATE LH (for Access Cab) |
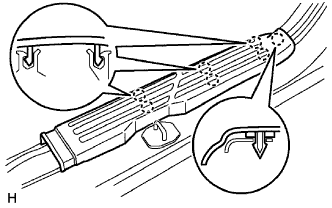 |
Disengage the 7 claws and remove the rear door scuff plate.
| 33. REMOVE REAR DOOR SCUFF PLATE RH (for Double Cab) |
| 34. REMOVE REAR DOOR SCUFF PLATE RH (for Access Cab) |
| 35. REMOVE COWL SIDE TRIM BOARD LH (for Double Cab) |
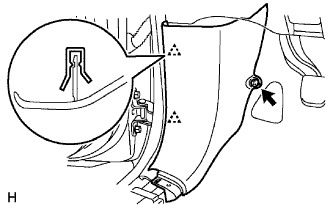 |
Remove the clip.
Disengage the 2 clips and remove the cowl side trim board.
| 36. REMOVE COWL SIDE TRIM BOARD LH (for Regular Cab) |
|
Remove the clip.
Disengage the 2 clips and remove the cowl side trim board.
| 37. REMOVE COWL SIDE TRIM BOARD LH (for Access Cab) |
|
Remove the clip.
Disengage the 2 clips and remove the cowl side trim board.
| 38. REMOVE COWL SIDE TRIM BOARD RH (for Double Cab) |
| 39. REMOVE COWL SIDE TRIM BOARD RH (for Regular Cab) |
| 40. REMOVE COWL SIDE TRIM BOARD RH (for Access Cab) |
| 41. REMOVE ROOF SIDE INNER GARNISH COVER LH (for Access Cab) |
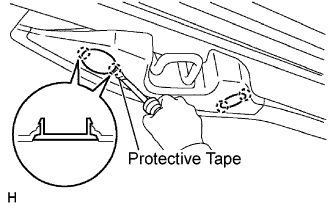 |
Using a screwdriver with its tip taped in protective tape, disengage the 2 claws and remove the roof side inner garnish cover.
| 42. REMOVE ROOF SIDE INNER GARNISH COVER RH (for Access Cab) |
| 43. REMOVE ROOF SIDE INNER GARNISH CAP LH (for Access Cab) |
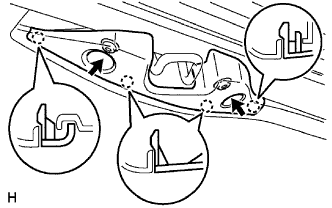 |
Using a "Torx" socket wrench T30, remove the 2 screws.
Disengage the 4 claws and remove the roof side inner garnish cap.
| 44. REMOVE ROOF SIDE INNER GARNISH CAP RH (for Access Cab) |
| 45. REMOVE ROOF SIDE INNER GARNISH LH (for Access Cab) |
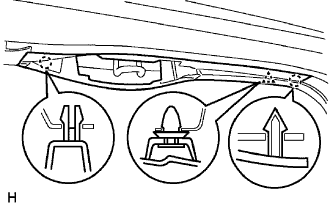 |
Disengage the 2 claws and clip, and remove the roof side inner garnish.
| 46. REMOVE ROOF SIDE INNER GARNISH RH (for Access Cab) |
| 47. REMOVE FRONT DOOR OPENING TRIM WEATHERSTRIP LH (for Double Cab) |
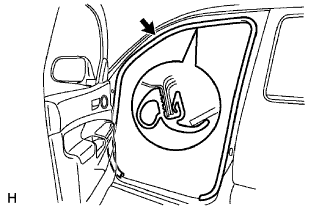 |
Remove the front door opening trim weatherstrip.
| 48. REMOVE FRONT DOOR OPENING TRIM WEATHERSTRIP LH (for Regular Cab) |
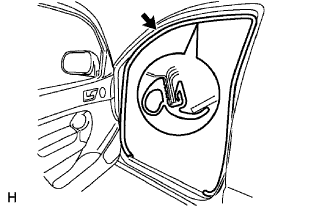 |
Remove the front door opening trim weatherstrip.
| 49. REMOVE FRONT DOOR OPENING TRIM WEATHERSTRIP LH (for Access Cab) |
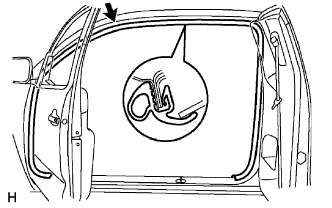 |
Remove the front door opening trim weatherstrip.
| 50. REMOVE FRONT DOOR OPENING TRIM WEATHERSTRIP RH (for Double Cab) |
| 51. REMOVE FRONT DOOR OPENING TRIM WEATHERSTRIP RH (for Regular Cab) |
| 52. REMOVE FRONT DOOR OPENING TRIM WEATHERSTRIP RH (for Access Cab) |
| 53. REMOVE REAR DOOR OPENING TRIM WEATHERSTRIP LH (for Double Cab) |
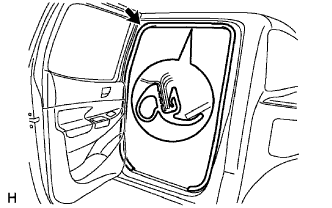 |
Remove the rear door opening trim weatherstrip.
| 54. REMOVE REAR DOOR OPENING TRIM WEATHERSTRIP RH (for Double Cab) |
| 55. REMOVE FRONT PILLAR GARNISH LH (for Double Cab) |
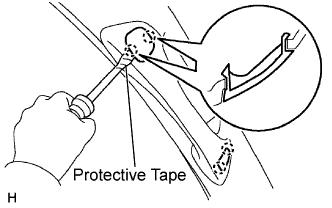 |
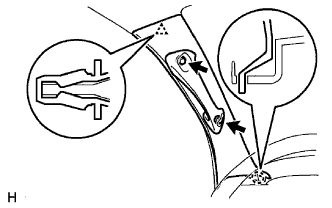
Using a screwdriver with its tip taped in protective tape, disengage the 2 claws and remove the assist grip plug.
 |
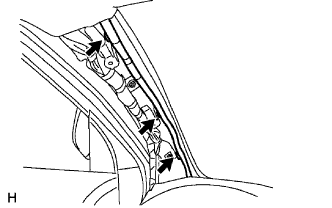
Remove the 2 screws.
Disengage the clip and claw and remove the front pillar garnish.
 |
for LH side:
Using a clip remover, remove the 3 wire harness clamps.
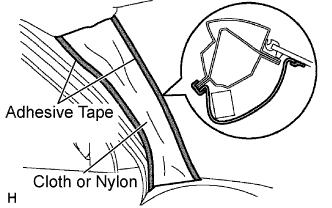 |
w/ Curtain Shield Airbag:
Thoroughly cover the air bag with cloth or nylon of 700 mm (27.56 in.) x 120 mm (4.72 in.) and fix the ends of the cover with adhesive tape, as shown in the illustration.
| 56. REMOVE FRONT PILLAR GARNISH LH (for Regular Cab) |
|
Using a screwdriver with its tip taped in protective tape, disengage the 2 claws and remove the assist grip plug.
|
Remove the 2 screws.
Disengage the clip and claw and remove the front pillar garnish.
|
for LH Side:
Using a clip remover, remove the 3 wire harness clamps.
| 57. REMOVE FRONT PILLAR GARNISH LH (for Access Cab) |
|
Using a screwdriver with its tip taped in protective tape, disengage the 2 claws and remove the assist grip plug.
|
Remove the 2 screws.
Disengage the claw and clip, and remove the front pillar garnish.
|
for LH Side:
Using a clip remover, remove the 3 wire harness clamps.
| 58. REMOVE FRONT PILLAR GARNISH RH (for Double Cab) |
| 59. REMOVE FRONT PILLAR GARNISH RH (for Regular Cab) |
| 60. REMOVE FRONT PILLAR GARNISH RH (for Access Cab) |
| 61. REMOVE LAP BELT OUTER ANCHOR COVER (for Double Cab) |
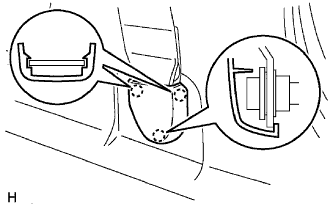 |
Disengage the 3 claws and remove the lap belt outer anchor cover.
| 62. REMOVE CENTER PILLAR LOWER GARNISH LH (for Double Cab) |
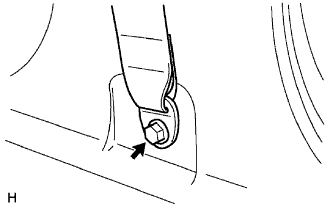 |
Remove the bolt and floor anchor of the front seat outer belt.
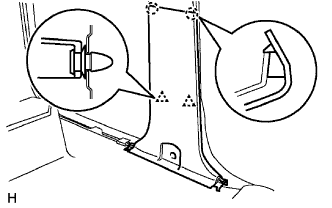 |
Disengage the 2 claws and 2 clips, and remove the center pillar lower garnish.
| 63. REMOVE CENTER PILLAR LOWER GARNISH RH (for Double Cab) |
| 64. REMOVE CENTER PILLAR UPPER GARNISH LH (for Double Cab) |
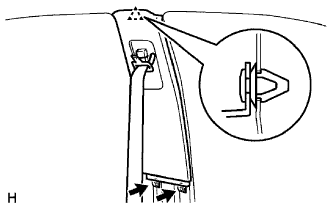 |
Remove the 2 screws.
Disengage the clip and remove the center pillar upper garnish.
| 65. REMOVE CENTER PILLAR UPPER GARNISH RH (for Double Cab) |
| 66. REMOVE QUARTER TRIM LOWER PANEL LH (for Double Cab) |
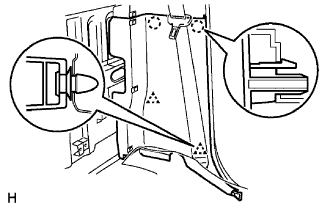 |
Disengage the 2 claws and 2 clips, and remove the quarter trim lower panel.
| 67. REMOVE QUARTER TRIM LOWER PANEL LH (for Regular Cab) |
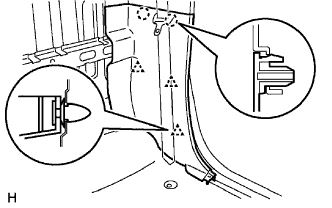 |
Disengage the 2 claws and 3 clips, and remove the quarter trim lower panel.
| 68. REMOVE QUARTER TRIM LOWER PANEL LH (for Access Cab) |
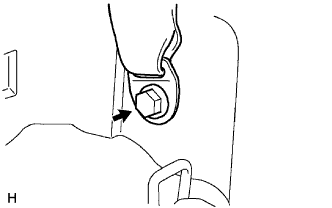 |
Remove the bolt and floor anchor of the rear seat belt outer.
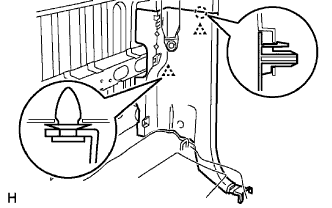 |
Disengage the claw and 2 clips, and remove the quarter trim lower panel.
| 69. REMOVE QUARTER TRIM LOWER PANEL RH (for Double Cab) |
| 70. REMOVE QUARTER TRIM LOWER PANEL RH (for Regular Cab) |
| 71. REMOVE QUARTER TRIM LOWER PANEL RH (for Access Cab) |
| 72. REMOVE QUARTER INSIDE TRIM BOARD LH (for Double Cab) |
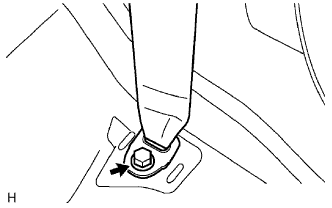 |
Remove the bolt and remove the floor anchor of the rear seat belt outer.
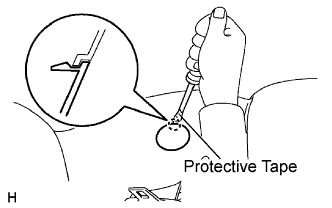 |
Using a screwdriver with its tip taped in protective tape, disengage the claw and open the cover.
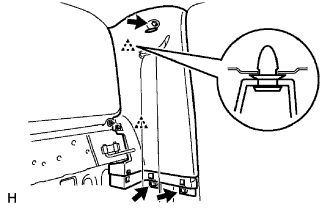 |
Remove the 3 screws.
Disengage the 2 clips and remove the quarter inside trim board.
| 73. REMOVE QUARTER INSIDE TRIM BOARD LH (for Regular Cab) |
|
for LH Side and Separate Seat Type RH side:
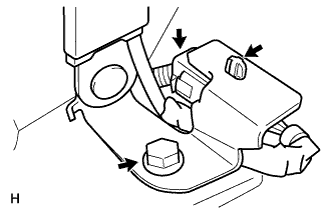
Remove the bolt and the floor anchor of the front seat outer belt.
 |
for Bench Seat Type RH Side:
Remove the bolt and the floor anchor of the front seat outer belt.
Disconnect the belt tension sensor connector.
Remove the wiring harness clamp.
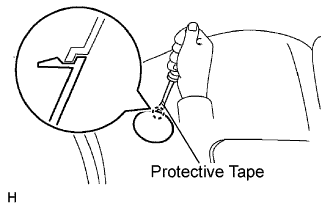 |
Using a screwdriver with its tip taped in protective tape, disengage the claw and open the cover.
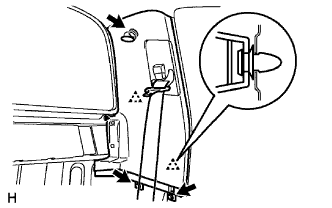 |
Remove the 3 screws.
Disengage the 2 clips and remove the quarter trim board.
| 74. REMOVE QUARTER INSIDE TRIM BOARD LH (for Access Cab) |
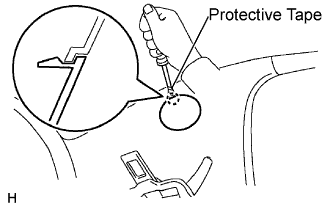 |
Using a screwdriver with its tip taped in protective tape, disengage the claw and open the cover.
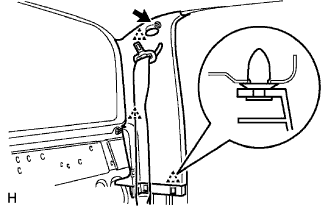 |
Remove the screw.
Disengage the 3 clips and remove the quarter inside trim board.
| 75. REMOVE QUARTER INSIDE TRIM BOARD RH (for Double Cab) |
| 76. REMOVE QUARTER INSIDE TRIM BOARD RH (for Regular Cab) |
| 77. REMOVE QUARTER INSIDE TRIM BOARD RH (for Access Cab) |
| 78. REMOVE INNER REAR VIEW MIRROR ASSEMBLY (w/ EC Mirror) |
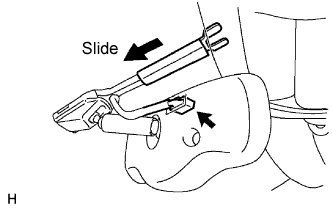 |
Disconnect the EC mirror connector.
Slide the inner rear view mirror cover.
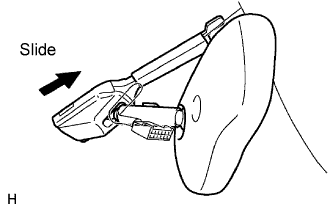 |
Slide the inner rear view mirror.
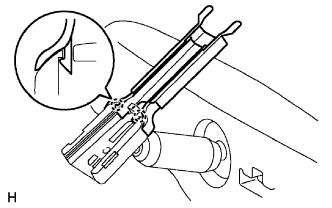 |
Disengage the 2 claws and remove the inner rear view mirror cover.
| 79. REMOVE ROOM LIGHT ASSEMBLY (for Double Cab) |
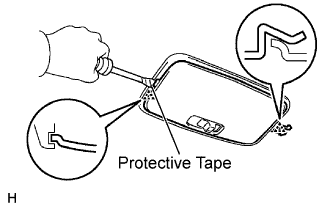 |
Using a screwdriver with its tip taped in protective tape, disengage the 2 claws and remove the room light lens.
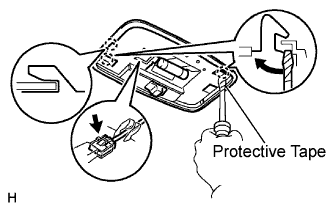 |
Using a screwdriver with its tip taped in protective tape, disengage the 3 claws.
Disconnect the room light connector and remove the room light.
| 80. REMOVE ROOM LIGHT ASSEMBLY (for Regular Cab) |
|
Using a screwdriver with its tip taped in protective tape, disengage the 2 claws and remove the room light lens.
|
Using a screwdriver with its tip taped in protective tape, disengage the 3 claws.
Disconnect the room light connector and remove the room light.
| 81. REMOVE ROOM LIGHT ASSEMBLY (for Access Cab) |
|
Using a screwdriver with its tip taped in protective tape, disengage the 2 claws and remove the room light lens.
|
Using a screwdriver with its tip taped in protective tape, disengage the 2 claws.
Disconnect the room light connector and remove the room light.
| 82. REMOVE ROOF CONSOLE BOX ASSEMBLY (for Double Cab) |
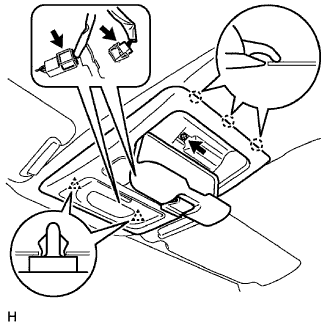 |
Remove the screw.
Disengage the 2 clips and 3 claws.
Disconnect the accessory meter connector and map lamp connector and remove the map lamp.
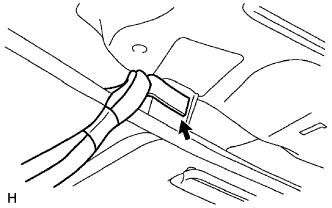 |
Using a clip remover, remove the wire harness clamp.
| 83. REMOVE ROOF CONSOLE BOX ASSEMBLY (for Access Cab) |
|
Remove the screw.
Disengage the 2 clips and 3 claws.
Disconnect the accessory meter connector and map lamp connector, and remove the roof console box.
|
Using a clip remover, remove the wire harness clamp.
| 84. REMOVE ASSIST GRIP SUB-ASSEMBLY (for Double Cab) |
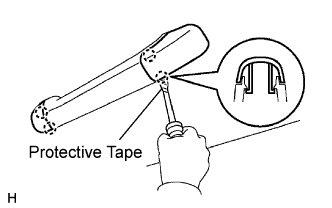 |
Using a screwdriver with its tip taped in protective tape, disengage the 2 claws and open the cover.
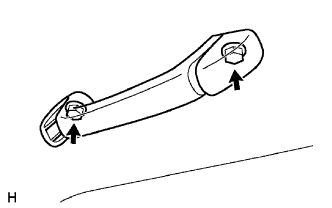 |
Remove the 2 screws and assist grip.
| 85. REMOVE ASSIST GRIP PLUG (for Double Cab) |
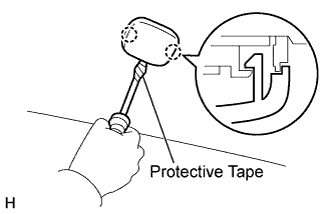 |
Using a screwdriver with its tip taped in protective tape, disengage the 2 claws and open the cover.
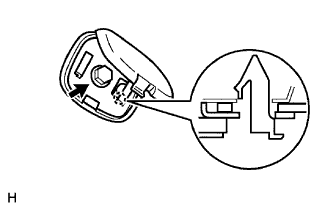 |
Remove the screw.
Disengage the claw and remove the assist grip plug.
| 86. REMOVE VISOR ASSEMBLY LH (for Double Cab) |
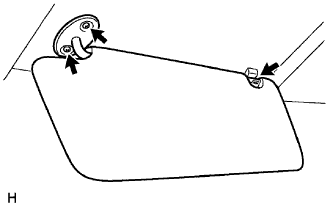 |
Remove the 2 screws.
Remove the visor from the visor hol
| 87. REMOVE VISOR ASSEMBLY LH (for Regular Cab) |
|
Remove the 2 screws.
Remove the visor from the visor holder.
| 88. REMOVE VISOR ASSEMBLY LH (for Access Cab) |
|
Remove the 2 screws.
Remove the visor from the visor holder.
| 89. REMOVE VISOR ASSEMBLY RH (for Double Cab) |
| 90. REMOVE VISOR ASSEMBLY RH (for Regular Cab) |
| 91. REMOVE VISOR ASSEMBLY RH (for Access Cab) |
| 92. REMOVE VISOR HOLDER (for Double Cab) |
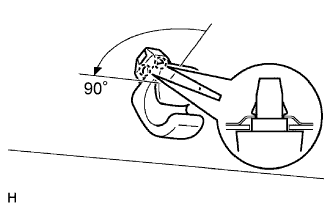 |
Turn the visor holder 90° counterclockwise and remove it.
| 93. REMOVE VISOR HOLDER (for Regular Cab) |
|
Turn the visor holder 90° counterclockwise and remove it.
| 94. REMOVE VISOR HOLDER (for Access Cab) |
|
Turn the visor holder 90° counterclockwise and remove it.
| 95. REMOVE COAT HOOK (for Regular Cab) |
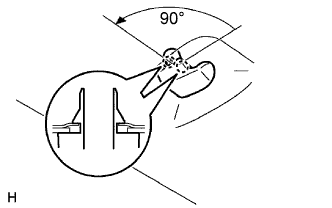 |
Turn the coat hook 90° counterclockwise and remove it.
| 96. REMOVE COAT HOOK (for Access Cab) |
|
Turn the coat hook 90° counterclockwise and remove it.
| 97. REMOVE COAT HOOK (for Double Cab) |
|
Turn the coat hook 90° counterclockwise and remove it.
| 98. SEPARATE ROOF HEADLINING ASSEMBLY (for Regular Cab) |
| 99. SEPARATE ROOF HEADLINING ASSEMBLY (for Double Cab) |
| 100. SEPARATE ROOF HEADLINING ASSEMBLY (for Access Cab) |
| 101. REMOVE TIRE PRESSURE WARNING RECEIVER |
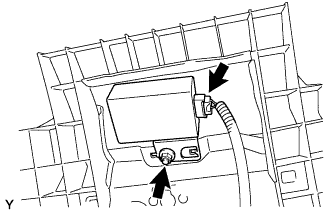 |
Disconnect the connector.
Remove the nut and the tire pressure warning receiver.