 |
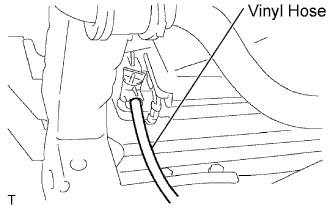
Install a vinyl hose onto the radiator side.
AIR CONDITIONING UNIT > REMOVAL |
| 1. PRECAUTION |
| 2. DISCHARGE REFRIGERANT FROM REFRIGERATION SYSTEM |
Start up the engine.
Turn the A/C switch to ON.
Operate the cooler compressor with an engine speed of approximately 1,000 rpm for 5 to 6 minutes to circulate the refrigerant and collect the compressor oil remaining in each component into the cooler compressor.
Stop the engine.
Recover the refrigerant from the A/C system using a refrigerant recovery unit.
| 3. DISCONNECT CABLE FROM NEGATIVE BATTERY TERMINAL |
| 4. DRAIN ENGINE COOLANT (for 2TR-FE) |
Remove the 4 bolts, then remove the engine under cover No. 1. (PRE RUNNER AND 4WD TYPE)
|
Install a vinyl hose onto the radiator side.
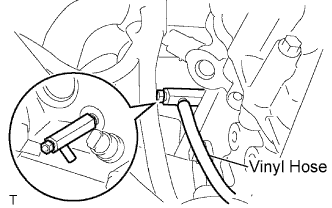 |
Install a vinyl hose onto the engine side.
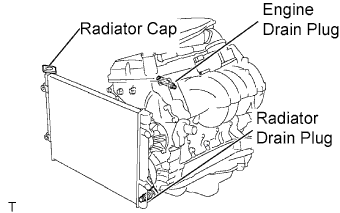 |
Loosen the engine drain plug.
Loosen the radiator drain plug.
Remove the radiator cap and drain coolant.
Drain the coolant from the reservoir tank.
| 5. DRAIN ENGINE COOLANT (for 1GR-FE) |
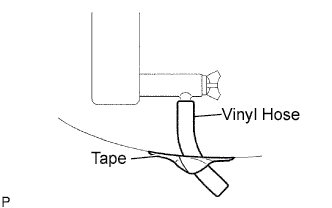 |
Remove the service hole cover from the engine under cover.
Install a vinyl hose onto the drain on the radiator side.
Fix the vinyl hose with tape.
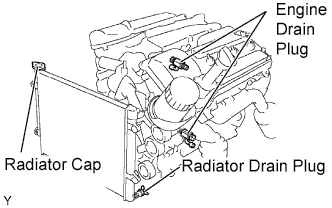 |
Loosen the 3 drain plugs on the engine and radiator, and drain the coolant.
Remove the radiator cap.
Drain the coolant from the reservoir tank.
Tighten the 3 drain plugs.
Remove the vinyl hose from the radiator.
| 6. DISCONNECT SUCTION HOSE SUB-ASSEMBLY |
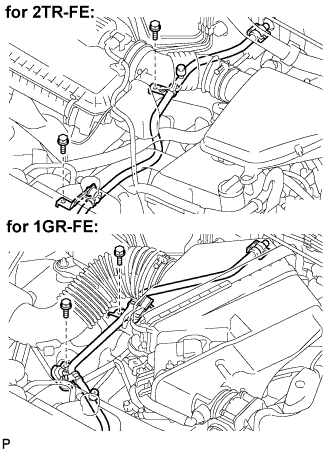 |
Remove the 2 bolts and separate the suction hose sub-assembly.
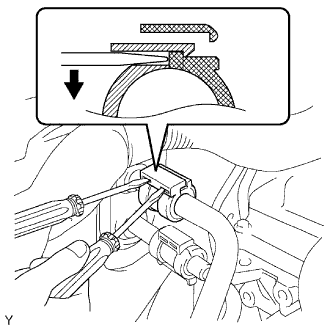 |
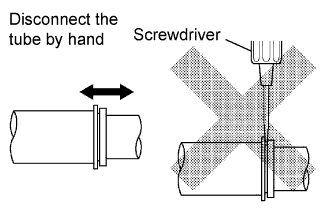
Insert 2 screwdrivers into the 2 piping clamp slots, and while holding them down, disengage the piping clamp claws and the piping clamp.
 |
Disconnect the suction hose sub-assembly.
Remove the 2 O-rings from the suction hose sub-assembly.
| 7. DISCONNECT AIR CONDITIONING TUBE ASSEMBLY |
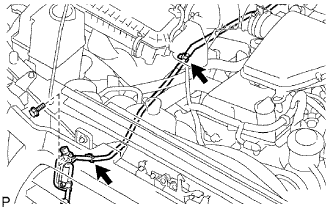 |
Remove the bolt.
Disengage the 2 clamps and separate the air conditioning tube assembly.
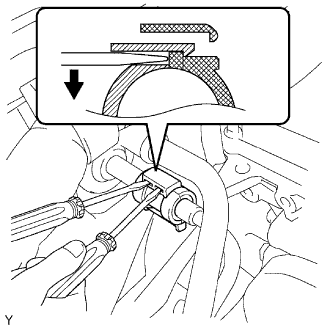 |
Insert 2 screwdrivers into the 2 piping clamp slots, and while holding them down, disengage the piping clamp claws and the piping clamp.
|
Disconnect the air conditioner tube.
Remove the 2 O-rings from the air conditioner tube.
| 8. DISCONNECT HEATER WATER INLET HOSE (for 2TR-FE) |
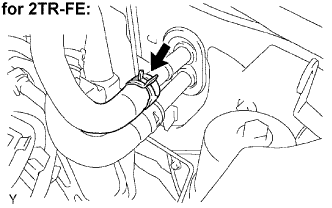 |
Using pliers, grip the claws of the clip, slide the clip and disconnect the heater water inlet hose from the heater unit.
| 9. DISCONNECT HEATER WATER INLET HOSE (for 1GR-FE) |
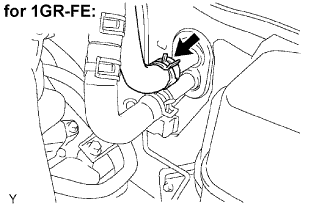 |
Using pliers, grip the claws of the clip, slide the clip and disconnect the heater water inlet hose from the heater unit.
| 10. DISCONNECT HEATER WATER OUTLET HOSE (for 2TR-FE) |
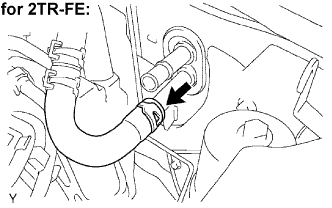 |
Using pliers, grip the claws of the clip, slide the clip and disconnect the heater water outlet hose from the heater unit.
| 11. DISCONNECT HEATER WATER OUTLET HOSE (for 1GR-FE) |
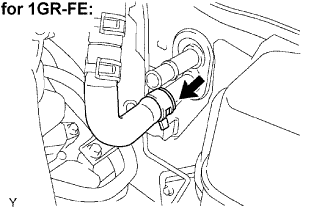 |
Using pliers, grip the claws of the clip, slide the clip and disconnect the heater water outlet hose from the heater unit.
| 12. REMOVE FRONT WIPER ARM HEAD CAP |
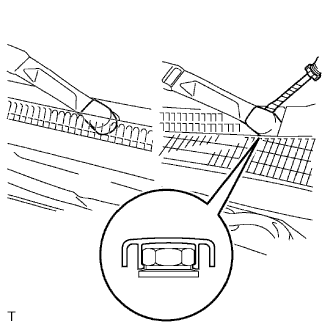 |
Using a screwdriver wrapped with protective tape, remove the 2 front wiper arm head caps.
| 13. REMOVE FRONT WIPER ARM LH |
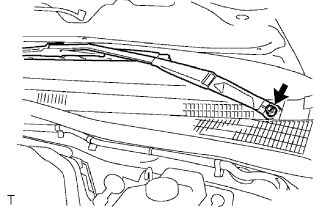 |
Operate the wiper, then stop the windshield wiper motor assembly at the automatic stop position.
Remove the nut and front wiper arm LH.
| 14. REMOVE FRONT WIPER ARM RH |
| 15. REMOVE FRONT FENDER TO COWL SIDE SEAL LH |
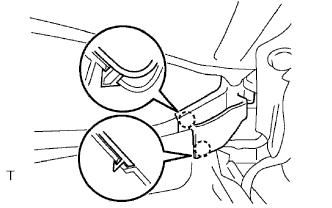 |
Disengage the 2 claws and remove the front fender to cowl side seal LH.
| 16. REMOVE FRONT FENDER TO COWL SIDE SEAL RH |
| 17. REMOVE COWL TOP VENTILATOR LOUVER SUB-ASSEMBLY |
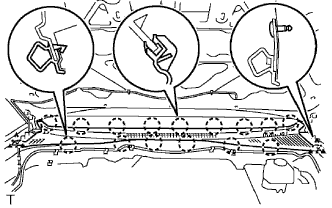 |
Disengage the 2 clips.
Disengage the 15 claws, then remove the cowl top ventilator louver sub-assembly.
| 18. PLACE FRONT WHEELS FACING STRAIGHT AHEAD |
| 19. REMOVE LOWER NO. 2 STEERING WHEEL COVER |
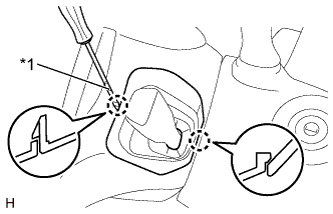 |
Using a screwdriver with its tip wrapped with protective tape, disengage the 2 claws and remove the lower No. 2 steering wheel cover.
| *1 | Protective Tape |
| 20. REMOVE LOWER NO. 3 STEERING WHEEL COVER |
| 21. REMOVE HORN BUTTON ASSEMBLY |
Check that the ignition switch is off.
Check that the cable is disconnected from the negative (-) battery terminal.
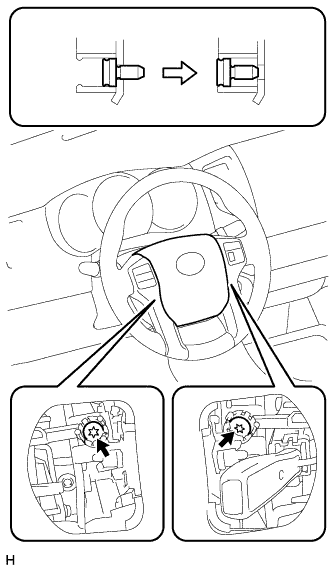 |
Using T30 "TORX" socket wrench, loosen the 2 bolts completely.
Pull the steering pad toward rear.
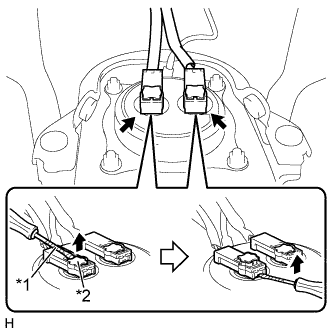 |
Using a screwdriver with its tip wrapped with protective tape, release the 2 airbag connector locks.
Disconnect the 2 airbag connectors.
| *1 | Protective Tape |
| *2 | Locking button |
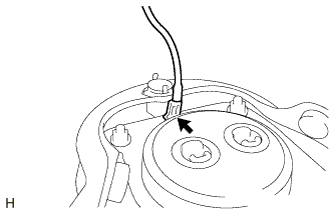 |
Disconnect the horn terminal to remove the steering pad.
| 22. REMOVE STEERING WHEEL ASSEMBLY |
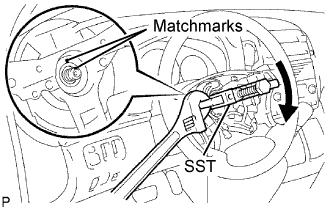 |
Remove the steering wheel assembly set nut.
Place matchmarks on the steering wheel assembly and main shaft assembly.
Using SST, remove the steering wheel assembly.
| 23. REMOVE STEERING COLUMN COVER LOWER |
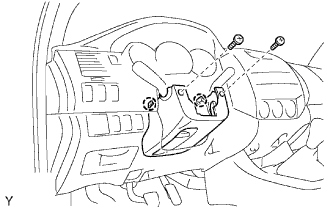 |
Remove the 2 screws.
Disengage the 2 claws to remove the lower steering column cover.
| 24. REMOVE STEERING COLUMN COVER UPPER |
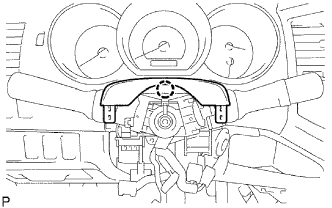 |
Disengage the claw and then remove the upper steering column cover.
| 25. REMOVE SPIRAL CABLE SUB-ASSEMBLY |
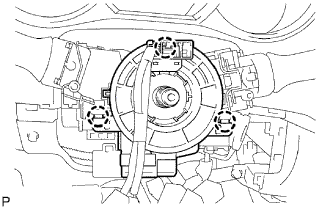 |
Disconnect the airbag connector and the connector from the spiral cable sub-assembly.
Disengage the 3 claws and remove the spiral cable sub-assembly.
| 26. REMOVE WINDSHIELD WIPER SWITCH ASSEMBLY |
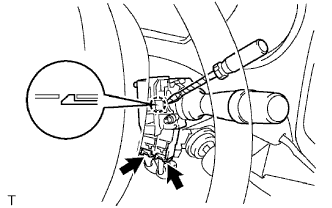 |
Disconnect the 2 connectors.
Using a screwdriver wrapped with protective tape, disengage the claw and remove the windshield wiper switch assembly.
| 27. REMOVE FRONT FLOOR FOOTREST |
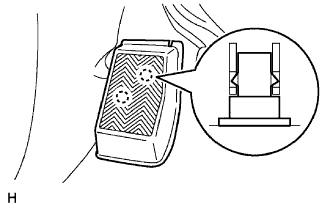 |
Disengage the 2 clips and remove the front floor footrest.
| 28. REMOVE FRONT DOOR SCUFF PLATE LH (for Regular Cab) |
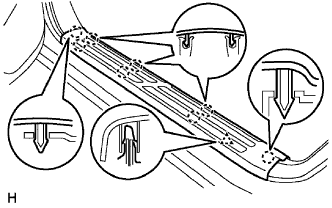 |
Disengage the 8 claws and clip, and remove the front door scuff plate.
| 29. REMOVE FRONT DOOR SCUFF PLATE LH (for Access Cab) |
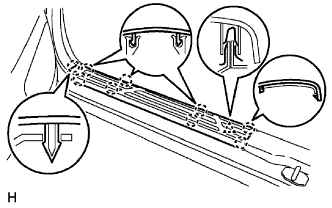 |
Disengage the 9 claws and clip, and remove the front door scuff plate.
| 30. REMOVE FRONT DOOR SCUFF PLATE LH (for Double Cab) |
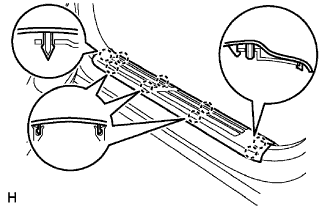 |
Disengage the 9 claws and remove the front door scuff plate.
| 31. REMOVE FRONT DOOR SCUFF PLATE RH (for Regular Cab) |
| 32. REMOVE FRONT DOOR SCUFF PLATE RH (for Access Cab) |
| 33. REMOVE FRONT DOOR SCUFF PLATE RH (for Double Cab) |
| 34. REMOVE COWL SIDE TRIM BOARD LH (for Regular Cab) |
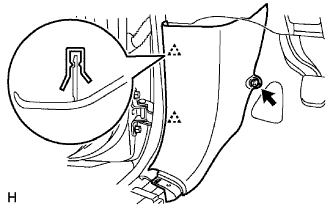 |
Remove the clip.
Disengage the 2 clips and remove the cowl side trim board.
| 35. REMOVE COWL SIDE TRIM BOARD LH (for Access Cab) |
|
Remove the clip.
Disengage the 2 clips and remove the cowl side trim board.
| 36. REMOVE COWL SIDE TRIM BOARD LH (for Double Cab) |
|
Remove the clip.
Disengage the 2 clips and remove the cowl side trim board.
| 37. REMOVE COWL SIDE TRIM BOARD RH (for Regular Cab) |
| 38. REMOVE COWL SIDE TRIM BOARD RH (for Access Cab) |
| 39. REMOVE COWL SIDE TRIM BOARD RH (for Double Cab) |
| 40. SEPARATE FRONT DOOR OPENING TRIM WEATHERSTRIP LH |
Separate the front door opening trim weatherstrip LH.
| 41. SEPARATE FRONT DOOR OPENING TRIM WEATHERSTRIP RH |
Separate the front door opening trim weatherstrip RH.
| 42. REMOVE FRONT PILLAR GARNISH LH (for Regular Cab) |
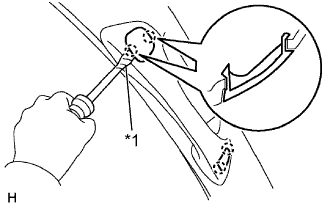 |
Using a screwdriver with its tip taped in protective tape, disengage the 2 claws and remove the assist grip plug.
| *1 | Protective Tape |
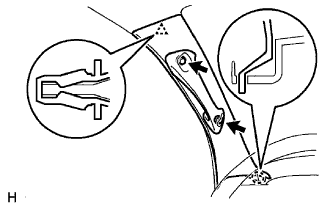 |
Remove the 2 screws.
Disengage the clip and claw and remove the front pillar garnish.
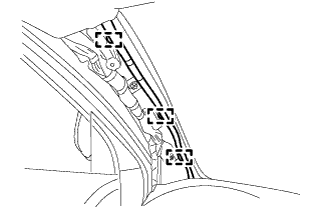 |
for LH Side:
Using a clip remover, remove the 3 wire harness clamps.
| 43. REMOVE FRONT PILLAR GARNISH LH (for Access Cab) |
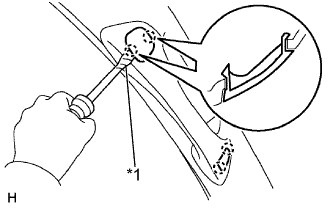 |
Using a screwdriver with its tip taped in protective tape, disengage the 2 claws and remove the assist grip plug.
| *1 | Protective Tape |
|
Remove the 2 screws.
Disengage the claw and clip, and remove the front pillar garnish.
|
for LH Side:
Using a clip remover, remove the 3 wire harness clamps.
| 44. REMOVE FRONT PILLAR GARNISH LH (for Double Cab) |
|
Using a screwdriver with its tip taped in protective tape, disengage the 2 claws and remove the assist grip plug.
| *1 | Protective Tape |
|
Remove the 2 screws.
Disengage the clip and claw and remove the front pillar garnish.
|
for LH side:
Using a clip remover, remove the 3 wire harness clamps.
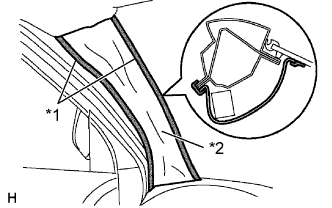 |
w/ Curtain Shield Airbag:
| *1 | Adhesive Tape |
| *2 | Cloth or Nylon |
Thoroughly cover the airbag with cloth or nylon of 700 mm (27.56 in.) x 120 mm (4.72 in.) and fix the ends of the cover with adhesive tape, as shown in the illustration.
| 45. REMOVE FRONT PILLAR GARNISH RH (for Regular Cab) |
| 46. REMOVE FRONT PILLAR GARNISH RH (for Access Cab) |
| 47. REMOVE FRONT PILLAR GARNISH RH (for Double Cab) |
| 48. REMOVE INSTRUMENT PANEL UNDER TRAY (for Pedal Type Parking Brake) |
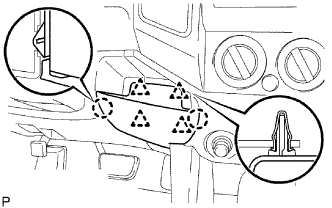 |
Disengage the 4 clips and 2 claws, and remove the instrument panel under tray.
| 49. REMOVE INSTRUMENT PANEL HOLE COVER (for Lever Type Parking Brake) |
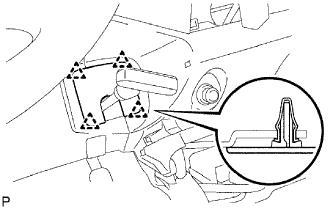 |
Disengage the 4 clips and remove the instrument panel hole cover.
| 50. REMOVE CONSOLE UPPER REAR PANEL SUB-ASSEMBLY (for Automatic Transmission on Separate Seat Type) |
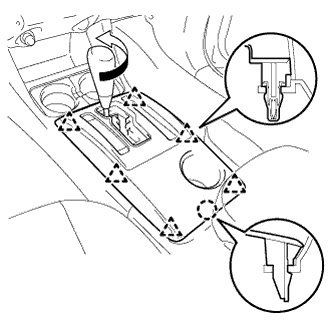 |
Remove the shift knob.
Disengage the 6 clips and claw, and remove the console upper rear panel sub-assembly.
| 51. REMOVE CONSOLE UPPER REAR PANEL SUB-ASSEMBLY (for Manual Transmission on Separate Seat Type) |
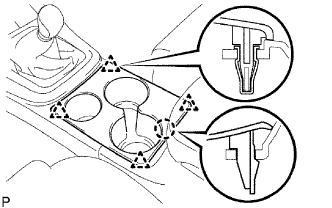 |
Disengage the 4 clips and claw, and remove the console upper rear panel sub-assembly.
| 52. REMOVE REAR CONSOLE BOX ASSEMBLY (for Separate Seat Type) |
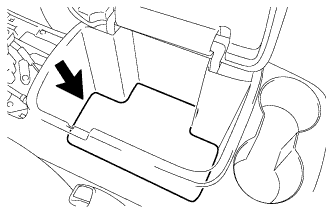 |
Remove the console box carpet.
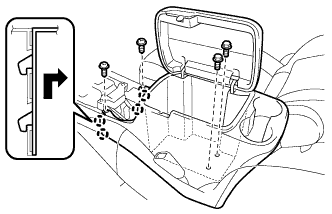 |
Remove the 2 screws <F> and 2 bolts <B>.
Disengage the 4 claws and remove the rear console box assembly.
| 53. REMOVE INSTRUMENT PANEL CUP HOLDER TRAY (for Automatic Transmission on Separate Seat Type) |
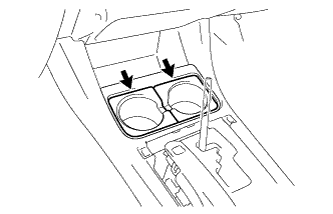 |
Remove the 2 instrument panel cup holders.
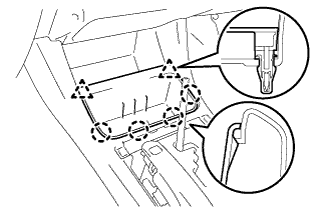 |
Disengage the 2 clips and 4 claws, and remove the instrument panel cup holder tray.
| 54. REMOVE FRONT CONSOLE BOX (for Automatic Transmission on Separate Seat Type) |
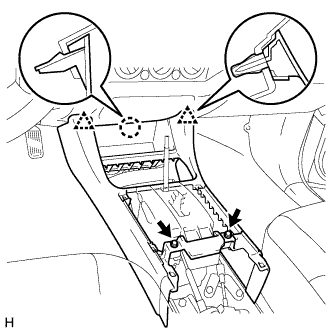 |
Remove the 2 screws <F>.
Disengage the 2 clips and claw, and remove the front console box.
| 55. REMOVE FRONT CONSOLE BOX (for Manual Transmission on Separate Seat Type) |
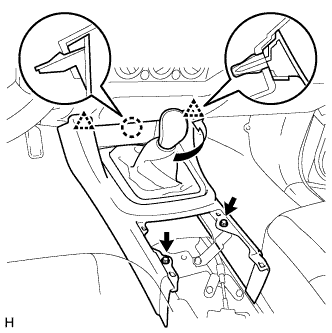 |
Remove the shift knob.
Remove the 2 screws <F>.
Disengage the 2 clips and claw, and remove the front console box.
| 56. REMOVE FRONT CONSOLE BOX (for Automatic Transmission on Bench Seat Type) |
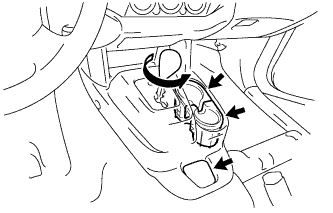 |
Remove the shift knob.
Remove the box bottom mat.
Remove the 2 instrument panel cup holders.
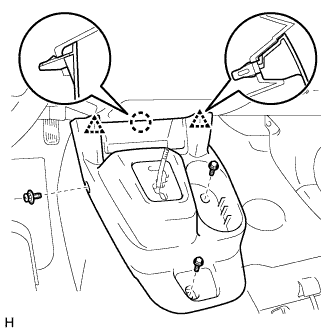 |
Remove the clip and 2 bolts <A>.
Disengage the 2 clips and claw, and remove the front console box.
| 57. REMOVE FRONT CONSOLE BOX (for Manual Transmission on Bench Seat Type) |
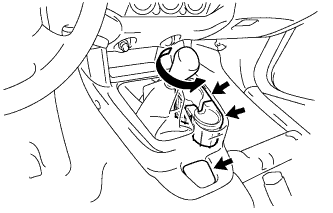 |
Remove the shift knob.
Remove the box bottom mat.
Remove the 2 instrument panel cup holders.
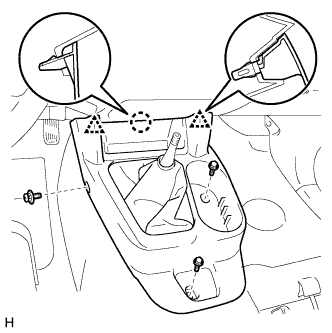 |
Remove the clip and 2 bolts <A>.
Disengage the 2 clips and claw, and remove the front console box.
| 58. REMOVE AIR CONDITIONING CONTROL ASSEMBLY |
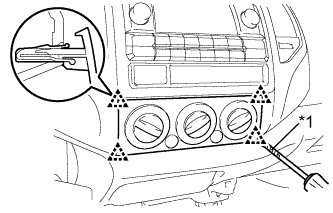 |
Using a screwdriver with its tip wrapped in protective tape, disengage the 4 clips and remove the air conditioner control assembly.
| *1 | Protective Tape |
Disconnect the 2 connectors.
| 59. REMOVE RADIO RECEIVER ASSEMBLY |
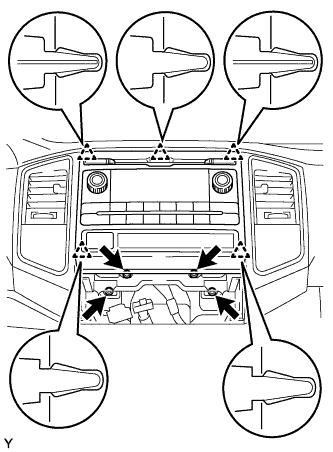 |
Remove the 4 bolts.
Disengage the 5 clips and remove the radio receiver assembly with bracket.
Disconnect the plug.
Disconnect all the connectors.
| 60. SEPARATE HOOD LOCK CONTROL LEVER SUB-ASSEMBLY |
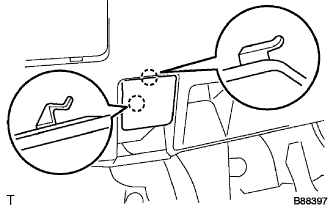 |
Disengage the 2 claws.
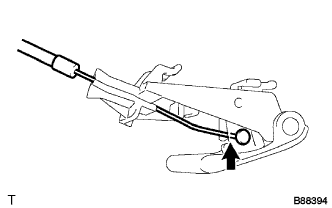 |
Disconnect the hood lock control cable assembly and remove the hood lock control lever sub-assembly.
| 61. REMOVE LOWER NO. 1 INSTRUMENT PANEL FINISH PANEL |
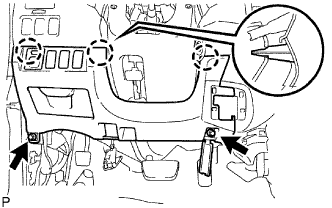 |
Remove the 2 bolts <B>.
Disengage the 3 clips and remove the lower No. 1 instrument panel finish panel.
Disconnect the connectors.
| 62. REMOVE INSTRUMENT CLUSTER FINISH PANEL SUB-ASSEMBLY |
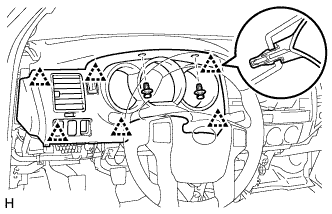 |
Remove the 2 clips.
Disengage the 6 clips and remove the instrument cluster finish panel sub-assembly.
Disconnect the connectors.
| 63. REMOVE COMBINATION METER ASSEMBLY |
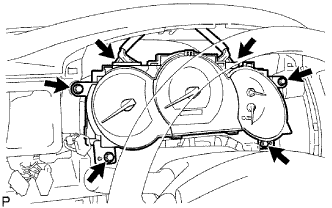 |
Remove the 4 screws <E> and the combination meter assembly.
Disconnect the 2 connectors.
| 64. REMOVE INSTRUMENT CLUSTER CENTER FINISH PANEL SUB-ASSEMBLY |
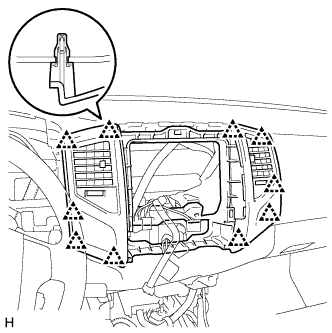 |
Disengage the 10 clips and remove the instrument cluster center finish panel sub-assembly.
| 65. REMOVE GLOVE COMPARTMENT DOOR ASSEMBLY |
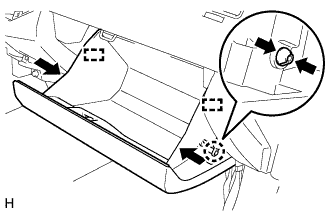 |
Disengage the claw and separate the glove compartment door stopper from the glove compartment door assembly.
Slightly deform the upper part of the glove compartment door assembly to release the 2 stoppers and open the glove compartment door assembly until it becomes horizontal.
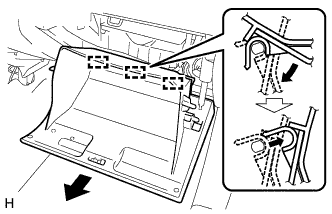 |
Pull the glove compartment door assembly toward the rear of the vehicle to release the 3 hinges and remove the glove compartment door assembly.
Remove the glove compartment door stopper.
| 66. REMOVE LOWER INSTRUMENT PANEL FINISH PANEL SUB-ASSEMBLY RH |
|
Disengage the claw and separate the glove compartment door stopper from the glove compartment door assembly.
Slightly deform the upper part of the glove compartment door assembly to release the 2 stoppers and open the glove compartment door assembly until it becomes horizontal.
|
Pull the glove compartment door assembly toward the rear of the vehicle to release the 3 hinges and remove the glove compartment door assembly.
Remove the glove compartment door stopper.
| 67. REMOVE LOWER INSTRUMENT PANEL LH |
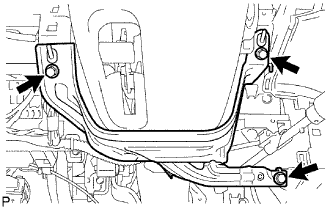 |
Remove the 3 bolts <B> and the lower instrument panel LH.
| 68. REMOVE INSTRUMENT LOWER COVER SUB-ASSEMBLY |
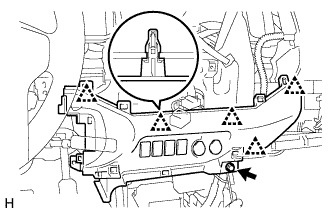 |
Remove the bolt <B>.
Disengage the 5 clips and remove the instrument lower cover sub-assembly.
Disconnect the connectors.
| 69. REMOVE INSTRUMENT SIDE PANEL RH |
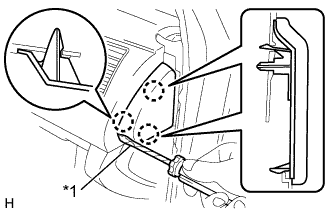 |
Using a screwdriver, disengage the 3 claws and remove the instrument side panel RH.
| *1 | Protective Tape |
| 70. DISCONNECT PASSENGER AIRBAG CONNECTOR |
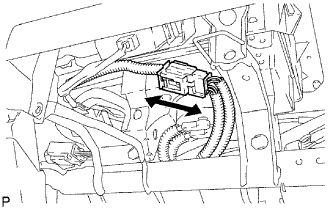 |
Disconnect the airbag connector.
| 71. REMOVE INSTRUMENT PANEL SUB-ASSEMBLY W/ PASSENGER AIRBAG ASSEMBLY |
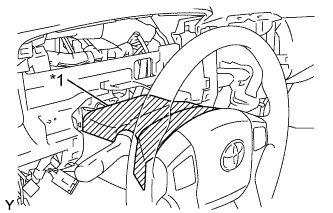 |
Tape the steering column cover upper and steering wheel sub-assembly with protective tape.
| *1 | Protective Tape |
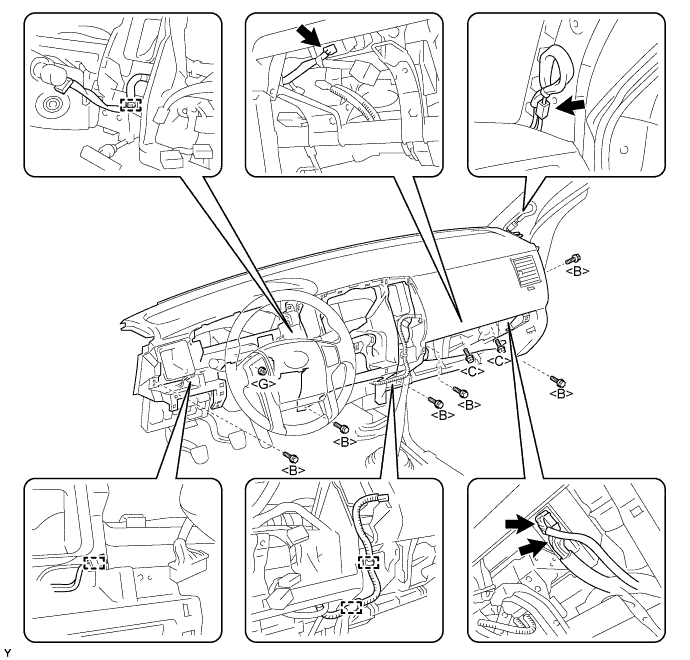
Disengage the 4 clamps and disconnect the 4 connectors.
Remove the 8 bolts, nut and instrument panel sub-assembly with passenger airbag assembly.
| 72. REMOVE NO. 1 HEATER TO REGISTER DUCT |
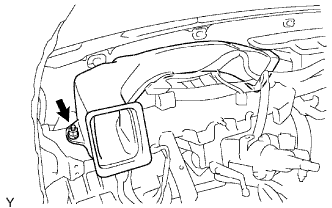 |
Remove the nut and heater to register duct.
| 73. REMOVE NO. 3 HEATER TO REGISTER DUCT |
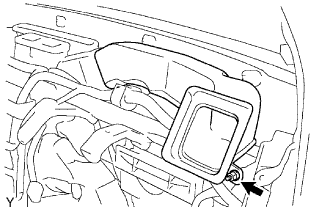 |
Remove the nut and heater to register duct.
| 74. REMOVE NO. 2 REAR AIR DUCT (for Double Cab) |
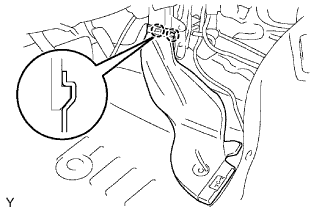 |
Fold back the floor carpet.
Disengage the 2 claws and remove the air duct rear.
| 75. REMOVE NO. 1 REAR AIR DUCT (for Double Cab) |
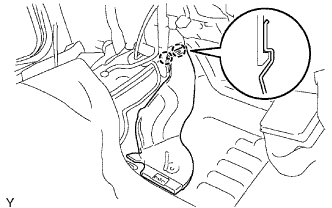 |
Fold back the floor carpet.
Disengage the 2 claws and remove the air duct rear.
| 76. REMOVE AIR DUCT ASSEMBLY LH |
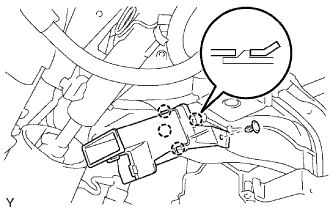 |
Remove the clip.
Disengage the 4 claws and remove the air duct assembly heater.
| 77. REMOVE AIR DUCT ASSEMBLY RH |
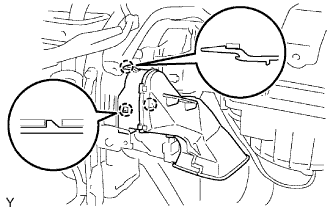 |
Disengage the 3 claws and remove the air duct assembly.
| 78. REMOVE NO. 1 INSTRUMENT PANEL BRACE MOUNTING BRACKET |
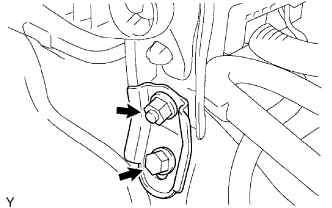 |
Remove the bolt, nut and instrument panel brace mounting bracket LH.
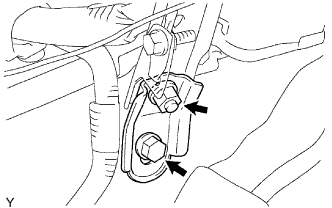 |
Remove the bolt, nut and instrument panel brace mounting bracket RH.
| 79. REMOVE STEERING COLUMN HOLE COVER |
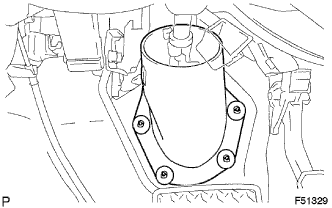 |
Disengage the 4 clips and remove the steering column hole cover.
| 80. SEPARATE STEERING SLIDING YOKE |
Mark matchmarks on the steering sliding yoke, steering intermediate shaft sub-assembly No. 2 and steering intermediate shaft assembly.
Remove bolts A and B from the steering sliding yoke.
Slide the steering sliding yoke up and separate it from the steering intermediate shaft sub-assembly No. 2.
Pull down the steering sliding yoke from the steering intermediate shaft assembly to remove.
| 81. REMOVE STEERING COLUMN ASSEMBLY |
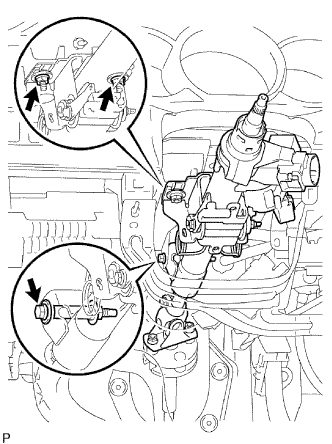 |
Disconnect the connectors and wire harness clamps.
Remove the bolt and 2 nuts, then remove the steering column assembly from the instrument panel reinforcement assembly.
| 82. REMOVE PARKING BRAKE CONTROL LEVER ASSEMBLY (for Lever Type Parking Brake) |
Release the parking brake lever.
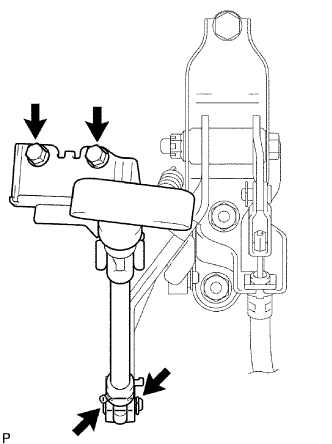 |
Remove the clip and pin and separate the sleeve.
Remove the 2 bolts and parking brake lever assembly.
| 83. REMOVE ECM (for 2TR-FE) |
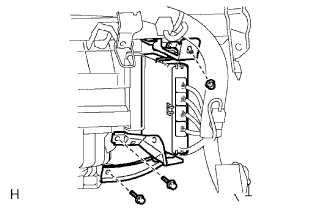 |
Disconnect the 4 connectors.
Remove the 2 bolts and nut, then remove the ECM.
| 84. REMOVE ECM (for 1GR-FE) |
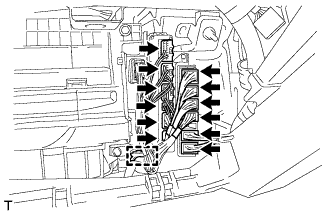 |
Disconnect the 6 ECM connectors, 6 No. 2 junction block connectors and wire harness clamp.
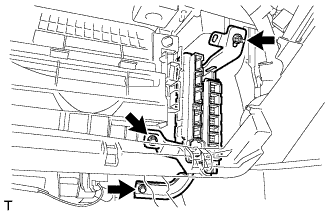 |
Remove the 2 bolts and nut and the ECM.
| 85. SEPARATE DRIVER SIDE JUNCTION BLOCK |
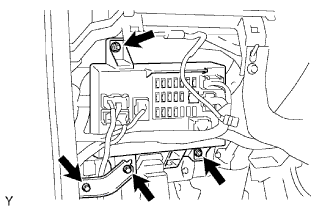 |
Remove the 2 bolts and bracket.
Remove the 2 nuts and separate the driver side junction block assembly.
| 86. REMOVE TRANSPONDER KEY ECU ASSEMBLY |
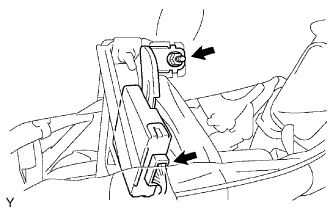 |
Disconnect the connector.
Remove the nut and the transponder key ECU assembly.
| 87. REMOVE AIR CONDITIONER AMPLIFIER ASSEMBLY |
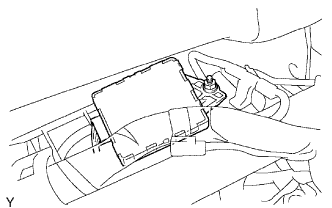 |
Disconnect the connector.
Remove the nut and the air conditioner amplifier assembly.
| 88. REMOVE AIR CONDITIONING UNIT ASSEMBLY |
Disengage the 4 clamps and disconnect the 6 connectors from the air conditioning unit assembly.
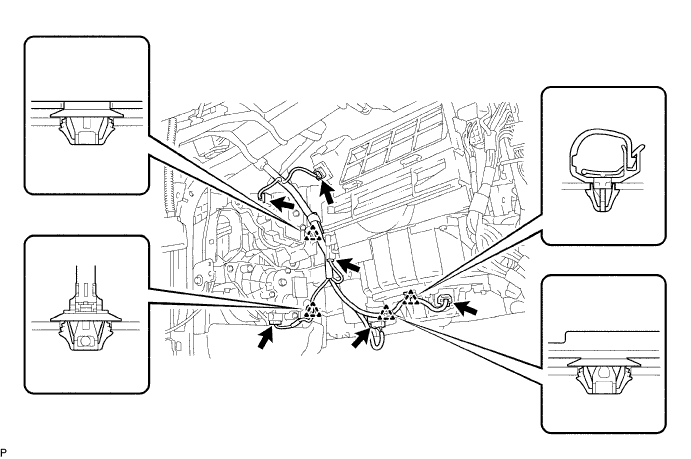
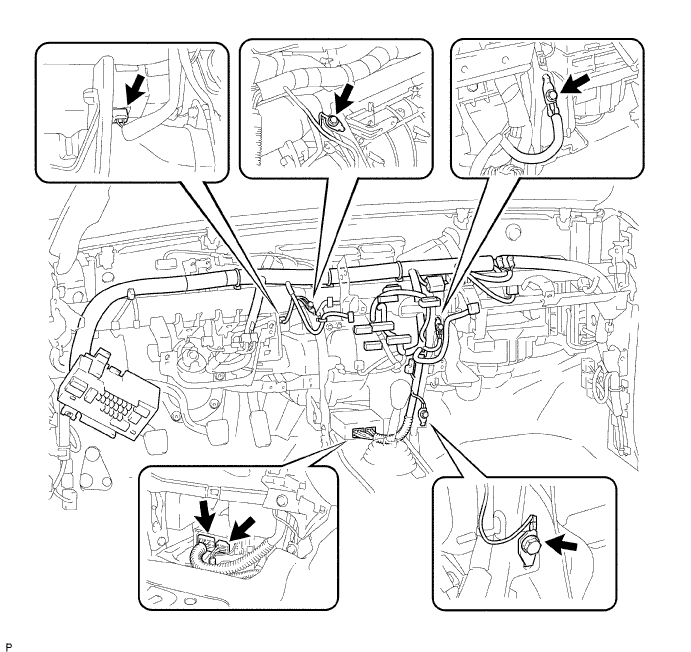
Remove the 3 bolts.
Disconnect the connector.
Disconnect the 2 airbag connectors (Click here).
Disengage the 20 clamps.
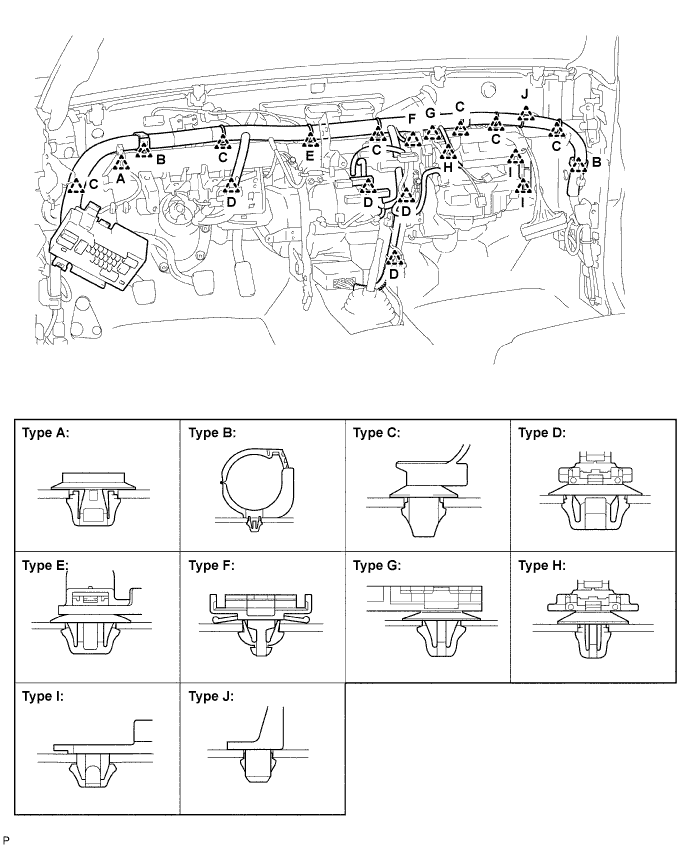
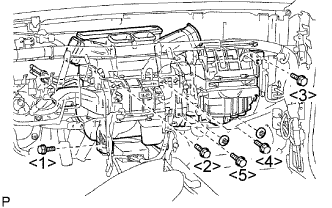 |
Remove the 5 bolts and 2 nuts.
Remove the 2 caps and 7 bolts.
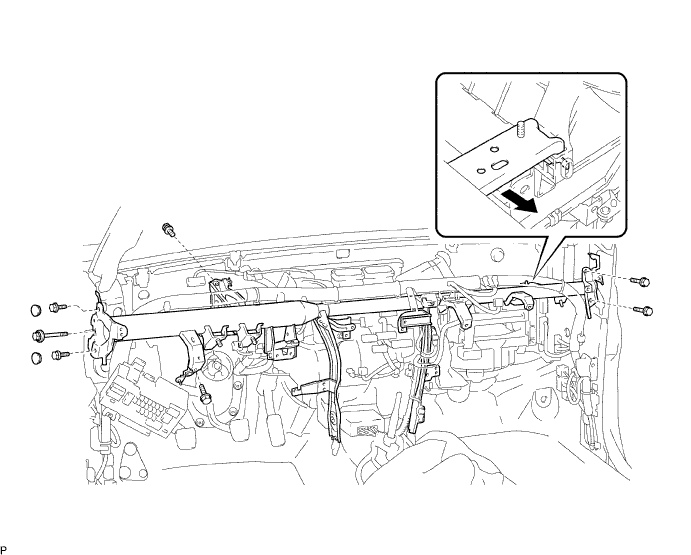
Disengage the reinforcement hook of the air conditioning unit, and remove the reinforcement.
Remove the air conditioner unit assembly.