 |
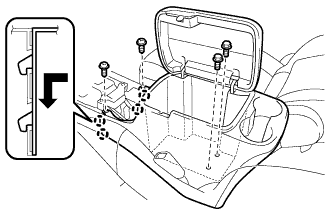
Engage the 4 claws and install the console box rear.
TRANSMISSION CONTROL CABLE > INSTALLATION |
| 1. INSTALL TRANSMISSION CONTROL CABLE ASSEMBLY |
Connect the transmission control cable assembly to the transmission control cable bracket with a new clip, and connect the cable end to the control shaft lever with the nut.
Connect the transmission control cable with the nut to the body.
Connect the transmission control cable with the 2 nuts to the body.
Connect the transmission control cable with the lock plate to the floor shift assembly, and install a new clip.
Connect the transmission control cable assembly onto the floor shift assembly.
| 2. INSTALL FRONT CONSOLE BOX |
Engage the 2 clips and claw, and install the front console box.
Install the 2 screws <F>.
| 3. INSTALL INSTRUMENT PANEL CUP HOLDER TRAY |
Engage the 2 clips and 4 claws, and install the instrument panel cup holder tray.
Install the 2 instrument panel cup holders.
| 4. INSTALL REAR CONSOLE BOX ASSEMBLY |
|
Engage the 4 claws and install the console box rear.
Install the 2 screws <F> and 2 bolts <B>.
Install the console box carpet.
| 5. INSTALL CONSOLE UPPER REAR PANEL SUB-ASSEMBLY |
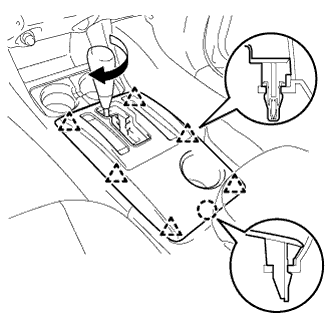 |
Engage the 6 clips and claw, and install the console upper rear panel.
Install the shift knob.
| 6. ADJUST SHIFT LEVER POSITION |
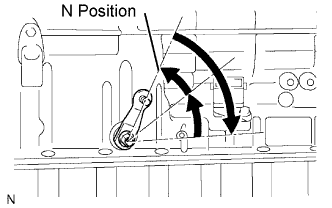 |
Push the control shaft fully rearward.
Turn the control shaft lever 2 notches counterclockwise to the N position.
Set the shift lever to the N position.
| 7. INSPECT SHIFT LEVER POSITION |
Check that the shift lever moves smoothly and appropriately from the P to R position, only when the ignition switch is turned to ON and the brake pedal is depressed.
When starting the engine, make sure that the vehicle moves forward when shifting the lever from the N to D position and moves rearward when shifting the lever to the R position.