BACK WINDOW GLASS > INSTALLATION |
| 1. CLEAN VEHICLE BODY |
|
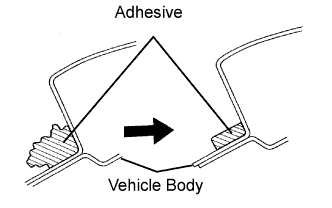
Clean and shape the contact surface of the vehicle body.
Using a knife, cut away any rough adhesive on the contact surface of the vehicle body to ensure the appropriate surface shape.
Clean the contact surface of the vehicle body with a shop rag saturated with cleaner.
| 2. INSTALL BACK WINDOW ASSEMBLY |
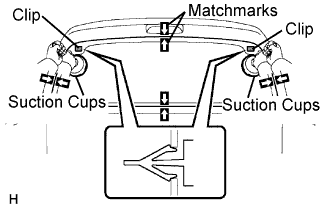 |
Position the windshield glass.
Using suction cups, place the back window in the correct position.
Check that the whole contact surface of the back window rim is perfectly even.
Place matchmarks over the back window and vehicle body.
Using suction cups, remove the back window.
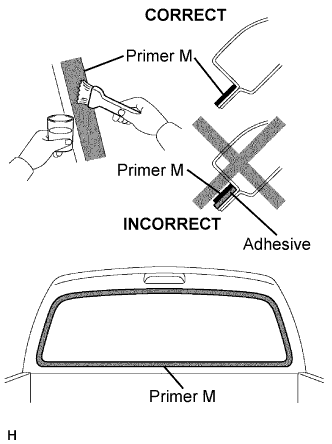 |
Using a brush, apply Primer M to the exposed part of the vehicle body.
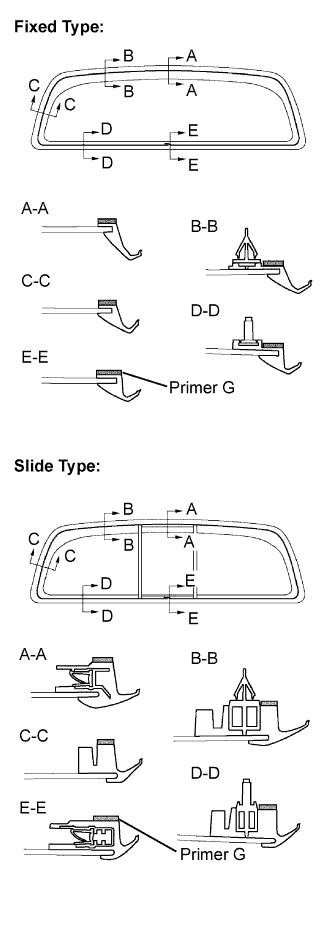 |
Using a brush or sponge, apply Primer G to the edge of the back window and contact surface.
 |
Apply adhesive.
Cut off the tip of the cartridge nozzle, as shown in the illustration.
| Temperature | Usage Time Frame |
| 35°C (95°F) | 15 minutes |
| 20°C (68°F) | 1 hour 40 minutes |
| 5°C (41°F) | 8 hours |
Load the sealer gun with the cartridge.
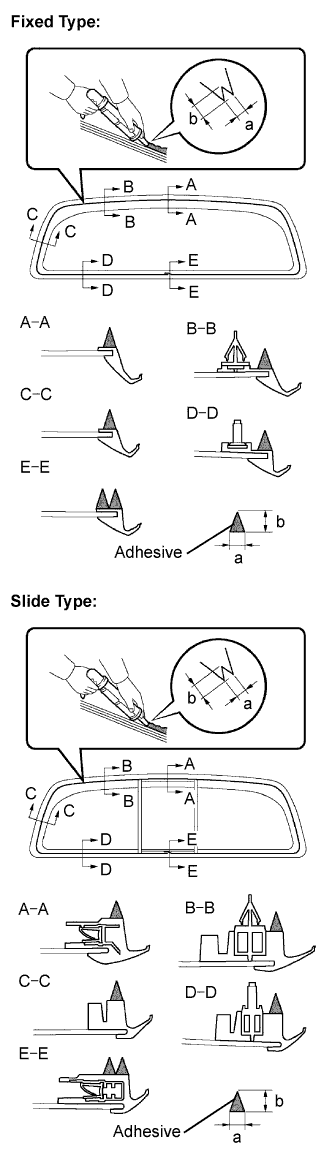
Apply adhesive to the back window, as shown in the illustration.
| Area | Measurement |
| a | 6 mm (0.236 in.) or 8 mm (0.315 in.) |
| b | 8 mm (0.315 in.) or 12 mm (0.472 in.) |
|
Install the windshield glass onto the vehicle body.
Using suction cups, position the back window so that the matchmarks are aligned. Press it in gently along the rim.
Lightly press the front surface of the windshield glass to ensure that the windshield glass is securely fitted to the vehicle body.
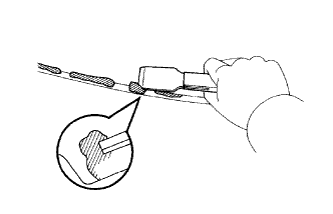 |
Using a scraper, remove any excessive or protruding adhesive.
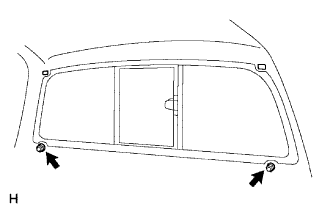 |
Tighten the 2 nuts.
| 3. CHECK FOR LEAKAGE AND REPAIR |
Conduct a leak test after the adhesive has completely hardened.
Seal any leakage with auto glass sealer.
| 4. INSTALL COAT HOOK (for Regular Cab) |
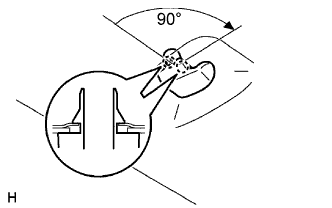 |
Turn the coat hook 90° clockwise and install it.
| 5. INSTALL COAT HOOK (for Access Cab) |
|
Turn the coat hook 90° clockwise and install it.
| 6. INSTALL COAT HOOK (for Double Cab) |
|
Turn the coat hook 90° clockwise and install it.
| 7. INSTALL QUARTER INSIDE TRIM BOARD LH (for Regular Cab) |
Engage the 2 clips and install the quarter trim board.
Tighten the 3 screws.
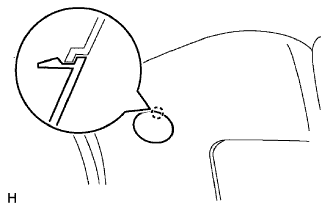 |
Engage the claw and close the cover.
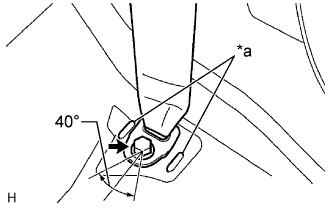 |
for LH Side and Separate Seat Type RH Side:
| *a | Convex |
Install the floor anchor of the front seat outer belt with the bolt.
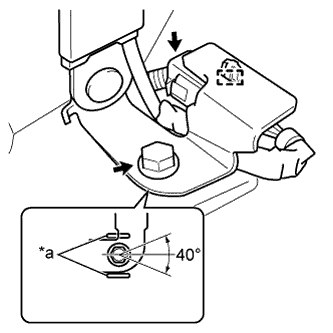 |
for Bench Seat Type RH Side:
| *a | Convex |
Install the wiring harness clamp.
Connect the belt tension sensor connector.
Install the floor anchor of the front seat outer belt with the bolt.
| 8. INSTALL QUARTER INSIDE TRIM BOARD LH (for Access Cab) |
Engage the 3 clips and install the quarter inside trim board.
Tighten the screw.
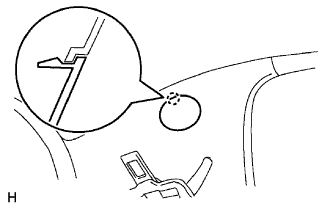 |
Engage the claw and close the cover.
| 9. INSTALL QUARTER INSIDE TRIM BOARD LH (for Double Cab) |
Engage the 2 clips and install the quarter inside trim board.
Tighten the 3 screws.
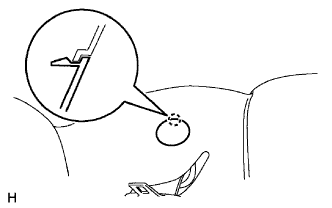 |
Engage the claw and close the cover.
|
Install the floor anchor of the rear seat belt outer with the bolt.
| *a | Convex |
| 10. INSTALL QUARTER INSIDE TRIM BOARD RH (for Regular Cab) |
| 11. INSTALL QUARTER INSIDE TRIM BOARD RH (for Access Cab) |
| 12. INSTALL QUARTER INSIDE TRIM BOARD RH (for Double Cab) |
| 13. INSTALL ROOF SIDE INNER GARNISH LH (for Access Cab) |
Engage the 2 claws and clip, and install the roof side inner garnish.
| 14. INSTALL ROOF SIDE INNER GARNISH RH (for Access Cab) |
| 15. INSTALL QUARTER TRIM LOWER PANEL LH (for Regular Cab) |
Engage the 2 claws and 3 clips, and install the quarter trim lower panel.
| 16. INSTALL QUARTER TRIM LOWER PANEL LH (for Access Cab) |
Engage the claw and 2 clips, and install the quarter trim lower panel.
Install the floor anchor of the rear seat belt outer with the bolt.
| 17. INSTALL QUARTER TRIM LOWER PANEL LH (for Double Cab) |
Engage the 2 claws and 2 clips, and install the quarter trim lower panel.
| 18. INSTALL QUARTER TRIM LOWER PANEL RH (for Regular Cab) |
| 19. INSTALL QUARTER TRIM LOWER PANEL RH (for Access Cab) |
| 20. INSTALL QUARTER TRIM LOWER PANEL RH (for Double Cab) |
| 21. INSTALL LUGGAGE COMPARTMENT SIDE TRAY (for Double Cab) |
w/ Woofer:
Engage the 5 claws and 7 clips, and install the luggage compartment side tray.
Tighten the bolt.
w/o Woofer:
Engage the 5 claws and 5 clips, and install the luggage compartment side tray.
Tighten the 3 bolts.
| 22. INSTALL REAR SEAT BACK CENTER HINGE SUB-ASSEMBLY (for Double Cab) |
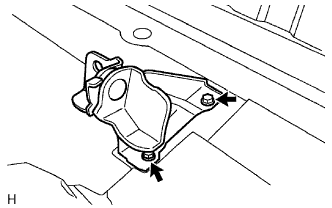 |
Install the rear seat back center hinge with the 2 bolts.
| 23. INSTALL LUGGAGE COMPARTMENT SIDE TRAY (for Double Cab) |
Engage the 8 claws and 3 clips, and install the luggage compartment side tray.
Tighten the 3 bolts.
| 24. INSTALL BACK PANEL TRIM (for Regular Cab on Separate Seat Type) |
Install the back panel trim with the 4 clips.
| 25. INSTALL BACK PANEL TRIM (for Access Cab on Separate Seat Type) |
Engage the 8 claws and 14 clips, and install the back panel trim.
Install the 2 clips.
| 26. INSTALL BACK PANEL TRIM COVER (for Regular Cab on Separate Seat Type) |
Engage the 4 claws and install the back panel trim cover.
Install the 2 clips.
| 27. INSTALL JACK ASSEMBLY (for Regular Cab on Separate Seat Type) |
| 28. INSTALL BACK PANEL UPPER GARNISH (for Regular Cab) |
Engage the 4 claws and 5 clips, and install the back panel upper garnish.
| 29. INSTALL BACK PANEL TRIM COVER (for Regular Cab on Bench Seat Type) |
for Separate Seat Type and Bench Seat Type:
Engage the 6 claws and install the back panel trim cover.
for Bench Seat Type:
Engage the 6 claws and install the back panel trim cover.
| 30. INSTALL BACK PANEL TRIM COVER (for Regular Cab) |
for Separate Seat Type and Bench Seat Type:
Engage the 6 claws and install the back panel trim cover.
for Bench Seat Type:
Engage the 6 claws and install the back panel trim cover.
| 31. INSTALL BACK PANEL TRIM COVER (for Access Cab) |
Engage the 4 claws and install the back panel trim cover.
| 32. INSTALL REAR DOOR OPENING TRIM WEATHERSTRIP LH (for Double Cab) |
Install the rear door opening trim weatherstrip.
| 33. INSTALL REAR DOOR OPENING TRIM WEATHERSTRIP RH (for Double Cab) |
| 34. INSTALL FRONT DOOR OPENING TRIM WEATHERSTRIP LH (for Regular Cab) |
Install the front door opening trim weatherstrip.
| 35. INSTALL FRONT DOOR OPENING TRIM WEATHERSTRIP LH (for Access Cab) |
Install the front door opening trim weatherstrip.
| 36. INSTALL FRONT DOOR OPENING TRIM WEATHERSTRIP RH (for Regular Cab) |
| 37. INSTALL FRONT DOOR OPENING TRIM WEATHERSTRIP RH (for Access Cab) |
| 38. INSTALL ROOF SIDE INNER GARNISH CAP LH (for Access Cab) |
Engage the 4 claws and install the roof side inner garnish cap.
Using a "TORX" socket wrench T30, tighten the 2 screws.
| 39. INSTALL ROOF SIDE INNER GARNISH CAP RH (for Access Cab) |
| 40. INSTALL REAR DOOR SCUFF PLATE LH (for Access Cab) |
Engage the 7 claws and install the rear door scuff plate.
| 41. INSTALL REAR DOOR SCUFF PLATE LH (for Double Cab) |
Engage the 8 claws and install the rear door scuff plate.
| 42. INSTALL REAR DOOR SCUFF PLATE RH (for Access Cab) |
| 43. INSTALL REAR DOOR SCUFF PLATE RH (for Double Cab) |
| 44. INSTALL FRONT DOOR SCUFF PLATE LH (for Regular Cab) |
Engage the 8 claws and clip, and install the front door scuff plate.
| 45. INSTALL FRONT DOOR SCUFF PLATE LH (for Access Cab) |
Engage the 9 claws and clip, and install the front door scuff plate.
| 46. INSTALL FRONT DOOR SCUFF PLATE RH (for Regular Cab) |
| 47. INSTALL FRONT DOOR SCUFF PLATE RH (for Access Cab) |
| 48. INSTALL REAR SEAT BACK HINGE SUB-ASSEMBLY LH (for Double Cab) |
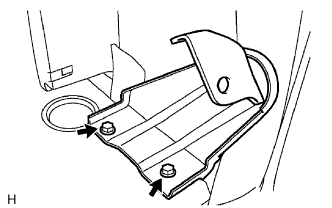 |
Install the rear seat back hinge with the 2 bolts.
| 49. INSTALL REAR SEAT BACK HINGE SUB-ASSEMBLY RH (for Double Cab) |
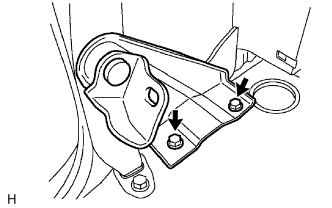 |
Install the rear seat back hinge with the 2 bolts.
| 50. INSTALL REAR SEATBACK ASSEMBLY LH (for Double Cab) |
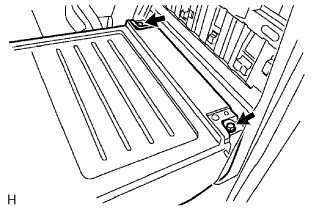 |
Install the rear seat back with the 2 bolts.
| 51. INSTALL REAR SEATBACK ASSEMBLY RH (for Double Cab) |
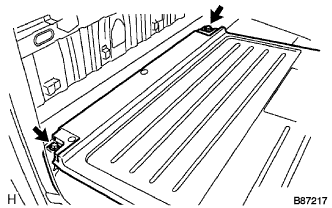 |
Install the rear seat back with the 2 bolts.
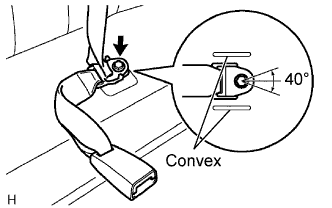 |
Install the rear seat belt inner and rear seat belt outer center of the floor anchor with the bolt.
| 52. INSTALL REAR SEAT BACK HINGE COVER (for Double Cab) |
for RH Side:
Install the rear seat back hinge cover .
for LH Side:
Install the rear seat back hinge cover .