WINDSHIELD GLASS > INSTALLATION |
| 1. CLEAN WINDSHIELD GLASS |
|
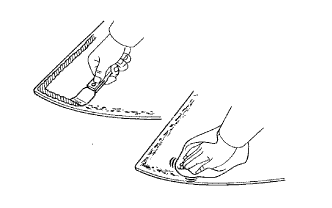
Using a scraper, remove the damaged stoppers, dam and adhesive stuck to the windshield glass.
Clean the outer circumference of the windshield glass with white gasoline.
| 2. CLEAN VEHICLE BODY |
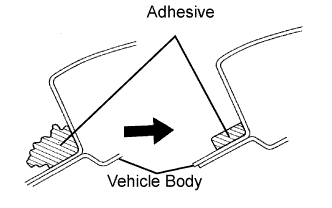 |
Clean and shape the contact surface of the vehicle body.
Using a knife, cut away any rough adhesive on the contact surface of the vehicle body to ensure the appropriate surface shape.
Clean the contact surface of the vehicle body with a shop rag saturated with cleaner.
| 3. INSTALL NO. 2 WINDSHIELD GLASS STOPPER |
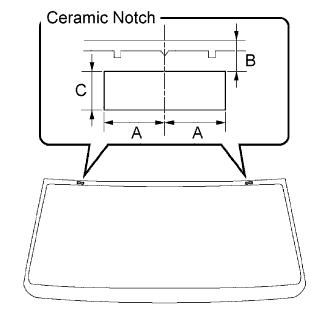 |
Apply Primer G to the installation part of the stoppers.
Install 2 new stoppers onto the windshield glass, as shown in the illustration.
| Area | Measurement |
| A | 40 mm (1.575 in.) |
| B | 9.4 mm (0.37 in.) |
| C | 12.5 mm (0.482 in.) |
| 4. INSTALL NO. 1 WINDSHIELD GLASS STOPPER |
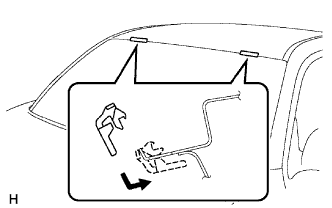 |
Install 2 new stoppers onto the vehicle body, as shown in the illustration.
| 5. INSTALL WINDSHIELD GLASS ADHESIVE DAM |
Apply Primer G to the illustration part of the dam.
Install 3 new dams. Install the 3 new dams by applying double-sided tape all the way around the windshield glass except where the stoppers are installed, as shown in the illustration.
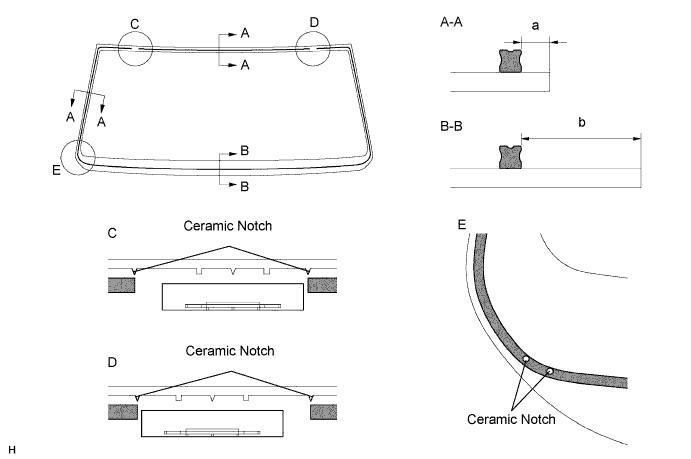
| Area | Measurement |
| a | 7.0 mm (0.276 in.) |
| b | 30.9 mm (1.217 in.) |
| 6. INSTALL WINDSHIELD GLASS |
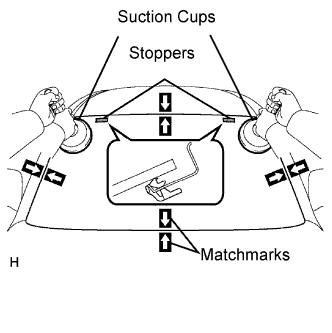 |
Position the windshield glass.
Using suction cups, place the windshield glass in the correct position.
Check that the whole contact surface of the windshield glass rim is perfectly even.
Place matchmarks over the windshield glass and vehicle body.
Using suction cups, remove the windshield glass.
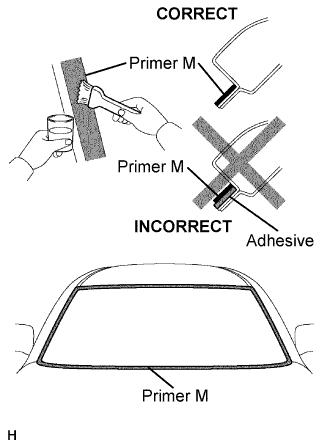 |
Using a brush, apply Primer M to the exposed part of the vehicle body.
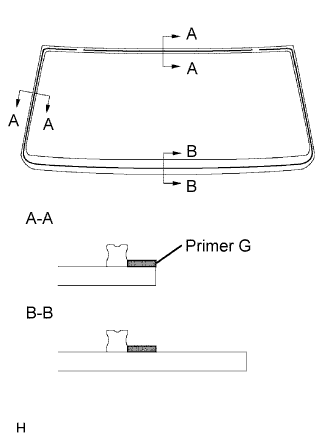 |
Using a brush or sponge, apply Primer G to the edge of the windshield glass and contact surface.
 |
Apply adhesive.
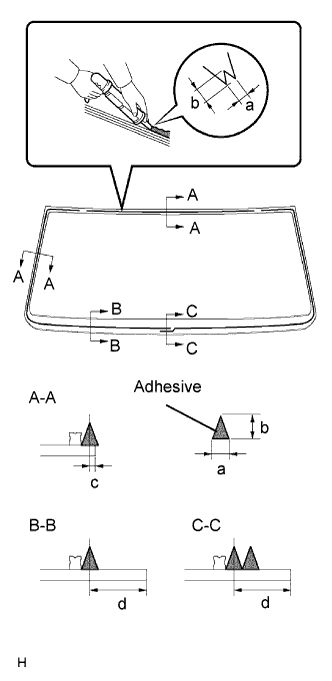
Cut off the tip of the cartridge nozzle, as shown in the illustration.
| Temperature | Usage Time Frame |
| 35°C (95°F) | 15 minutes |
| 20°C (68°F) | 1 hour 40 minutes |
| 5°C (41°F) | 8 hours |
Load the sealer gun with the cartridge.
Apply adhesive to the windshield glass as shown in the illustration.
| Area | Measurement |
| a | 8 mm (0.315 in.) |
| b | 12 mm (0.472 in.) |
| c | 3 mm (0.118 in.) |
| d | 26.9 mm (1.059 in.) |
|
Install the windshield glass onto the vehicle body.
Using suction cups, position the windshield glass so that the matchmarks are aligned. Press it in gently along the rim
Lightly press the front surface of the windshield glass to ensure that the windshield glass is securely fitted to the vehicle body.
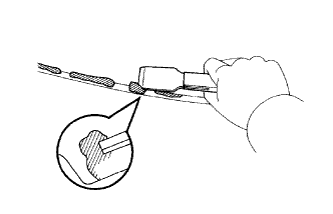 |
Using a scraper, remove any excessive or protruding adhesive.
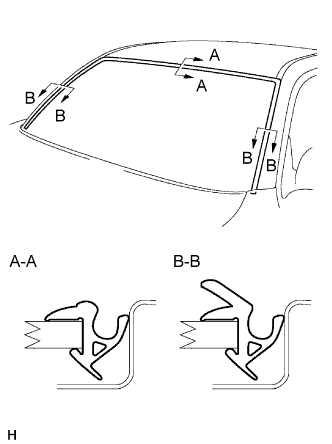
| 7. INSTALL WINDSHIELD UPPER MOULDING OUTER |
 |
Using a brush or sponge, apply Primer G to the edge of the windshield glass and contact surface.
Install the windshield upper moulding outer before the adhesive dries.
| Temperature | Minimum time prior to driving vehicle |
| 35°C (95°F) | 1 hour 30 minutes |
| 20°C (68°F) | 5 hours |
| 5°C (41°F) | 24 hours |
| 8. INSTALL COWL TOP VENTILATOR LOUVER SUB-ASSEMBLY |
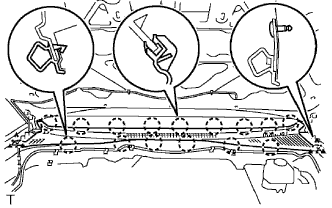 |
Engage the 15 claws and install the cowl top ventilator louver sub-assembly.
Engage the 2 clips
| 9. INSTALL FRONT FENDER TO COWL SIDE SEAL LH |
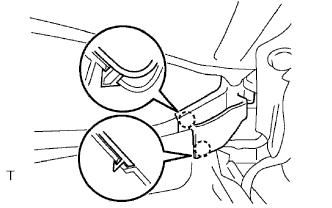 |
Engage the 2 claws and install the front fender onto cowl side seal LH.
| 10. INSTALL FRONT FENDER TO COWL SIDE SEAL RH |
| 11. INSTALL FRONT WIPER ARM LH |
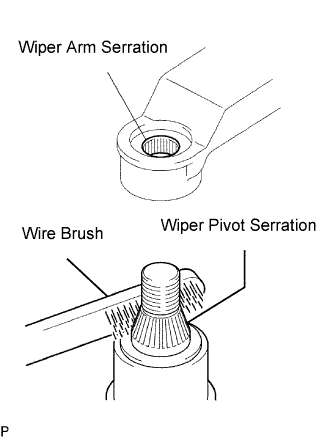 |
Scrape any metal powder off the serration part of the wiper arm with a round file or equivalent (when reinstalling).
Clean the wiper pivot serration with a wire brush.
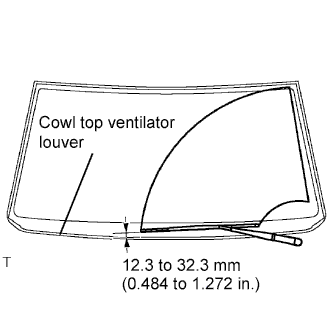 |
Install the front wiper arm LH onto the position with the nut as shown in the illustration.
Operate the front wipers while spraying water or washer fluid on the windshield. Ensure that there is no interference between the blades and pillar.
| 12. INSTALL FRONT WIPER ARM RH |
|
Scrape any metal powder off the serration part of the wiper arm with a round file or equivalent (when reinstalling).
Clean the wiper pivot serration with a wire brush.
Operate the wiper, then stop the windshield wiper motor assembly at the automatic stop position.
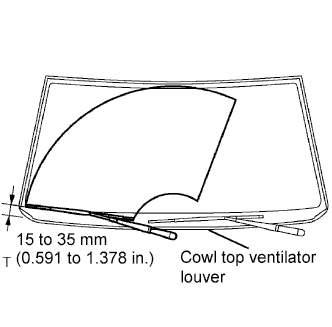 |
Install the front wiper arm RH onto the position with the nut as shown in the illustration.
| 13. INSTALL FRONT WIPER ARM HEAD CAP |
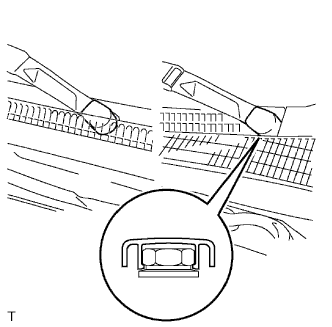 |
Engage the claw and install the 2 front wiper arm head caps.
| 14. CHECK FOR LEAKAGE AND REPAIR |
Conduct a leak test after the adhesive has completely hardened.
Seal any leakage with auto glass sealer.
| 15. INSTALL VISOR HOLDER (for Regular Cab) |
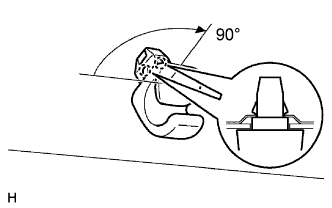 |
Turn the visor holder 90° clockwise and install it.
| 16. INSTALL VISOR HOLDER (for Access Cab) |
|
Turn the visor holder 90° clockwise and install it.
| 17. INSTALL VISOR HOLDER (for Double Cab) |
|
Turn the visor holder 90° clockwise and install it.
| 18. INSTALL VISOR ASSEMBLY LH (for Regular Cab) |
Install the visor into the visor holder.
Install the 2 screws.
| 19. INSTALL VISOR ASSEMBLY LH (for Access Cab) |
Install the visor into the visor holder.
Tighten the 2 screws.
| 20. INSTALL VISOR ASSEMBLY LH (for Double Cab) |
Install the visor into the visor holder.
Tighten the 2 screws.
| 21. INSTALL VISOR ASSEMBLY RH (for Regular Cab) |
| 22. INSTALL VISOR ASSEMBLY RH (for Access Cab) |
| 23. INSTALL VISOR ASSEMBLY RH (for Double Cab) |
| 24. INSTALL ASSIST GRIP PLUG (w/ Curtain Shield Airbag) |
Engage the claw and install the assist grip plug.
Tighten the screw.
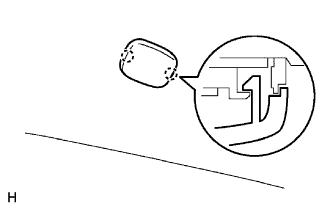 |
Engage the 2 claws and close the cover.
| 25. INSTALL ASSIST GRIP SUB-ASSEMBLY (for Double Cab) |
Install the assist grip with the 2 screws.
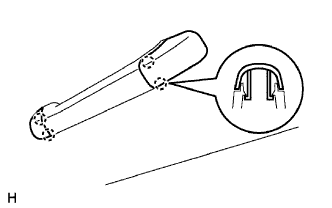 |
Engage the 2 claws and close the cover.
| 26. INSTALL ROOF CONSOLE BOX ASSEMBLY (for Access Cab) |
Install the wire harness clamp.
Connect the accessory meter connector and map lamp connector.
Engage the 2 clips and 3 claws and install the map lamp.
Tighten the screw.
| 27. INSTALL ROOF CONSOLE BOX ASSEMBLY (for Double Cab) |
Install the wire harness clamp.
Connect the connectors.
Engage the 2 clips and 3 claws and install the roof console box assembly.
Tighten the screw.
| 28. INSTALL FRONT PILLAR GARNISH LH (for Regular Cab) |
for LH Side:
Install the 3 wire harness clamps.
Engage the claw and clip, and install the front pillar garnish.
Tighten the 2 screws.
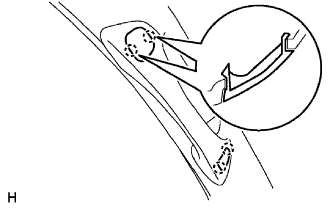 |
Engage the 2 claws and install the assist grip plug.
| 29. INSTALL FRONT PILLAR GARNISH LH (for Access Cab) |
for LH Side:
Install the 3 wire harness clamps.
Engage the claw and clip, and install the front pillar garnish and assist grip.
Tighten the 2 screws.
|
Engage the 2 claws and install the assist grip plug.
| 30. INSTALL FRONT PILLAR GARNISH LH (for Double Cab) |
Install the 3 wire harness clamps (LH side only).
Engage the claw and clip, and install the front pillar garnish.
Tighten the 2 screws.
|
Engage the 2 claws and install the assist grip plug.
| 31. INSTALL FRONT PILLAR GARNISH RH (for Regular Cab) |
| 32. INSTALL FRONT PILLAR GARNISH RH (for Access Cab) |
| 33. INSTALL FRONT PILLAR GARNISH RH (for Double Cab) |
| 34. INSTALL FRONT DOOR OPENING TRIM WEATHERSTRIP LH |
Install the front door opening trim weatherstrip.
| 35. INSTALL FRONT DOOR OPENING TRIM WEATHERSTRIP RH |
| 36. INSTALL INNER REAR VIEW MIRROR ASSEMBLY |
Using a T20 "TORX" socket wrench, install the inner rear view mirror assembly with the screw.
| 37. CONNECT CABLE TO NEGATIVE BATTERY TERMINAL |