REAR BRAKE > INSTALLATION |
| 1. INSTALL REAR BRAKE DRUM SUB-ASSEMBLY |
Install a new drum gasket onto the rear brake drum.
Install the rear brake drum.
| 2. ADJUST REAR DRUM BRAKE SHOE CLEARANCE |
|
Provisionally install the hub nuts.
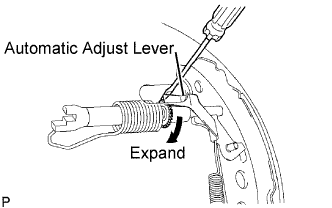
Remove the hole plug, and turn the adjuster to expand the shoe until the drum locks.
Using a screwdriver, release the adjuster 15 notches.
Install the hole plug.
| 3. FILL RESERVOIR WITH BRAKE FLUID (for Hydraulic Brake Booster) |
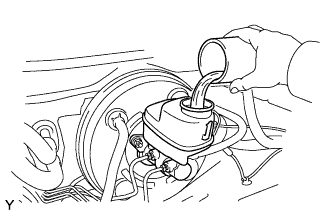
| 4. FILL RESERVOIR WITH BRAKE FLUID (for Vacuum Brake Booster) |
 |
| 5. BLEED BRAKE BOOSTER WITH ACCUMULATOR PUMP ASSEMBLY (for Hydraulic Brake Booster) |
Turn the ignition switch to ON, and wait until the pump motor has stopped (step A).
Turn the ignition switch to OFF, and depress the brake pedal more than 20 times (step B).
Repeat step A and B 5 times (step C).
Turn the ignition switch to ON, and check that the pump stops after approximately 8 to 14 seconds.
| 6. BLEED MASTER CYLINDER (for Vacuum Brake Booster) |
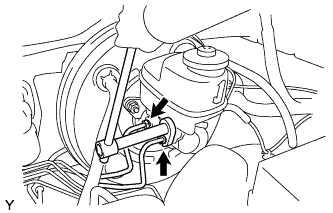 |
Using a union nut wrench, separate the brake tubes from the master cylinder.
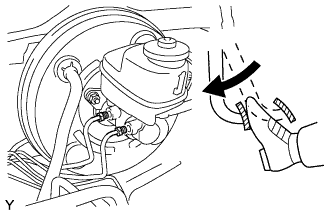 |
Slowly depress the brake pedal and hold it there (Step A).
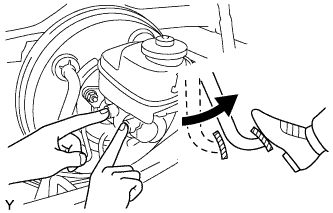 |
Block the outer holes with your fingers, and release the brake pedal (Step B).
Repeat steps A and B 3 or 4 times.
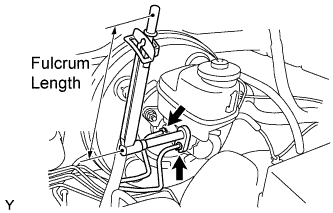 |
Using a union nut wrench, install the brake tubes into the master cylinder.
| 7. BLEED BRAKE LINE (for Hydraulic Brake Booster) |
Turn the ignition switch to ON, and wait until the pump motor has stopped.
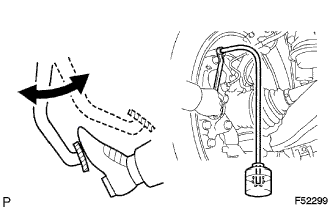 |
Front brake line.
Connect the vinyl tube to the brake caliper.
Depress the brake pedal several times, then loosen the bleeder plug with the pedal held down (step D).
At the point when the fluid stops coming out, tighten the bleeder plug, then release the brake pedal (step E).
Repeat step D and E until all the air in the fluid has been bled out.
Repeat the above procedures to bleed the other brake line.
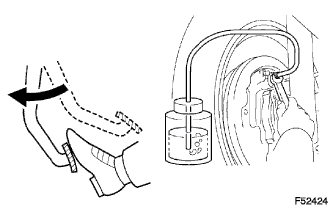 |
Rear brake line.
Connect the vinyl tube to the wheel cylinder.
Depress the brake pedal, hold it, and then loosen the bleeder plug.
Loosen the bleeder plug and release air.
When the air is completely bled out of the brake fluid through the bleeder plug, tighten the bleeder plug.
Repeat the above procedures to bleed the other brake line.
| 8. BLEED BRAKE LINE (for Vacuum Brake Booster) |
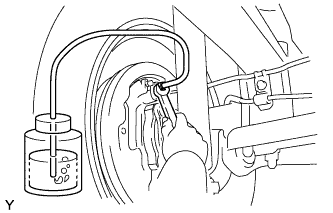 |
Connect a vinyl tube to the bleeder plug.
Depress the brake pedal several times, and then loosen the bleeder plug with the pedal depressed (Step C).
At the point where the fluid stops coming out, tighten the bleeder plug, and then release the brake pedal (Step D).
Repeat steps C and D until all the air in the fluid is completely bled out.
Tighten the bleeder plug.
Repeat the above procedure to bleed the air out of the brake line for each wheel.
| 9. BLEED MASTER CYLINDER SOLENOID (for Hydraulic Brake Booster) |
Connect the Techstream to the DLC3.
Turn the ignition switch to ON.
Select "Active Test" mode on the Techstream.
|
Connect the vinyl tube to the rear wheel cylinder.
Loosen the bleeder plug.
Select "TRAC Solenoid (SRMF & SRMR)" to drive the solenoids and bleed air from the rear wheel cylinder (step F).
Repeat step F until all the air in the brake fluid is bled out.
When the air is completely bled out of the brake fluid through the bleeder plug, tighten the bleeder plug.
Repeat the above procedures to bleed the other brake line.
Turn the ignition switch to OFF.
Turn the ignition switch to ON.
Clear DTC (Click here).
| 10. BLEED BRAKE ACTUATOR (for Vacuum Brake Booster) |
Depress the brake pedal more than 20 times with the engine off.
Connect the Techstream to the DLC3, and turn the ignition switch ON.
Select "Air Bleeding" on the Techstream.
Bleed the air out of the brake line when Step 1: Increase appears on the Techstream display.
Connect the vinyl tube to either one of the bleeder plugs.
|
Depress the brake pedal several times, and then loosen the bleeder plug connected to the vinyl tube with the pedal depressed (Step E).
When fluid stops coming out, tighten the bleeder plug and release the brake pedal (Step F).
Repeat steps E and F until all the air in the fluid is completely bled out.
Tighten the bleeder plug completely.
Repeat the above procedure for each wheel to bleed the air out of the brake line.
Bleed the air out of the suction line when Step 2: Inhalation appears on the Techstream display.
Connect the vinyl tube to the bleeder plug at the right front wheel or the right rear wheel and loosen the bleeder plug.
Operate the brake actuator to bleed the air using the Techstream (Step G).
Check if the operation has stopped by referring to the Techstream display and tighten the bleeder plug (Step H).
Repeat steps G and H until all the air in the fluid is completely bled out.
Tighten the bleeder plug.
Repeat the above procedure for the other wheels to bleed the air out of the brake line.
Bleed the air out of the pressure reduction line when Step 3: Decrease appears on the Techstream display.
Connect a vinyl tube to either one of the bleeder plugs.
Loosen the bleeder plug (Step I).
Using the Techstream, operate the brake actuator assembly, completely depress the brake pedal and hold it there (Step J).
Tighten the bleeder plug, and then release the brake pedal (Step K).
Repeat steps I to K until all the air in the fluid is completely bled out.
Tighten the bleeder plug.
Repeat the above procedure for the other wheels to bleed the air out of the brake line.
Bleed the air out of the brake line again when Step 4: Increase appears on the Techstream display.
Connect the vinyl tube to either one of the bleeder plugs.
|
Depress the brake pedal several times, and then loosen the bleeder plug connected to the vinyl tube with the pedal depressed (Step L).
When fluid stops coming out, tighten the bleeder plug, and then release the brake pedal (Step M).
Repeat steps L and M until all the air in the fluid is completely bled out.
Tighten the bleeder plug.
Repeat the above procedure for the other wheels to bleed the air out of the brake line.
Make sure that the air bleeding is complete by referring to the Techstream display and turn off the Techstream.
Disconnect the Techstream from the DLC3.
Turn the ignition switch off.
| 11. INSPECT FLUID LEVEL IN RESERVOIR (for Hydraulic Brake Booster) |
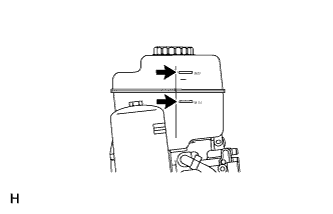 |
Turn the ignition switch to OFF, and depress the brake pedal more than 40 times (until the pedal reaction feels light and pedal stroke becomes longer), and adjust the fluid level to the MAX level.
When the ignition switch is turned to the ON, brake fluid is sent to the accumulator and the fluid level decreases by approximately 5 mm from the level when the ignition switch is off (normal).
| 12. INSPECT FLUID LEVEL IN RESERVOIR (for Vacuum Brake Booster) |
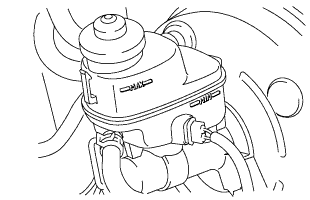 |
Check the fluid level.
If the brake fluid level is lower than the MIN line, check for leaks and inspect the disc brake pads. If necessary, refill the reservoir with brake fluid to the MAX line after repair or replacement.
| 13. INSPECT FOR BRAKE FLUID LEAK |
| 14. INSTALL REAR WHEEL |
| 15. INSPECT PARKING BRAKE PEDAL TRAVEL (for Automatic Transmission) |
Slowly depress the parking brake pedal to the fully applied position, and count the number of clicks.
| 16. INSPECT PARKING BRAKE LEVER TRAVEL (for Manual Transmission) |
Slowly pull the parking brake lever to the fully applied position, and count the number of clicks.
| 17. ADJUST PARKING BRAKE PEDAL TRAVEL (for Automatic Transmission) |
Confirm that the parking brake pedal is released.
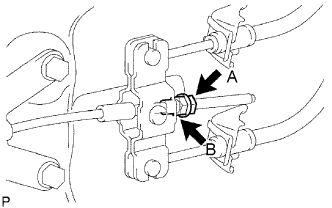 |
Loosen the lock nut (labeled A) and turn the adjusting nut (labeled B) until the parking brake pedal travel is corrected to the specified value.
Tighten the lock nut.
Check whether the parking brake drags or not.
When operating the parking brake pedal, check that the parking brake pedal indicator light comes on.
| 18. ADJUST PARKING BRAKE LEVER TRAVEL (for Manual Transmission) |
Confirm that the parking brake lever is released.
|
Loosen the lock nut (labeled A) and turn the adjusting nut (labeled B) until the parking brake lever travel is corrected to the specified value.
Tighten the lock nut.
Check whether the parking brake drags or not.
When operating the parking brake lever, check that the parking brake lever indicator light comes on.