 |
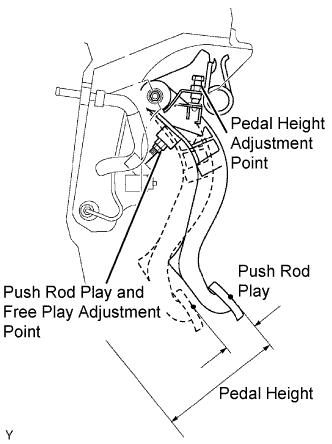
Check that the pedal height is correct.
- Pedal height from asphalt sheet:
- 168.5 to 178.5 mm (6.634 to 7.028 in.)
CLUTCH MASTER CYLINDER > INSTALLATION |
| 1. INSTALL CLUTCH MASTER CYLINDER ASSEMBLY |
Install the clutch master cylinder assembly with the 2 bolts.
Install the clutch start switch to the clutch pedal support with the nut.
Using a union nut wrench, connect the clutch master cylinder assembly to the 2 way tube.
Connect the clutch reservoir tube.
| 2. INSTALL CLUTCH PEDAL WITH CLUTCH MASTER CYLINDER |
Install the clutch pedal with clutch master cylinder to the vehicle with the 2 nuts and the bolt.
Connect the clutch start switch connector.
| 3. INSTALL DRIVER SIDE JUNCTION BLOCK |
| 4. INSTALL LOWER NO. 1 INSTRUMENT PANEL FINISH PANEL |
Connect the connectors.
Engage the 3 clips and install the lower NO. 1 instrument panel finish panel sub-assembly.
Install the 2 bolts <B>.
| 5. INSTALL COWL SIDE TRIM BOARD LH |
| 6. INSTALL FRONT DOOR SCUFF PLATE LH |
| 7. CONNECT CLUTCH MASTER CYLINDER TO FLEXIBLE HOSE TUBE |
Using a union nut wrench, connect the flexible hose tube.
| 8. CONNECT CLUTCH RESERVOIR TUBE |
| 9. BLEED BRAKE LINE (for Vacuum Brake Booster) |
| 10. BLEED CLUTCH PIPE LINE |
| 11. INSPECT AND ADJUST CLUTCH PEDAL SUB-ASSEMBLY |
Lift the floor carpet.
|
Check that the pedal height is correct.
Adjust the pedal height.
Loosen the lock nut and turn the stopper bolt until the height is correct. Tighten the lock nut.
Check that the pedal free play and push rod play are correct.
Depress the pedal until the clutch resistance begins to be felt.
Gently depress the pedal until the resistance begins to increase a little.
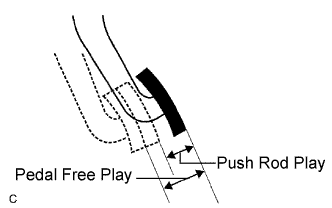 |
Adjust the pedal free play and push rod play.
Loosen the lock nut and turn the push rod until the free play and push rod play are correct.
Tighten the lock nut.
After adjusting the pedal free play, check the pedal height.
Connect the air duct and install the lower finish panel.
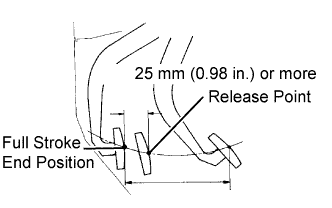 |
Check the clutch release point.
Pull the parking brake lever and use wheel chocks.
Start the engine and allow it to idle.
Without depressing the clutch pedal, slowly move the shift lever into the reverse position until the gears engage.
Gradually depress the clutch pedal and measure the stroke distance from the point that the gear noise stops (release point) up to the full stroke end position.
| 12. INSPECT FOR BRAKE FLUID LEAK (for Vacuum Brake Booster) |
| 13. INSPECT FOR CLUTCH FLUID LEAK |
| 14. INSPECT FLUID LEVEL IN RESERVOIR |