OUTER REAR VIEW MIRROR > INSPECTION |
| 1. INSPECT OUTER REAR VIEW MIRROR ASSEMBLY LH |
|
w/ Power Mirror Control System:
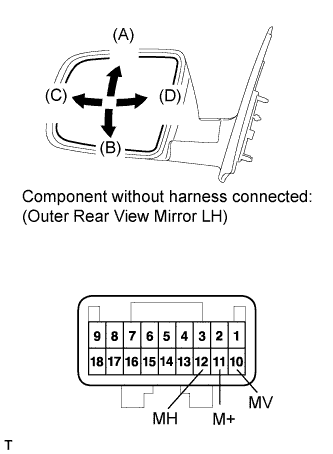
Check the outer mirror motor operation.
Apply battery voltage and check operation of the mirror face.
| Measurement Condition | Specified Condition |
| Battery positive (+) → Terminal 10 (MV) Battery negative (-) → Terminal 11 (M+) | Turns upward (A) |
| Battery positive (+) → Terminal 10 (MV) Battery negative (-) → Terminal 11 (M+) | Turns downward (B) |
| Battery positive (+) → Terminal 12 (MH) Battery negative (-) → Terminal 11 (M+) | Turns right (D) |
| Battery positive (+) → Terminal 11 (M+) Battery negative (-) → Terminal 12 (MH) | Turns left (C) |
 |
w/ Retract Mirror:
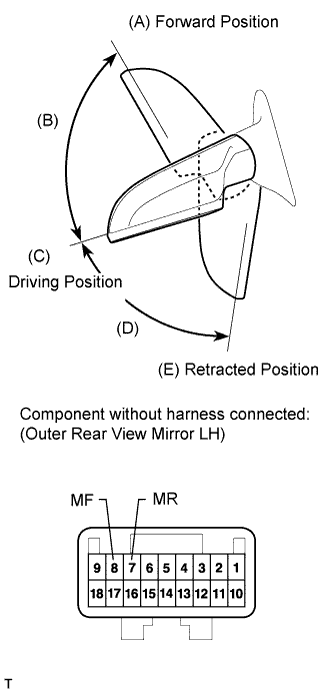
Check the retractable mirror's movement.
For each position: Disconnect the battery, set the mirror position by hand, connect the battery, and check the retractable mirror's movement.
| Measurement Condition | Mirror Position | Specified Condition |
| Battery positive (+) → Terminal 7 (MR) Battery negative (-) → Terminal 8 (MF) | Forward position (A) | Moves from (A) to retracted position (E) |
| Battery positive (+) → Terminal 8 (MF) Battery negative (-) → Terminal 7 (MR) | Forward position (A) | Does not move |
| Battery positive (+) → Terminal 7 (MR) Battery negative (-) → Terminal 8 (MF) | Position between forward position (A) and driving position (C) | Moves from (B) to retracted position (E) |
| Battery positive (+) → Terminal 8 (MF) Battery negative (-) → Terminal 7 (MR) | Position between forward position (A) and driving position (C) | Moves from (B) to forward position (A) |
| Battery positive (+) → Terminal 7 (MR) Battery negative (-) → Terminal 8 (MF) | Driving position (C) | Moves from (C) to retracted position (E) |
| Battery positive (+) → Terminal 8 (MF) Battery negative (-) → Terminal 7 (MR) | Driving position (C) | Does not move |
| Battery positive (+) → Terminal 7 (MR) Battery negative (-) → Terminal 8 (MF) | Position between driving position (C) and retracted position (E) | Moves from (D) to retracted position (E) |
| Battery positive (+) → Terminal 8 (MF) Battery negative (-) → Terminal 7 (MR) | Position between driving position (C) and retracted position (E) | Moves from (D) to driving position (C) |
| Battery positive (+) → Terminal 7 (MR) Battery negative (-) → Terminal 8 (MF) | Retracted position (E) | Does not move |
| Battery positive (+) → Terminal 8 (MF) Battery negative (-) → Terminal 7 (MR) | Retracted position (E) | Moves from (E) to driving position (C) |
 |
w/ Door Mirror Turn Indicator:
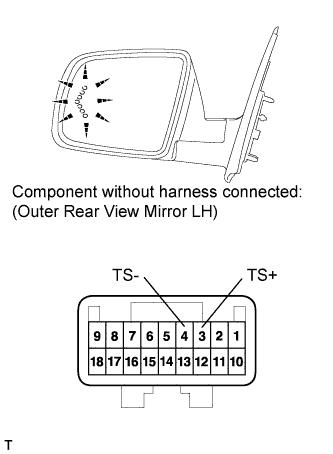
Check the door mirror turn indicator.
Apply battery voltage to the terminals of the connector, and check the LED illumination condition.
| Tester Connection | Specified Condition |
| Battery positive (+) → Terminal 3 (TS+) Battery negative (-) → Terminal 4 (TS-) | Door mirror turn indicator illuminates |
 |
w/ EC Mirror:
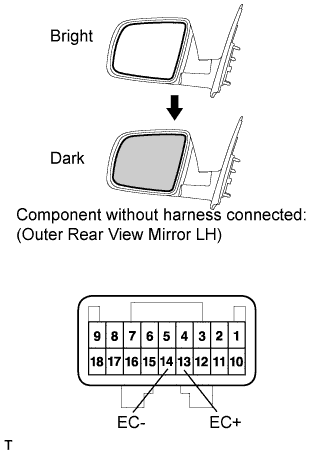
Check the EC mirror operation.
Apply battery voltage and check operation of the mirror face, as shown in the table and illustration.
| Tester Connection | Specified Condition |
| Battery positive (+) → Terminal 13 (EC+) Battery negative (-) → Terminal 14 (EC-) | Mirror surface becomes dark |
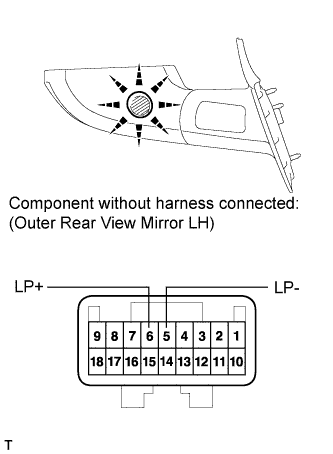 |
w/ Door Mirror Foot Light:
Check the door mirror foot light.
Apply battery voltage to the terminals of the connector, and check the illumination condition.
| Tester Connection | Specified Condition |
| Battery positive (+) → Terminal 6 (LP+) Battery negative (-) → Terminal 5 (LP-) | Door mirror foot light illuminates |
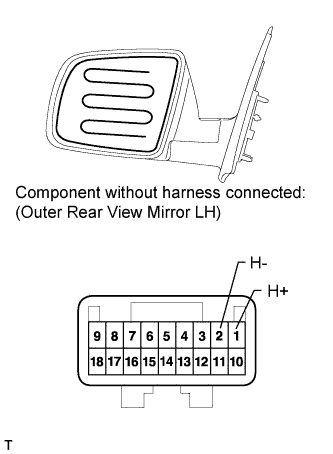 |
w/ Mirror Heater:
Check the mirror heater.
Apply battery voltage and check the operation of the mirror heater.
| Measurement Condition | Specified Condition |
| Battery positive (+) → Terminal 1 (H+) Battery negative (-) → Terminal 2 (H-) | Mirror becomes warm |
| 2. INSPECT OUTER REAR VIEW MIRROR ASSEMBLY LH (for Extended Type) |
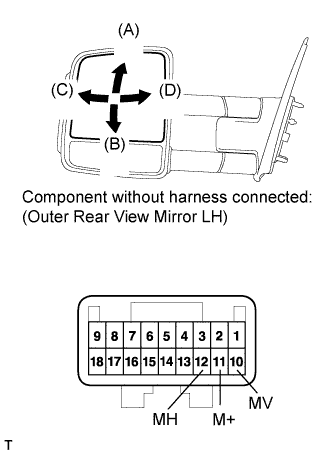 |
Check the outer mirror motor operation.
Apply battery voltage and check operation of the mirror face.
| Measurement Condition | Specified Condition |
| Battery positive (+) → Terminal 10 (MV) Battery negative (-) → Terminal 11 (M+) | Turns upward (A) |
| Battery positive (+) → Terminal 10 (MV) Battery negative (-) → Terminal 11 (M+) | Turns downward (B) |
| Battery positive (+) → Terminal 12 (MH) Battery negative (-) → Terminal 11 (M+) | Turns right (D) |
| Battery positive (+) → Terminal 11 (M+) Battery negative (-) → Terminal 12 (MH) | Turns left (C) |
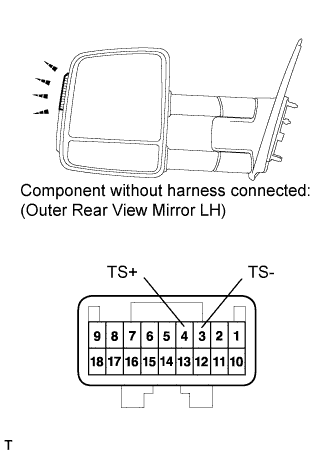 |
Check the door mirror turn indicator.
Apply battery voltage to the terminals of the connector, and check the LED illumination condition.
| Tester Connection | Specified Condition |
| Battery positive (+) → Terminal 4 (TS+) Battery negative (-) → Terminal 3 (TS-) | Door mirror turn indicator illuminates |
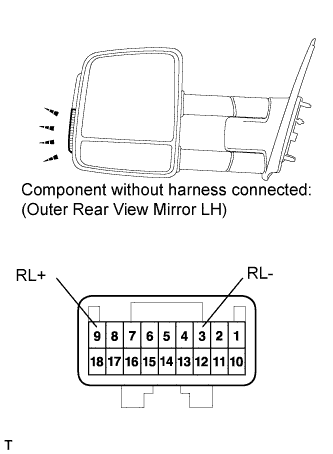 |
w/ Running Light:
Check the running Light.
Apply battery voltage to the terminals of the connector, and check the LED illumination condition.
| Tester Connection | Specified Condition |
| Battery positive (+) → Terminal 9 (RL+) Battery negative (-) → Terminal 3 (RL-) | Running light illuminates |
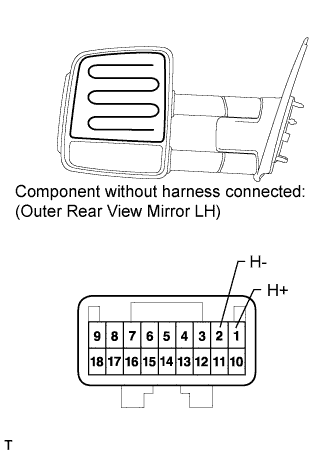 |
Check the mirror heater.
Apply battery voltage and check the operation of the mirror heater.
| Measurement Condition | Specified Condition |
| Battery positive (+) → Terminal 1 (H+) Battery negative (-) → Terminal 2 (H-) | Mirror becomes warm |
| 3. INSPECT OUTER REAR VIEW MIRROR ASSEMBLY RH |
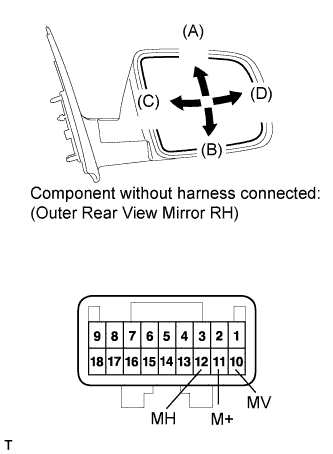 |
w/ Power Mirror Control System:
Check the outer mirror motor operation.
Apply battery voltage and check operation of the mirror face.
| Measurement Condition | Specified Condition |
| Battery positive (+) → Terminal 10 (MV) Battery negative (-) → Terminal 11 (M+) | Turns upward (A) |
| Battery positive (+) → Terminal 10 (MV) Battery negative (-) → Terminal 11 (M+) | Turns downward (B) |
| Battery positive (+) → Terminal 12 (MH) Battery negative (-) → Terminal 11 (M+) | Turns right (D) |
| Battery positive (+) → Terminal 11 (M+) Battery negative (-) → Terminal 12 (MH) | Turns left (C) |
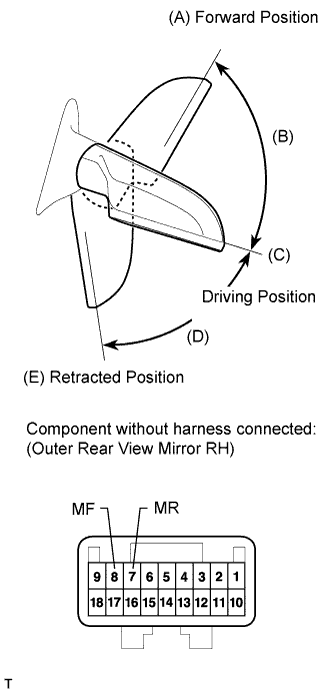 |
w/ Retract Mirror:
Check the retractable mirror's movement.
For each position: Disconnect the battery, set the mirror position by hand, connect the battery, and check the retractable mirror's movement.
| Measurement Condition | Mirror Position | Specified Condition |
| Battery positive (+) → Terminal 7 (MR) Battery negative (-) → Terminal 8 (MF) | Forward position (A) | Moves from (A) to retracted position (E) |
| Battery positive (+) → Terminal 8 (MF) Battery negative (-) → Terminal 7 (MR) | Forward position (A) | Does not move |
| Battery positive (+) → Terminal 7 (MR) Battery negative (-) → Terminal 8 (MF) | Position between forward position (A) and driving position (C) | Moves from (B) to retracted position (E) |
| Battery positive (+) → Terminal 8 (MF) Battery negative (-) → Terminal 7 (MR) | Position between forward position (A) and driving position (C) | Moves from (B) to forward position (A) |
| Battery positive (+) → Terminal 7 (MR) Battery negative (-) → Terminal 8 (MF) | Driving position (C) | Moves from (C) to retracted position (E) |
| Battery positive (+) → Terminal 8 (MF) Battery negative (-) → Terminal 7 (MR) | Driving position (C) | Does not move |
| Battery positive (+) → Terminal 7 (MR) Battery negative (-) → Terminal 8 (MF) | Position between driving position (C) and retracted position (E) | Moves from (D) to retracted position (E) |
| Battery positive (+) → Terminal 8 (MF) Battery negative (-) → Terminal 7 (MR) | Position between driving position (C) and retracted position (E) | Moves from (D) to driving position (C) |
| Battery positive (+) → Terminal 7 (MR) Battery negative (-) → Terminal 8 (MF) | Retracted position (E) | Does not move |
| Battery positive (+) → Terminal 8 (MF) Battery negative (-) → Terminal 7 (MR) | Retracted position (E) | Moves from (E) to driving position (C) |
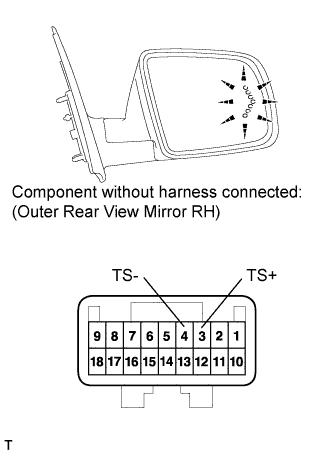 |
w/ Door Mirror Turn Indicator:
Check the door mirror turn indicator.
Apply battery voltage to the terminals of the connector, and check the LED illumination condition.
| Tester Connection | Specified Condition |
| Battery positive (+) → Terminal 3 (TS+) Battery negative (-) → Terminal 4 (TS-) | Door mirror turn indicator illuminates |
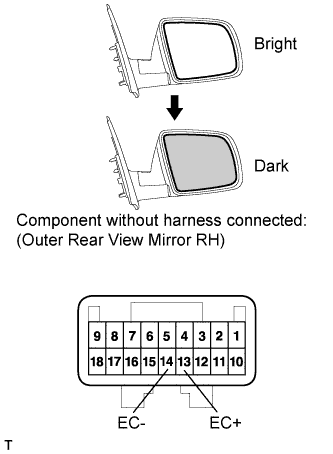 |
w/ EC Mirror:
Check the EC mirror operation.
Apply battery voltage and check operation of the mirror face, as shown in the table and illustration.
| Tester Connection | Specified Condition |
| Battery positive (+) → Terminal 13 (EC+) Battery negative (-) → Terminal 14 (EC-) | Mirror surface becomes dark |
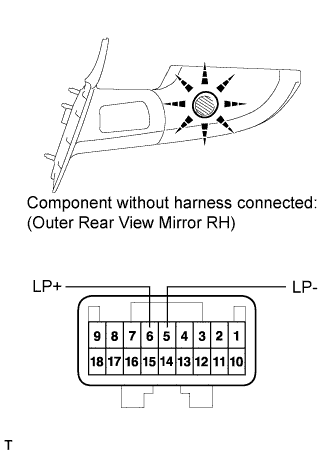 |
w/ Door Mirror Foot Light:
Check the door mirror foot light.
Apply battery voltage to the terminals of the connector, and check the illumination condition.
| Tester Connection | Specified Condition |
| Battery positive (+) → Terminal 6 (LP+) Battery negative (-) → Terminal 5 (LP-) | Door mirror foot light illuminates |
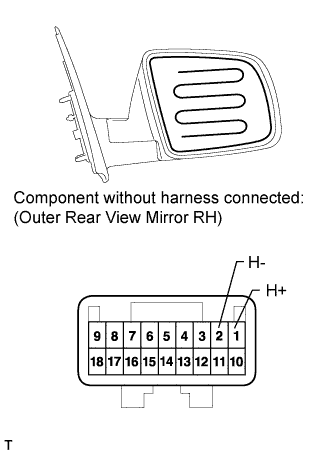 |
w/ Mirror Heater:
Check the mirror heater.
Apply battery voltage and check the operation of the mirror heater.
| Measurement Condition | Specified Condition |
| Battery positive (+) → Terminal 1 (H+) Battery negative (-) → Terminal 2 (H-) | Mirror becomes warm |
| 4. INSPECT OUTER REAR VIEW MIRROR ASSEMBLY RH (for Extended Type) |
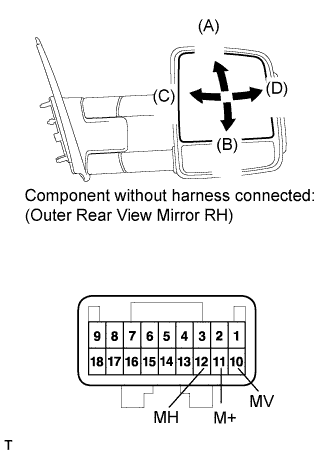 |
Check the outer mirror motor operation.
Apply battery voltage and check operation of the mirror face.
| Measurement Condition | Specified Condition |
| Battery positive (+) → Terminal 10 (MV) Battery negative (-) → Terminal 11 (M+) | Turns upward (A) |
| Battery positive (+) → Terminal 10 (MV) Battery negative (-) → Terminal 11 (M+) | Turns downward (B) |
| Battery positive (+) → Terminal 12 (MH) Battery negative (-) → Terminal 11 (M+) | Turns left (C) |
| Battery positive (+) → Terminal 11 (M+) Battery negative (-) → Terminal 12 (MH) | Turns right (D) |
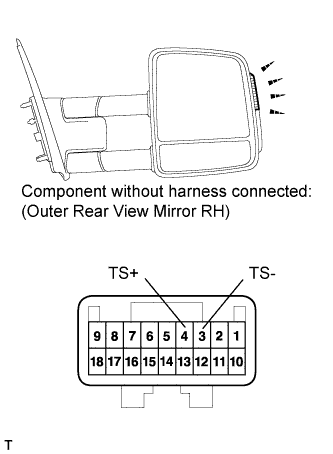 |
Check the door mirror turn indicator.
Apply battery voltage to the terminals of the connector, and check the LED illumination condition.
| Tester Connection | Specified Condition |
| Battery positive (+) → Terminal 4 (TS+) Battery negative (-) → Terminal 3 (TS-) | Door mirror turn indicator illuminates |
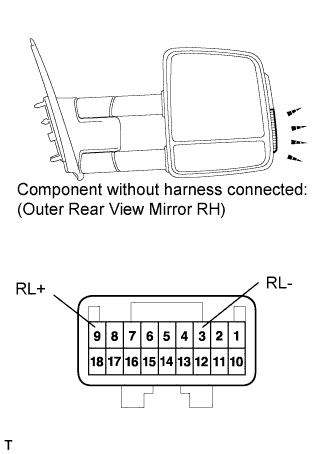 |
w/ Running light:
Check the running light.
Apply battery voltage to the terminals of the connector, and check the LED illumination condition.
| Tester Connection | Specified Condition |
| Battery positive (+) → Terminal 9 (RL+) Battery negative (-) → Terminal 3 (RL-) | Running light illuminates |
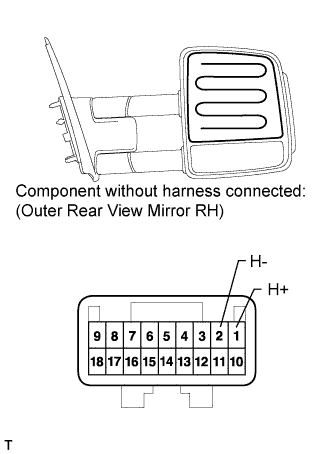 |
Check the mirror heater.
Apply battery voltage and check the operation of the mirror heater.
| Measurement Condition | Specified Condition |
| Battery positive (+) → Terminal 1 (H+) Battery negative (-) → Terminal 2 (H-) | Mirror becomes warm |