Home › HEATER & AIR CONDITIONING SYSTEM › AIR CONDITIONING › COMPRESSOR AND MAGNETIC CLUTCH (for 3UR-FE, 3UR-FBE)

COMPRESSOR AND MAGNETIC CLUTCH (for 3UR-FE, 3UR-FBE) > INSTALLATION

for Preparation Click here


1. ADJUST COMPRESSOR OIL
  1. When replacing the compressor and magnetic clutch with a new one, gradually discharge the refrigerant gas from the service valve, and drain the following amount of oil from the new compressor and magnetic clutch before installation.

    Standard:
    (Oil capacity inside the new compressor and magnetic clutch: 120 + 15 cc (4.1 + 0.51 fl.oz.)) - (Remaining oil amount in the removed compressor and magnetic clutch) = (Oil amount to be removed from the new compressor when replacing)

    NOTICE:
    1. When checking the compressor oil level, follow the A/C system's precautions.
    2. If a new compressor and magnetic clutch is installed without removing some oil remaining in the pipes of the vehicle, the oil amount will be too large. This prevents heat exchange in the refrigerant cycle and causes refrigerant failure.
    3. If the volume of oil remaining in the removed compressor and magnetic clutch is too small, check for oil leakage.
    4. Be sure to use ND-OIL 8 or equivalent for compressor oil.


2. INSTALL COOLER COMPRESSOR ASSEMBLY


E147759E01
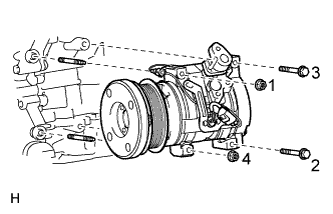
  1. Install the cooler compressor and 2 stud bolts.

    Torque:
    10 N*m{ 102 kgf*cm , 7 ft.*lbf }

  1. Install the 2 bolts and 2 nuts.

    Torque:
    24.5 N*m{ 250 kgf*cm , 18 ft.*lbf }

    HINT:
    Tighten the bolts and nuts in the order shown in the illustration to install the cooler compressor.

  1. Connect the connector.


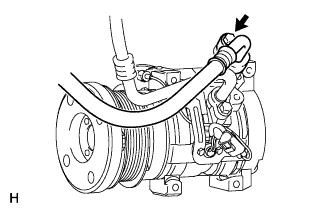
3. CONNECT SUCTION HOSE


    E147758
  1. Remove the attached vinyl tape from the cooler refrigerant suction hose.

  1. Sufficiently apply compressor oil to a new O-ring and the fitting surface of the cooler compressor.

    Compressor oil:
    ND-OIL 8 or equivalent

  1. Install the O-ring on the cooler refrigerant suction hose.

  1. Connect the cooler refrigerant suction hose on the cooler compressor with the bolt.

    Torque:
    9.8 N*m{ 100 kgf*cm , 87 in.*lbf }


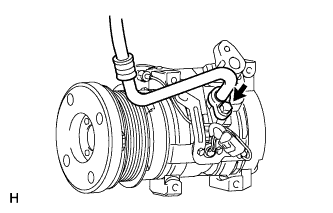
4. CONNECT DISCHARGE HOSE


E147757
  1. Remove the attached vinyl tape from the cooler refrigerant discharge hose.

  1. Sufficiently apply compressor oil to a new O-ring and the fitting surface of the cooler compressor.

    Compressor oil:
    ND-OIL 8 or equivalent

  1. Install the O-ring on the cooler refrigerant discharge hose.

  1. Connect the cooler refrigerant discharge hose on the cooler compressor with the bolt.

    Torque:
    9.8 N*m{ 100 kgf*cm , 87 in.*lbf }


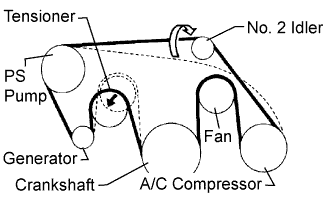
5. INSTALL FAN AND GENERATOR V BELT


    A053117E03
  1. Set the V belt onto every part except the No. 2 idler pulley, as shown in the illustration.

  1. Loosen the V belt by turning the belt tensioner counterclockwise.

  1. Set the V belt to the No. 2 idler pulley.


    A141644E02
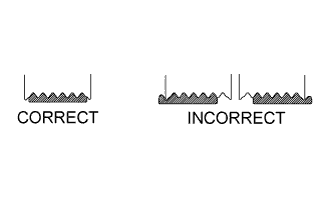
  1. After installing the belt, check that it fits properly in the ribbed grooves.

  1. Check by hand to confirm that the belt has not slipped out of the grooves on the bottom of the pulley.


    A141645E01
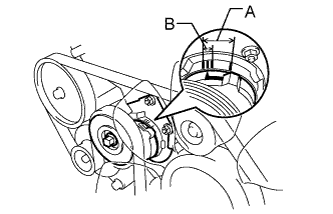
  1. Check that the arrow on the belt tensioner is within area "A".
    If it is outside area "A", replace the fan and generator V belt.

    HINT:
    When a new belt is installed, the arrow should be within area "B". If not, the fan and generator V belt is not installed correctly.


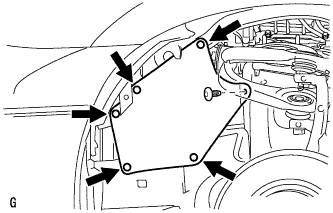
6. INSTALL FENDER APRON MUDGUARD SEAL LH


E143269
  1. Install the seal with the 6 clips.


7. CHARGE REFRIGERANT
SST
09985-20010   (09985-02010, 09985-02050, 09985-02060, 09985-02070, 09985-02090, 09985-02110, 09985-02130, 09985-02150)
  1. Perform vacuum purging using a vacuum pump.


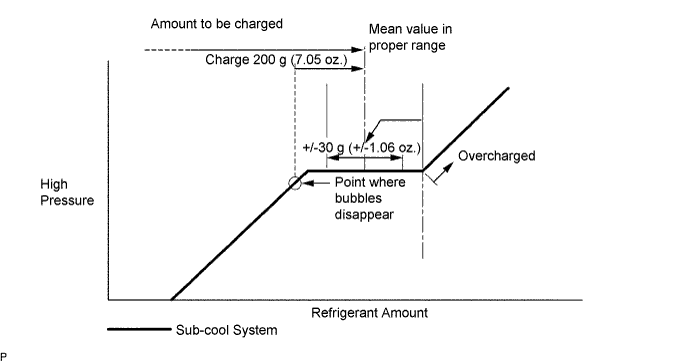
  1. Charge refrigerant HFC-134a (R134a).

    Standard:
    600 +/-30 g (21.2 +/-1.1 oz.)


    I037365E21

    NOTICE:
    1. Do not operate the cooler compressor before charging refrigerant as the cooler compressor will not work properly without any refrigerant, and will overheat.
    2. Approximately 200 g (7.05 oz.) of refrigerant may need to be charged after bubbles disappear. The refrigerant amount should be checked by measuring its quantity, and not with the sight glass.


8. WARM UP ENGINE
  1. Warm up the engine at less than 1500 rpm for 1 minute or more after charging the refrigerant.

    NOTICE:
    Be sure to warm up the compressor when turning the A/C switch ON after removing and installing the cooler refrigerant lines (including the compressor), to prevent damage to the compressor.


9. CHECK FOR REFRIGERANT GAS LEAK
  1. After recharging the refrigerant gas, check for refrigerant gas leakage using a halogen leak detector.

  1. Perform the operation under the following conditions:
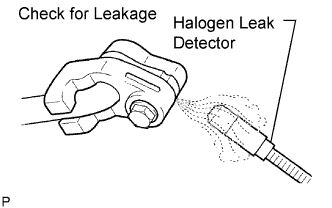
    1. The ignition switch is OFF.
    2. The vehicle is in a place with good air ventilation and without any volatile gases, such as evaporated gasoline or exhaust gas. The detector is very sensitive to volatile gases.
    3. Some refrigerant is remaining in the refrigerant system.
    4. The compressor is off and its pressure is approximately 392 to 588 kPa (4.0 to 6.0 kgf/cm2, 57 to 85 psi).


    I042222E22
  1. Using a halogen leak detector, check the refrigerant line for leakage.

  1. If a gas leak is not detected on the drain hose, remove the blower motor control (blower resistor) from the cooling unit. Insert the halogen leak detector sensor into the unit and perform the test.

  1. Disconnect the connector and wait for approximately 20 minutes. Bring the halogen leak detector close to the pressure switch and perform the test.