 |
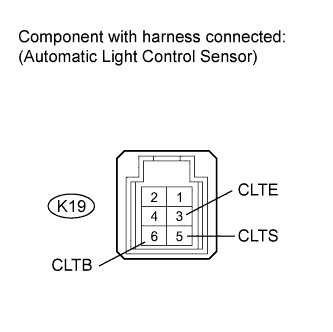
Connect the voltmeter's positive (+) lead to terminal K19-6 (CLTB) and the negative (-) lead to terminal K19-3 (CLTE).
AUTOMATIC LIGHT CONTROL SENSOR > ON-VEHICLE INSPECTION |
| 1. INSPECT AUTOMATIC LIGHT CONTROL SENSOR |
|
Connect the voltmeter's positive (+) lead to terminal K19-6 (CLTB) and the negative (-) lead to terminal K19-3 (CLTE).
Measure the voltage according to the value(s) in the table below.
| Tester Connection | Switch Condition | Specified Condition |
| K19-6 (CLTB) - K19-3 (CLTE) | Ignition switch ON | 11 to 14 V |
Measure the resistance according to the value(s) in the table below.
| Tester Connection | Switch Condition | Specified Condition |
| K19-3 (CLTE) - Body ground | Always | Below 1 Ω |
Reconnect the K19 sensor connector.
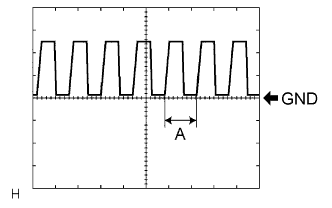 |
Check the waveform according to the value(s) in the table below.
| Tester Connection | Tool Setting | Switch Condition | Specified Condition |
| K19-3 (CLTE) - K19-5 (CLTS) | 5 V/DIV., 5 msec./ DIV. | Ignition switch ON, Headlight dimmer switch AUTO | Correct waveform is as shown |