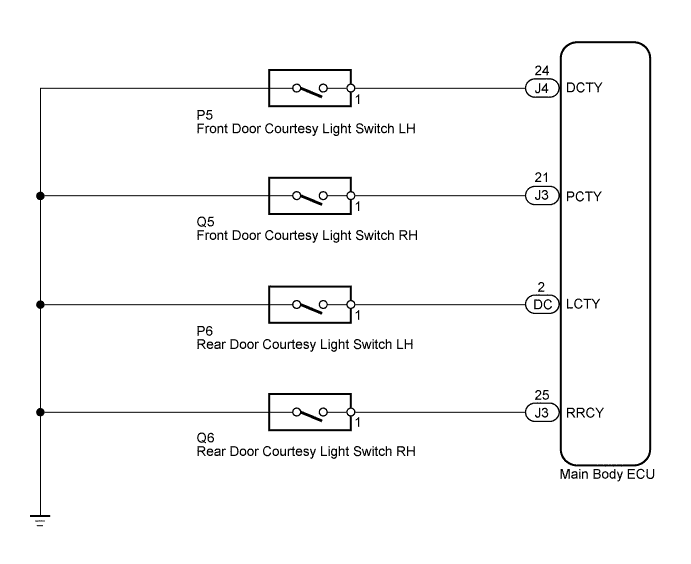
LIGHTING SYSTEM > Door Courtesy Switch Circuit |
| 1.READ VALUE USING TECHSTREAM (DOOR COURTESY LIGHT SWITCH) |
Operate the Techstream according to the display and select the "Data List".
| Tester Display | Measurement Item/Range | Normal Condition | Diagnostic Note |
| D Dor Cty SW | Front door courtesy light switch LH signal / ON or OFF | ON: Front door courtesy light switch LH ON OFF: Front door courtesy light switch LH OFF | - |
| P Dor Cty SW | Front door courtesy light switch RH signal / ON or OFF | ON: Front door courtesy light switch RH ON OFF: Front door courtesy light switch RH OFF | - |
| RL Dor Cty SW | Rear door courtesy light switch LH signal / ON or OFF | ON: Rear door courtesy light switch LH ON OFF: Rear door courtesy light switch LH OFF | - |
| RR Dor Cty SW | Rear door courtesy light switch RH signal / ON or OFF | ON: Rear door courtesy light switch RH ON OFF: Rear door courtesy light switch RH OFF | - |
| Result | Proceed to |
| OK | A |
| NG (Front door courtesy light switch LH does not operate) | B |
| NG (Front door courtesy light switch RH does not operate) | C |
| NG (Rear door courtesy light switch LH does not operate) | D |
| NG (Rear door courtesy light switch RH does not operate) | E |
|
| ||||
|
| ||||
|
| ||||
|
| ||||
| A | ||
 | ||
| ||
| 2.INSPECT FRONT DOOR COURTESY LIGHT SWITCH LH |
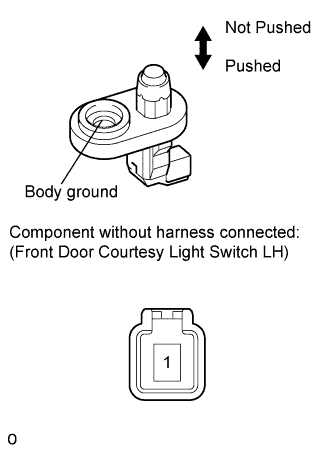 |
Remove the front door courtesy light switch LH (Click here).
Measure the resistance according to the value(s) in the table below.
| Tester Connection | Switch Condition | Specified Condition |
| 1 - Body ground | Not pushed | Below 1 Ω |
| Pushed | 10 kΩ or higher |
|
| ||||
| OK | |
 |
| 3.CHECK HARNESS AND CONNECTOR (FRONT DOOR COURTESY LIGHT SWITCH LH - MAIN BODY ECU) |
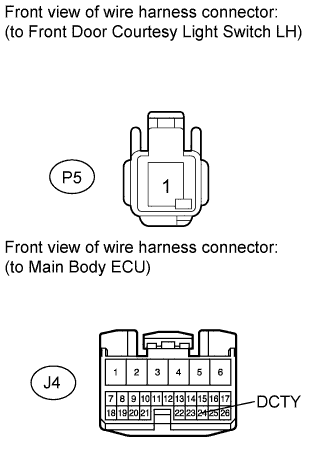 |
Disconnect the P5 switch connector.
Disconnect the J4 ECU connector.
Measure the resistance according to the value(s) in the table below.
| Tester Connection | Condition | Specified Condition |
| P5-1 - J4-24 (DCTY) | Always | Below 1 Ω |
| P5-1 - Body ground | Always | 10 kΩ or higher |
|
| ||||
| OK | ||
| ||
| ||
| 4.INSPECT FRONT DOOR COURTESY LIGHT SWITCH RH |
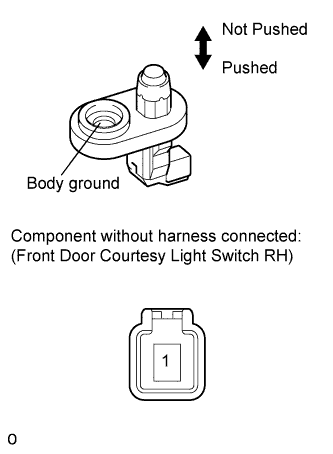 |
Remove the front door courtesy light switch RH (Click here).
Measure the resistance according to the value(s) in the table below.
| Tester Connection | Switch Condition | Specified Condition |
| 1 - Body ground | Not pushed | Below 1 Ω |
| Pushed | 10 kΩ or higher |
|
| ||||
| OK | |
|
| 5.CHECK HARNESS AND CONNECTOR (FRONT DOOR COURTESY LIGHT SWITCH RH - MAIN BODY ECU) |
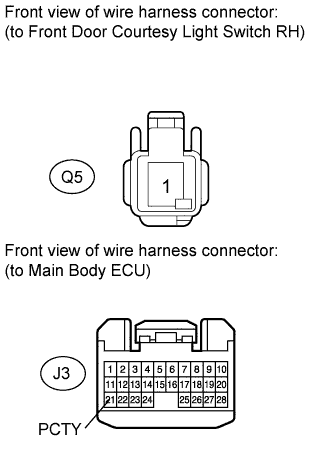 |
Disconnect the Q5 switch connector.
Disconnect the J3 ECU connector.
Measure the resistance according to the value(s) in the table below.
| Tester Connection | Condition | Specified Condition |
| Q5-1 - J3-21 (PCTY) | Always | Below 1 Ω |
| Q5-1 - Body ground | Always | 10 kΩ or higher |
|
| ||||
| OK | ||
| ||
| ||
| 6.INSPECT REAR DOOR COURTESY LIGHT SWITCH LH |
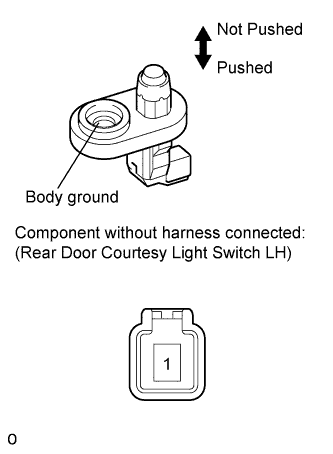 |
Remove the rear door courtesy light switch LH (Click here).
Measure the resistance according to the value(s) in the table below.
| Tester Connection | Switch Condition | Specified Condition |
| 1 - Body ground | Not pushed | Below 1 Ω |
| Pushed | 10 kΩ or higher |
|
| ||||
| OK | |
|
| 7.CHECK HARNESS AND CONNECTOR (REAR DOOR COURTESY LIGHT SWITCH LH - MAIN BODY ECU) |
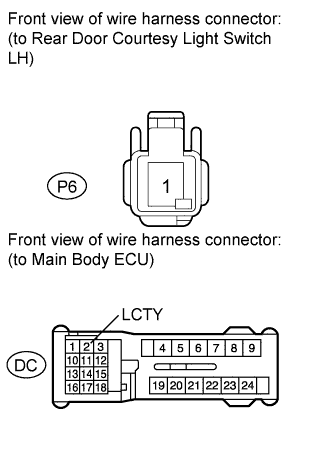 |
Disconnect the P6 switch connector.
Disconnect the DC ECU connector.
Measure the resistance according to the value(s) in the table below.
| Tester Connection | Condition | Specified Condition |
| P6-1 - DC-2 (LCTY) | Always | Below 1 Ω |
| P6-1 - Body ground | Always | 10 kΩ or higher |
|
| ||||
| OK | ||
| ||
| ||
| 8.INSPECT REAR DOOR COURTESY LIGHT SWITCH RH |
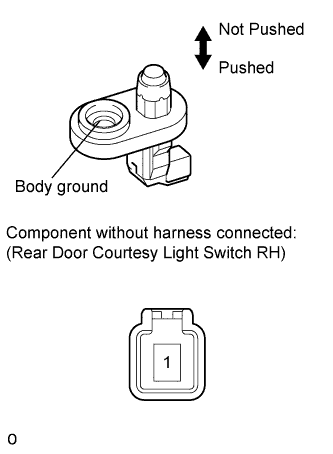 |
Remove the rear door courtesy light switch RH (Click here).
Measure the resistance according to the value(s) in the table below.
| Tester Connection | Switch Condition | Specified Condition |
| 1 - Body ground | Not pushed | Below 1 Ω |
| Pushed | 10 kΩ or higher |
|
| ||||
| OK | |
|
| 9.CHECK HARNESS AND CONNECTOR (REAR DOOR COURTESY LIGHT SWITCH RH - MAIN BODY ECU) |
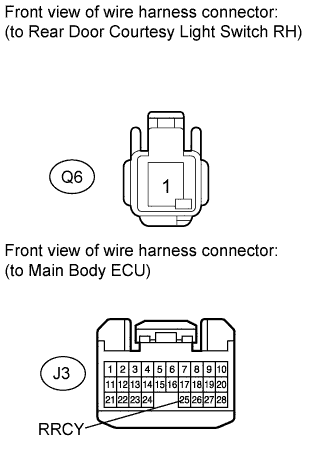 |
Disconnect the Q6 switch connector.
Disconnect the J3 ECU connector.
Measure the resistance according to the value(s) in the table below.
| Tester Connection | Condition | Specified Condition |
| Q6-1 - J3-25 (RRCY) | Always | Below 1 Ω |
| Q6-1 - Body ground | Always | 10 kΩ or higher |
|
| ||||
| OK | ||
| ||
| ||

