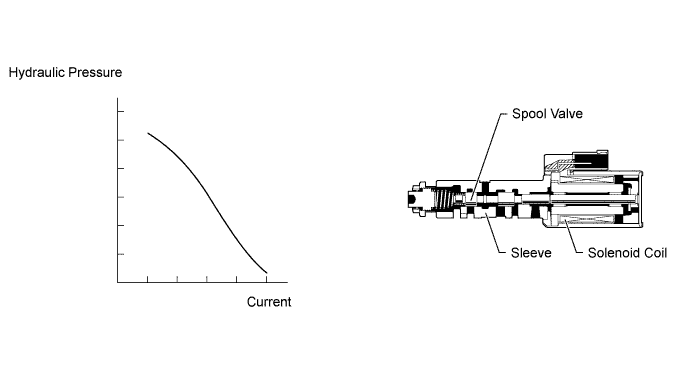
DTC P0894 Transmission Component Slipping |
DTC P2714 Pressure Control Solenoid "D" Performance (Shift Solenoid Valve SLT) |
| DTC Code | DTC Detection Condition | Trouble Area |
| P0894 | The ECM detects a malfunction in shift solenoid valve SLT, S1, S2, S3, S4 or SL2, or the 1-2 shift valve, or an incorrect gear 6 ratio according to the difference in speed of the turbine and output shaft, and also by the oil pressure (2-trip detection logic). |
|
| P2714 | The ECM detects a malfunction in shift solenoid valve SLT (ON side) according to the difference in speed of the turbine and output shaft, and also by the oil pressure (2-trip detection logic). |
|
| Related DTCs | P0894: Automatic transmission slip malfunction P2714: Shift solenoid valve SLT/Functional check |
| Required sensors/Components | Shift solenoid valve SLT |
| Frequency of operation | Continuous |
| Duration | P0894 ON malfunction (A): Immediately P0894 ON malfunction (B): 0.4 seconds P2714: Immediately |
| MIL operation | 2 driving cycles |
| Sequence of operation | None |
| The monitor will run whenever the following DTCs are not present | P0717 (Turbine speed sensor circuit) P0500 (Output speed sensor circuit) P0712, P0713 (ATF temperature sensor circuit) P0327, P0328, P0332, P0333 (KCS sensor circuit) |
| Shift solenoid valve S1 circuit | Not circuit malfunction |
| Shift solenoid valve S2 circuit | Not circuit malfunction |
| Shift solenoid valve S3 circuit | Not circuit malfunction |
| Shift solenoid valve S4 circuit | Not circuit malfunction |
| Shift solenoid valve SR circuit | Not circuit malfunction |
| Shift solenoid valve SL1 circuit | Not circuit malfunction |
| Shift solenoid valve SL2 circuit | Not circuit malfunction |
| Shift solenoid valve SLT circuit | Not circuit malfunction |
| ECT (Engine Coolant Temperature) sensor circuit | Not circuit malfunction |
| ETCS (Electric Throttle Control System) | Not system down |
| Transmission position | "D" |
| Duration time from shifting "N" to "D" | 4 seconds or more |
| ECT | 40°C (104°F) or more |
| Spark advance from max. retard timing by KCS control | 0° crankshaft angle or more |
| Engine | Starting |
| Transfer position | HIGH* |
| Vehicle speed sensor "A" circuit | Not circuit malfunction |
| Output shaft speed sensor circuit | Not circuit malfunction |
| Transfer output speed | 143 rpm or more |
| Transfer input speed / Transfer output speed (NO / NOtf) | 0.9 or more, and less than 1.1 |
| Summation of C1 clutch heat generations | Specified value |
| Summation of C2 clutch heat generations | Specified value |
| Actual gear for SLT failure judgment | Not determined |
| Summation of C1 clutch heat generations | Specified value |
| Shift solenoid valve S1 OFF malfunction | Detected |
| Shift solenoid valve S2 OFF malfunction | Detected |
| Shift solenoid valve S3 ON malfunction | Detected |
| Shift solenoid valve S4 OFF malfunction | Detected |
| 1-2 shift valve malfunction | Detected |
| Sequence valve malfunction | Detected |
| Shift solenoid valve SL2 ON malfunction | Detected |
| 1.CHECK DTC OUTPUT (IN ADDITION TO DTCS P0894 AND P2714) |
Connect the Techstream to the DLC3.
Turn the ignition switch to ON.
Turn the Techstream on.
Enter the following menus: Powertrain / Engine and ECT / Trouble Codes.
Read the DTCs using the Techstream.
| Result | Proceed to |
| A |
| P0894, P2714 and other DTCs are output | B |
|
| ||||
| A | |
 |
| 2.PERFORM ACTIVE TEST USING TECHSTREAM (SHIFT SOLENOID VALVE SLT) |
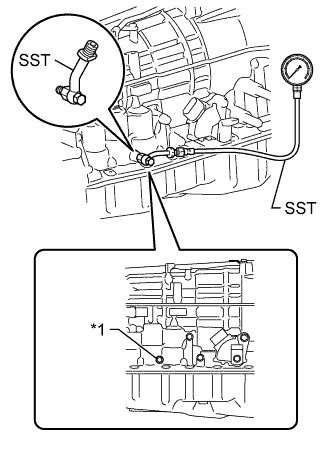 |
Remove the test plug from the center of the right side of the transmission case and connect SST.
Connect the Techstream to the DLC3.
Start the engine and warm it up.
Measure the line pressure with SST.
Turn the Techstream on.
Enter the following menus: Powertrain / Engine and ECT / Active Test.
According to the display on the Techstream, perform the Active Test.
Measure the line pressure.
| Tester Display | Test Part | Control Range | Diagnostic Note |
| Activate the Solenoid (SLT)* | Operate the shift solenoid SLT and raise line pressure | ON or OFF
| [Vehicle Condition]
|
| *1 | Test Plug |
|
| ||||
| OK | |
|
| 3.PERFORM ACTIVE TEST USING TECHSTREAM (RUNNING TEST) |
Connect the Techstream to the DLC3.
Clear the DTC (Click here).
Enter the following menus: Powertrain / Engine and ECT / Active Test.
According to the display on the Techstream, perform the Active Test.
| Tester Display | Test Part | Control Range | Diagnostic Note |
| Control the Shift Position | Operate shift solenoid valves and set each shift position |
| Possible to check operation of the shift solenoid valves. [Vehicle Condition] 50 km/h (30 mph) or less |
Compare the ECM gear shift command and the actual gear position.
| ECM Gear Shift Command | 1st | 2nd | 3rd | 4th | 5th | 6th | Proceed to | ||
| Actual gear position under malfunction | Shift solenoid S1 | Stuck ON*1 | 2nd | 2nd | 3rd | 4th | 5th | 6th | A |
| Stuck OFF | 1st | 1st | 3rd | 4th | 5th | N*2 | |||
| Shift solenoid S2 | Stuck ON | 1st | 2nd | 2nd | 4th | 6th | 6th | B | |
| Stuck OFF | 3rd | 3rd | 3rd | 4th | 5th | 5th | |||
| Shift solenoid S3 | Stuck ON | 1st | 2nd | 3rd | 3rd | N*2 | N*2 | C | |
| Stuck OFF | 3rd | 4th | 4th | 4th | 5th | 6th | |||
| Shift solenoid S4 | Stuck ON*3 | 1st | 2nd | 3rd | 4th | 5th | 6th | D | |
| Stuck OFF | 1st | 2nd | 3rd | 4th | 4th | 4th | |||
| Actual gear position when normal | 1st | 2nd | 3rd | 4th | 5th | 6th | E | ||
|
| ||||
|
| ||||
|
| ||||
|
| ||||
| A | |
|
| 4.INSPECT SHIFT SOLENOID VALVE S1 |
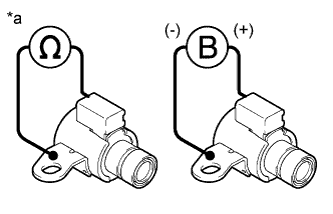 |
Remove shift solenoid valve S1.
Measure the resistance according to the value(s) in the table below.
| Tester Connection | Condition | Specified Condition |
| Shift solenoid valve S1 connector terminal - Shift solenoid valve S1 body | 20°C (68°F) | 11 to 15 Ω |
Apply 12 V battery voltage to the shift solenoid valve and check that the valve moves and makes an operating noise.
| Measurement Condition | Specified Condition |
| Valve moves and makes an operating noise |
| *a | Component without harness connected (Shift Solenoid Valve S1) |
|
| ||||
| OK | |
|
| 5.INSPECT TRANSMISSION VALVE BODY ASSEMBLY |
Check the transmission valve body assembly.
|
| ||||
| OK | |
|
| 6.INSPECT TORQUE CONVERTER ASSEMBLY |
Check the torque converter assembly (Click here).
|
| ||||
| OK | ||
 | ||
| ||
| 7.INSPECT SHIFT SOLENOID VALVE S2 |
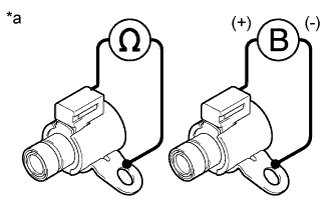 |
Remove shift solenoid valve S2.
Measure the resistance according to the value(s) in the table below.
| Tester Connection | Condition | Specified Condition |
| Shift solenoid valve S2 connector terminal - Shift solenoid valve S2 body | 20°C (68°F) | 11 to 15 Ω |
Apply 12 V battery voltage to the shift solenoid valve and check that the valve moves and makes an operating noise.
| Measurement Condition | Specified Condition |
| Valve moves and makes an operating noise |
| *a | Component without harness connected (Shift Solenoid Valve S2) |
|
| ||||
| OK | |
|
| 8.INSPECT TRANSMISSION VALVE BODY ASSEMBLY |
Check the transmission valve body assembly.
|
| ||||
| OK | |
|
| 9.INSPECT TORQUE CONVERTER ASSEMBLY |
Check the torque converter assembly (Click here).
|
| ||||
| OK | ||
| ||
| ||
| 10.INSPECT SHIFT SOLENOID VALVE S3 |
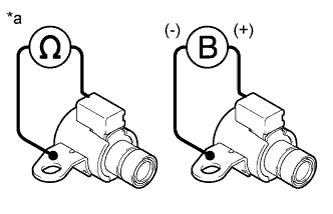 |
Remove shift solenoid valve S3.
Measure the resistance according to the value(s) in the table below.
| Tester Connection | Condition | Specified Condition |
| Shift solenoid valve S3 connector terminal - Shift solenoid valve S3 body | 20°C (68°F) | 11 to 15 Ω |
Apply 12 V battery voltage to the shift solenoid valve and check that the valve moves and makes an operating noise.
| Measurement Condition | Specified Condition |
| Valve moves and makes an operating noise |
| *a | Component without harness connected (Shift Solenoid Valve S3) |
|
| ||||
| OK | |
|
| 11.INSPECT TRANSMISSION VALVE BODY ASSEMBLY |
Check the transmission valve body assembly.
|
| ||||
| OK | |
|
| 12.INSPECT TORQUE CONVERTER ASSEMBLY |
Check the torque converter assembly (Click here).
|
| ||||
| OK | ||
| ||
| ||
| 13.INSPECT SHIFT SOLENOID VALVE S4 |
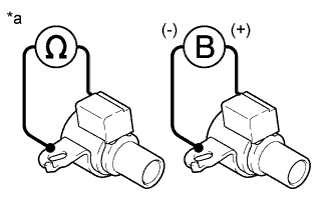 |
Remove shift solenoid valve S4.
Measure the resistance according to the value(s) in the table below.
| Tester Connection | Condition | Specified Condition |
| Shift solenoid valve S4 connector terminal - Shift solenoid valve S4 body | 20°C (68°F) | 11 to 15 Ω |
Apply 12 V battery voltage to the shift solenoid valve and check that the valve moves and makes an operating noise.
| Measurement Condition | Specified Condition |
| Valve moves and makes an operating noise |
| *a | Component without harness connected (Shift Solenoid Valve S4) |
|
| ||||
| OK | |
|
| 14.INSPECT SHIFT SOLENOID VALVE SL2 |
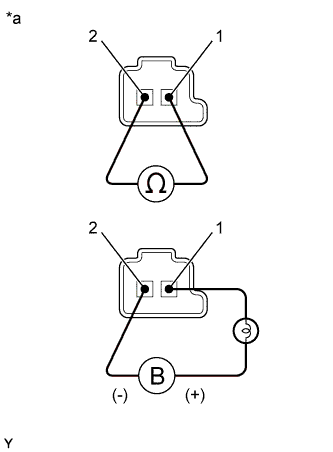 |
Remove shift solenoid valve SL2.
Measure the resistance according to the value(s) in the table below.
| Tester Connection | Condition | Specified Condition |
| 1 - 2 | 20°C (68°F) | 5.0 to 5.6 Ω |
Apply 12 V battery voltage to the shift solenoid valve and check that the valve moves and makes an operating noise.
| Measurement Condition | Specified Condition |
| Valve moves and makes an operating noise |
| *a | Component without harness connected (Shift Solenoid Valve SL2) |
|
| ||||
| OK | |
|
| 15.INSPECT TRANSMISSION VALVE BODY ASSEMBLY |
Check the transmission valve body assembly.
|
| ||||
| OK | |
|
| 16.INSPECT TORQUE CONVERTER ASSEMBLY |
Check the torque converter assembly (Click here).
|
| ||||
| OK | ||
| ||
| ||
| 17.INSPECT SHIFT SOLENOID VALVE SLT |
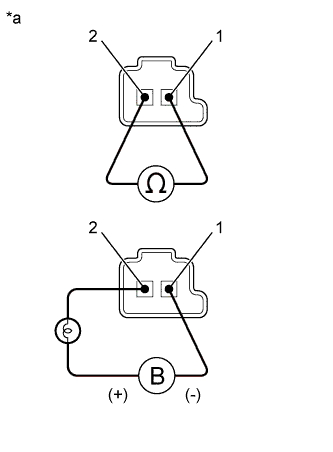 |
Remove shift solenoid valve SLT.
Measure the resistance according to the value(s) in the table below.
| Tester Connection | Condition | Specified Condition |
| 1 - 2 | 20°C (68°F) | 5.0 to 5.6 Ω |
Apply 12 V battery voltage to the shift solenoid valve and check that the valve moves and makes an operating noise.
| Measurement Condition | Specified Condition |
| Valve moves and makes an operating noise |
| *a | Component without harness connected (Shift Solenoid Valve SLT) |
|
| ||||
| OK | |
|
| 18.INSPECT TRANSMISSION VALVE BODY ASSEMBLY |
Check the transmission valve body assembly.
|
| ||||
| OK | |
|
| 19.INSPECT TORQUE CONVERTER ASSEMBLY |
Check the torque converter assembly (Click here).
|
| ||||
| OK | ||
| ||
| ||
| 20.INSPECT SHIFT SOLENOID VALVE SLT |
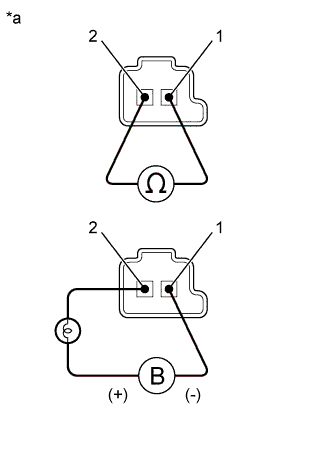 |
Remove shift solenoid valve SLT.
Measure the resistance according to the value(s) in the table below.
| Tester Connection | Condition | Specified Condition |
| 1 - 2 | 20°C (68°F) | 5.0 to 5.6 Ω |
Apply 12 V battery voltage to the shift solenoid valve and check that the valve moves and makes an operating noise.
| Measurement Condition | Specified Condition |
| Valve moves and makes an operating noise |
| *a | Component without harness connected (Shift Solenoid Valve SLT) |
|
| ||||
| OK | |
|
| 21.INSPECT TRANSMISSION VALVE BODY ASSEMBLY |
Check the transmission valve body assembly.
|
| ||||
| OK | |
|
| 22.INSPECT TORQUE CONVERTER ASSEMBLY |
Check the torque converter assembly (Click here).
|
| ||||
| OK | ||
| ||
| ||

