 |
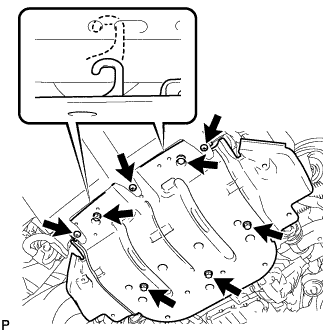
Remove the 3 screws and 5 bolts.
FRONT DIFFERENTIAL CARRIER ASSEMBLY (for 4WD) > REMOVAL |
| 1. REMOVE FRONT WHEELS |
| 2. REMOVE NO. 1 ENGINE UNDER COVER |
|
Remove the 3 screws and 5 bolts.
Unhook the engine under cover from the vehicle body as shown in the illustration.
| 3. DRAIN DIFFERENTIAL OIL |
Stop the vehicle on a level place.
for Front Differential:
Using a 10 mm hexagon wrench, remove the filler plug and gasket.
Using a 10 mm hexagon wrench, remove the drain plug and gasket, and drain the oil.
Using a 10 mm hexagon wrench, install a new gasket and the drain plug.
for Rear Differential:
Remove the filler plug and gasket.
Remove the drain plug and gasket, and drain the oil.
Install a new gasket and the drain plug.
| 4. REMOVE FRONT PROPELLER SHAFT ASSEMBLY |
| 5. REMOVE FRONT DRIVE SHAFT ASSEMBLY LH |
| 6. REMOVE FRONT DRIVE SHAFT ASSEMBLY RH |
| 7. REMOVE FRONT DIFFERENTIAL CARRIER ASSEMBLY |
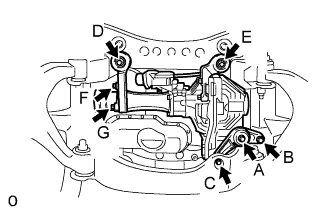 |
Remove the bolt and disconnect the front differential breather tube bracket.
Disconnect the differential actuator hose.
Disconnect the differential actuator connector.
Support the front differential with a jack.
Remove the A, B, C, D and E bolts.
Slowly lower the jack, and remove the front differential carrier.
Remove the F and G bolts, and differential support.