
POWER WINDOW CONTROL SYSTEM (w/ Jam Protection Function) > TERMINALS OF ECU |
| CHECK FRONT POWER WINDOW REGULATOR MOTOR ASSEMBLY LH |
Disconnect the N12 motor connector.
Measure the resistance and voltage according to the value(s) in the table below.
| Terminal No. (Symbol) | Wiring Color | Terminal Description | Condition | Specified Condition |
| N12-2 (B) - Body ground | G - Body ground | Battery power supply | Always | 11 to 14 V |
| N12-1 (GND) - Body ground | W-B - Body ground | Ground | Always | Below 1 Ω |
Reconnect the N12 motor connector.
Measure the voltage according to the value(s) in the table below.
| Terminal No. (Symbol) | Wiring Color | Terminal Description | Condition | Specified Condition |
| N12-10 (UP) - N12-1 (GND) | BE - W-B | Power window UP operation | Ignition switch ON Master switch OFF → UP | 11 to 14 V → Below 1 V |
| N12-10 (UP) - N12-1 (GND) | BR - W-B | Power window UP operation | Ignition switch ON Door glass fully open → power window AUTO UP operation → door glass fully closed | 11 to 14 V → Below 1 V → 11 to 14 V |
| N12-7 (DOWN) - N12-1 (GND) | BR - W-B | Power window DOWN operation | Ignition switch ON Master switch OFF → DOWN | 11 to 14 V → Below 1 V |
| N12-7 (DOWN) - N12-1 (GND) | SB - W-B | Power window DOWN operation | Ignition switch ON Door glass fully closed → power window AUTO DOWN operation → door glass fully open | 11 to 14 V → Below 1 V → 11 to 14 V |
| CHECK FRONT POWER WINDOW REGULATOR MOTOR RH |

Disconnect the M11 motor connector.
Measure the resistance and voltage according to the value(s) in the table below.
| Terminal No. (Symbol) | Wiring Color | Terminal Description | Condition | Specified Condition |
| M11-2 (B) - Body ground | V - Body ground | Battery power supply | Always | 11 to 14 V |
| M11-1 (GND) - Body ground | W-B - Body ground | Ground | Always | Below 1 Ω |
Reconnect the M11 motor connector.
Measure the voltage according to the value(s) in the table below.
| Terminal No. (Symbol) | Wiring Color | Terminal Description | Condition | Specified Condition |
| M11-10 (UP) - M11-1 (GND) | G - W-B | Power window UP operation | Ignition switch ON Power window regulator switch assembly OFF → UP | 11 to 14 V → Below 1 V |
| M11-10 (UP) - M11-1 (GND) | G - W-B | Power window UP operation | Ignition switch ON Door glass fully open → power window AUTO UP operation → door glass fully closed | 11 to 14 V → Below 1 V → 11 to 14 V |
| M11-7 (DOWN) - M11-1 (GND) | P - W-B | Power window DOWN operation | Ignition switch ON Power window regulator switch assembly OFF → DOWN | 11 to 14 V → Below 1 V |
| M11-7 (DOWN) - M11-1 (GND) | P - W-B | Power window DOWN operation | Ignition switch ON Door glass fully closed → power window AUTO DOWN operation → door glass fully open | 11 to 14 V → Below 1 V → 11 to 14 V |
| M11-9 (LIN) - M11-1 (GND) | L - W-B | LIN communication signal | Ignition switch ON | Pulse generation |
| M11-4 (AUTO) - M11-1 (GND) | B - W-B | Power window AUTO UP/DOWN operation | Ignition switch ON Power window regulator switch assembly OFF → AUTO UP/DOWN operation | 11 to 14 V → Below 1 V |
| CHECK POWER WINDOW REGULATOR MASTER SWITCH |

Disconnect the N2 master switch connector.
Measure the resistance and voltage according to the value(s) in the table below.
| Terminal No. (Symbol) | Wiring Color | Terminal Description | Condition | Specified Condition |
| N2-3 (B) - Body ground | L - Body ground | Battery power supply | Always | 11 to 14 V |
| N2-13 (B) - Body ground | P - Body ground | Battery power supply | Ignition switch ON | 11 to 14 V |
| N2-1 (E) - Body ground | W-B - Body ground | Ground | Always | Below 1 Ω |
Reconnect the N2 master switch connector.
Measure the voltage according to the value(s) in the table below.
| Terminal No. (Symbol) | Wiring Color | Terminal Description | Condition | Specified Condition |
| N2-4 (UP) - N2-1 (E) | BE - W-B | Driver side door power window UP operation | Ignition switch ON, driver side switch of master switch OFF → UP | 11 to 14 V → Below 1 V |
| N2-4 (UP) - N2-1 (E) | BE - W-B | Driver side door power window AUTO UP operation | Ignition switch ON, driver side door glass fully open → power window AUTO UP operation → driver side door glass fully closed | 11 to 14 V → Below 1 V → 11 to 14 V |
| N2-5 (DOWN) - N2-1 (E) | SB - W-B | Driver side door power window DOWN operation | Ignition switch ON, driver side switch of master switch OFF → DOWN | 11 to 14 V → Below 1 V |
| N2-5 (DOWN) - N2-1 (E) | SB - W-B | Driver side door power window AUTO DOWN operation | Ignition switch ON, driver side door glass fully closed → power window AUTO DOWN operation → driver side door glass fully open | 11 to 14 V → Below 1 V → 11 to 14 V |
| N2-12 (U) - N2-1 (E) | V - W-B | Rear LH side door power window UP operation | Ignition switch ON, rear LH switch of master switch OFF → UP | Below 1 V → 11 to 14 V |
| N2-15 (D) - N2-1 (E) | B - W-B | Rear LH side door power window DOWN operation | Ignition switch ON, rear LH switch of master switch OFF → DOWN | Below 1 V → 11 to 14 V |
| N2-10 (U) - N2-1 (E) | BE - W-B | Rear RH side door power window UP operation | Ignition switch ON, rear RH switch of master switch OFF → UP | Below 1 V → 11 to 14 V |
| N2-16 (D) - N2-1 (E) | LG - W-B | Rear RH side door power window DOWN operation | Ignition switch ON, rear RH switch of master switch OFF → DOWN | Below 1 V → 11 to 14 V |
| CHECK MAIN BODY ECU (DRIVER SIDE JUNCTION BLOCK) |
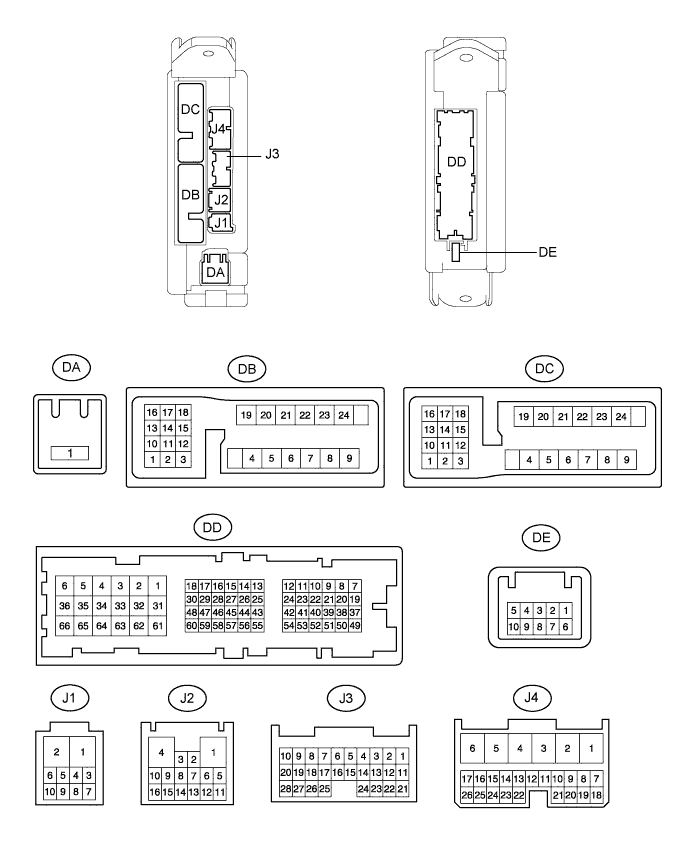
Disconnect the J3, J4, DA and DD ECU connectors.
Measure the voltage and resistance according to the value(s) in the table below.
| Terminal No. (Symbol) | Wiring Color | Terminal Description | Condition | Specified Condition |
| DA-1 (ACC) - Body ground | B - Body ground | ACC power supply | Always | 11 to 14 V |
| DA-1 (IG) - Body ground | B - Body ground | IG power supply | Always | 11 to 14 V |
| DB-21 (GND1) - Body ground | B - Body ground | Body ground | Always | Below 1 Ω |
| DB-21 (GND2) - Body ground | B - Body ground | Body ground | Always | Below 1 Ω |
| J4-24 (DCTY) - Body ground | GR - Body ground | Front door courtesy light switch LH signal | Front door LH open | Below 1 Ω |
| Front door LH closed | 10 kΩ or higher | |||
| J3-21 (PCTY) - Body ground | W - Body ground | Front door courtesy light switch RH signal | Front door RH open | Below 1 Ω |
| Front door RH closed | 10 kΩ or higher |