ENGINE UNIT > REASSEMBLY |
| 1. INSTALL STUD BOLT |
|
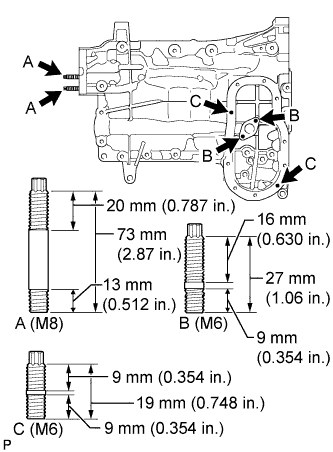
Install the oil pan stud bolt.
Using E6 and E8 "TORX" socket wrenches, install the 6 stud bolts as shown in the illustration.
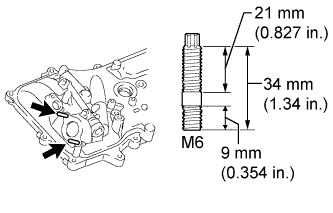 |
Install the cylinder head cover LH stud bolt.
Using an E6 "TORX" socket wrench, install the stud bolt as shown in the illustration.
| 2. INSTALL RING PIN |
Using a plastic-faced hammer, tap in new ring pins to the camshaft housing.
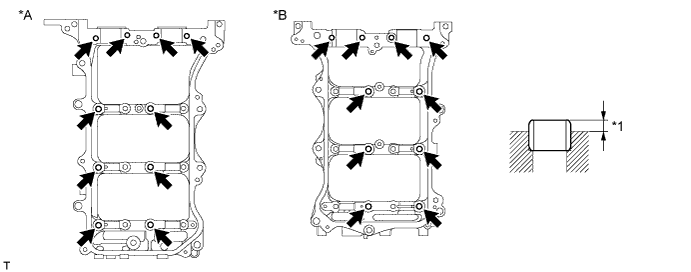
| *A | LH | *B | RH |
| *1 | Protrusion Height | - | - |
| 3. INSTALL STRAIGHT PIN |
Using a plastic-faced hammer, tap in new straight pins to the camshaft housing.
| Item | Specified Condition |
| Ring pin A | 7.7 to 8.3 mm (0.303 to 0.327 in.) |
| Ring pin B | 5.7 to 6.3 mm (0.224 to 0.248 in.) |
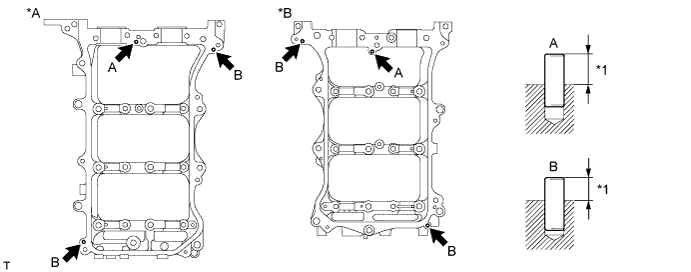
| *A | LH | *B | RH |
| *1 | Protrusion Height | - | - |
| 4. INSTALL TAPER SCREW PLUG |
Apply adhesive to 2 or 3 threads of the taper screw plug end.
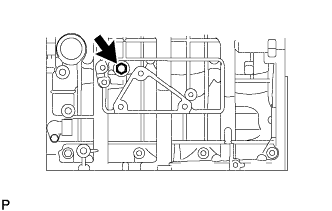 |
Install the taper screw plug.
| 5. INSTALL REAR CRANKSHAFT OIL SEAL |
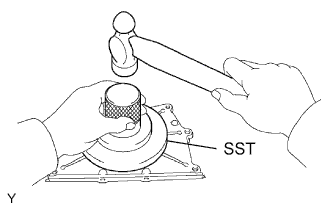 |
Using SST and a hammer, tap in a new oil seal until its surface is flush with the rear oil seal retainer edge.
Apply MP grease to the lip of the oil seal.
| 6. INSTALL ENGINE REAR OIL SEAL RETAINER |
Remove any old packing (FIPG) material and be careful not to drop any oil on the contact surfaces of the oil seal retainer or cylinder block.
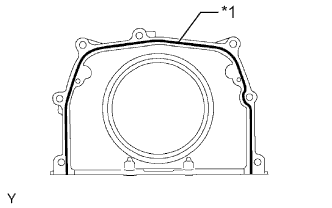 |
Apply seal packing in a continuous line as shown in the illustration.
| *1 | Seal Packing |
Install the oil seal retainer with the 5 bolts and 2 nuts.
| 7. INSTALL CYLINDER BLOCK WATER JACKET SPACER |
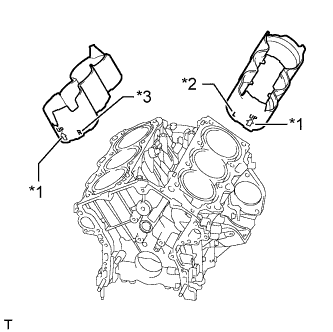 |
Install the 2 water jacket spacers as shown in the illustration.
| *1 | UP Mark |
| *2 | L Mark |
| *3 | R Mark |
| 8. INSTALL KNOCK SENSOR |
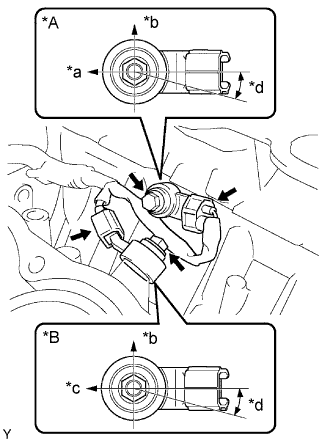 |
Install the 2 sensors with the 2 bolts as shown in the illustration.
| *A | for Bank 2 |
| *B | for Bank 1 |
| *a | Engine Rear |
| *b | Top |
| *c | Engine Front |
| *d | 0 to 15° |
Connect the 2 sensor connectors.
| 9. INSTALL NO. 1 WATER OUTLET PIPE |
Install the water outlet pipe with the 2 nuts and bolt.
Attach the 3 wire harness clamps.
| 10. INSTALL CYLINDER HEAD GASKET |
Remove any old packing (FIPG) material and be careful not to drop any oil on the contact surfaces of the cylinder head or cylinder block.
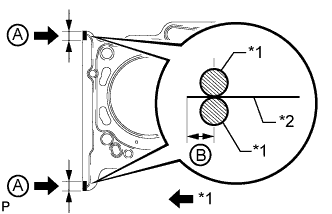 |
Apply seal packing to a new cylinder head gasket as shown in the illustration.
| A | 10 to 15 mm (0.394 to 0.591 in.) |
| B | 1.25 to 1.5 mm (0.0492 to 0.0591 in.) |
| *1 | Seal Packing |
| *2 | Gasket |
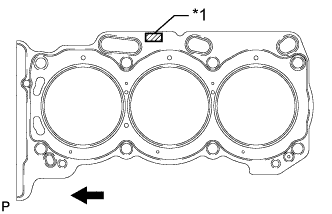 |
Place the cylinder head gasket on the cylinder block surface with the front face of the Lot No. stamp upward.
| *1 | Lot No. |
 | Engine Front |
| 11. INSTALL CYLINDER HEAD SUB-ASSEMBLY |
Place the cylinder head on the cylinder block.
Apply a light coat of engine oil to the threads and under the heads of the cylinder head bolts.
Step 1:
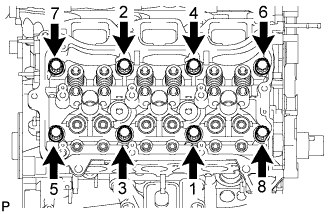 |
Using a 10 mm bi-hexagon wrench, install and uniformly tighten the 8 cylinder head bolts with the plate washers in several steps in the sequence shown in the illustration.
Step 2:
Mark the front side of each cylinder head bolt head with paint.
Tighten the cylinder head bolts another 90°.
Step 3:
Tighten the cylinder head bolts an additional 90°.
Check that the paint mark is now at a 180° angle to the front.
| 12. INSTALL NO. 2 CYLINDER HEAD GASKET |
Remove any old packing (FIPG) material and be careful not to drop any oil on the contact surfaces of the cylinder head or cylinder block.
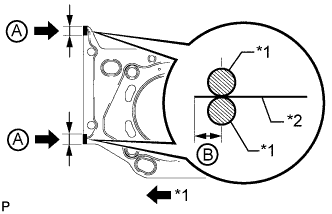 |
Apply seal packing to a new cylinder head gasket as shown in the illustration.
| A | 10 to 15 mm (0.394 to 0.591 in.) |
| B | 1.25 to 1.5 mm (0.0492 to 0.0591 in.) |
| *1 | Seal Packing |
| *2 | Gasket |
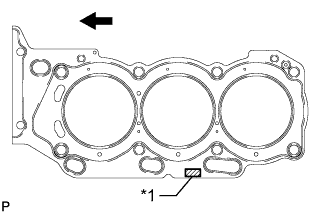 |
Place the cylinder head gasket on the cylinder block surface with the front face of the Lot No. stamp upward.
| *1 | Lot No. |
| Engine Front |
| 13. INSTALL CYLINDER HEAD LH |
Place the cylinder head on the cylinder block.
Apply a light coat of engine oil to the threads and under the heads of the cylinder head bolts.
Step 1:
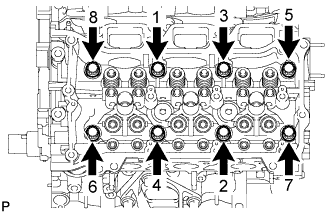 |
Using a 10 mm bi-hexagon wrench, install and uniformly tighten the 8 cylinder head bolts with the plate washers in several steps in the sequence shown in the illustration.
Step 2:
Mark the front side of each cylinder head bolt head with paint.
Tighten the cylinder head bolts another 90°.
Step 3:
Tighten the cylinder head bolts an additional 90°.
Check that the paint mark is now at a 180° angle to the front.
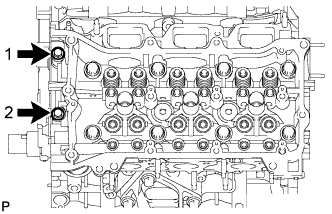 |
Tighten the 2 bolts in the order shown in the illustration.
| 14. INSTALL VALVE STEM CAP |
Apply a light coat of engine oil to the valve stem caps.
Install the 24 valve stem caps to the cylinder head.
| 15. INSTALL VALVE LASH ADJUSTER ASSEMBLY |
Inspect the valve lash adjuster .
Install the 24 valve lash adjusters to the cylinder head.
| 16. INSTALL NO. 1 VALVE ROCKER ARM SUB-ASSEMBLY |
Apply engine oil to the lash adjuster tips and valve stem cap ends.
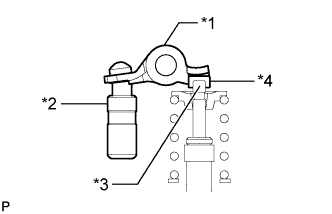 |
Install the 24 valve rocker arms as shown in the illustration.
| *1 | Valve Rocker Arm |
| *2 | Lash Adjuster |
| *3 | Valve Stem |
| *4 | Valve Stem Cap |
| 17. INSTALL CAMSHAFT BEARING CAP (for Bank 2) |
Apply a light coat of engine oil to the camshaft journals, camshaft housings and bearing caps.
Install the No. 3 camshaft and No. 4 camshaft to the camshaft housing.
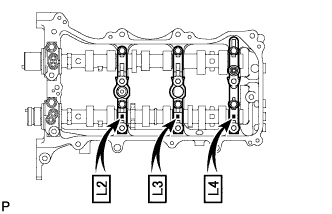 |
Check the marks and numbers on the camshaft bearing caps and place each of them in the proper position facing the proper direction.
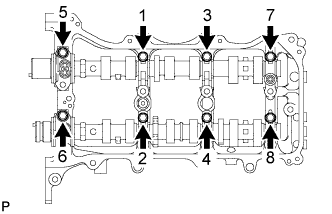 |
Temporarily install the 8 bolts in the order shown in the illustration.
| 18. INSTALL CAMSHAFT HOUSING SUB-ASSEMBLY LH |
|
Make sure that the valve rocker arm is installed as shown in the illustration.
| *1 | Valve Rocker Arm |
| *2 | Lash Adjuster |
| *3 | Valve Stem |
| *4 | Valve Stem Cap |
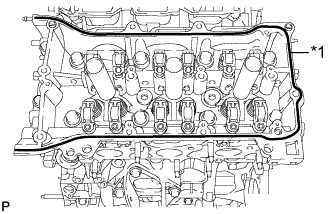 |
Apply seal packing in a continuous line as shown in the illustration.
| *1 | Seal Packing |
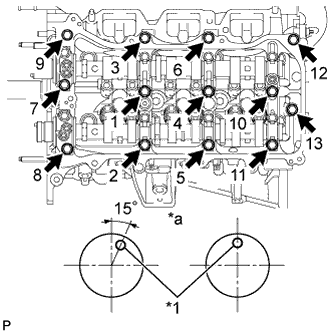 |
Install the camshaft housing sub-assembly LH and tighten the 13 bolts in the order shown in the illustration.
| *1 | Knock Pin |
| *a | Front View |
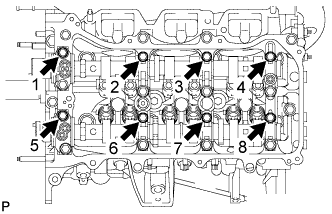 |
Tighten the 8 bolts in the order shown in the illustration.
| 19. INSTALL CAMSHAFT BEARING CAP (for Bank 1) |
Apply a light coat of engine oil to the camshaft journals, camshaft housings and bearing caps.
Install the camshaft and No. 2 camshaft to the camshaft housing.
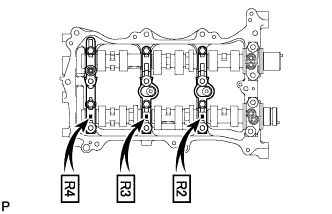 |
Check the marks and numbers on the camshaft bearing caps and place each of them in the proper position facing the proper direction.
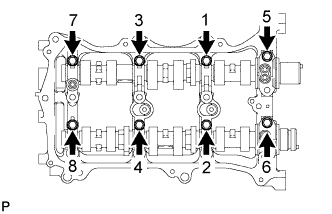 |
Temporarily install the 8 bearing cap bolts in the order shown in the illustration.
| 20. INSTALL CAMSHAFT HOUSING SUB-ASSEMBLY RH |
|
Make sure that the No. 1 valve rocker arm sub-assembly is installed as shown in the illustration.
| *1 | Valve Rocker Arm |
| *2 | Lash Adjuster |
| *3 | Valve Stem |
| *4 | Valve Stem Cap |
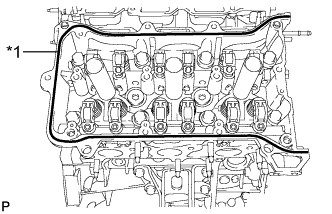 |
Apply seal packing in a continuous line as shown in the illustration.
| *1 | Seal Packing |
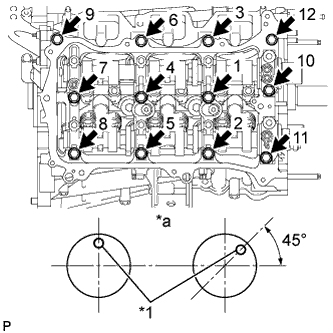 |
Install the camshaft housing sub-assembly RH and tighten the 12 bolts in the order shown in the illustration.
| *1 | Knock Pin |
| *a | Front View |
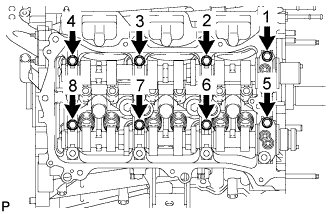 |
Tighten the 8 bolts in the order shown in the illustration.
| 21. INSTALL NO. 3 CHAIN TENSIONER ASSEMBLY (for Bank 2) |
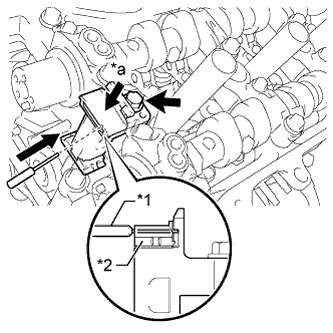 |
Install the No. 3 chain tensioner assembly with the bolt.
Push in the tensioner and insert a pin with a diameter of 1.0 mm (0.0394 in.) into the hole to hold the tensioner.
| *1 | Pin |
| *2 | Plunger |
| *a | Push |
| 22. INSTALL CAMSHAFT TIMING GEARS AND NO. 2 CHAIN (for Bank 2) |
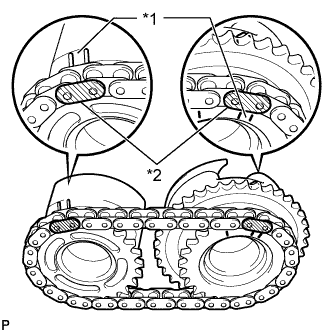 |
Align the mark plates (yellow) with the timing marks of the camshaft timing gear assemblies as shown in the illustration.
| *1 | Timing Mark |
| *2 | Mark Plate |
Apply a light coat of engine oil to the bolt threads and bolt-seating surface.
Align the knock pin of the camshaft with the pin hole of the camshaft timing gear assembly. Install the camshaft timing gear assembly and camshaft timing exhaust gear LH with the No. 2 chain sub-assembly installed.
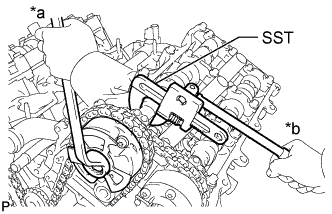 |
Using SST to hold the hexagonal portion of each camshaft, tighten the bolts of the camshaft timing gear assembly and camshaft timing exhaust gear assembly.
| *a | Turn |
| *b | Hold |
Remove the pin from the No. 3 chain tensioner assembly.
| 23. INSTALL NO. 2 CHAIN TENSIONER ASSEMBLY (for Bank 1) |
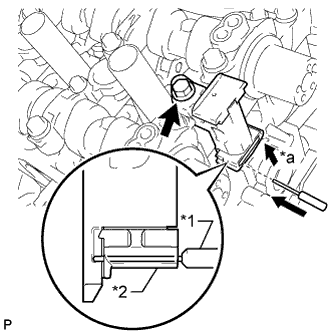 |
Install the No. 2 chain tensioner assembly with the bolt.
Push in the No. 2 chain tensioner assembly and insert a pin with a diameter of 1.0 mm (0.0394 in.) into the hole to hold the tensioner.
| *1 | Pin |
| *2 | Plunger |
| *a | Push |
| 24. INSTALL CAMSHAFT TIMING GEARS AND NO. 2 CHAIN (for Bank 1) |
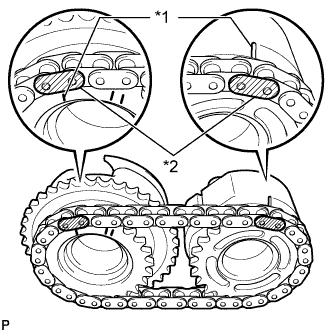 |
Align the mark plates (yellow) with the timing marks of the camshaft timing gear assemblies as shown in the illustration.
| *1 | Timing Mark |
| *2 | Mark Plate |
Apply a light coat of engine oil to the bolt threads and bolt-seating surface.
Align the knock pin of the camshaft with the pin hole of the camshaft timing gear assembly. Install the camshaft timing gear assembly and camshaft timing exhaust gear assembly with the No. 2 chain sub-assembly installed.
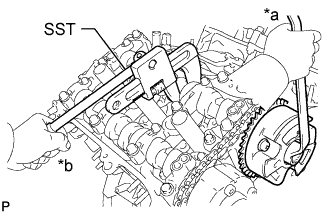 |
Using SST to hold the hexagonal portion of each camshaft, tighten the bolts of the camshaft timing gear assembly and camshaft timing exhaust gear assembly.
| *a | Turn |
| *b | Hold |
Remove the pin from the No. 2 chain tensioner assembly.
| 25. INSTALL NO. 1 CHAIN VIBRATION DAMPER |
Install the No. 1 chain vibration damper with the 2 bolts.
| 26. INSTALL NO. 2 CHAIN VIBRATION DAMPER |
Install the 2 No. 2 chain vibration dampers.
| 27. INSTALL CRANKSHAFT TIMING SPROCKET |
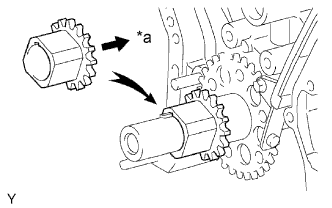 |
Align the key groove of the timing sprocket with the timing sprocket set key.
Install the timing sprocket to the crankshaft with the sprocket facing inward as shown in the illustration.
| *a | Inward |
| 28. INSTALL NO. 1 IDLE GEAR SHAFT |
Apply a light coat of engine oil to the sliding surface of the No. 1 idle gear shaft.
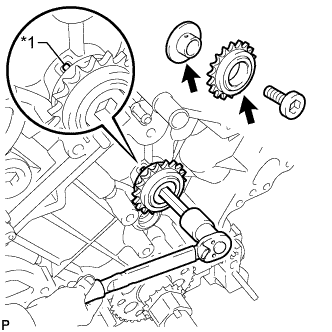 |
Temporarily install the No. 1 idle gear shaft and No. 1 idle gear with the No. 2 idle gear shaft while aligning the knock pin of the No. 1 idle gear shaft with the knock pin groove of the cylinder block.
| *1 | Knock Pin |
Using a 10 mm hexagon wrench, tighten the No. 2 idle gear shaft.
| 29. INSTALL NO. 1 CHAIN SUB-ASSEMBLY |
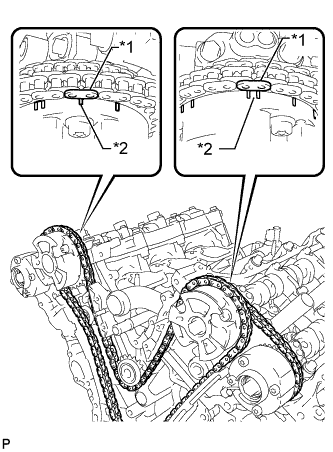 |
Align the mark plate and timing marks as shown in the illustration and install the chain.
| *1 | Mark Plate |
| *2 | Timing Mark |
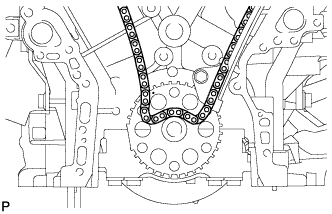 |
Do not pass the chain around the crankshaft, just temporarily place it on the crankshaft.
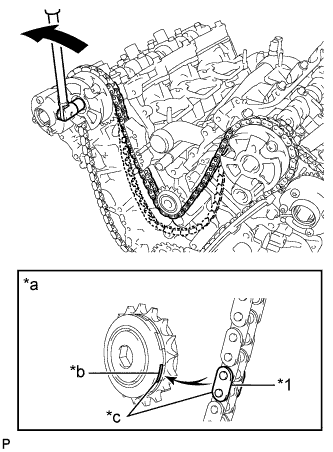 |
Turn the camshaft timing gear assembly on bank 1 counterclockwise to tighten the chain between the banks.
| *1 | Chain Plate |
| *a | When idle sprocket is reused |
| *b | Mark |
| *c | Align |
| Turn |
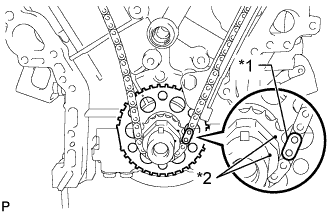 |
Align the mark plate and timing marks as shown in the illustration and install the chain to the crankshaft timing sprocket.
| *1 | Mark Plate |
| *2 | Timing Mark |
Temporarily install the pulley set bolt.
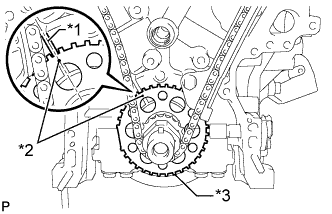 |
Turn the crankshaft clockwise to set it to the RH block bore center line (TDC/compression).
| *1 | Center Line |
| *2 | Timing Mark |
| *3 | Sensor Plate |
| 30. INSTALL CHAIN TENSIONER SLIPPER |
Install the chain tensioner slipper.
| 31. INSTALL NO. 1 CHAIN TENSIONER ASSEMBLY |
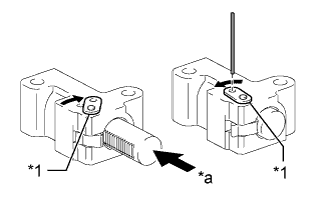 |
Turn the stopper plate of the tensioner clockwise and push in the plunger of the tensioner as shown in the illustration.
| *1 | Stopper Plate |
| *a | Push |
Turn the stopper plate of the tensioner counterclockwise and insert a pin of 1.27 mm (0.0500 in.) into the holes on the stopper plate and tensioner to fix the stopper plate in place.
Install the chain tensioner with the 2 bolts.
Remove the pin from the No. 1 chain tensioner.
| 32. INSPECT VALVE TIMING |
Check the camshaft timing marks.
Check that each camshaft timing mark is positioned as shown in the illustration.
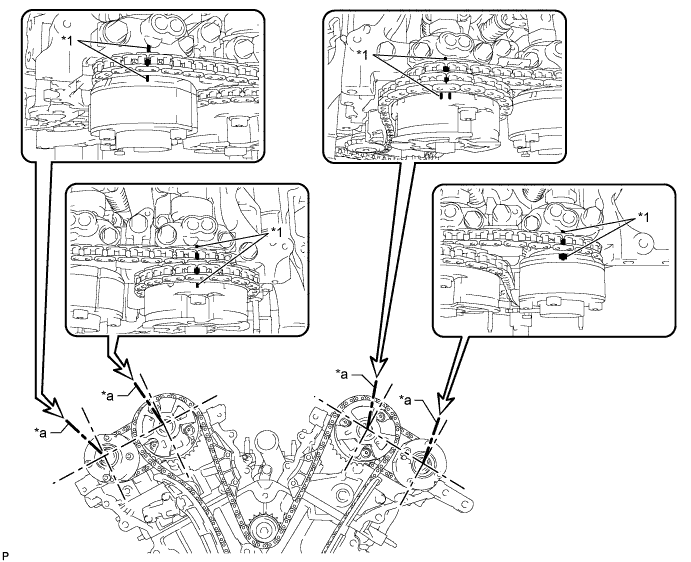
| *1 | Timing Mark | - | - |
| *a | Viewpoint | - | - |
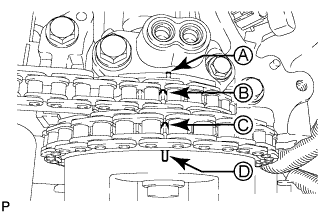 |
If the valve timing is misaligned, reinstall the timing chain.
Remove the pulley set bolt.
| 33. INSTALL FRONT CRANKSHAFT OIL SEAL |
Apply MP grease to the lip of a new oil seal.
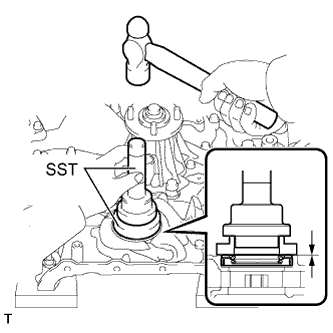 |
Using SST and a hammer, tap in a new oil seal until its surface is flush with the timing chain cover edge.
| 34. INSTALL WATER PUMP ASSEMBLY |
Install a new gasket and the water pump with the 8 bolts.
| 35. INSTALL TIMING CHAIN COVER SUB-ASSEMBLY |
Remove any old packing (FIPG material) and be careful not to drop any oil on the contact surfaces of the timing chain cover, cylinder head and cylinder block.
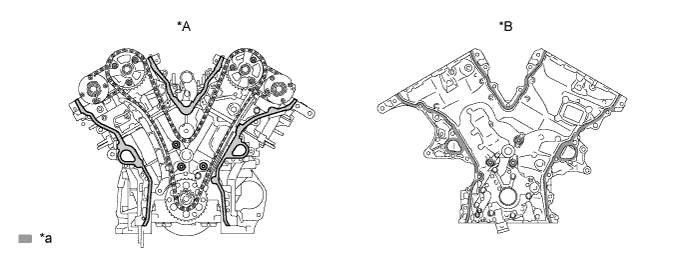
| *A | Cylinder Head and Cylinder Block Side | *B | Timing Chain Cover Side |
| *a | Clean and Degrease | - | - |
Apply a light coat of engine oil to a new oil pump gasket.
Install the oil pump gasket.
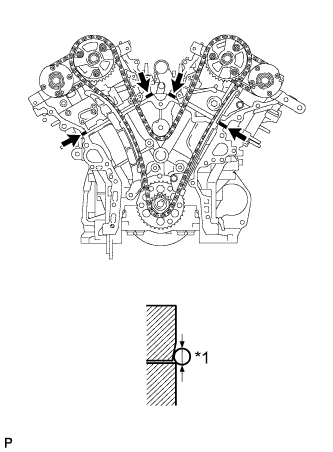 |
Apply seal packing as shown in the illustration.
| *1 | Seal Diameter |
| Seal Packing |
Apply seal packing to the timing chain cover in a continuous line as shown in the following illustration.
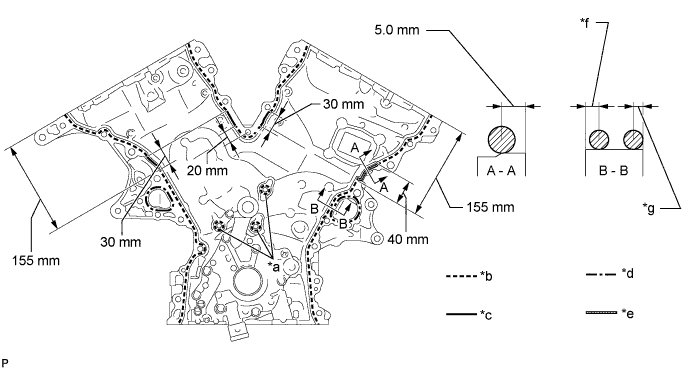
| *a | Be sure to apply seal packing | *b | Dashed line area (Seal packing: Toyota Genuine Seal Packing Black, Three Bond 1207B or equivalent) |
| *c | Continuous line area (Seal packing: Toyota Genuine Seal Packing Black, Three Bond 1207B or equivalent) | *d | Alternate long and short dashed line area (Seal packing: Toyota Genuine Seal Packing 1282B, Three Bond 1282B or equivalent) |
| *e | Diagonal line area (Seal packing: Toyota Genuine Seal Packing Black, Three Bond 1207B or equivalent) | *f | 3.0 to 4.0 mm (0.118 to 0.157 in.) |
| *g | 2.0 to 3.0 mm (0.0787 to 0.118 in.) | - | - |
| Area | Seal Packing Diameter | Application Position from Inside Seal Line |
| Continuous Line Area | 4.5 mm (0.177 in.) or more | 3.0 to 4.0 mm (0.118 to 0.158 in.) |
| Alternate Long and Short Dashed Line Area | 3.5 mm (0.138 in.) or more | 2.0 to 3.0 mm (0.0787 to 0.118 in.) |
| Dashed Line Area | 3.5 mm (0.138 in.) or more | 3.0 to 4.0 mm (0.118 to 0.158 in.) |
| Diagonal Line Area | 6.0 mm (0.236 in.) or more | 5.0 mm (0.197 in.) |
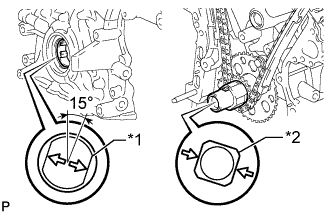 |
Align the oil pump drive rotor spline and crankshaft as shown in the illustration. Install the drive rotor and chain cover to the crankshaft.
| *1 | Drive Rotor Spline |
| *2 | Crankshaft |
Install the timing chain cover with the 26 bolts, labeled A, B, C and D, and the 2 nuts. Tighten the bolts and nuts uniformly in several steps.
| Item | Length |
| Bolt A | 25 mm (0.984 in.) |
| Bolt B | 55 mm (2.17 in.) |
| Bolt C | 35 mm (1.38 in.) |
| Bolt D | 65 mm (2.56 in.) |
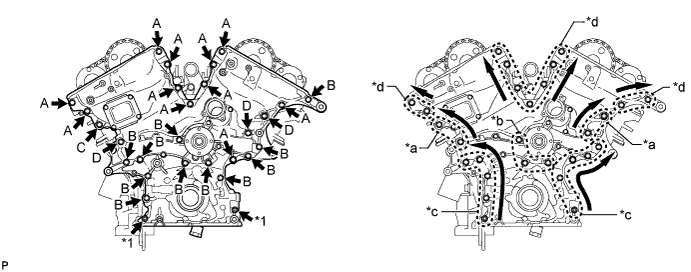
| *1 | Nut | - | - |
| *a | Area 1 | *b | Area 2 |
| *c | Area 3 | *d | Area 4 |
Tighten the bolts in area 1.
Tighten the bolts in area 2.
Tighten the bolts in area 3.
Tighten the bolts in area 4.
| 36. INSTALL NO. 1 OIL PAN BAFFLE PLATE |
Install the No. 1 oil pan baffle plate with the 6 bolts.
| 37. INSTALL OIL PAN SUB-ASSEMBLY |
Remove any old packing (FIPG material) and be careful not to drop any oil on the contact surfaces of the cylinder block, rear oil seal retainer and oil pan.
Install a new 3 O-rings to the timing chain cover.
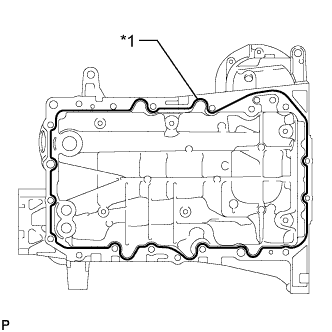 |
Apply seal packing in a continuous line as shown in the illustration.
| *1 | Seal Packing |
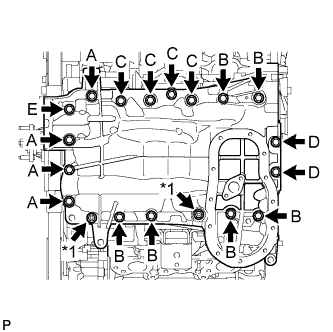 |
Install the oil pan with the 17 bolts (A, B, C, D and E) and 2 nuts. Tighten the bolts and nuts uniformly in several steps.
| Item | Length |
| Bolt A | 60 mm (2.36 in.) |
| Bolt B | 45 mm (1.77 in.) |
| Bolt C | 25 mm (0.984 in.) |
| Bolt D | 16 mm (0.630 in.) |
| Bolt E | 70 mm (2.76 in.) |
| *1 | Nut |
| 38. INSTALL OIL STRAINER SUB-ASSEMBLY |
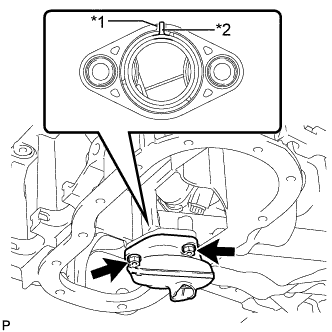 |
Install a new gasket to the oil strainer.
| *1 | Groove |
| *2 | Protrusion |
Install the oil strainer with the 2 nuts.
| 39. INSTALL NO. 2 OIL PAN SUB-ASSEMBLY |
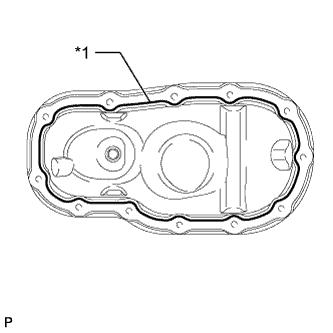 |
Apply seal packing in a continuous line as shown in the illustration.
| *1 | Seal Packing |
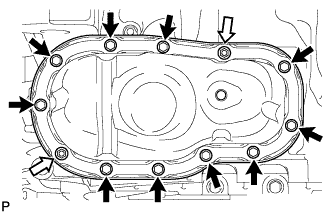 |
Install the No. 2 oil pan with the 10 bolts and 2 nuts. Tighten the bolts and nuts uniformly in several steps.
| Bolt |
 | Nut |
| 40. INSTALL OIL PAN DRAIN PLUG |
Install a new gasket and the drain plug.
| 41. POUR ENGINE OIL |
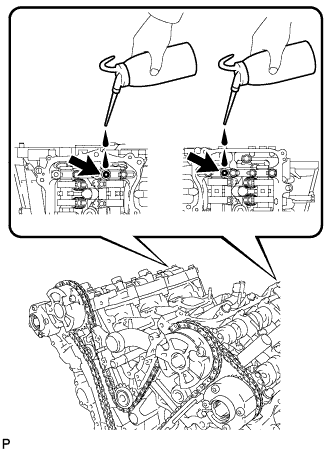 |
| 42. INSTALL SPARK PLUG TUBE GASKET |
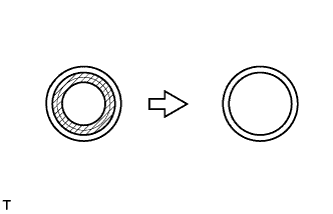 |
Using a cutter knife, cut off the seal part of the removed gasket.
 | Area to cut off |
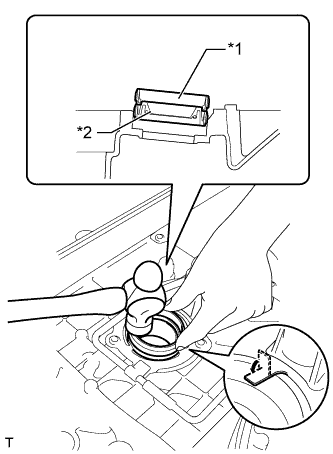 |
Using the removed gasket and a hammer, tap in a new gasket until it stops.
| *1 | Removed Gasket |
| *2 | New Gasket |
Apply a light coat of MP grease to the gasket lip.
Return the ventilation baffle plate claws to their original positions.
| 43. INSTALL CYLINDER HEAD COVER SUB-ASSEMBLY |
Remove any old packing (FIPG) material and be careful not to drop any oil on the contact surfaces of the cylinder head, timing chain cover or cylinder head cover.
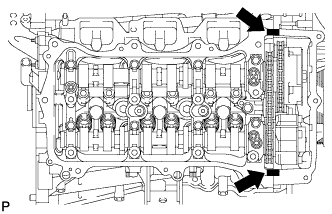 |
Apply seal packing as shown in the illustration.
| Seal Packing |
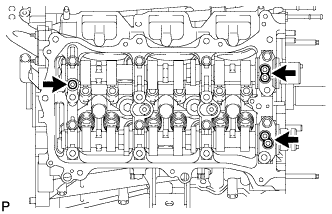 |
Install 3 new gaskets as shown in the illustration.
Install a new gasket to the cylinder head cover.
Install the seal washers to the bolts.
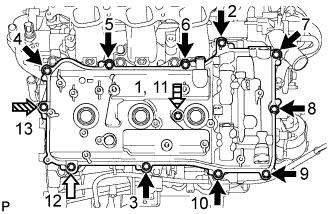 |
Temporarily install the cylinder head cover with the 12 bolts. Tighten the bolts uniformly in several steps.
| Item | Length |
| A | 25 mm (0.984 in.) |
| B | 35 mm (1.38 in.) |
| C | 65 mm (2.56 in.) |
| D | 60 mm (2.36 in.) |
| Bolt A |
| Bolt B |
 | Bolt C |
 | Bolt D |
| 44. INSTALL CYLINDER HEAD COVER SUB-ASSEMBLY LH |
Remove any old packing (FIPG) material and be careful not to drop any oil on the contact surfaces of the cylinder head, timing chain cover or cylinder head cover.
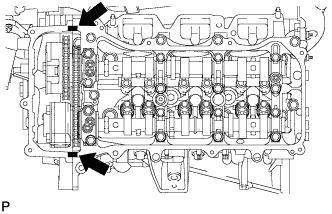 |
Apply seal packing as shown in the illustration.
| Seal Packing |
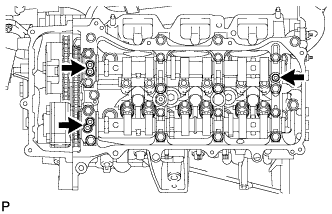 |
Install 3 new gaskets as shown in the illustration.
Install a new gasket to the cylinder head cover.
Install the seal washers to the bolts.
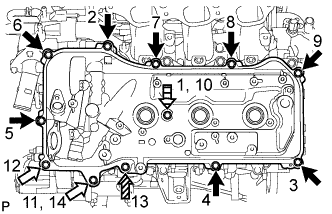 |
Temporarily install the cylinder head cover with the 12 bolts. Tighten the bolts uniformly in several steps.
| Item | Length |
| A | 25 mm (0.984 in.) |
| B | 35 mm (1.38 in.) |
| C | 70 mm (2.76 in.) |
| D | 60 mm (2.36 in.) |
| Bolt A |
| Bolt B |
| Bolt C |
| Bolt D |
| 45. INSTALL CRANKSHAFT PULLEY |
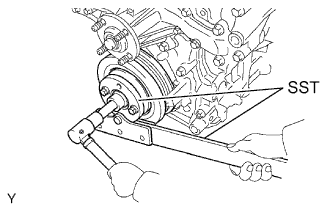 |
Using SST, install the crankshaft pulley with the pulley set bolt.
| 46. INSTALL PCV VALVE SUB-ASSEMBLY |
Apply adhesive to 2 or 3 threads of the PCV valve.
Install the PCV valve.
Connect the PCV hose to the valve.
Secure the hose with the clamp.
| 47. INSTALL SPARK PLUG |
Install the 6 spark plugs.
| 48. INSTALL REAR WATER BY-PASS JOINT |
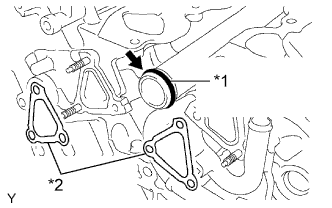 |
Apply soapy water to a new O-ring and install it to the water outlet pipe. Then install 2 new gaskets to the water ports LH and RH.
| *1 | New O-Ring |
| *2 | New Gasket |
Install the rear water by-pass joint with the 2 bolts and 4 nuts.
| 49. INSTALL WATER INLET HOUSING |
Install the 3 water by-pass hoses.
Apply soapy water to a new O-ring and install the O-ring to the water outlet pipe.
Install a new O-ring to the water outlet pipe.
Install a new gasket to the water pump.
Install the water inlet with the 5 bolts.
Connect the 3 water by-pass hoses.
| 50. INSTALL OIL FILTER BRACKET |
Install the oil filter bracket and a new gasket with the 2 nuts and bolt.
| 51. INSTALL OIL FILTER ELEMENT |
Clean the inside of the oil filter cap, the threads and O-ring groove.
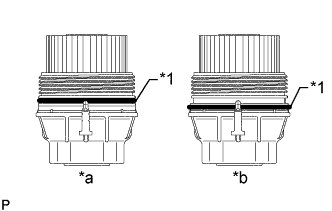 |
Apply a small amount of engine oil to a new O-ring and install the O-ring to the oil filter cap.
| *1 | O-Ring |
| *a | CORRECT |
| *b | INCORRECT |
Set a new oil filter element on the oil filter cap.
Remove any dirt or foreign matter from the installation surface of the engine.
Apply a small amount of engine oil to the O-ring again and temporarily install the oil filter cap.
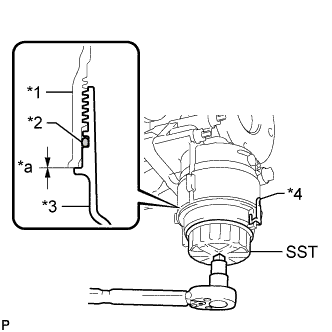 |
Using SST, tighten the oil filter cap.
| *1 | Oil Filter Bracket |
| *2 | O-Ring |
| *3 | Oil Filter Cap |
| *4 | Oil Filter Bracket Clip |
| *a | No Gap |
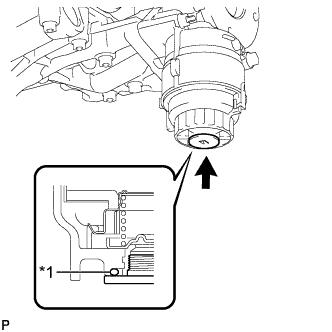 |
Apply a small amount of engine oil to a new drain plug O-ring and install the O-ring to the oil filter cap.
| *1 | O-Ring |
Install the oil filter drain plug.
| 52. INSTALL NO. 2 OIL PIPE |
Make sure that there is no foreign matter on the mesh of the oil control valve filter RH.
Install a new gasket and temporarily install the oil pipe (on the cylinder head side) with the oil check valve bolt.
Install the oil control valve filter RH to the oil pipe union. Install new gaskets and temporarily install the oil pipe (on the head cover side).
Tighten the oil pipe union (on the cylinder head side).
Tighten the oil pipe union (on the head cover side).
| 53. INSTALL NO. 1 OIL PIPE |
Make sure that there is no foreign matter on the mesh of the oil control valve filter LH.
Install a new gasket and temporarily install the oil pipe (on the cylinder head side) with the oil check valve bolt.
Install the oil control valve filter LH to the oil pipe union. Install new gaskets and temporarily install the oil pipe (on the head cover side).
Tighten the oil pipe union (on the cylinder head side).
Tighten the oil pipe union (on the head cover side).
| 54. INSTALL OIL FILLER CAP HOUSING |
Install a new gasket and the oil filler cap housing with the 2 nuts.
Install the oil filler cap.
| 55. INSTALL CAMSHAFT TIMING OIL CONTROL VALVE ASSEMBLY |
RH:
Apply a light coat of engine oil to 2 new O-rings.
Install the 2 O-rings to the 2 oil control valves.
Install the 2 oil control valves with the 2 bolts.
LH:
Apply a light coat of engine oil to 2 new O-rings.
Install the 2 O-rings to the 2 oil control valves.
Install the 2 oil control valves with the 2 bolts.
| 56. INSTALL CRANKSHAFT POSITION SENSOR |
Apply a light coat of engine oil to the O-ring of the sensor.
Install the sensor with the bolt.
| 57. INSTALL VVT SENSOR |
RH:
Apply a light coat of engine oil to the 2 O-rings of the 2 sensors.
Install the 2 VVT sensors with the 2 bolts.
LH:
Apply a light coat of engine oil to the 2 O-rings of the 2 sensors.
Install the 2 VVT sensors with the 2 bolts.
| 58. INSTALL CYLINDER BLOCK WATER DRAIN COCK SUB-ASSEMBLY |
Apply adhesive to 2 or 3 threads of the water drain cock end.
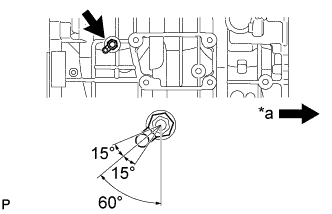 |
Install the water drain cock.
| *a | Front |
Rotate the water drain cock clockwise to the position shown in the illustration.
Install the water drain cock plug to the water drain cock.
| 59. INSTALL ENGINE COOLANT TEMPERATURE SENSOR |
Install a new gasket to the sensor.
Using a 19 mm deep socket wrench, install the sensor.
Connect the sensor connector.
| 60. INSTALL ENGINE OIL PRESSURE SWITCH ASSEMBLY |
Apply adhesive to 2 or 3 threads of the engine oil pressure switch assembly.
Using a 24 mm deep socket wrench, install the engine oil pressure switch assembly.
Connect the oil pressure switch connector to the engine oil pressure switch assembly.