INSTRUMENT PANEL SAFETY PAD (for Column Shift Type) > REMOVAL |
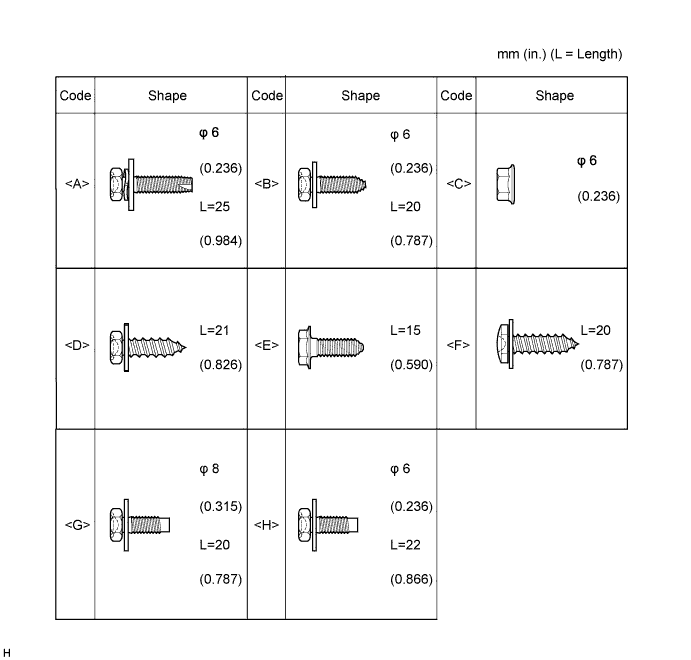
| 1. TABLE OF BOLT, SCREW AND NUT |
| 2. PRECAUTION |
| 3. DISCONNECT CABLE FROM NEGATIVE BATTERY TERMINAL |
Disconnect the cable from the negative (-) battery terminal.
| 4. REMOVE NO. 1 INSTRUMENT PANEL REGISTER SUB-ASSEMBLY |
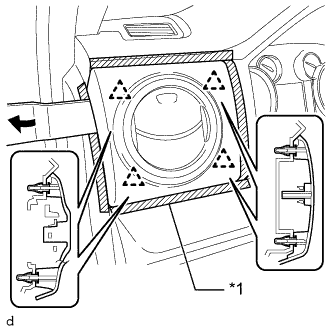 |
Apply protective tape as shown in the illustration.
| *1 | Protective Tape |
Using a moulding remover B, detach the 4 clips and remove the No. 1 instrument panel register sub-assembly.
| 5. REMOVE INSTRUMENT SIDE PANEL LH |
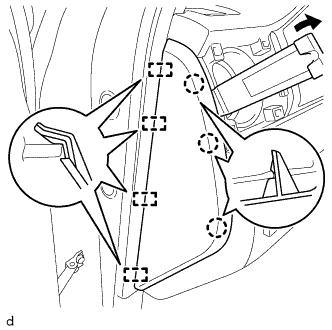 |
Using a moulding remover B, detach the 3 claws, 4 guides and remove the instrument side panel LH.
| 6. REMOVE LOWER CENTER INSTRUMENT COVER |
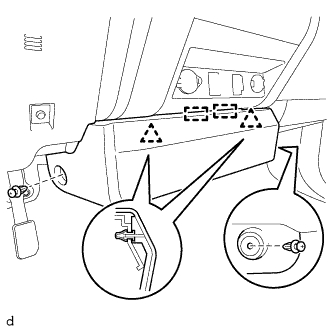 |
Remove the 2 clips.
Detach the 2 clips, 2 guides and remove the lower center instrument cover.
| 7. REMOVE FRONT DOOR SCUFF PLATE LH |
for Double Cab:
for CrewMax:
for Regular Cab:
| 8. REMOVE COWL SIDE TRIM BOARD LH |
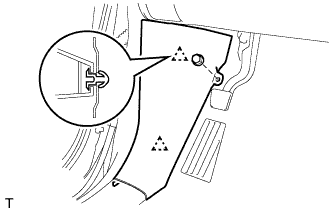 |
Remove the nut.
Detach the 2 clips and remove the cowl side trim board LH.
| 9. REMOVE FRONT DOOR SCUFF PLATE RH |
| 10. REMOVE COWL SIDE TRIM BOARD RH |
| 11. REMOVE LOWER INSTRUMENT PANEL FINISH PANEL SUB-ASSEMBLY LH |
Operate the tilt lever to fully extend and raise the steering column.
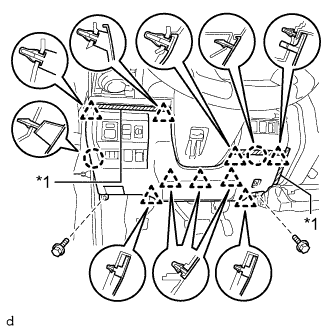 |
Apply protective tape as shown in the illustration.
| *1 | Protective Tape |
Remove the 2 bolts <A>.
Detach the 9 clips, 2 claws and remove the lower instrument panel finish panel sub-assembly LH.
Disconnect each connector.
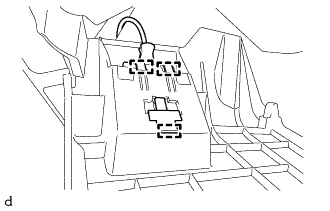 |
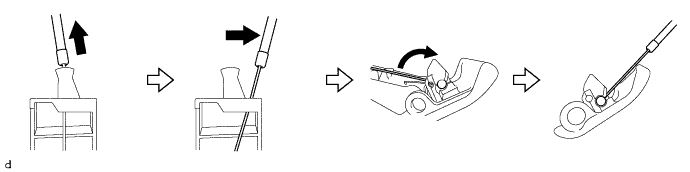
Detach the 3 hooks and disconnect the hood lock control lever from the lower instrument panel finish panel sub-assembly LH.
Pull and slide the hood lock control cable, rotate the hood lock control cable, and then disconnect the hood lock control cable from the hood lock control lever.
| 12. REMOVE LOWER NO. 1 INSTRUMENT PANEL AIRBAG ASSEMBLY |
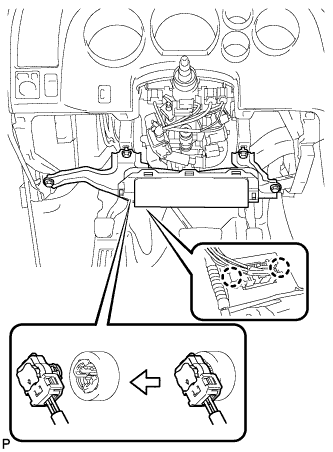 |
Remove the 4 bolts and remove the instrument panel airbag.
Detach the 2 claws and disconnect the DLC3.
Disconnect the connector.
| 13. REMOVE NO. 1 INSTRUMENT CLUSTER FINISH PANEL GARNISH |
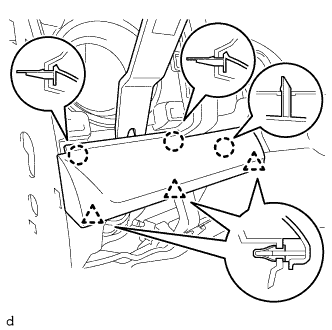 |
Using a moulding remover B, detach the 3 claws, 3 clips and remove the No. 1 instrument cluster finish panel garnish.
| 14. REMOVE LOWER STEERING COLUMN COVER |
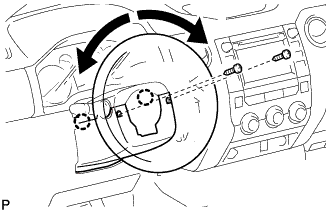 |
While turning the steering wheel assembly to the right and left, remove the 2 screws.
Detach the 2 claws and remove the lower steering column cover.
| 15. REMOVE UPPER STEERING COLUMN COVER |
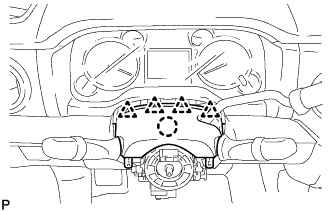 |
Detach the 4 clips.
Detach the claw to remove the upper steering column cover.
| 16. REMOVE NO. 2 SWITCH HOLE BASE |
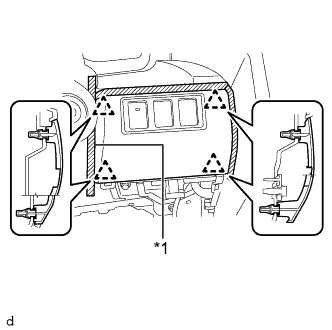 |
Apply protective tape as shown in the illustration.
| *1 | Protective Tape |
Detach the 4 clips and remove the No. 2 switch hole base.
Disconnect each connector.
| 17. REMOVE INSTRUMENT CLUSTER FINISH PANEL ORNAMENT |
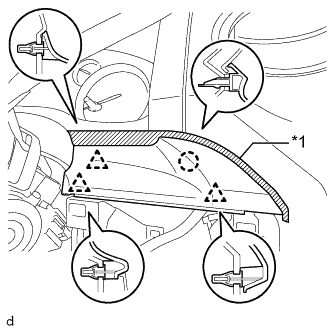 |
Apply protective tape as shown in the illustration.
| *1 | Protective Tape |
Detach the 3 clips, claw and remove the instrument cluster finish panel ornament.
| 18. REMOVE INSTRUMENT CLUSTER FINISH PANEL ASSEMBLY |
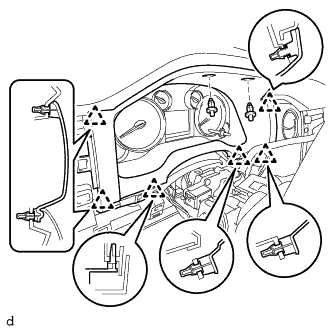 |
Remove the 2 clips.
Detach the 6 clips and remove the instrument cluster finish panel assembly.
| 19. REMOVE COMBINATION METER ASSEMBLY |
for Floor Shift Type:
Apply protective tape as shown in the illustration.
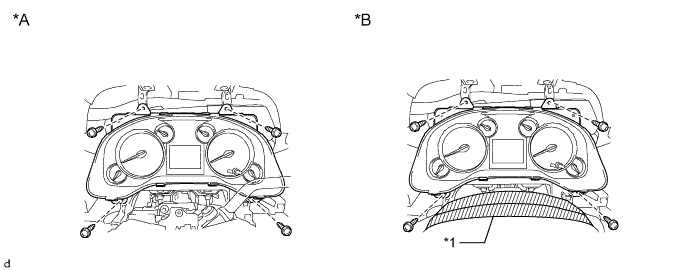
| *A | for Column Shift Type | *B | for Floor Shift Type |
| *1 | Protective Tape | - | - |
Remove the 4 screws.
Move the combination meter assembly as shown in the illustration and disconnect the connector and detach the wire harness clamp.
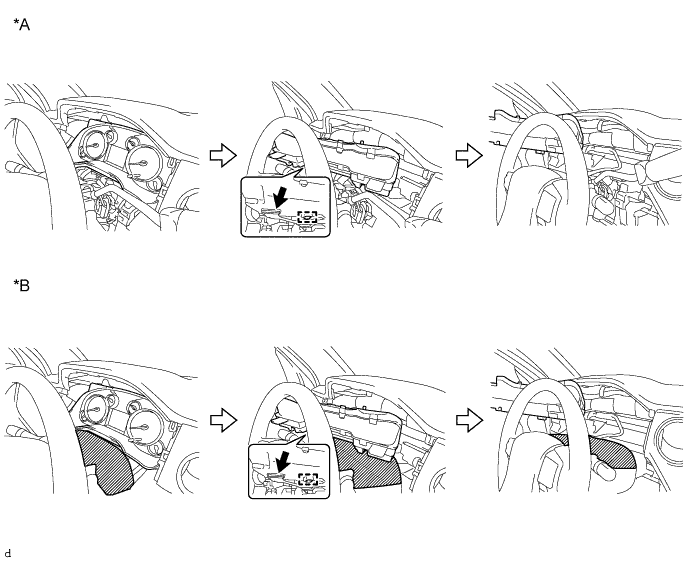
| *A | for Column Shift Type | *B | for Floor Shift Type |
Pass the combination meter assembly between the steering wheel assembly and instrument panel.
| 20. REMOVE NO. 2 INSTRUMENT PANEL UNDER COVER SUB-ASSEMBLY |
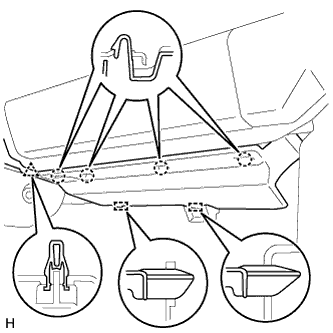 |
Detach the clip, 4 claws and 2 guides and remove the No. 2 instrument panel under cover sub-assembly.
| 21. REMOVE LOWER INSTRUMENT PANEL |
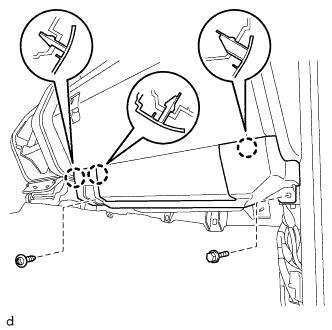 |
Remove the screw <D> and bolt <A>.
Detach the 3 claws and remove the lower instrument panel.
| 22. REMOVE LOWER NO. 2 INSTRUMENT PANEL AIRBAG ASSEMBLY |
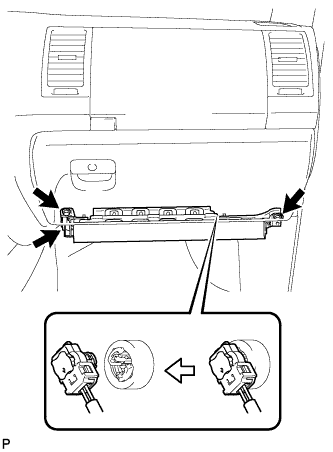 |
Remove the 3 bolts and remove the instrument panel airbag.
Disconnect the connector.
| 23. REMOVE NO. 4 INSTRUMENT REGISTER SUB-ASSEMBLY |
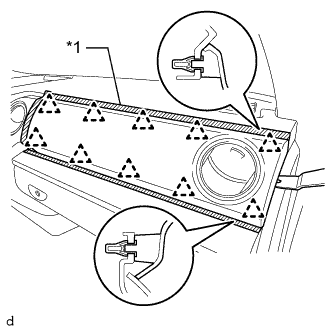 |
Apply protective tape as shown in the illustration.
| *1 | Protective Tape |
Using a moulding remover B, detach the 10 clips and remove the No. 4 instrument register sub-assembly.
| 24. REMOVE INSTRUMENT SIDE PANEL RH |
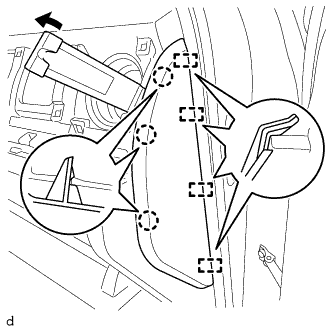 |
Using a moulding remover B, detach the 3 claws, 4 guides and remove the instrument side panel RH.
| 25. REMOVE LOWER INSTRUMENT PANEL FINISH PANEL SUB-ASSEMBLY RH |
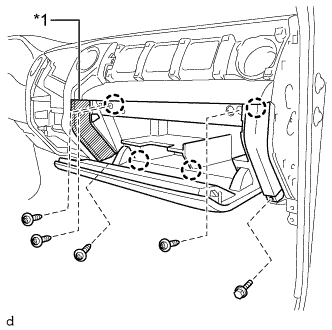 |
Apply protective tape as shown in the illustration.
| *1 | Protective Tape |
Remove the bolt <A> and 4 screws <F>.
Detach the 4 claws and remove the lower instrument panel finish panel sub-assembly RH.
| 26. REMOVE NO. 2 INSTRUMENT CLUSTER FINISH PANEL GARNISH |
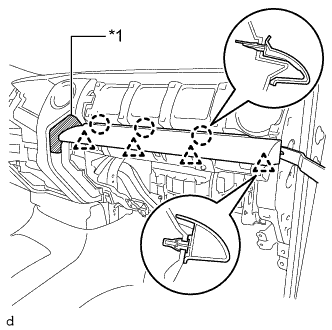 |
Apply protective tape as shown in the illustration.
| *1 | Protective Tape |
Using a moulding remover B, detach the 4 clips, 3 claws and remove the No. 2 instrument cluster finish panel garnish.
| 27. REMOVE LOWER CENTER INSTRUMENT PANEL FINISH PANEL WITH AIR CONDITIONING CONTROL ASSEMBLY |
Apply protective tape as shown in the illustration.
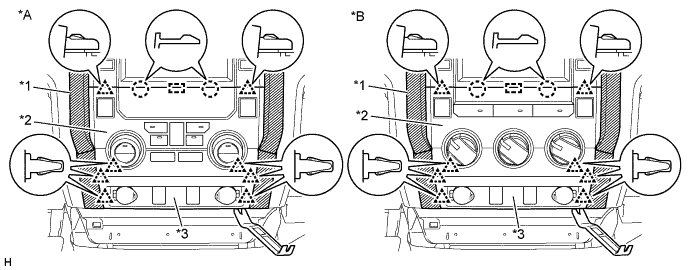
| *A | for Automatic Air Conditioning System | *B | for Manual Air Conditioning System |
| *1 | Protective Tape | *2 | Air Conditioning Control Assembly |
| *3 | Lower Center Instrument Panel Finish Panel | - | - |
Using moulding remover B, detach the 8 clips, 2 claws and guide and remove the lower center instrument panel finish panel together with the air conditioning control assembly.
Disconnect each connector.
| 28. REMOVE RADIO AND DISPLAY RECEIVER ASSEMBLY WITH BRACKET |
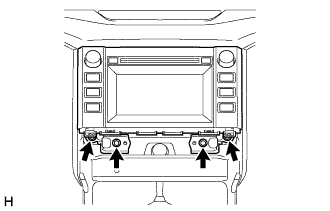 |
Remove the 4 bolts.
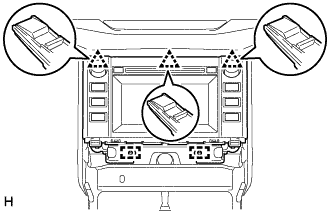 |
Pull the radio and display receiver assembly with bracket to detach the 3 clips and 2 guides on the backside of the radio and display receiver assembly with bracket.
Disconnect each connector and remove the radio and display receiver assembly with bracket.
| 29. REMOVE CENTER INSTRUMENT CLUSTER FINISH PANEL SUB-ASSEMBLY |
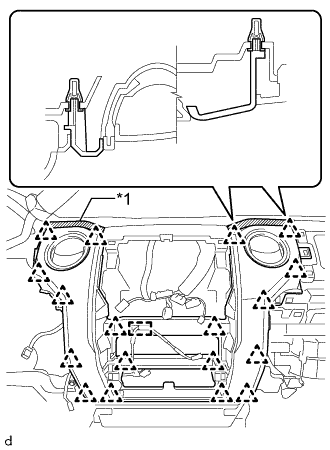 |
Apply protective tape as shown in the illustration.
| *1 | Protective Tape |
Detach the wire harness clamp and 18 clips and remove the center instrument cluster finish panel sub-assembly.
for 4WD:
Disconnect the connector.
| 30. REMOVE FRONT DOOR OPENING TRIM WEATHERSTRIP LH |
for Double Cab:
for CrewMax:
for Regular Cab:
| 31. REMOVE FRONT PILLAR GARNISH LH |
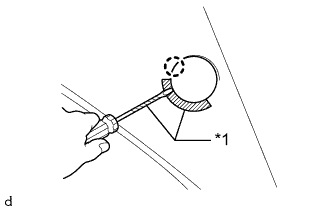 |
Apply protective tape as shown in the illustration.
| *1 | Protective Tape |
Using a screwdriver, detach the claw and open the cover.
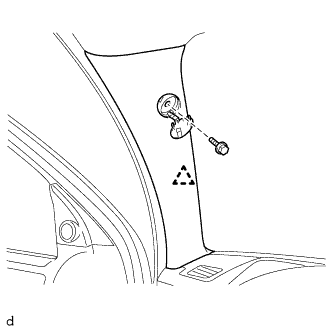 |
Remove the bolt.
Detach the clip and remove the front pillar garnish LH.
Protect the curtain shield airbag assembly.
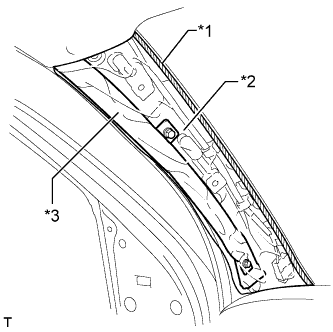 |
Completely cover the curtain shield airbag assembly with a cloth or nylon sheet and secure the ends of the cover with adhesive tape as shown in the illustration.
| *1 | Adhesive Tape |
| *2 | Protective Cover |
| *3 | Curtain Shield Airbag Assembly |
| 32. REMOVE FRONT DOOR OPENING TRIM WEATHERSTRIP RH |
| 33. REMOVE FRONT PILLAR GARNISH RH |
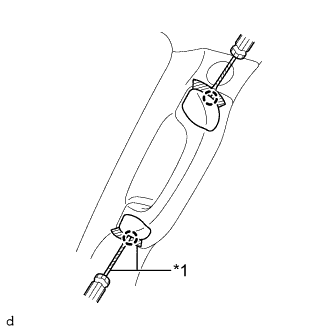 |
Apply protective tape as shown in the illustration.
| *1 | Protective Tape |
Using a screwdriver, detach the 2 claws and open the 2 assist grip covers.
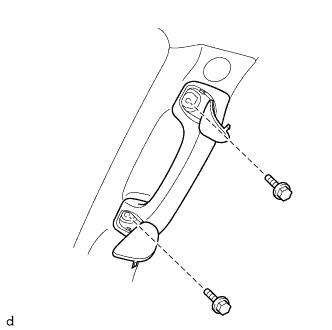 |
Remove the 2 bolts and front assist grip sub-assembly from the front pillar garnish RH.
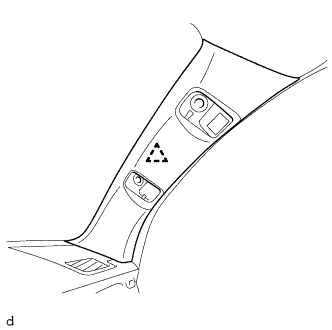 |
Detach the clip and remove the front pillar garnish RH.
Protect the curtain shield airbag assembly.
Completely cover the curtain shield airbag assembly with a cloth or nylon sheet and secure the ends of the cover with adhesive tape.
| 34. REMOVE INSTRUMENT PANEL SPEAKER PANEL SUB-ASSEMBLY |
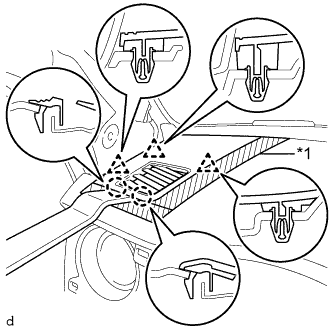 |
Apply protective tape as shown in the illustration.
| *1 | Protective Tape |
Using a moulding remover B, detach the 2 claws, 3 clips and remove the instrument panel speaker panel sub-assembly.
| 35. REMOVE FRONT NO. 2 SPEAKER ASSEMBLY LH |
Remove the 2 bolts.
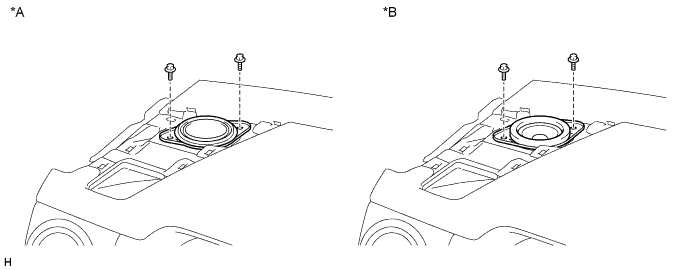
| *A | for Standard | *B | for 7 Speakers |
Disconnect the connector and remove the front No. 2 speaker assembly LH.
| 36. REMOVE NO. 2 INSTRUMENT PANEL SPEAKER PANEL SUB-ASSEMBLY |
| 37. REMOVE FRONT NO. 2 SPEAKER ASSEMBLY RH |
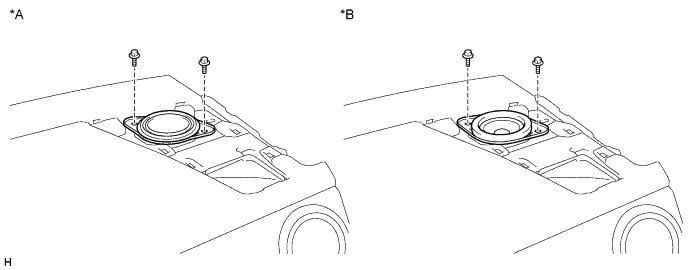
| *A | for Standard | *B | for 7 Speakers |
Remove the 2 bolts.
Disconnect the connector and remove the front No. 2 speaker assembly RH.
| 38. REMOVE INSTRUMENT PANEL SUB-ASSEMBLY |
Operate the tilt lever to fully extend and lower the steering column.
Disconnect each connector and each wire harness clamp.
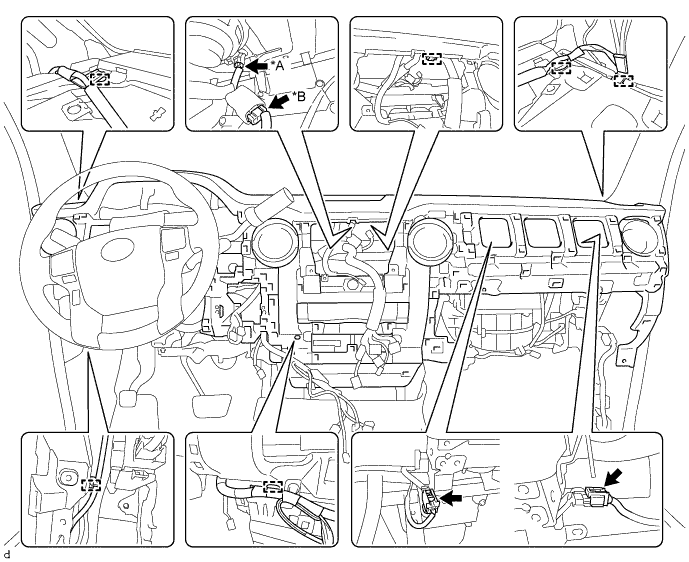
| *A | w/ Automatic Light Control System | *B | w/ Front Center Speaker |
Apply protective tape as shown in the illustration.
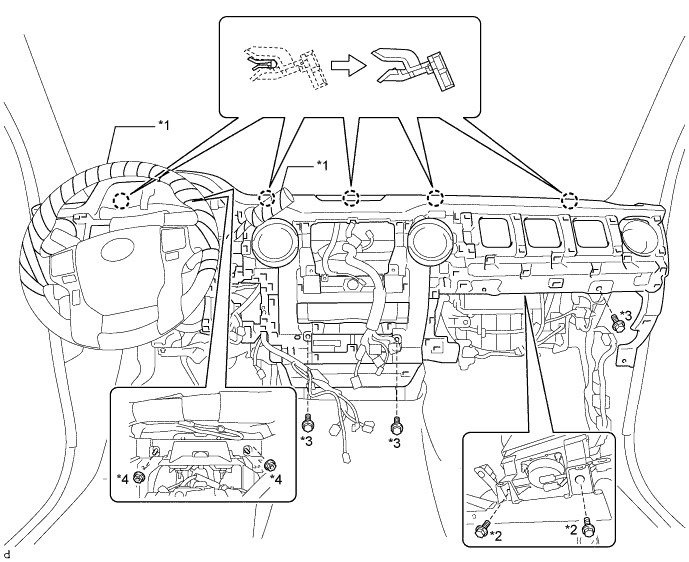
| *1 | Protective Tape | *2 | Bolt <G> |
| *3 | Bolt <B> | *4 | Nut <C> |
Remove the 2 bolts <G>.
Remove the 3 bolts <B> and 2 nuts <C>.
Detach the 5 claws and remove the instrument panel sub-assembly.
| 39. REMOVE NO. 3 INSTRUMENT PANEL STAY |
Detach the 3 claws and remove the 3 No. 3 instrument panel stays.
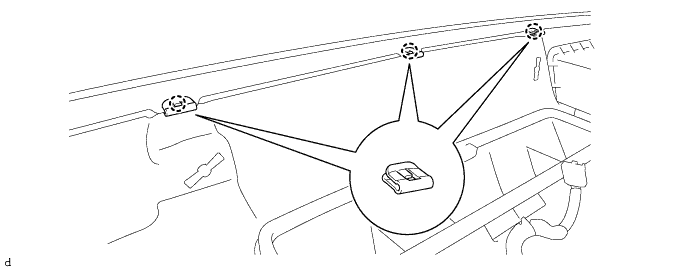
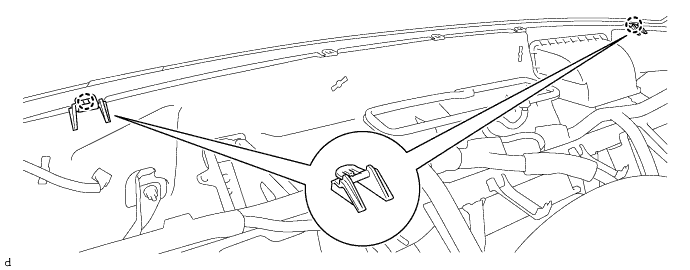
| 40. REMOVE NO. 1 INSTRUMENT PANEL CLIP |
Detach the 2 claws and remove the 2 No. 1 instrument panel clips.