Home › BODY › SEAT › REAR SEAT ASSEMBLY (for Double Cab)

REAR SEAT ASSEMBLY (for Double Cab) > REASSEMBLY

for Preparation Click here


CAUTION:
Wear protective gloves. Sharp areas on the parts may injure your hands.


1. INSTALL SEPARATE TYPE REAR SEATBACK COVER RH
  1. Set the separate type rear seatback cover RH in place.


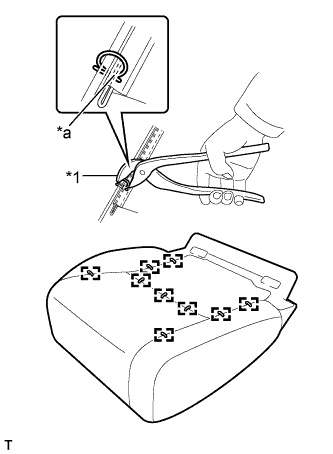
    B356753E01
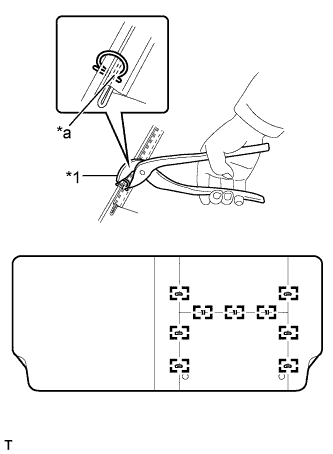
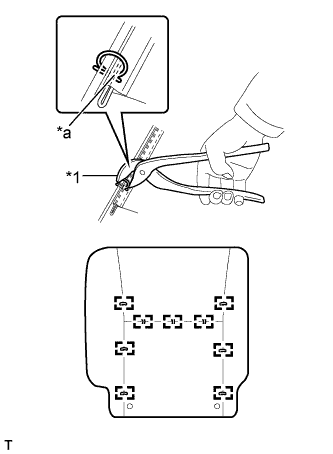
  1. Using hog ring pliers, install the separate type rear seatback cover RH to the separate type rear seatback pad RH with 9 new hog rings as shown in the illustration.

    NOTICE:
    1. Be careful not to damage the separate type rear seatback cover RH.
    2. Be sure to securely install the hog rings as shown in the illustration while preventing wrinkles from forming on the separate type rear seatback cover RH.

    HINT:
    Install the hog rings at the cutouts if they are there.

    Text in Illustration 
    *1
    Hog Ring Pliers
    *a
    Cutout


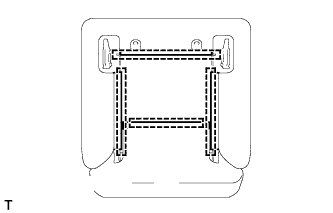
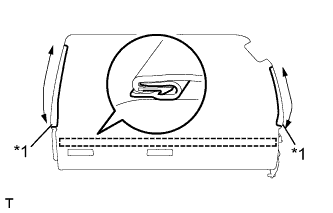
2. INSTALL REAR SEATBACK COVER WITH PAD RH


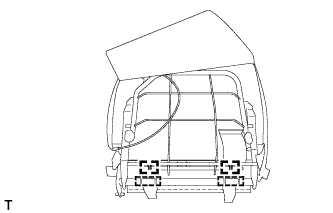
B356751
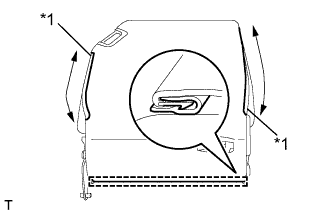
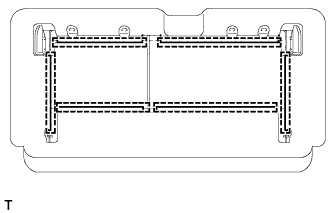
  1. Install the rear seatback cover with pad RH to the rear seatback frame sub-assembly RH, and then attach the 4 hooks.


3. INSTALL REAR SEAT HEADREST SUPPORT RH
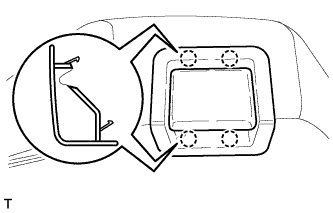
  1. Attach 4 claws to install the 2 rear seat headrest supports.


4. INSTALL REAR SEAT HEADREST ASSEMBLY RH
  1. Install the rear seat headrest assembly RH.


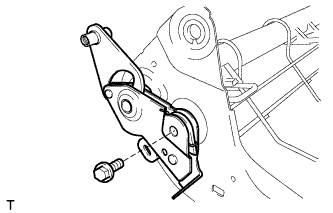
5. INSTALL REAR SEAT TURN LOCK SUB-ASSEMBLY RH


B166339
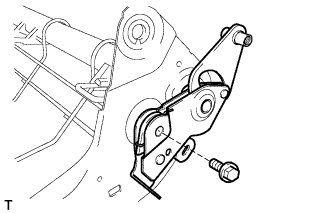
  1. Install the rear seat turn lock sub-assembly RH with the bolt.

    Torque:
    45 N*m{ 459 kgf*cm , 33 ft.*lbf }


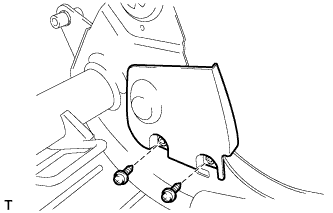
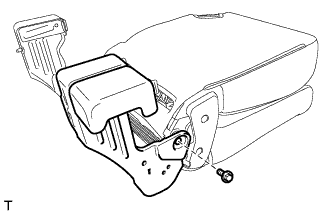
6. INSTALL REAR SEAT HINGE COVER RH


B165767
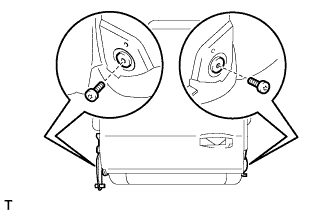
  1. Install the rear seat hinge cover RH with the 2 screws.


7. INSTALL REAR SEAT HINGE COVER LH
  1. Install the rear seat hinge cover LH with the 2 screws.


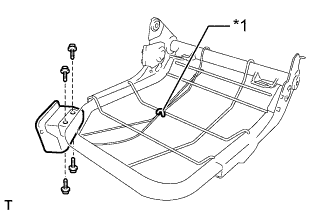
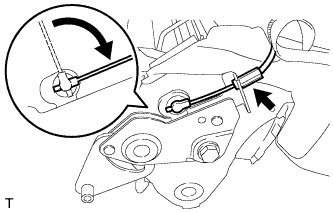
8. INSTALL NO. 1 RECLINING ADJUSTER RELEASE HANDLE RH


B165778E03
  1. Install the No. 1 reclining adjuster release handle RH with the 4 screws.

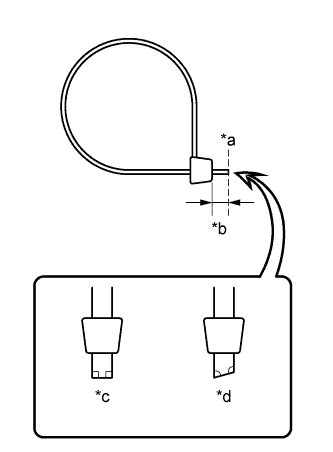
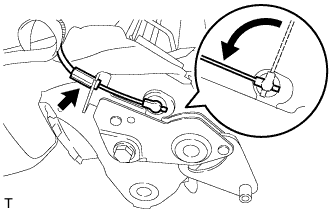
  1. Connect the cable and install a new cable tie.
    Text in Illustration 
    *1
    Cable Tie


    B272385E01
  1. Cut off the end of the cable tie as shown in the illustration.
    Text in Illustration 
    *a
    Cut Here
    *b
    10 mm (0.40 in.)
    *c
    Correct
    *d
    Incorrect


9. INSTALL SEPARATE TYPE REAR SEAT CUSHION COVER RH
  1. Set the separate type rear seat cushion cover RH in place.


    B356754E01
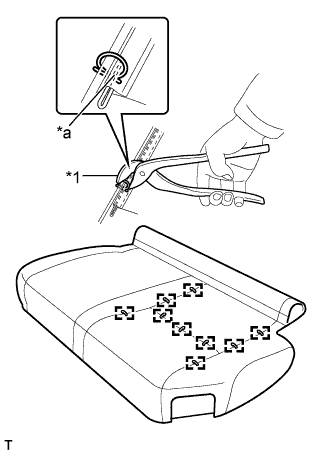
  1. Using hog ring pliers, install the separate type rear seat cushion cover RH to the separate type rear seat cushion pad RH with 9 new hog rings as shown in the illustration.

    NOTICE:
    1. Be careful not to damage the separate type rear seat cushion cover RH.
    2. Be sure to securely install the hog rings as shown in the illustration while preventing wrinkles from forming on the separate type rear seat cushion cover RH.

    HINT:
    Install the hog rings at the cutouts if they are there.

    Text in Illustration 
    *1
    Hog Ring Pliers
    *a
    Cutout


10. INSTALL REAR SEAT CUSHION COVER WITH PAD RH


    B356749
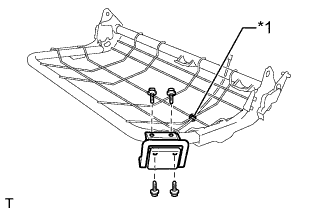
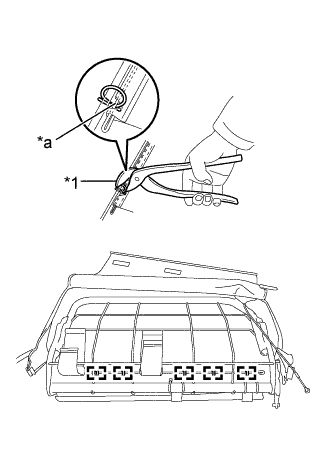
  1. Using hog ring pliers, install the rear seat cushion cover with pad RH to the rear seat cushion frame sub-assembly RH with 2 new hog rings as shown in the illustration.

    NOTICE:
    1. Be careful not to damage the separate type rear seat cushion cover RH.
    2. Be sure to securely install the hog rings as shown in the illustration while preventing wrinkles from forming on the separate type rear seat cushion cover RH.

    HINT:
    Install the hog rings at the cutouts if they are there.

    Text in Illustration 
    *1
    Hog Ring Pliers
    *a
    Cutout

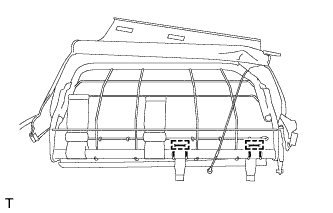
  1. Attach the 2 hooks.


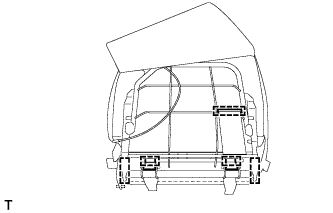
    B356748
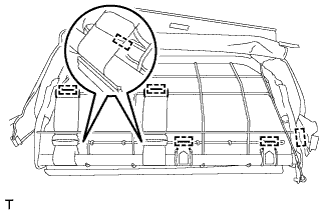
  1. Attach the 5 hooks to the seat cushion frame sub-assembly RH.


    B356747E01
  1. Fold down the separate type rear seat cushion cover RH and close the 2 fasteners, and then attach the hook.
    Text in Illustration 
    *1
    Fastener


    B166342
  1. Connect the cable to the rear seat turn lock sub-assembly RH.


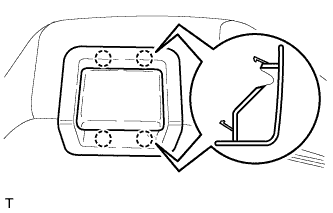
11. INSTALL REAR SEATBACK LOCK CONTROL BEZEL RH


B166337
  1. Attach the 4 claws to install the rear seatback lock control bezel RH.


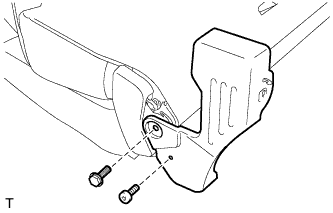
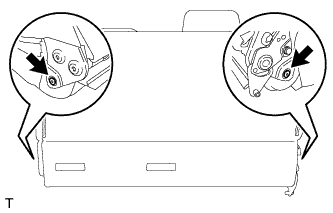
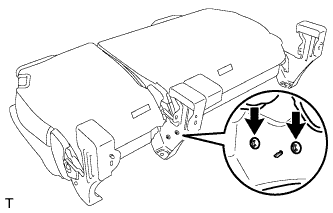
12. INSTALL REAR SEAT CUSHION ASSEMBLY RH


B165773
  1. Using a T40 "TORX" socket wrench, install the rear seat cushion assembly RH with the 2 bolts.

    Torque:
    23 N*m{ 235 kgf*cm , 17 ft.*lbf }


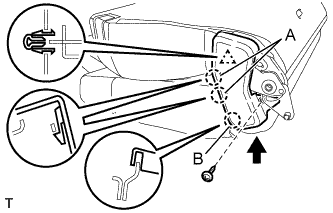
13. INSTALL OUTER REAR SEAT LOCK COVER RH


B166340E03
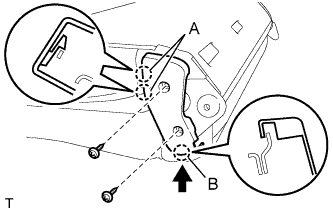
  1. Attach the claw labeled B in the direction indicated by the arrow in the illustration, and then attach the clip and 2 claws labeled A to install the outer rear seat lock cover RH.

  1. Install the screw.


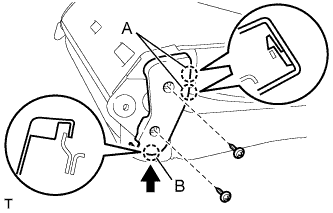
14. INSTALL INNER REAR SEAT LOCK COVER RH


B166341E02
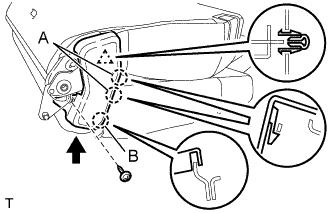
  1. Attach the claw labeled B in the direction indicated by the arrow in the illustration, and then attach the 2 claws labeled A to install the inner rear seat lock cover RH.

  1. Install the 2 screws.


15. INSTALL NO. 1 SEAT LEG SUB-ASSEMBLY


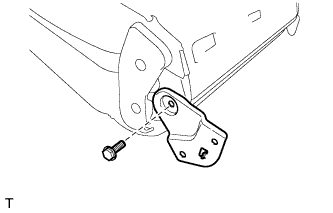
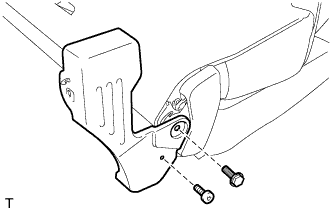
B166554
  1. Install the No. 1 seat leg sub-assembly with the bolt.

    Torque:
    60 N*m{ 612 kgf*cm , 44 ft.*lbf }

  1. Using a T45 "TORX" socket wrench, install the bolt.

    Torque:
    30 N*m{ 306 kgf*cm , 22 ft.*lbf }


16. INSTALL SEAT LEG SUB-ASSEMBLY LH


B166346
  1. Install the seat leg sub-assembly LH with the bolt.

    Torque:
    60 N*m{ 612 kgf*cm , 44 ft.*lbf }


17. INSTALL SEPARATE TYPE REAR SEATBACK COVER LH
  1. Set the separate type rear seatback cover LH in place.


    B356755E01
  1. Using hog ring pliers, install the separate type rear seatback cover LH to the separate type rear seatback pad LH with 9 new hog rings as shown in the illustration.

    NOTICE:
    1. Be careful not to damage the separate type rear seatback cover LH.
    2. Be sure to securely install the hog rings as shown in the illustration while preventing wrinkles from forming on the separate type rear seatback cover LH.

    HINT:
    Install the hog rings at the cutouts if they are there.

    Text in Illustration 
    *1
    Hog Ring Pliers
    *a
    Cutout


18. INSTALL REAR SEATBACK COVER WITH PAD LH


B356745
  1. Install the rear seatback cover with pad to the rear seatback frame sub-assembly LH, and then attach the 6 hooks.


19. INSTALL REAR NO. 1 SEAT HEADREST SUPPORT ASSEMBLY
  1. Attach the 4 claws to install the 2 rear No. 1 seat headrest support assemblies.


20. INSTALL REAR SEAT HEADREST SUPPORT LH
  1. Attach the 4 claws to install the 2 rear seat headrest supports.


21. INSTALL CENTER REAR SEAT HEADREST ASSEMBLY
  1. Install the center rear seat headrest assembly.


22. INSTALL REAR SEAT HEADREST ASSEMBLY LH
  1. Install the rear seat headrest assembly LH.


23. INSTALL REAR SEAT TURN LOCK SUB-ASSEMBLY LH


B165768
  1. Install the rear seat turn lock sub-assembly LH with the bolt.

    Torque:
    45 N*m{ 459 kgf*cm , 33 ft.*lbf }


24. INSTALL REAR SEAT HINGE COVER RH


B165767
  1. Install the rear seat hinge cover RH with the 2 screws.


25. INSTALL REAR SEAT HINGE COVER LH
  1. Install the rear seat hinge cover LH with the 2 screws.


26. INSTALL NO. 1 RECLINING ADJUSTER RELEASE HANDLE LH


    B165764E03
  1. Install the No. 1 reclining adjuster release handle LH with the 4 screws.

  1. Connect the cable and install a new cable tie.
    Text in Illustration 
    *1
    Cable Tie


    B272385E01
  1. Cut off the end of the cable tie as shown in the illustration.
    Text in Illustration 
    *a
    Cut Here
    *b
    10 mm (0.40 in.)
    *c
    Correct
    *d
    Incorrect


27. INSTALL SEPARATE TYPE REAR SEAT CUSHION COVER LH
  1. Set the separate type rear seat cushion cover LH in place.


    B356756E01
  1. Using hog ring pliers, install the separate type rear seat cushion cover LH to the separate type rear seat cushion pad LH with 9 new hog rings as shown in the illustration.

    NOTICE:
    1. Be careful not to damage the separate type rear seat cushion cover LH.
    2. Be sure to securely install the hog rings as shown in the illustration while preventing wrinkles from forming on the separate type rear seat cushion cover LH.

    HINT:
    Install the hog rings at the cutouts if they are there.

    Text in Illustration 
    *1
    Hog Ring Pliers
    *a
    Cutout


28. INSTALL REAR SEAT CUSHION COVER WITH PAD LH


    B356757E01
  1. Using hog ring pliers, install the rear seat cushion cover with pad LH to the rear seat cushion frame sub-assembly LH with 5 new hog rings as shown in the illustration.

    NOTICE:
    1. Be careful not to damage the separate type rear seat cushion cover LH.
    2. Be sure to securely install the hog rings as shown in the illustration while preventing wrinkles from forming on the separate type rear seat cushion cover LH.

    HINT:
    Install the hog rings at the cutouts if they are there.

    Text in Illustration 
    *1
    Hog Ring Pliers
    *a
    Cutout


    B356742
  1. Attach the 2 hooks to the seat cushion frame sub-assembly LH.


    B356741
  1. Attach each hook to the seat cushion frame sub-assembly LH.


    B356740E01
  1. Fold down the separate type rear seat cushion cover LH and close the 2 fasteners, and then attach the hook.
    Text in Illustration 
    *1
    Fastener


    B166345
  1. Connect the cable to the rear seat turn lock sub-assembly LH.


29. INSTALL REAR SEATBACK LOCK CONTROL BEZEL LH


B165608
  1. Attach the 4 claws to install the rear seatback lock control bezel LH.


30. INSTALL REAR SEAT CUSHION ASSEMBLY LH


B165607
  1. Using a T40 "TORX" socket wrench, install the rear seat cushion assembly LH with the 2 bolts.

    Torque:
    23 N*m{ 235 kgf*cm , 17 ft.*lbf }


31. INSTALL INNER REAR SEAT LOCK COVER LH


B166344E02
  1. Attach the claw labeled B in the direction indicated by the arrow in the illustration, and then attach the 2 claws labeled A to install the inner rear seat lock cover LH.

  1. Install the 2 screws.


32. INSTALL OUTER REAR SEAT LOCK COVER LH


B166343E03
  1. Attach the claw labeled B in the direction indicated by the arrow in the illustration, and then attach the clip and 2 claws labeled A to install the outer rear seat lock cover LH.

  1. Install the screw.


33. INSTALL NO. 1 SEAT LEG SUB-ASSEMBLY RH


B165604
  1. Install the No. 1 seat leg sub-assembly RH with the bolt.

    Torque:
    60 N*m{ 612 kgf*cm , 44 ft.*lbf }


34. INSTALL NO. 1 SEAT LEG SUB-ASSEMBLY LH


B165603
  1. Install the No. 1 seat leg sub-assembly LH with the bolt.

    Torque:
    60 N*m{ 612 kgf*cm , 44 ft.*lbf }

  1. Using a T45 "TORX" socket wrench, install the bolt.

    Torque:
    30 N*m{ 306 kgf*cm , 22 ft.*lbf }


35. INSTALL REAR SEAT ASSEMBLY LH


B165602
  1. Using a T50 "TORX" socket wrench, install the rear seat assembly LH with the 2 bolts.

    Torque:
    45 N*m{ 459 kgf*cm , 33 ft.*lbf }