Home › ENGINE ยท 3UR-FBE › ENGINE MECHANICAL › ENGINE UNIT

ENGINE UNIT > INSPECTION

for Preparation Click here


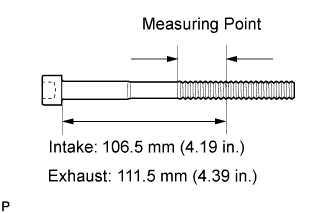
1. INSPECT CYLINDER HEAD SET BOLT


    A194652E01
  1. Using a vernier caliper, measure the diameter of the elongated thread at the measuring point.

    Standard diameter:
    10.85 to 11.00 mm (0.427 to 0.433 in.)

    Minimum diameter:
    10.6 mm (0.417 in.)

    If the diameter is less than the minimum, replace the cylinder head bolt.

    HINT:
    If a visual check reveals no excessively thin areas, check the center of the bolt (see illustration) and find the area that has the lowest diameter.


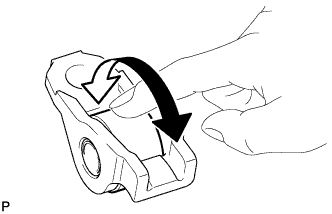
2. INSPECT NO. 1 VALVE ROCKER ARM SUB-ASSEMBLY


    A160725
  1. Turn the roller by hand to check that it turns smoothly.
    If the roller does not turn smoothly, replace the valve rocker arm.


3. INSPECT VALVE LASH ADJUSTER ASSEMBLY


A186391E01

NOTICE:
  1. Keep the adjuster free from dirt and foreign objects.
  2. Use only clean engine oil.

  1. Place the lash adjuster into a container full of new engine oil.

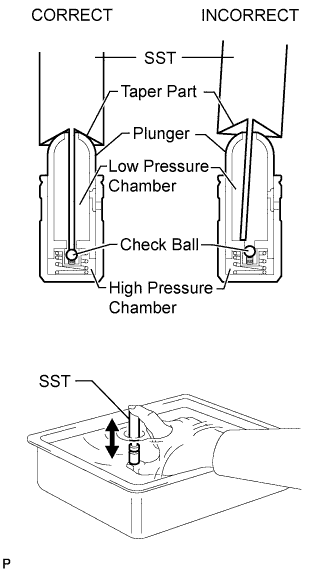
  1. Insert SST's tip into the lash adjuster's plunger and use the tip to press down on the check ball inside the plunger.

    SST
    09276-75010  

  1. Squeeze SST and the lash adjuster together to move the plunger up and down 5 to 6 times.

  1. Check the movement of the plunger and bleed air.

    OK:
    Plunger moves up and down.

    NOTICE:
    When bleeding high-pressure air from the compression chamber, make sure that the tip of SST is actually pressing the check ball as shown in the illustration. If the check ball is not pressed, air will not bleed.

  1. After bleeding the air, remove SST. Then try to quickly and firmly press the plunger with your fingers.

    OK:
    Plunger can be pressed 3 times.

    If the plunger can still be compressed after pressing it 3 times, replace the lash adjuster with a new one.


4. INSPECT CAMSHAFT SUB-ASSEMBLY


A148243
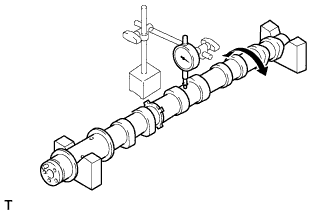
  1. Inspect the camshaft for runout.

    1. Place the camshaft on V-blocks.

    2. Using a dial indicator, measure the circle runout at the center journal.

      Maximum circle runout:
      0.04 mm (0.00157 in.)

      If the circle runout is more than the maximum, replace the camshaft.

      HINT:
      Check the oil clearance after replacing the camshaft.


    A148244
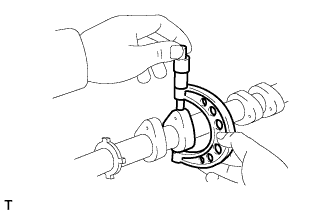
  1. Using a micrometer, measure the cam lobe height.

    Standard cam lobe height:
    Item
    Specified Condition
    Intake
    44.291 to 44.441 mm (1.744 to 1.750 in.)
    Exhaust
    44.196 to 44.346 mm (1.740 to 1.746 in.)

    Minimum cam lobe height:
    Item
    Specified Condition
    Intake
    44.241 mm (1.742 in.)
    Exhaust
    44.146 mm (1.738 in.)

    If the cam lobe height is less than the minimum, replace the camshaft.


    A148245
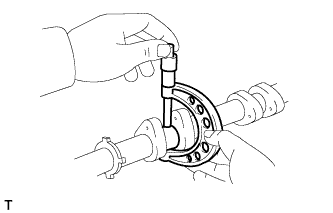
  1. Using a micrometer, measure the journal diameter.

    Standard journal diameter:
    Item
    Specified Condition
    No. 1 journal
    29.956 to 29.970 mm (1.1793 to 1.1799 in.)
    Other journals
    25.959 to 25.975 mm (1.0220 to 1.0226 in.)

    If the journal diameter is not as specified, check the oil clearance.


5. INSPECT CAMSHAFT TIMING GEAR
  1. Install the camshaft bearing cap .

    HINT:
    Only install the intake camshaft.

  1. Install the camshaft housing .

  1. Apply a light coat of engine oil on the camshaft and camshaft timing gear.


    A160670E01
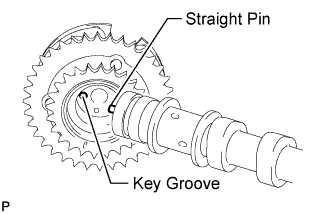
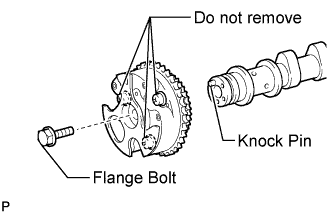
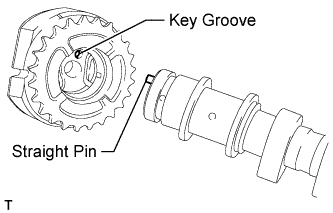
  1. Using the hexagonal portion of the camshaft, align and attach the knock pin of the camshaft with the pin hole of the camshaft timing gear.

    NOTICE:
    1. Do not forcefully push in the camshaft timing gear. This may cause the camshaft knock pin tip to damage the installation surface of the camshaft timing gear.

    2. A160671E04
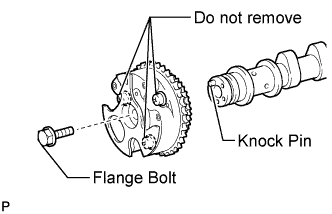
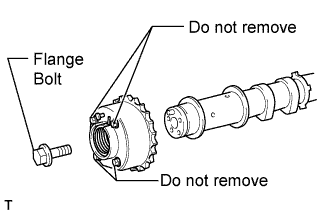
      Do not loosen or remove the 3 bolts shown in the illustration. If any of them are loosened or removed, the backlash of the gear in the timing tube will go out of adjustment. In this case, replace the camshaft timing gear assembly with a new one.


    A164349E01
  1. Apply a light coat of engine oil on the threads and under the head of the bolt.

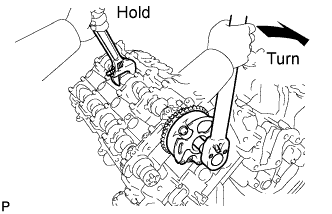
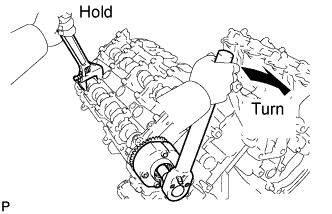
  1. Using a wrench to hold the hexagonal portion of the camshaft, install the camshaft timing gear with the bolt.

    Torque:
    100 N*m{ 1020 kgf*cm , 74 ft.*lbf }

  1. Remove the camshaft bearing cap .

  1. Check the lock of the camshaft timing gear.

    1. Clamp the camshaft in a vise, and confirm that the camshaft timing gear is locked.

      NOTICE:
      Be careful not to damage the camshaft.


    A160672E03
  1. Release the lock pin.

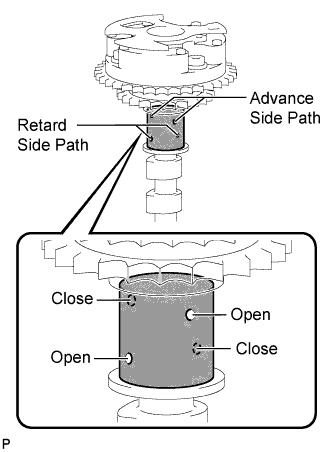
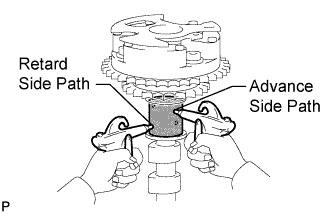
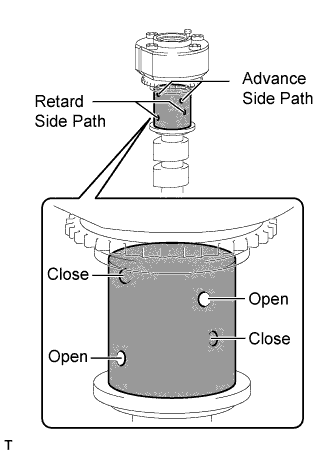
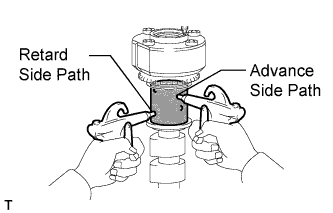
    1. Cover the 4 oil paths of the cam journal with vinyl tape as shown in the illustration.

    2. Break through the tape of the advance side path. Then break through the tape of the retard side path on the opposite side of the advanced side path, as shown in the illustration.


    3. A160673E01
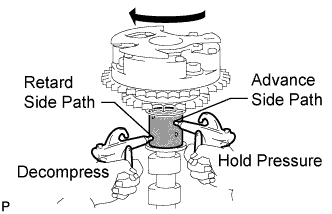
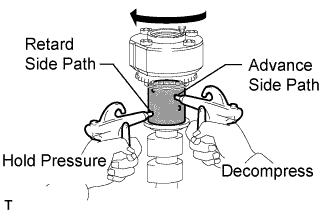
    4. Apply approximately 200 kPa (2.0 kgf/cm2, 29 psi) of air pressure to the two broken paths.

      NOTICE:
      Cover the paths with a piece of cloth when applying pressure to keep oil from splashing.


    5. A160674E01
    6. Check that the camshaft timing gear revolves in the advance direction when reducing the air pressure applied to the retard side path.

      HINT:
      This operation releases the lock pin for the most retarded position.

    7. When the camshaft timing gear reaches the most advanced position, release the air pressure from the retard side path and advance side path, in that order.

      NOTICE:
      Do not release the air pressure from the advance side path first. The gear may abruptly shift in the retard direction and break the lock pin.

  1. Check for smooth rotation.

    1. Turn the camshaft timing gear within its movable range (21°) 2 or 3 times, but do not turn it to the most retarded position. Make sure that the gear turns smoothly.

      NOTICE:
      Do not use air pressure to perform the smooth rotation check.

  1. Check the lock in the most retarded position.

    1. Confirm that the camshaft timing gear is locked at the most retarded position.

  1. Install the camshaft bearing cap .

    HINT:
    Only install the intake camshaft.

  1. Install the camshaft housing .


    A164348E01
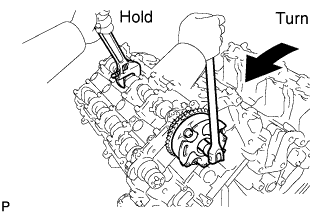
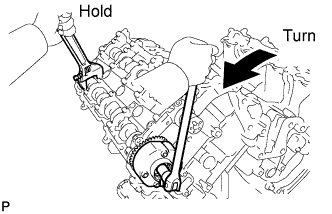
  1. Hold the hexagonal portion of the camshaft with a wrench and loosen the bolt.

  1. Remove the camshaft bearing cap .


    A160671E05
  1. Remove the flange bolt and camshaft timing gear.


6. INSPECT CAMSHAFT TIMING EXHAUST GEAR
  1. Install the camshaft bearing cap .

    HINT:
    Only install the exhaust camshaft.

  1. Install the camshaft housing .

  1. Apply a light coat of engine oil on the camshaft and camshaft timing exhaust gear.


    A148246E02
  1. Using the hexagonal portion of the camshaft, align and attach the knock pin of the camshaft with the pin hole of the camshaft timing exhaust gear.

    NOTICE:
    1. Do not forcefully push in the camshaft timing exhaust gear. This may cause the camshaft knock pin tip to damage the installation surface of the camshaft timing exhaust gear.

    2. A148250E06
      Do not loosen or remove the 4 bolts shown in the illustration. If any of them are loosened or removed, the backlash of the gear in the timing tube will go out of adjustment. In this case, replace the camshaft timing exhaust gear assembly with a new one.

  1. Apply a light coat of engine oil on the threads and under the head of the bolt.


    A164350E01
  1. Using a wrench to hold the hexagonal portion of the camshaft, install the camshaft timing exhaust gear with the bolt.

    Torque:
    100 N*m{ 1020 kgf*cm , 74 ft.*lbf }

  1. Remove the camshaft bearing cap .

  1. Check the camshaft timing exhaust gear lock.

    1. Make sure that the camshaft timing exhaust gear is locked.


    A148247E05
  1. Release the lock pin.

    1. Cover the 4 oil paths of the cam journal with vinyl tape as shown in the illustration.

    2. Break through the tape of the advance side path. Then break through the tape of the retard side path on the opposite side of the advanced side path, as shown in the illustration.


    3. A148248E02
    4. Apply approximately 200 kPa (2.0 kgf/cm2, 29 psi) of air pressure to the two broken paths (the advance side path and the retard side path).

      NOTICE:
      Cover the paths with a piece of cloth when applying pressure to keep oil from splashing.


    5. A148249E02
    6. Check that the camshaft timing exhaust gear turns in the retard direction when reducing the air pressure applied to the advance side path.

      HINT:
      The lock pin is released and the camshaft timing exhaust gear turns in the retard direction.

    7. When the camshaft timing exhaust gear moves to the most retarded position, release the air pressure from the advance side path, and then release the air pressure from the retard side path.

      NOTICE:
      Be sure to release the air pressure from the advance side path first. If the air pressure of the retard side path is released first, the camshaft timing exhaust gear may abruptly shift in the advance direction and break the lock pin or other parts.
  1. Check for smooth rotation.

    1. Turn the camshaft timing exhaust gear within its movable range (18.5°) 2 or 3 times, but do not turn it to the most advanced position. Make sure that the gear turns smoothly.

      NOTICE:
      When the air pressure is released from the advance side path and then from the retard side path, the gear automatically returns to the most advanced position due to the advance assist spring operation, and locks. Gradually release the air pressure from the retard side path before performing the smooth rotation check.

  1. Check the lock at the most advanced position.

    1. Make sure that the camshaft timing exhaust gear is locked at the most advanced position.

  1. Install the camshaft bearing cap .

    HINT:
    Only install the exhaust camshaft.

  1. Install the camshaft housing .


    A164351E01
  1. Hold the hexagonal portion of the camshaft with a wrench and loosen the bolt.

  1. Remove the camshaft bearing cap .


    A148250E06
  1. Remove the flange bolt and camshaft timing exhaust gear.


7. INSPECT NO. 1 CHAIN SUB-ASSEMBLY


A168044E01
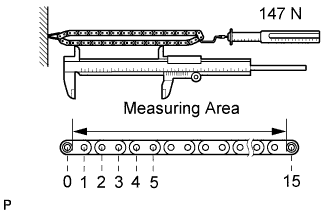
  1. Using a spring scale, pull the chain with a force of 147 N (15 kgf, 33.1 lbf) as shown in the illustration.

  1. Using a vernier caliper, measure the length of 15 pins.

    Maximum chain elongation:
    136.9 mm (5.39 in.)

    HINT:
    Perform the measurement at 3 random places.

    If the elongation is more than the maximum, replace the chain.


8. INSPECT NO. 2 CHAIN SUB-ASSEMBLY


A168044E01
  1. Using a spring scale, pull the chain with a force of 147 N (15 kgf, 33.1 lbf) as shown in the illustration.

  1. Using a vernier caliper, measure the length of 15 pins.

    Maximum chain elongation:
    137.6 mm (5.42 in.)

    HINT:
    Perform the measurement at 3 random places.

    If the elongation is more than the maximum, replace the chain.


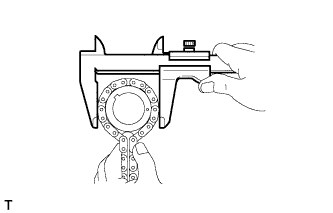
9. INSPECT CRANKSHAFT TIMING SPROCKET RH


A148252
  1. Wrap the chain around the sprocket.

  1. Using a vernier caliper, measure the sprocket diameter with the chain.

    Minimum sprocket diameter (with chain):
    61.4 mm (2.42 in.)

    HINT:
    The vernier caliper must contact the chain rollers for the measurement.

    If the diameter is less than the minimum, replace the chain and sprocket.


10. INSPECT CRANKSHAFT TIMING SPROCKET LH


A148252
  1. Wrap the chain around the sprocket.

  1. Using a vernier caliper, measure the sprocket diameter with the chain.

    Minimum sprocket diameter (with chain):
    61.4 mm (2.42 in.)

    HINT:
    The vernier caliper must contact the chain rollers for the measurement.

    If the diameter is less than the minimum, replace the chain and sprocket.


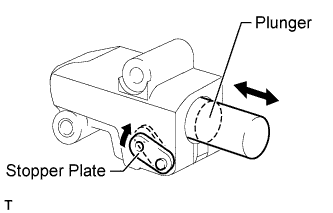
11. INSPECT NO. 1 CHAIN TENSIONER ASSEMBLY


A148251E03
  1. Move the stopper plate upward to release the lock. Push the plunger and check that it moves smoothly.
    If necessary, replace the chain tensioner.


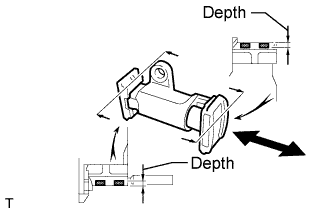
12. INSPECT NO. 2 CHAIN TENSIONER ASSEMBLY


A148258E03
  1. Check that the plunger moves smoothly.

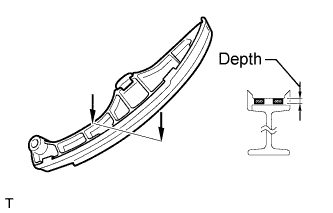
  1. Measure the worn depth of the chain tensioner.

    Maximum depth:
    0.9 mm (0.0354 in.)

    If the depth is more than the maximum, replace the chain tensioner.


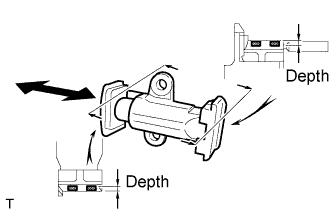
13. INSPECT NO. 3 CHAIN TENSIONER ASSEMBLY


A148259E03
  1. Check that the plunger moves smoothly.

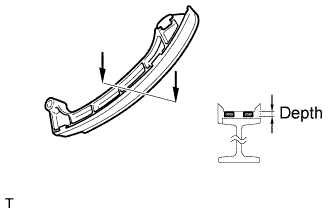
  1. Measure the worn depth of the chain tensioner.

    Maximum depth:
    0.9 mm (0.0354 in.)

    If the depth is more than the maximum, replace the chain tensioner.


14. INSPECT NO. 1 CHAIN TENSIONER SLIPPER LH


A148254E03
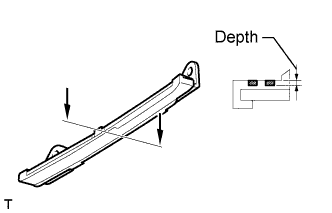
  1. Measure the worn depth of the chain tensioner slipper.

    Maximum depth:
    1.0 mm (0.0394 in.)

    If the depth is more than the maximum, replace the chain tensioner slipper.


15. INSPECT NO. 1 CHAIN TENSIONER SLIPPER RH


A148257E01
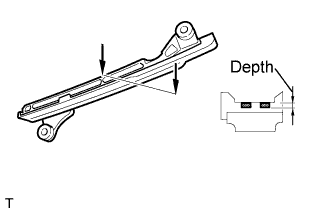
  1. Measure the worn depth of the chain tensioner slipper.

    Maximum depth:
    1.0 mm (0.0394 in.)

    If the depth is more than the maximum, replace the chain tensioner slipper.


16. INSPECT NO. 1 CHAIN VIBRATION DAMPER LH


A178534E01
  1. Measure the worn depth of the chain vibration damper.

    Maximum depth:
    1.0 mm (0.0394 in.)

    If the depth is more than the maximum, replace the chain vibration damper.


17. INSPECT NO. 1 CHAIN VIBRATION DAMPER RH


A148256E01
  1. Measure the worn depth of the chain vibration damper.

    Maximum depth:
    1.0 mm (0.0394 in.)

    If the depth is more than the maximum, replace the chain vibration damper.


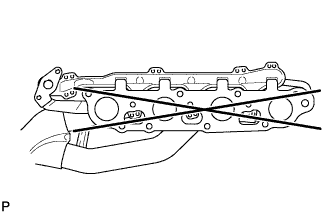
18. INSPECT EXHAUST MANIFOLD SUB-ASSEMBLY LH


A160652
  1. Using a precision straightedge and feeler gauge, measure the warpage of the contact surface of the cylinder head.

    Maximum warpage:
    0.7 mm (0.0276 in.)

    If the warpage is more than the maximum, replace the exhaust manifold.


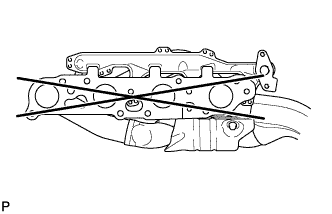
19. INSPECT EXHAUST MANIFOLD SUB-ASSEMBLY RH


A160653
  1. Using a precision straightedge and feeler gauge, measure the warpage of the contact surface of the cylinder head.

    Maximum warpage:
    0.7 mm (0.0276 in.)

    If the warpage is more than the maximum, replace the exhaust manifold.