ENGINE UNIT > REASSEMBLY |
| 1. INSTALL STUD BOLT |
|
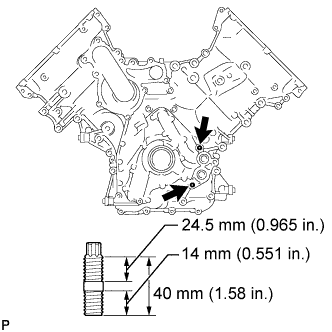
Install the timing chain cover stud bolt.
Using an E10 "TORX" socket wrench, install the 2 stud bolts as shown in the illustration.
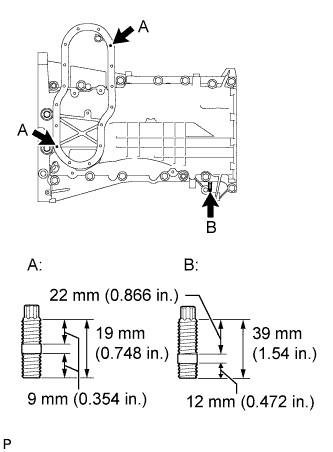 |
Install the oil pan stud bolt.
Using an E6 and E7 "TORX" socket wrench, install the 3 stud bolts as shown in the illustration.
| 2. INSTALL RING PIN |
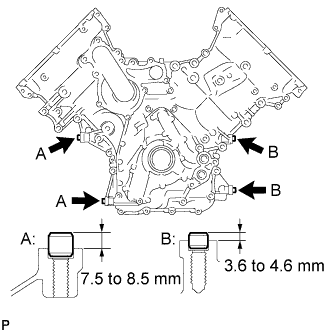 |
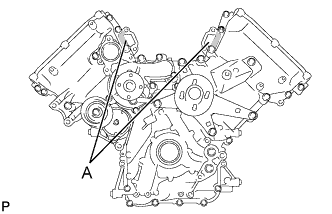
Using a plastic-faced hammer, tap in new ring pins to the timing chain cover.
| Item | Ring Pin Diameter | Specified Condition |
| Ring pin A | 13 mm (0.512 in.) | 7.5 to 8.5 mm (0.295 to 0.335 in.) |
| Ring pin B | 11 mm (0.433 in.) | 3.6 to 4.6 mm (0.142 to 0.181 in.) |
| 3. INSTALL REAR CRANKSHAFT OIL SEAL |
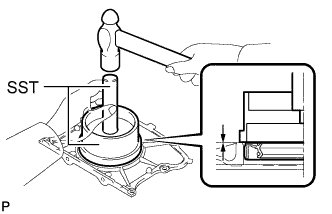 |
Using SST, tap in a new oil seal until its surface is flush with the oil seal retainer edge.
| 4. INSTALL OIL DRAIN PIPE SUB-ASSEMBLY |
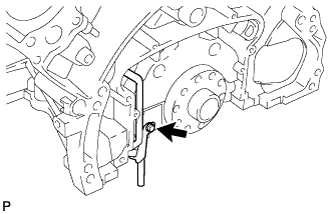 |
Apply a light coat of engine oil to a new O-ring.
Install the O-ring to the drain pipe.
Install the oil drain pipe with the bolt.
| 5. INSTALL ENGINE REAR OIL SEAL RETAINER |
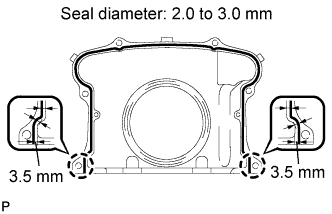 |
Apply seal packing in a continuous line as shown in the illustration.
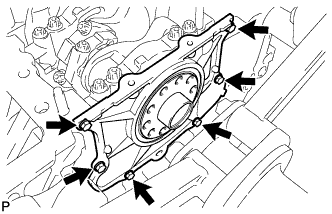 |
Install the oil seal retainer with the 6 bolts.
| 6. INSTALL OIL STRAINER SUB-ASSEMBLY |
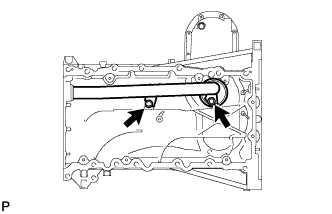 |
Apply a light coat of engine oil to a new O-ring.
Install the O-ring to the oil strainer.
Install the oil strainer with the 2 bolts.
| 7. INSTALL NO. 1 OIL PAN BAFFLE PLATE |
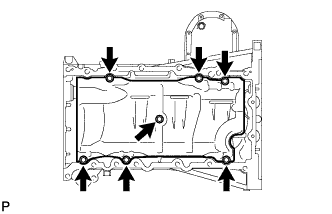 |
Install the baffle plate with the 7 bolts.
| 8. INSTALL NO. 1 OIL PAN SUB-ASSEMBLY |
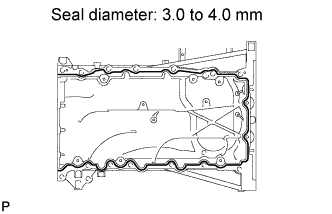 |
Apply seal packing in a continuous line as shown in the illustration.
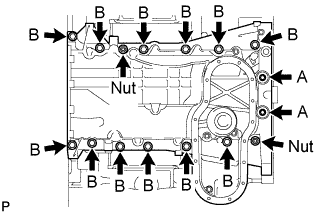 |
Install the oil pan with the 14 bolts and 2 nuts.
| 9. INSTALL NO. 2 OIL PAN SUB-ASSEMBLY |
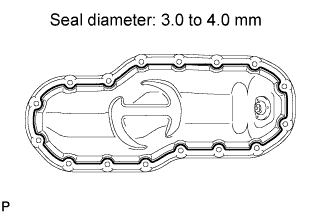 |
Apply seal packing in a continuous line as shown in the illustration.
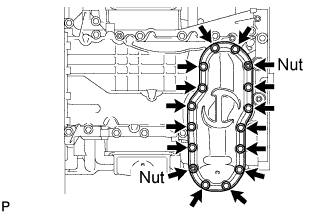 |
Install the oil pan with the 14 bolts and 2 nuts.
| 10. INSTALL NO. 1 HEAT EXCHANGER COVER |
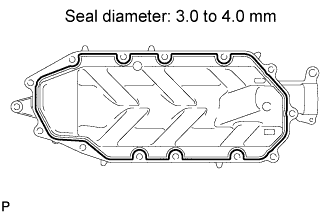 |
Apply seal packing in a continuous line as shown in the illustration.
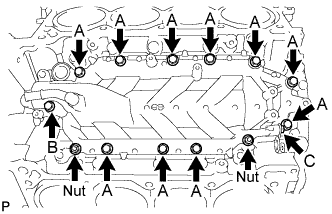 |
Install the heat exchanger cover with the 12 bolts and 2 nuts.
| Item | Length | Thread Diameter |
| Bolt A | 20 mm (0.787 in.) | 8 mm (0.315 in.) |
| Bolt B | 70 mm (2.76 in.) | 8 mm (0.315 in.) |
| Bolt C | 16 mm (0.630 in.) | 6 mm (0.236 in.) |
| 11. INSTALL VENTILATION PIPE GASKET |
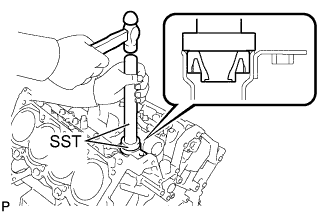 |
Using SST, evenly tap in a new ventilation pipe gasket until its surface is flush with the lip of the ventilation pipe.
| 12. INSTALL CYLINDER BLOCK WATER JACKET SPACER |
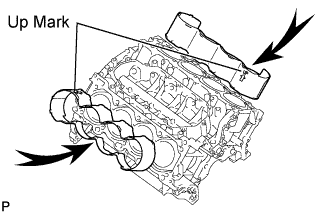 |
Install the 2 water jacket spacers as shown in the illustration.
| 13. INSTALL CYLINDER HEAD GASKET RH |
Check the piston protrusions for each cylinder.
Clean the cylinder block with solvent.
Set the piston of the cylinder to be measured to slightly ATDC.
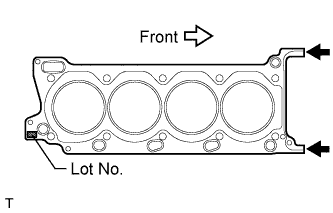 |
Place the cylinder head gasket on the cylinder block surface with the front face of the Lot No. stamp upward.
| 14. INSTALL CYLINDER HEAD GASKET LH |
Check the piston protrusions for each cylinder.
Clean the cylinder block with solvent.
Set the piston of the cylinder to be measured to slightly ATDC.
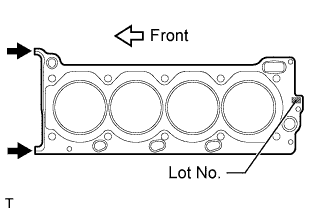 |
Place the cylinder head gasket on the cylinder block surface with the front face of the Lot No. stamp upward.
| 15. INSTALL CYLINDER HEAD SUB-ASSEMBLY RH |
Place the cylinder head on the cylinder block.
Apply a light coat of engine oil to the threads and under the heads of the cylinder head bolts.
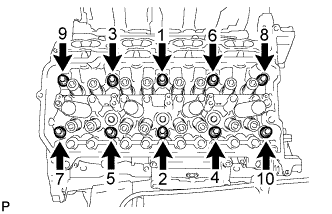 |
Step 1:
Using a 10 mm bi-hexagon wrench, install and uniformly tighten the 10 cylinder head bolts with the plate washers in several steps, in the sequence shown in the illustration.
 |
Step 2:
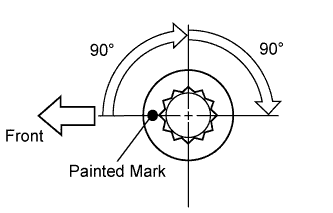
Mark each cylinder head bolt head with paint as shown in the illustration.
Tighten the cylinder head bolts another 90° in the sequence shown in step 1.
Step 3:
Tighten the cylinder head bolts an additional 90° in the sequence shown in step 1.
Check that the painting marks are now facing rearward.
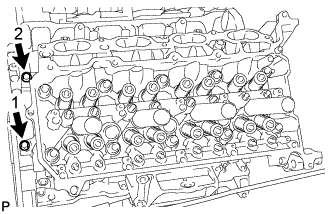 |
Install and uniformly tighten the 2 bolts in the sequence shown in the illustration.
| 16. INSTALL CYLINDER HEAD SUB-ASSEMBLY LH |
Place the cylinder head on the cylinder block.
Apply a light coat of engine oil to the threads and under the heads of the cylinder head bolts.
 |
Step 1:
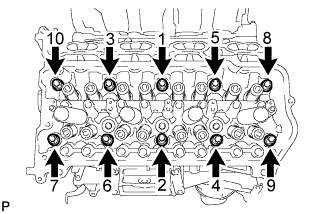
Using a 10 mm bi-hexagon wrench, install and uniformly tighten the 10 cylinder head bolts with the plate washers in several steps, in the sequence shown in the illustration.
|
Step 2:
Mark each cylinder head bolt head with paint as shown in the illustration.
Tighten the cylinder head bolts another 90° in the sequence shown in step 1.
Step 3:
Tighten the cylinder head bolts an additional 90° in the sequence shown in step 1.
Check that the painted marks are now facing rearward.
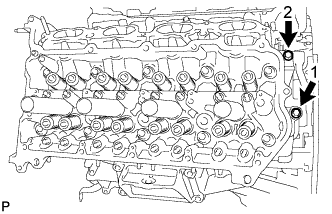 |
Install and uniformly tighten the 2 bolts in the sequence shown in the illustration.
| 17. INSTALL VALVE STEM CAP |
Apply a light coat of engine oil to the valve stem caps.
Install the 32 valve stem caps to the cylinder head.
| 18. INSTALL VALVE LASH ADJUSTER ASSEMBLY |
Inspect the valve lash adjuster .
Install the 32 valve lash adjusters to the cylinder head.
| 19. INSTALL NO. 1 VALVE ROCKER ARM SUB-ASSEMBLY |
Apply engine oil to the lash adjuster tips and valve stem cap ends.
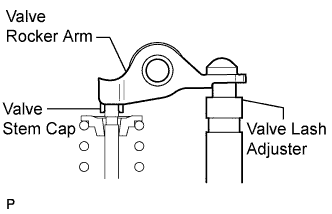 |
Install the 32 valve rocker arms as shown in the illustration.
| 20. INSTALL CAMSHAFT BEARING CAP RH |
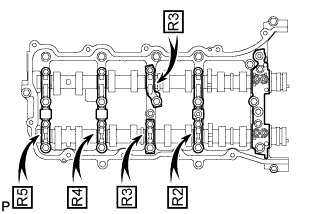 |
Apply a light coat of engine oil to the camshaft journals, camshaft housings and bearing caps.
Install the No. 1 and No. 2 camshafts to the camshaft housing.
Confirm the marks and numbers on the camshaft bearing caps and place them in their proper positions and directions.
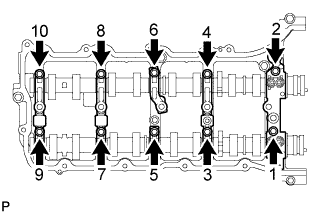 |
Temporarily install the 10 bolts in the order shown in the illustration.
| 21. INSTALL CAMSHAFT HOUSING SUB-ASSEMBLY RH |
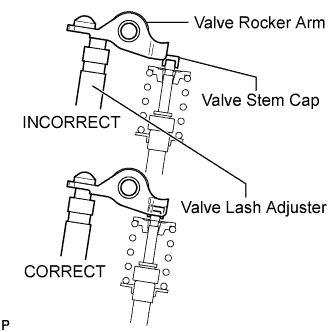 |
Make sure that the valve rocker arms are installed as shown in the illustration.
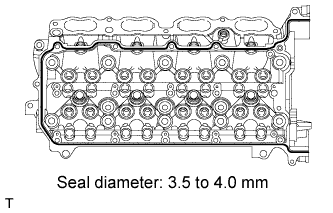 |
Apply seal packing in a continuous line as shown in the illustration.
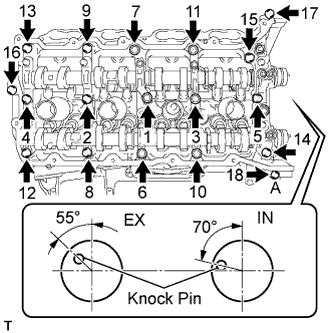 |
Install the camshaft housing, and install the 18 bolts in the order shown in the illustration.
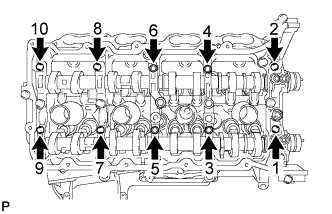 |
Tighten the 10 bolts in the order shown in the illustration.
| 22. INSTALL CAMSHAFT BEARING CAP LH |
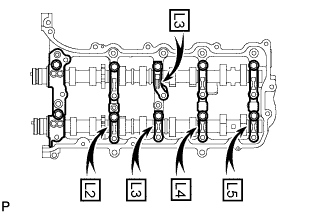 |
Apply a light coat of engine oil to the camshaft journals, camshaft housings and bearing caps.
Install the No. 3 and No. 4 camshafts to the camshaft housing.
Confirm the marks and numbers on the camshaft bearing caps and place them in their proper positions and directions.
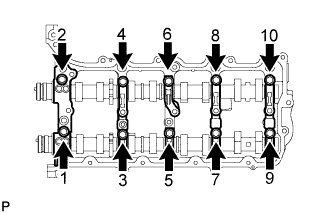 |
Temporarily install the 10 bolts in the order shown in the illustration.
| 23. INSTALL CAMSHAFT HOUSING SUB-ASSEMBLY LH |
|
Install the valve rocker arms as shown in the illustration.
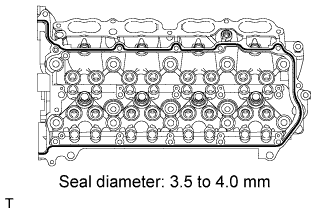 |
Apply seal packing in a continuous line as shown in the illustration.
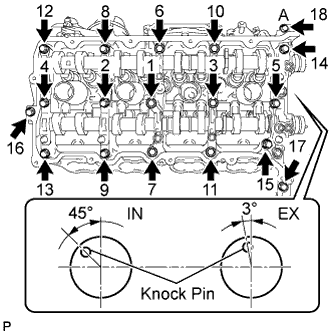 |
Install the camshaft housing, and install the 18 bolts in the order shown in the illustration.
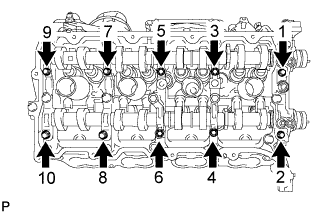 |
Tighten the 10 bolts in the order shown in the illustration.
| 24. INSTALL CRANKSHAFT TIMING GEAR KEY |
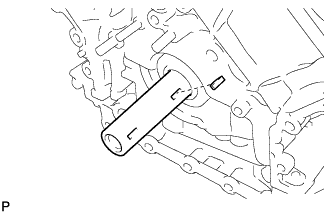 |
Install the timing gear key.
| 25. INSTALL NO. 2 CHAIN TENSIONER ASSEMBLY |
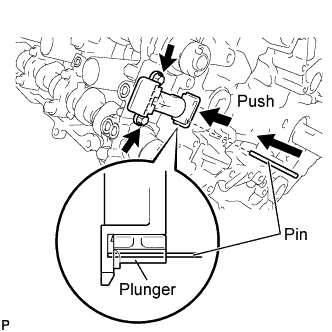 |
Install the chain tensioner with the 2 bolts.
While raising up the No. 2 chain tensioner, insert a pin of φ1.0 mm (0.0394 in.) into the hole to fix it in place.
| 26. INSTALL NO. 1 CHAIN SUB-ASSEMBLY RH |
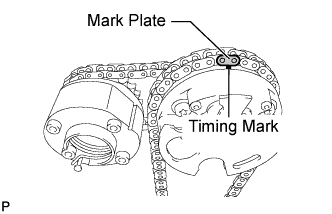 |
Align the No. 1 chain's orange mark plate with the camshaft timing gear's timing mark, and attach the chain to the gear as shown in the illustration.
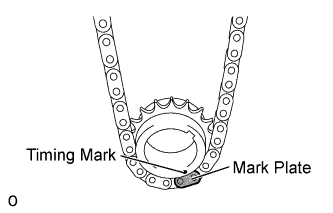 |
Align the No. 1 chain's orange mark plate with the crankshaft timing gear's timing mark, and attach the chain to the gear as shown in the illustration.
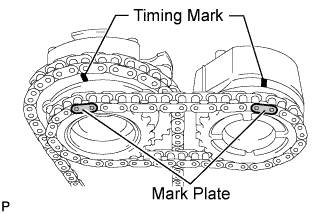 |
Align the No. 2 chain's mark plates (yellow) with the timing marks of the camshaft timing gear and camshaft timing exhaust gear, and attach the No. 2 chain to the gears as shown in the illustration.
Install the crankshaft timing sprocket to the crankshaft.
Align and attach the knock pin of the No. 1 camshaft with the pin hole of the camshaft timing gear.
Using the hexagonal portion of the No. 2 camshaft, align and attach the knock pin of the No. 2 camshaft with the pin hole of the camshaft timing exhaust gear.
Remove the pin from the No. 2 chain tensioner.
| 27. INSTALL NO. 1 CHAIN VIBRATION DAMPER RH |
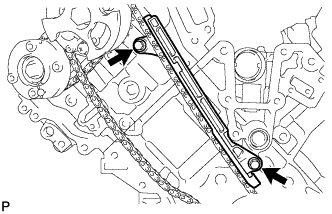 |
Install the vibration damper with the 2 bolts.
| 28. INSTALL NO. 1 CHAIN TENSIONER SLIPPER RH |
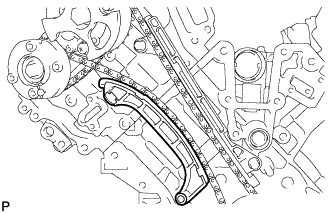 |
| 29. INSTALL NO. 1 CHAIN TENSIONER ASSEMBLY RH |
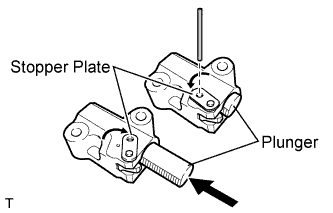 |
Move the stopper plate upward to release the lock, and push the plunger deep into the tensioner.
Move the stopper plate downward to set the lock, and insert a hexagon wrench into the hole of the stopper plate.
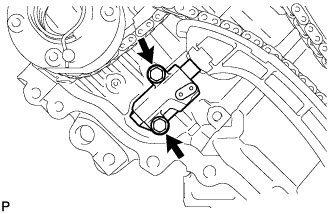 |
Install the chain tensioner with the 2 bolts.
Remove the hexagon wrench from the chain tensioner.
| 30. INSTALL NO. 3 CHAIN TENSIONER ASSEMBLY |
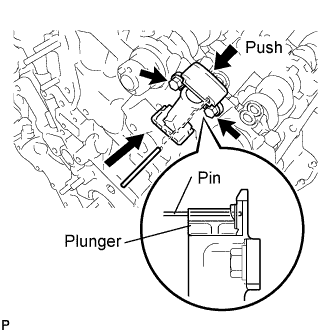 |
Install the chain tensioner with the 2 bolts.
While pushing down the No. 2 chain tensioner, insert a pin of φ1.0 mm (0.0394 in.) into the hole to fix it in place.
| 31. INSTALL NO. 1 CHAIN SUB-ASSEMBLY LH |
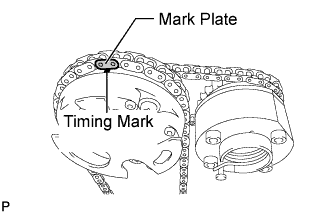 |
Align the No. 1 chain's orange mark plate with the camshaft timing gear's timing mark, and attach the chain to the gear as shown in the illustration.
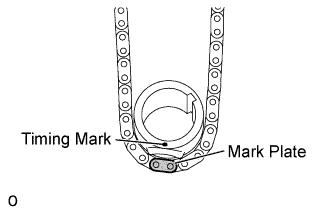 |
Align the No. 1 chain's orange mark plate with the crankshaft timing gear's timing mark, and attach the chain to the gear as shown in the illustration.
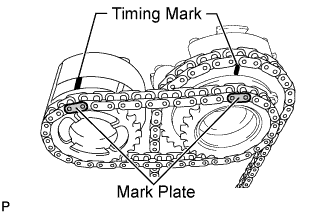 |
Align the No. 2 chain's mark plates (yellow) with the timing marks of the camshaft timing gear and camshaft timing exhaust gear, and attach the No. 2 chain to the gears as shown in the illustration.
Install the crankshaft timing sprocket to the crankshaft.
Align and attach the knock pin of the No. 3 camshaft with the pin hole of the camshaft timing gear.
Using the hexagonal portion of the No. 4 camshaft, align and attach the knock pin of the No. 4 camshaft with the pin hole of the camshaft timing exhaust gear.
Remove the pin from the No. 2 chain tensioner.
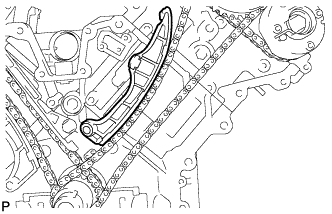
| 32. INSTALL NO. 1 CHAIN TENSIONER SLIPPER LH |
 |
| 33. INSTALL NO. 1 CHAIN TENSIONER ASSEMBLY LH |
|
Move the stopper plate upward to release the lock, and push the plunger deep into the tensioner.
Move the stopper plate downward to set the lock, and insert a hexagon wrench into the hole of the stopper plate.
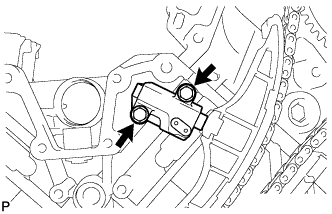 |
Install a new gasket and the chain tensioner with the 2 bolts.
| 34. INSTALL NO. 1 CHAIN VIBRATION DAMPER LH |
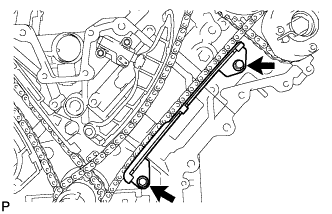 |
Install the vibration damper with the 2 bolts.
Remove the hexagon wrench from the No. 1 chain tensioner.
| 35. TIGHTEN CAMSHAFT TIMING GEAR |
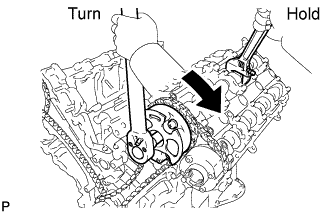 |
LH:
Using a wrench to hold the hexagonal portion of the No. 3 camshaft, tighten the camshaft timing gear with the bolt.
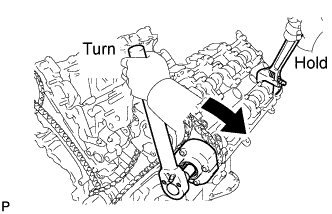 |
Using a wrench to hold the hexagonal portion of the No. 4 camshaft, tighten the camshaft timing exhaust gear with the bolt.
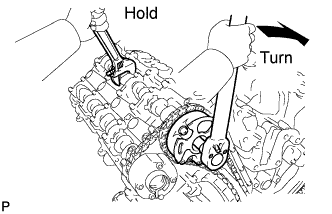 |
RH:
Using a wrench to hold the hexagonal portion of the No. 1 camshaft, tighten the camshaft timing gear with the bolt.
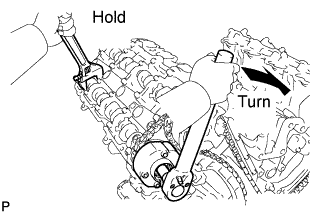 |
Using a wrench to hold the hexagonal portion of the No. 2 camshaft, tighten the camshaft timing exhaust gear with the bolt.
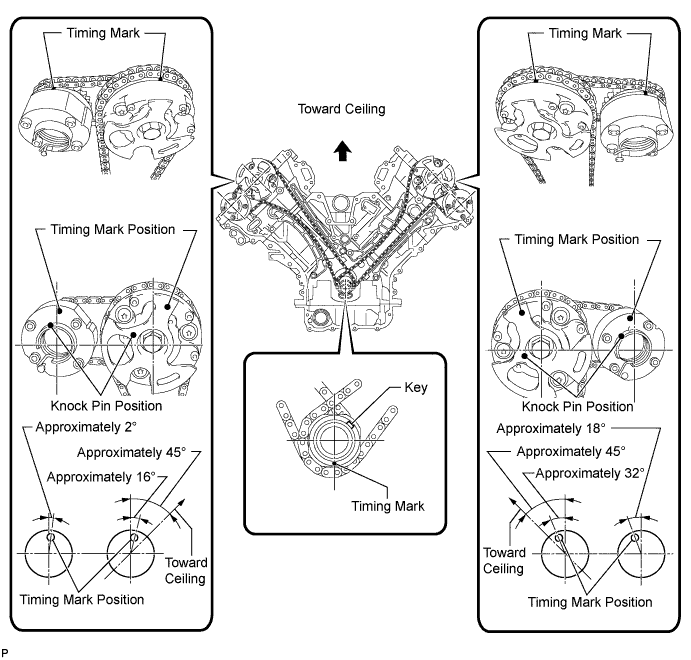
| 36. CHECK NO. 1 CYLINDER TO TDC / COMPRESSION |
Temporarily install the pulley set bolt.
Rotate the crankshaft clockwise, and check that the timing marks on the crankshaft timing gear and camshaft timing gears are as shown in the illustration.
Remove the crankshaft pulley bolt.
| 37. INSTALL WATER INLET PIPE |
Apply soapy water to 2 new O-rings and install them to the water inlet pipe.
Install the water inlet pipe to the No. 1 heat exchanger cover.
| 38. INSTALL WATER PUMP ASSEMBLY |
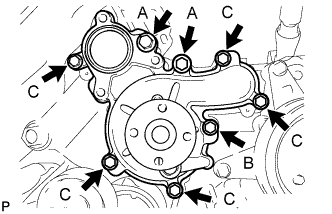 |
Install a new gasket and the water pump with the 8 bolts shown in the illustration.
| 39. INSTALL TIMING CHAIN COVER SUB-ASSEMBLY |
Apply a light coat of engine oil to a new oil pump gasket.
Install the oil pump gasket to the cylinder block.
Apply a light coat of engine oil to a new O-ring.
Install the O-ring to the oil pan sub-assembly.
Apply seal packing in a continuous line to the timing chain cover sub-assembly as shown in the following illustration.
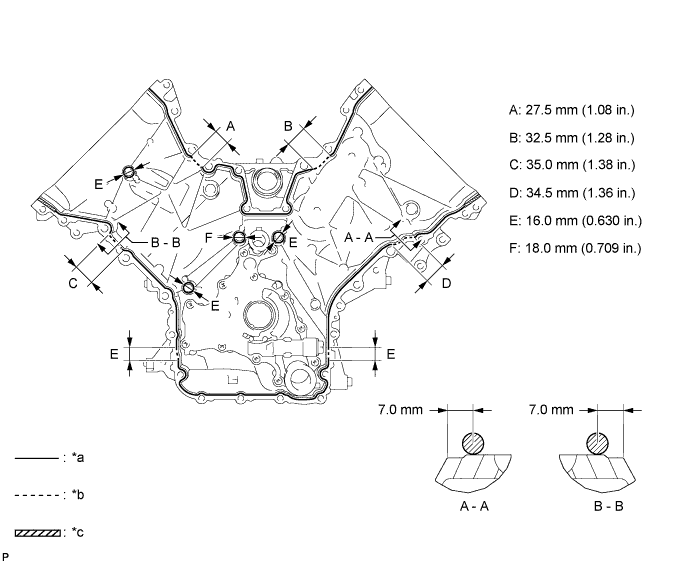
| *a | Continuous Line Area | *b | Dashed Line Area |
| *c | Diagonal Line Area | - | - |
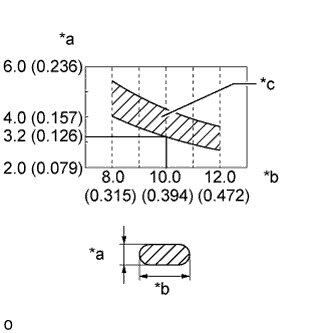 |
| Area | Seal Packing Diameter | Application Position from Inside Edge of Cover |
| Continuous line area | 3.0 to 4.0 mm (0.118 to 0.157 in.) | 2.5 mm (0.0984 in.) |
| Dashed line area | 6.4 mm (0.252 in.) or more, or within OK area shown in illustration | 7.0 mm (0.276 in.) |
| Diagonal line area | 3.0 to 4.0 mm (0.118 to 0.157 in.) | 5.5 mm (0.217 in.) |
| *a | Seal Packing Thickness |
| *b | Seal Packing Width |
| *c | OK Area |
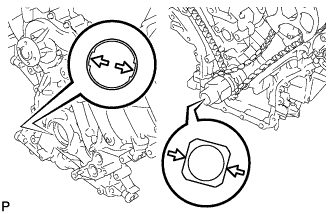 |
Align the oil pump drive rotor spline and crankshaft as shown in the illustration. Install the spline and timing chain cover sub-assembly to the crankshaft.
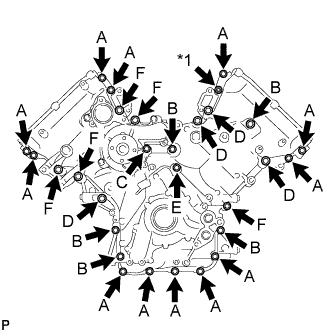 |
Temporarily install the timing chain cover sub-assembly with the 28 bolts and nut.
| Item | Length | Thread Diameter |
| Bolt A | 25 mm (0.984 in.) | 8 mm (0.315 in.) |
| Bolt B | 55 mm (2.17 in.) | 8 mm (0.315 in.) |
| Bolt C | 70 mm (2.76 in.) | 8 mm (0.315 in.) |
| Bolt D | 35 mm (1.38 in.) | 10 mm (0.394 in.) |
| Bolt E | 55 mm (2.17 in.) | 10 mm (0.394 in.) |
| Bolt F | 80 mm (3.15 in.) | 10 mm (0.394 in.) |
| *1 | Nut |
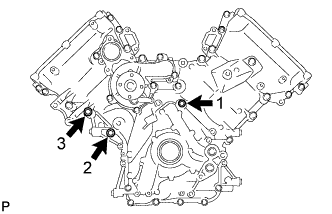 |
Tighten the 3 bolts in several steps in the sequence shown in the illustration.
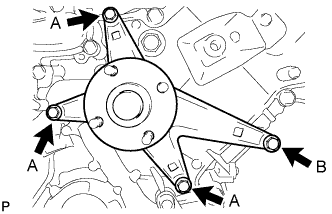 |
Temporarily install the fan bracket assembly with the 4 bolts.
| Item | Length | Thread Diameter |
| Bolt A | 70 mm (2.76 in.) | 8 mm (0.315 in.) |
| Bolt B | 80 mm (3.15 in.) | 10 mm (0.394 in.) |
Temporarily install the V-ribbed belt tensioner assembly with the standard bolt and 6 mm hexagon bolt.
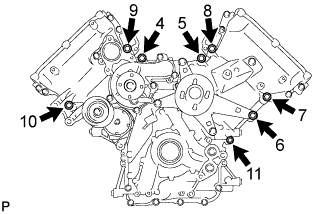 |
Tighten the 8 bolts labeled 4 to 11 in several steps in the sequence shown in the illustration.
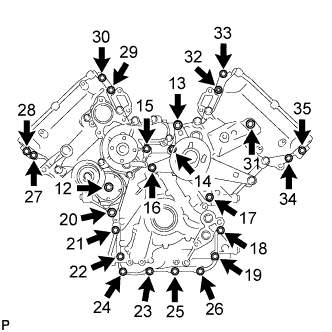 |
Tighten the 23 bolts and nut labeled 12 to 35 in several steps in the sequence shown in the illustration.
 |
| 40. INSTALL FRONT CRANKSHAFT OIL SEAL |
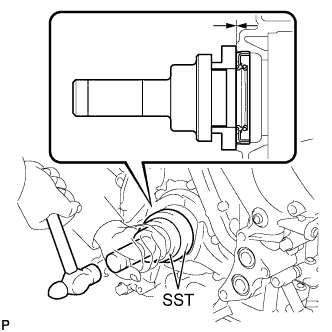 |
Apply MP grease to the lip of a new oil seal.
Using SST and a hammer, tap in the oil seal to a depth between 0 to 1.0 mm (0 to 0.0394 in.) from the timing chain cover edge.
| 41. INSTALL CRANKSHAFT TIMING GEAR KEY |
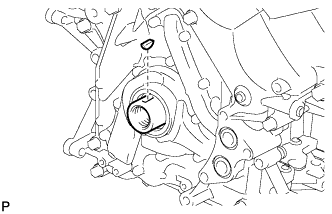 |
Install the crankshaft timing gear key to the crankshaft.
| 42. INSTALL SPARK PLUG TUBE GASKET |
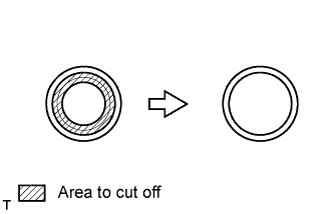 |
Using a cutter knife, cut off the seal part of the removed gasket.
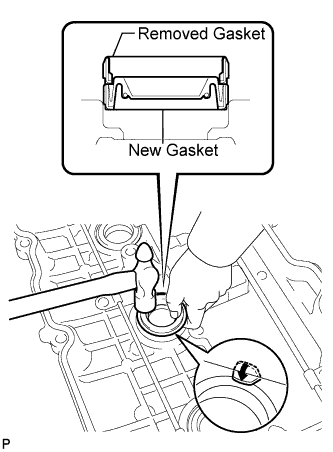 |
Using the removed gasket and a hammer, tap in a new gasket until it stops.
Apply a light coat of MP grease to the gasket lip.
Return the 4 ventilation baffle plate claws to the original positions.
| 43. INSTALL OIL CONTROL VALVE FILTER |
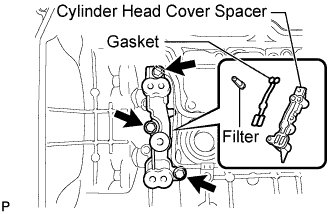 |
LH:
Install the valve filter in the cylinder head cover.
Install a new gasket and the cylinder head cover spacer with the 3 bolts.
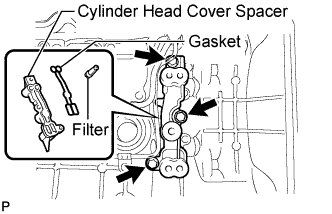 |
RH:
Install the valve filter in the cylinder head cover.
Install a new gasket and the cylinder head cover spacer with the 3 bolts.
| 44. INSTALL CYLINDER HEAD COVER SUB-ASSEMBLY RH |
Install 5 new gaskets to the No. 1 camshaft bearing cap and No. 3 camshaft bearing cap.
Install the gasket to the cylinder head cover sub-assembly RH.
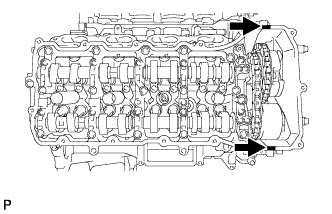 |
Apply seal packing as shown in the illustration.
 | Seal Packing |
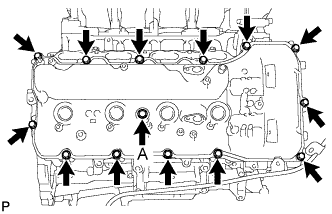 |
Install the cylinder head cover sub-assembly RH washer with a new seal and the 14 bolts.
| 45. INSTALL CYLINDER HEAD COVER SUB-ASSEMBLY LH |
Install 5 new gaskets to the No. 2 camshaft bearing cap and No. 3 camshaft bearing cap.
Install the gasket to the cylinder head cover sub-assembly LH.
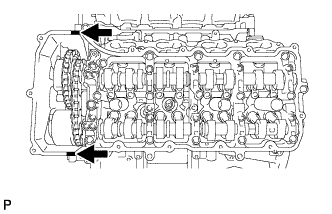 |
Apply seal packing as shown in the illustration.
| Seal Packing |
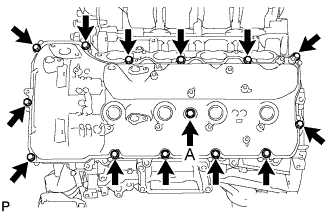 |
Install the cylinder head cover sub-assembly LH washer with a new seal and the 14 bolts.
| 46. INSTALL CAMSHAFT OIL CONTROL VALVE ASSEMBLY |
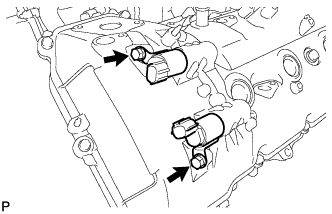 |
LH:
Apply a light coat of engine oil to 2 new O-rings.
Install the 2 O-rings to the 2 oil control valves.
Install the 2 oil control valves with the 2 bolts.
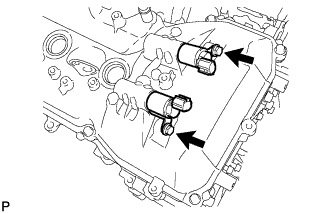 |
RH:
Apply a light coat of engine oil to 2 new O-rings.
Install the 2 O-rings to the 2 oil control valves.
Install the 2 oil control valves with the 2 bolts.
| 47. INSTALL CRANKSHAFT POSITION SENSOR |
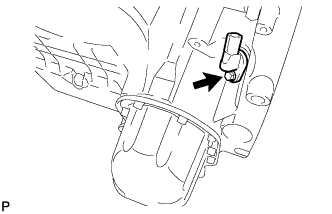 |
Install the crankshaft position sensor with the bolt.
| 48. INSTALL CRANK POSITION SENSOR PROTECTOR |
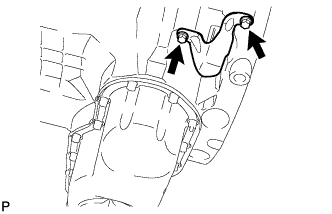 |
Install the sensor protector with the 2 bolts.
| 49. INSTALL CAMSHAFT POSITION SENSOR |
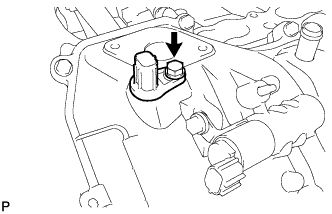 |
Install the camshaft position sensor with the bolt.
| 50. INSTALL VVT SENSOR |
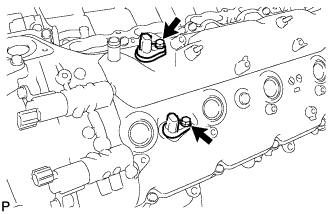 |
LH:
Install the 2 VVT sensors with the 2 bolts.
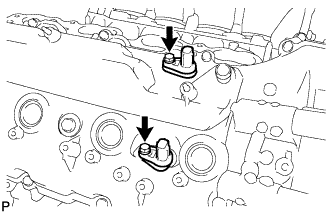 |
RH:
Install the 2 VVT sensors with the 2 bolts.
| 51. INSTALL SPARK PLUG |
| 52. INSTALL OIL FILLER CAP HOUSING |
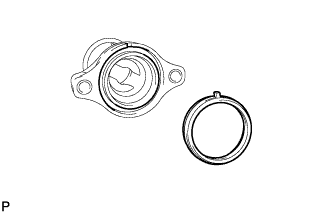 |
Align the protrusion of a new gasket with the cutout of the oil filler cap housing, and install the gasket to the housing.
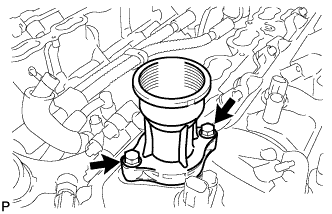 |
Install the cap housing with the 2 bolts.
| 53. INSTALL OIL FILLER CAP SUB-ASSEMBLY |
| 54. INSTALL CRANKSHAFT PULLEY |
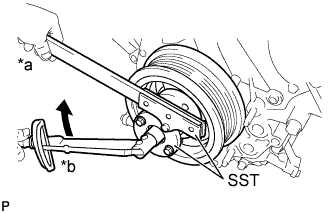 |
Align the crankshaft pulley set key with the key groove of the crankshaft pulley, and slide on the crankshaft pulley.
| *a | Hold |
| *b | Turn |
| *c | SST |
Using SST, install the crankshaft pulley set bolt.
| 55. INSTALL OIL FILTER BRACKET (w/o Oil Cooler) |
Apply a light coat of engine oil to 2 new O-rings.
Install the 2 O-rings to the timing chain cover sub-assembly.
Install the oil filter bracket with the 2 bolts and 2 nuts.
| 56. INSTALL OIL FILTER BRACKET (w/ Oil Cooler) |
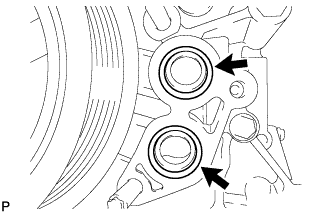 |
Apply a light coat of engine oil to 2 new O-rings.
Install the 2 O-rings to the timing chain cover.
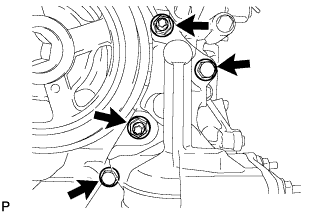 |
Install the oil filter bracket with the 2 nuts and 2 bolts.
| 57. INSTALL NO. 1 OIL COOLER BRACKET (w/ Oil Cooler) |
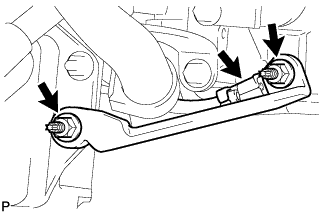 |
Connect the ground wire to the cylinder block.
Install the oil cooler bracket with the 2 nuts.
| 58. INSTALL OIL FILTER ELEMENT |
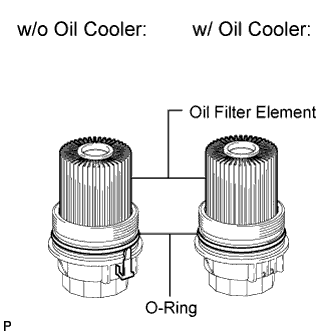 |
Clean the inside of the oil filter cap, its threads and its O-ring groove.
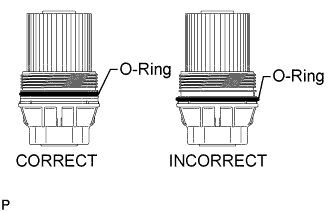 |
Apply a small amount of engine oil to a new O-ring and install it to the oil filter cap.
Set a new oil filter element to the oil filter cap.
Remove any dirt or foreign matter from the installation surface of the engine.
Apply a small amount of engine oil to the O-ring again and temporarily install the oil filter cap.
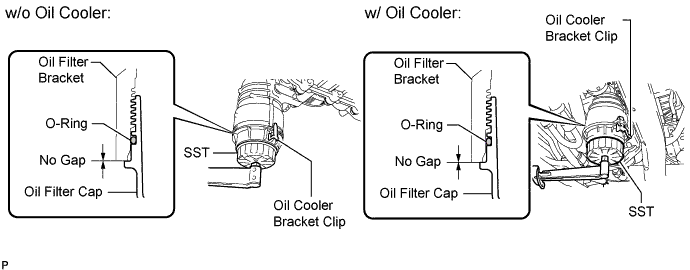
Using SST, tighten the oil filter cap.
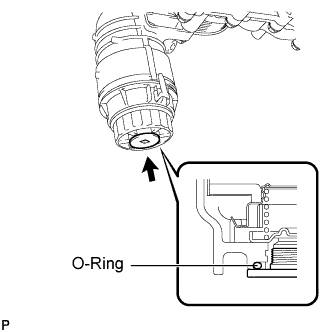 |
Apply a small amount of engine oil to a new drain plug O-ring, and install it to the oil filter cap.
Install the oil filter drain plug.