
FRONT POWER SEAT CONTROL SYSTEM (w/ Memory) > TERMINALS OF ECU |
| CHECK POSITION CONTROL ECU AND SWITCH ASSEMBLY |
Disconnect the Z9 and Z10 position control ECU and switch assembly connectors.
Measure the voltage and resistance according to the value(s) in the table below.
| Terminal No. (Symbols) | Wiring Color | Terminal Description | Condition | Specified Condition |
| Z9-2 (GND1) - Body ground | W-B - Body ground | Ground | Always | Below 1 Ω |
| Z9-7 (+B1) - Z9-2 (GND1) | W - W-B | Battery (ECU power source) | Always | 11 to 14 V |
| Z10-12 (SYSB) - Z9-2 (GND1) | LG - W-B | Battery (ECU power source) | Always | 11 to 14 V |
| Z10-10 (DBCL) - Z10-1 (SGND) | P - BR | Front seat inner belt buckle switch signal | Seat belt unfastened | Below 1 Ω |
| Seat belt fastened | 10 kΩ or higher |
Reconnect the Z9 and Z10 position control ECU and switch assembly connectors.
Measure the voltage and resistance according to the value(s) in the table below.
| Terminal No. (Symbols) | Wiring Color | Terminal Description | Condition | Specified Condition |
| Z9-1 (GND2) - Body ground | W-B - Body ground | Lumbar support adjuster ground | Always | Below 1 Ω |
| Z9-3 (SLD+) - Z9-2 (GND1) | L - W-B | Sliding motor signal (forward) | Seat moving forward using sliding switch | 11 to 14 V |
| OFF | Below 1 V | |||
| Z9-4 (SLD-) - Z9-2 (GND1) | GR - W-B | Sliding motor signal (rearward) | Seat moving rearward using sliding switch | 11 to 14 V |
| OFF | Below 1 V | |||
| Z9-5 (FRV-) - Z9-2 (GND1) | R - W-B | Front Vertical motor signal (downward) | Seat cushion front portion downward using front vertical switch | 11 to 14 V |
| OFF | Below 1 V | |||
| Z9-6 (+B2) - Z9-1 (GND2) | LG - W-B | Lumbar support adjuster power source | Always | 11 to 14 V |
| Z9-8 (FRV+) - Z9-2 (GND1) | B - W-B | Front vertical motor signal (upward) | Seat cushion front portion upward using front vertical switch | 11 to 14 V |
| OFF | Below 1 V | |||
| Z9-9 (RCL+) - Z9-2 (GND1) | LG - W-B | Reclining motor signal (forward) | Seatback moving forward using reclining switch | 11 to 14 V |
| OFF | Below 1 V | |||
| Z9-10 (LFT+) - Z9-2 (GND1) | V - W-B | Lift or motor signal (upward) | Seat cushion upward using lifter switch | 11 to 14 V |
| OFF | Below 1 V | |||
| Z9-11 (RCL-) - Z9-2 (GND1) | P - W-B | Reclining motor signal (rearward) | Seatback moving rearward using reclining switch | 11 to 14 V |
| OFF | Below 1 V | |||
| Z9-12 (LFT-) - Z9-2 (GND1) | Y - W-B | Lift or motor signal (downward) | Seat cushion downward using lifter switch | 11 to 14 V |
| OFF | Below 1 V | |||
| Z10-1 (SGND) - Body ground | BR - Body ground | Position sensor ground | Always | Below 1 Ω |
| Z10-3 (SSFV) - Z10-1 (SGND) | R - BR | Vertical position signal | Front vertical function operation | 4.5 to 4.8 V |
| Z10-4 (SSRL) - Z10-1 (SGND) | P - BR | Lift position signal | Lifter function operation | 4.5 to 4.8 V |
| Z10-5 (SSRS) - Z10-1 (SGND) | G - BR | Slide position signal | Slide function operation | 4.5 to 4.8 V |
| Z10-11 (SSRR) - Z10-1 (SGND) | O - BR | Reclining position signal | Reclining function operation | 4.5 to 4.8 V |
| CHECK OUTER MIRROR CONTROL ECU ASSEMBLY |
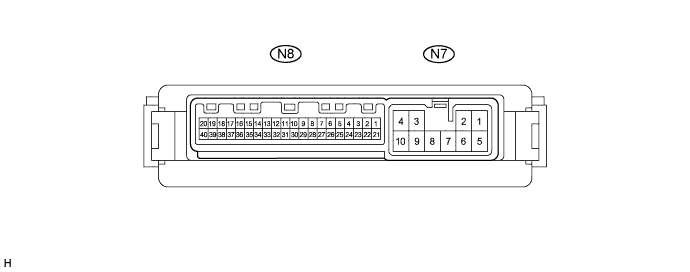
Disconnect the N7 outer mirror control ECU assembly connector.
Measure the voltage and resistance according to the value(s) in the table below.
| Terminal No. (Symbols) | Wiring Color | Terminal Description | Condition | Specified Condition |
| N7-3 (B) - N7-9 (GND) | R - W-B | Battery (ECU power source) | Always | 11 to 14 V |
| N7-4 (ACC) - N7-9 (GND) | Y - W-B | Ignition power supply | Ignition switch off | Below 1 V |
| Ignition switch ACC | 11 to 14 V | |||
| N7-9 (GND) - Body ground | W-B - Body ground | Ground | Always | Below 1 Ω |
Reconnect the N7 outer mirror control ECU assembly connector.
Measure the voltage according to the value(s) in the table below.
| Terminal No. (Symbols) | Wiring Color | Terminal Description | Condition | Specified Condition |
| N8-7 (M2) - N8-10 (MSWE) | BE - V | Memory 2 switch signal | Memory 2 switch off | 11 to 14 V |
| Memory 2 switch on | Below 1 V | |||
| N8-8 (M1) - N8-10 (MSWE) | P - V | Memory 1 switch signal | Memory 1 switch off | 11 to 14 V |
| Memory 1 switch on | Below 1 V | |||
| N8-9 (MM) - N8-10 (MSWE) | L - V | Memory SET switch signal | Memory SET switch off | 11 to 14 V |
| Memory SET switch on | Below 1 V |