Home › ENGINE · 3UR-FE › INTAKE › VACUUM SWITCHING VALVE (for ACIS)

VACUUM SWITCHING VALVE (for ACIS) > ON-VEHICLE INSPECTION

for Preparation Click here


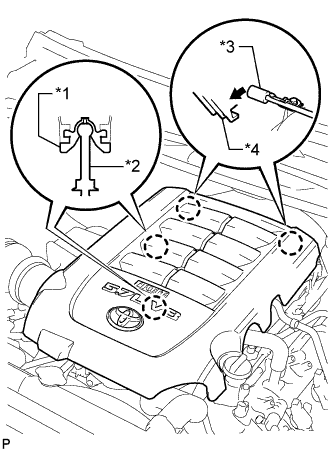
1. REMOVE V-BANK COVER SUB-ASSEMBLY


    A165576E04
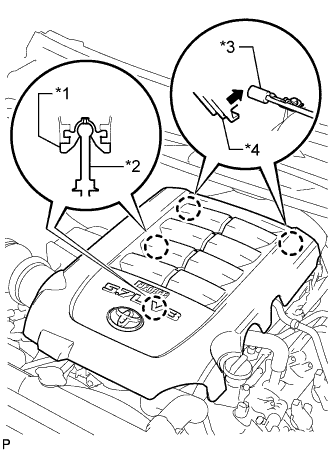
  1. Raise the front of the V-bank cover sub-assembly to detach the 2 pins. Then remove the 2 V-bank cover hooks from the No. 1 V-bank cover bracket, and remove the V-bank cover sub-assembly.
    Text in Illustration 
    *1
    V-bank Cover Grommet
    *2
    Pin
    *3
    No. 1 V-bank Cover Bracket
    *4
    V-bank Cover Hook


2. INSPECT VACUUM SWITCHING VALVE ASSEMBLY (for ACIS)
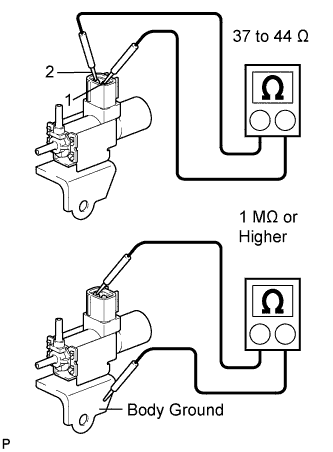
  1. Disconnect the vacuum switching valve connector.


    A162110E01
  1. Measure the resistance according to the value(s) in the table below.

    Standard resistance:
    Tester Condition
    Condition
    Specified Condition
    1 - 2
    20°C (68°F)
    37 to 44 Ω
    1 - Body ground
    Always
    1 MΩ or higher
    2 - Body ground

    If the result is not as specified, replace the vacuum switching valve assembly.


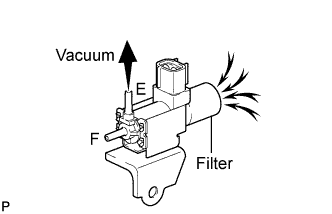
  1. Check the vacuum switching valve operation.


      A162111E01
    1. When applying a vacuum to port E, check that air is sucked into the filter.
      If the result is not as specified, replace the vacuum switching valve assembly.


    2. A162112E01
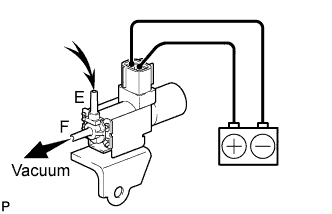
    3. Apply voltage across the terminals.

    4. When applying a vacuum to port F, check that air is sucked into port E.
      If the result is not as specified, replace the vacuum switching valve assembly.

  1. Connect the vacuum switching valve connector.


3. INSTALL V-BANK COVER SUB-ASSEMBLY


    A307791E01
  1. Attach the 2 V-bank cover hooks to the No. 1 V-bank cover bracket. Then align the 2 V-bank cover grommets with the 2 pins, and press down on the V-bank cover sub-assembly to attach the pins.
    Text in Illustration 
    *1
    V-bank Cover Grommet
    *2
    Pin
    *3
    No. 1 V-bank Cover Bracket
    *4
    V-bank Cover Hook