 |
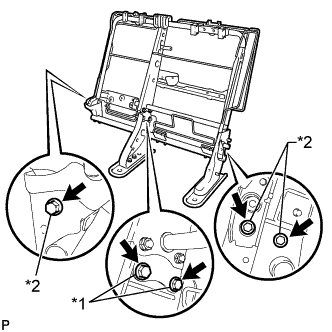
Install the rear seatback frame sub-assembly LH with the 5 bolts.
- Torque:
- for Bolt A:
- 85 N*m{ 867 kgf*cm , 63 ft.*lbf }
- for Bolt B:
- 45 N*m{ 459 kgf*cm , 33 ft.*lbf }
| *1 | Bolt A |
| *2 | Bolt B |
REAR SEAT ASSEMBLY (for CrewMax LH Side) > REASSEMBLY |
| 1. INSTALL REAR SEATBACK FRAME SUB-ASSEMBLY LH |
|
Install the rear seatback frame sub-assembly LH with the 5 bolts.
| *1 | Bolt A |
| *2 | Bolt B |
| 2. INSTALL REAR SEAT TURN LOCK SUB-ASSEMBLY |
Install the rear seat turn lock sub-assembly with the 2 nuts.
| 3. INSTALL REAR SEAT CUSHION FRAME SUB-ASSEMBLY LH |
Using a T40 "TORX" socket wrench, install the rear seat cushion frame sub-assembly LH with the 2 bolts.
| 4. INSTALL NO. 1 RECLINING ADJUSTER RELEASE HANDLE LH |
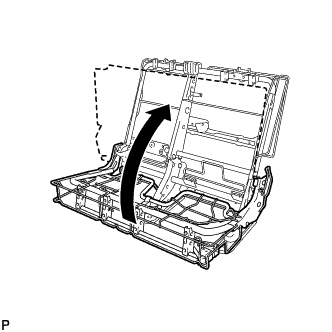 |
Fold up the rear seat cushion frame sub-assembly LH.
Install the No. 1 reclining adjuster release handle LH with the 4 screws.
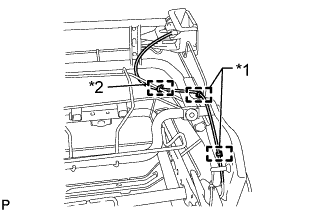 |
Attach the 2 cable clamps.
| *1 | Clamp |
| *2 | Cable Tie |
Install a new cable tie.
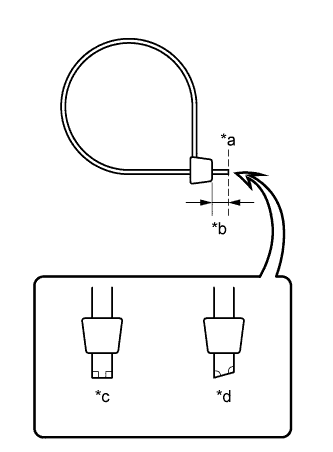 |
Cut off the end of the cable tie as shown in the illustration.
| *a | Cut Here |
| *b | 5 mm (0.20 in.) |
| *c | Correct |
| *d | Incorrect |
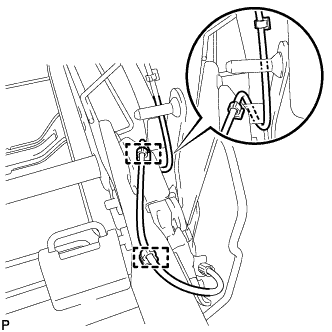 |
Attach the 2 cable clamps to connect the cable of the No. 1 reclining adjuster release handle LH as shown in the illustration.
Connect the cable end of the No. 1 reclining adjuster release handle LH as shown in the illustration and attach the clamp.
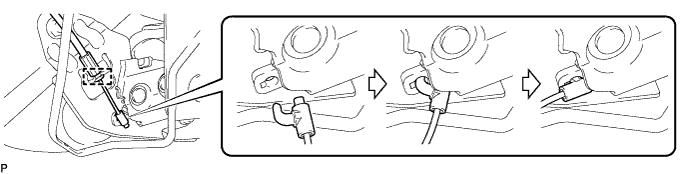
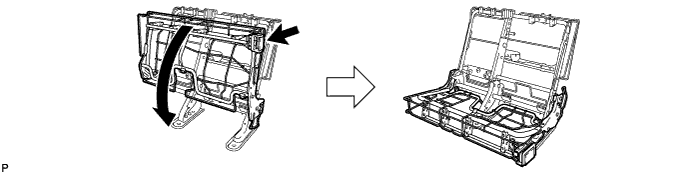
Pull the No. 1 reclining adjuster release handle LH and fold down the rear seat cushion frame sub-assembly LH.
| 5. INSTALL REAR CENTER SEAT OUTER BELT ASSEMBLY |
Attach the guide and install the rear center seat outer belt assembly with the nut.
| 6. INSTALL REAR SEAT SHOULDER BELT HOLE COVER |
Attach the 2 guides to install the rear seat shoulder belt hole cover with the screw.
Attach the 3 guides to install the rear center seat outer belt assembly to the rear seat shoulder belt hole cover.
| 7. INSTALL SEPARATE TYPE REAR SEATBACK COVER |
Set the separate type rear seatback cover in place.
Using hog ring pliers, install the separate type rear seatback cover to the separate type rear seatback pad with 9 new hog rings as shown in the illustration.
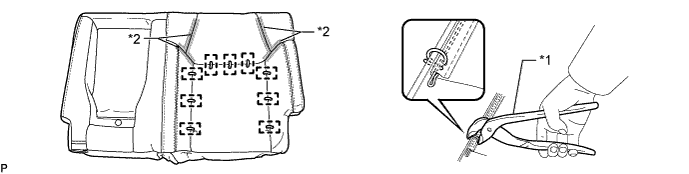
| *1 | Hog Ring Pliers | *2 | Fastener |
Attach the 4 fasteners.
| 8. INSTALL SEPARATE TYPE REAR SEATBACK COVER WITH PAD |
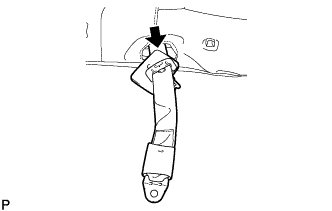 |
Pass the floor anchor of the rear center seat outer belt assembly through the hole of the separate type rear seatback cover with pad in the direction indicated by the arrow shown in the illustration.
Attach the 8 hooks to install the separate type rear seatback cover with pad.
Attach the 2 guides to install the upper rear seatback lock bezel of the rear center seat outer belt assembly with the screw.
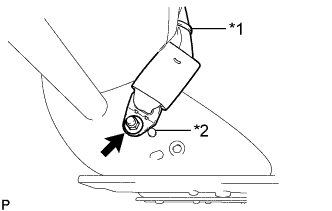 |
Pass the rear center seat outer belt assembly through the rubber band of the separate type rear seatback cover.
| *1 | Rubber Band |
| *2 | Protruding Part |
Connect the floor anchor of the rear center seat outer belt assembly with the nut.
| 9. INSTALL REAR NO. 1 SEAT HEADREST SUPPORT ASSEMBLY |
Attach the 4 claws to install the 2 rear No. 1 seat headrest support assemblies.
| 10. INSTALL REAR SEAT HEADREST SUPPORT |
Attach the 4 claws to install the 2 rear seat headrest supports.
| 11. INSTALL TETHER ANCHOR BRACKET SUB-ASSEMBLY |
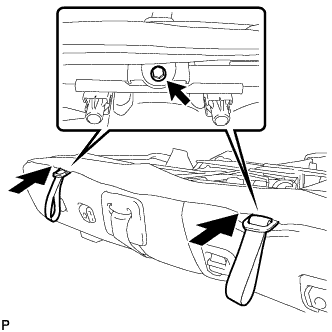 |
Install the 2 tether anchor bracket sub-assemblies with the 2 bolts.
Attach the 2 hooks of the separate type rear seatback cover.
| 12. INSTALL REAR NO. 1 SEAT CENTER ARMREST COVER |
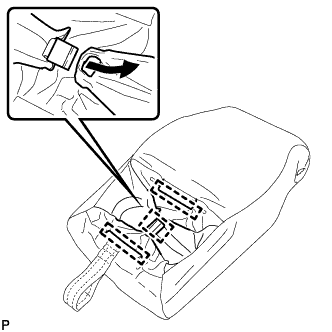 |
Attach the 3 hooks to install the rear No. 1 seat center armrest cover.
| 13. INSTALL CUP HOLDER ASSEMBLY |
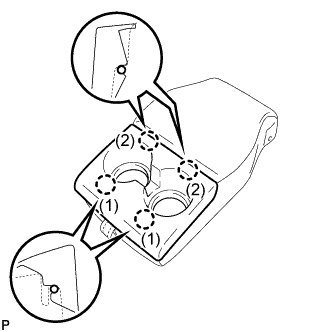 |
Attach the 4 claws in the order shown in the illustration to install the cup holder assembly.
| 14. INSTALL REAR SEAT CENTER ARMREST ASSEMBLY |
Install the rear seat armrest bracket and 2 bushes to the rear seat center armrest assembly.
Using a T25 "TORX" socket wrench, install the 2 bolts.
Install the rear seat center armrest assembly with the 3 nuts.
| 15. INSTALL REAR NO. 1 SEAT INNER BELT ASSEMBLY LH |
Attach the guide.
Tighten the bolt to install the rear No. 1 seat inner belt assembly LH.
| 16. INSTALL REAR SEAT INNER RECLINING COVER LH |
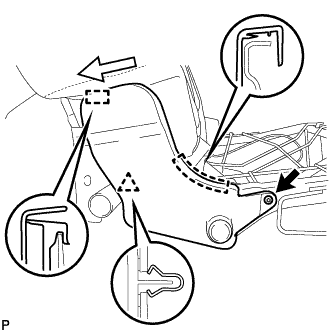 |
Attach the 2 guides in the direction indicated by the arrow shown in the illustration.
Attach the clip.
Using a T25 "TORX" socket wrench, install the rear seat inner reclining cover LH with the screw.
| 17. INSTALL REAR SEAT RECLINING COVER LH |
Attach the guide and claw.
Using a T25 "TORX" socket wrench, install the rear seat reclining cover LH with the 2 screws.
| 18. INSTALL SEPARATE TYPE REAR SEAT CUSHION COVER |
Set the separate type rear seat cushion cover in place.
Using hog ring pliers, install the separate type rear seat cushion cover to the separate type rear seat cushion pad with 12 new hog rings as shown in the illustration.
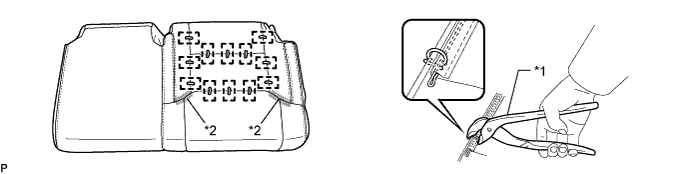
| *1 | Hog Ring Pliers | *2 | Fastener |
Attach the 2 fasteners.
| 19. INSTALL SEPARATE TYPE REAR SEAT CUSHION COVER WITH PAD |
Attach the 6 hooks to install the separate type rear seat cushion cover with pad.
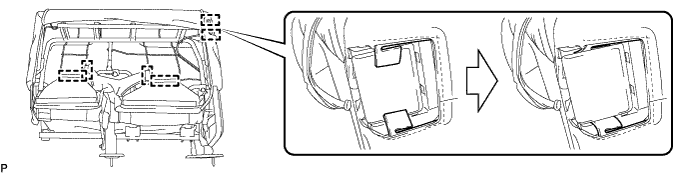
| 20. INSTALL REAR SEATBACK LOCK CONTROL BEZEL |
Attach the 4 claws to install the rear seatback lock control bezel.
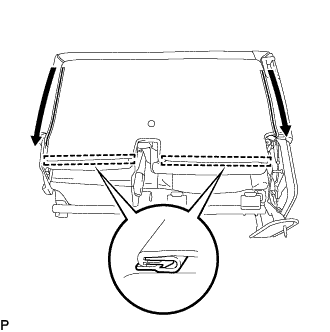 |
Close the 2 fasteners and attach the 2 hooks to close the separate type rear seat cushion cover.
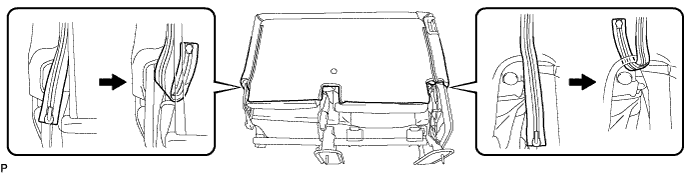
Fold in the 2 fasteners.
| 21. INSTALL REAR CENTER SEAT HEADREST ASSEMBLY |
Push the lock release button to release the lock, and then install the rear center seat headrest assembly.
| 22. INSTALL REAR SEAT HEADREST ASSEMBLY |
Push the 2 lock release buttons to release the lock, and then the rear seat headrest assembly.