Loosen the radiator drain cock plug and 2 cylinder block drain cock plugs.
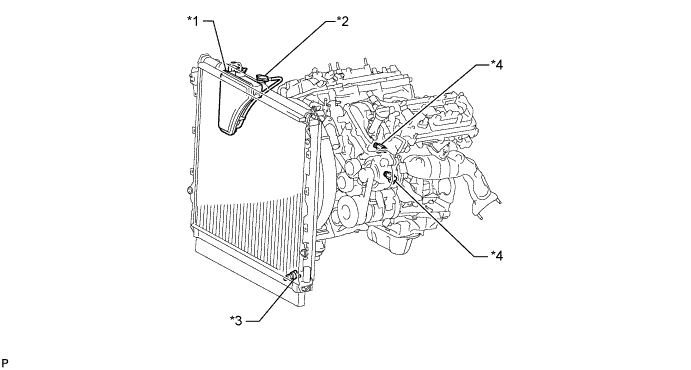
| *1 | Radiator Reservoir | *2 | Radiator Cap |
| *3 | Radiator Drain Cook Plug | *4 | Cylinder Block Drain Cock Plug |
CAMSHAFT > REMOVAL |
| 1. PRECAUTION |
| 2. DISCONNECT CABLE FROM NEGATIVE BATTERY TERMINAL |
| 3. DRAIN ENGINE OIL |
Remove the oil filler cap.
Remove the oil pan drain plug and drain the engine oil into a container.
Install a new gasket and the oil pan drain plug.
| 4. DRAIN ENGINE COOLANT |
Loosen the radiator drain cock plug and 2 cylinder block drain cock plugs.
| *1 | Radiator Reservoir | *2 | Radiator Cap |
| *3 | Radiator Drain Cook Plug | *4 | Cylinder Block Drain Cock Plug |
Remove the radiator cap. Then drain the coolant.
Tighten the 2 cylinder block drain cock plugs.
Tighten the radiator drain cock plug by hand.
| 5. DISCONNECT CABLE FROM POSITIVE BATTERY TERMINAL |
| 6. REMOVE AIR CLEANER CAP AND HOSE |
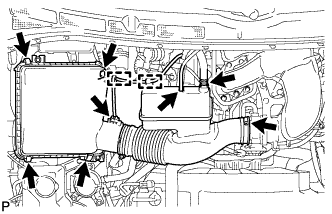 |
Remove the air cleaner cap and hose.
Disconnect the mass air flow meter connector, vacuum hose and ventilation hose and detach the 4 clamps.
Loosen the clamp.
Detach the 4 hook clamps, and then remove the air cleaner cap and hose.
| 7. REMOVE RADIATOR HOSE INLET |
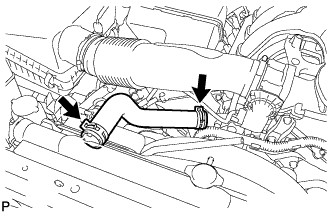 |
Slide the 2 clamps and remove the radiator hose inlet.
| 8. REMOVE RADIATOR HOSE OUTLET |
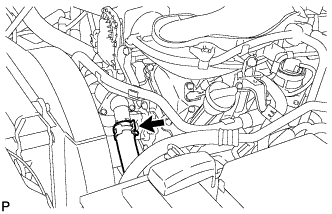 |
Slide the clamp and disconnect the radiator hose outlet from the water inlet.
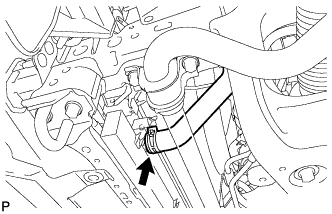 |
Slide the clamp and remove the radiator hose outlet from the radiator assembly.
| 9. REMOVE FAN SHROUD |
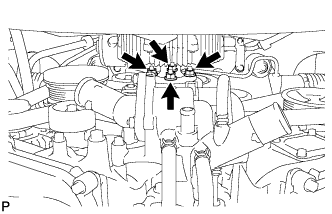 |
Loosen the 4 nuts holding the fan with fluid coupling.
Remove the fan and generator V-belt (Click here).
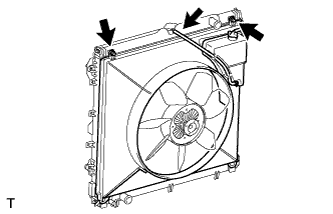 |
Disconnect the reservoir hose from the radiator tank upper.
Remove the 2 bolts holding the fan shroud.
Remove the 4 nuts of the fan with fluid coupling, and then remove the fan shroud together with the fan with fluid coupling.
Remove the fan pulley from the water pump assembly.
| 10. REMOVE AIR TUBE ASSEMBLY |
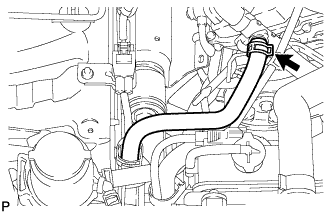 |
Disconnect the air injection system hose from the air tube assembly.
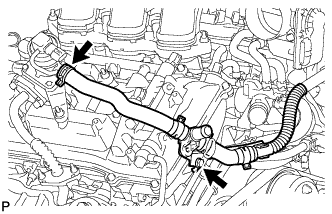 |
for Bank 1 Side:
Remove the bolt and disconnect the air tube assembly from the emission control valve set.
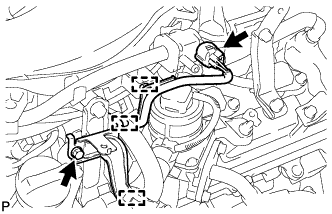 |
Disconnect the purge VSV connector.
Detach the 3 wire harness clamps from the intake air surge tank and bracket.
Remove the bolt and wire harness clamp bracket.
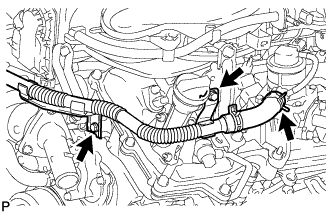 |
for Bank 2 Side:
Remove the 2 bolts and disconnect the air tube assembly from the No. 2 emission control valve set.
| 11. REMOVE INTAKE AIR SURGE TANK |
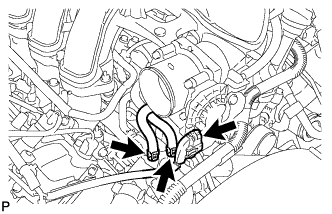 |
Disconnect the throttle body connector.
Disconnect the No. 4 water by-pass hose.
Disconnect the No. 5 water by-pass hose.
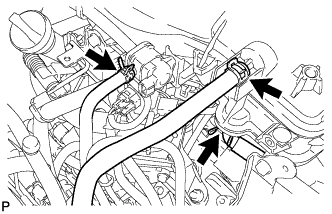 |
Disconnect the No. 1 fuel vapor feed hose.
Disconnect the vacuum hose.
Disconnect the No. 1 ventilation hose.
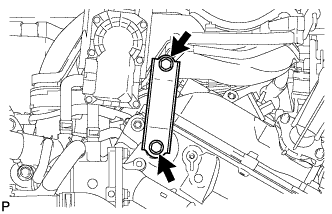 |
Remove the 2 bolts and throttle body bracket.
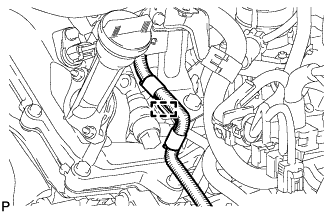 |
Using a clip remover, detach the wire harness clamp.
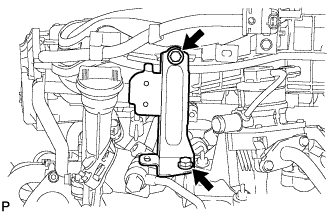 |
Remove the 2 bolts and No. 1 surge tank stay.
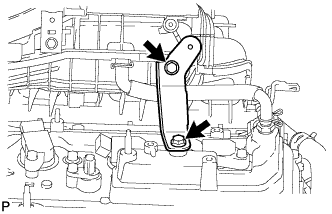 |
Remove the 2 bolts and No. 2 surge tank stay.
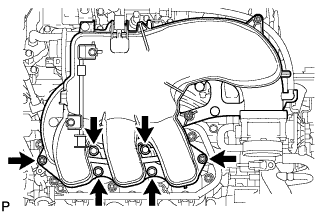 |
Remove the 2 nuts, 4 bolts and intake air surge tank.
Remove the gasket.
| 12. REMOVE AIR TUBE |
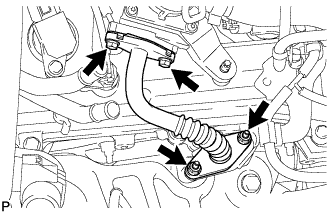 |
Remove the 2 bolts, 2 nuts and air tube.
Remove the 2 gaskets from the air tube.
| 13. REMOVE NO. 2 AIR TUBE |
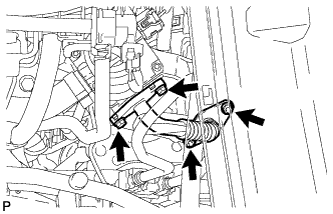 |
Remove the 2 bolts, 2 nuts and No. 2 air tube.
Remove the 2 gaskets from the No. 2 air tube.
| 14. REMOVE EMISSION CONTROL VALVE SET |
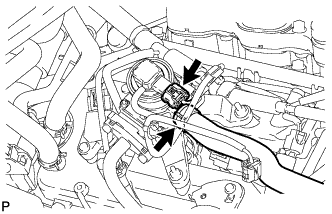 |
Disconnect the emission control valve set connector.
Disconnect the air hose from the emission control valve set.
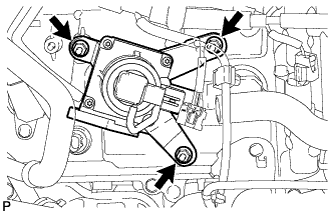 |
Remove the 3 nuts and emission control valve set.
| 15. REMOVE NO. 2 EMISSION CONTROL VALVE SET |
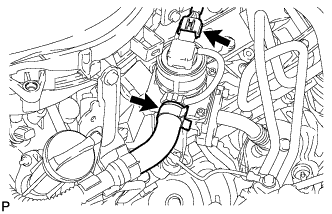 |
Disconnect the No. 2 emission control valve set connector.
Disconnect the air hose.
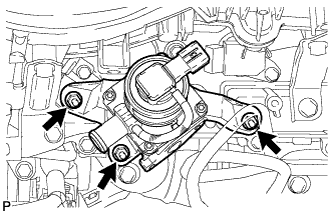 |
Remove the 3 nuts and No. 2 emission control valve set.
| 16. REMOVE IGNITION COIL ASSEMBLY |
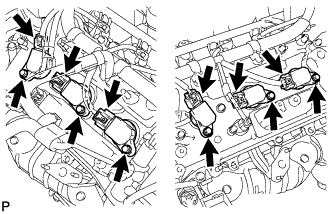 |
Disconnect the 6 ignition coil connectors.
Remove the 6 bolts and 6 ignition coils.
| 17. DISCONNECT VANE PUMP ASSEMBLY |
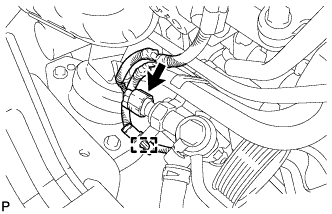 |
Disconnect the connector.
Detach the wire harness clamp.
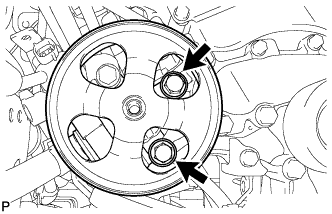 |
Remove the 2 bolts and disconnect the vane pump.
| 18. DISCONNECT WIRE HARNESS |
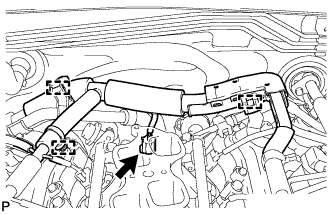 |
Disconnect the engine coolant temperature sensor connector.
Detach the 3 wire harness clamps and disconnect the wire harness.
| 19. DISCONNECT HEATER WATER PIPE SUB-ASSEMBLY |
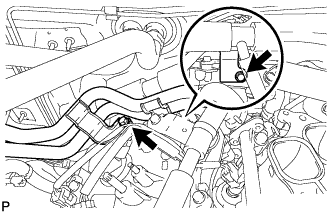 |
Remove the 2 bolts and disconnect the water by-pass pipe.
| 20. REMOVE NO. 2 IDLER PULLEY SUB-ASSEMBLY |
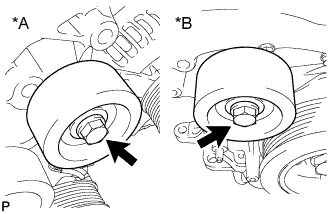 |
for Separate Type:
Remove the 2 bolts, 2 idler pulley cover plates, 2 No. 2 idler pulleys and 2 No. 2 idler pulley cover plates.
| *A | LH |
| *B | RH |
for Integrated Type:
Remove the 2 bolts and 2 No. 2 idler pulleys.
| 21. REMOVE NO. 2 EXHAUST MANIFOLD HEAT INSULATOR |
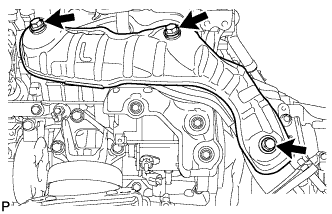 |
Remove the 3 bolts and heat insulator.
| 22. REMOVE GENERATOR ASSEMBLY |
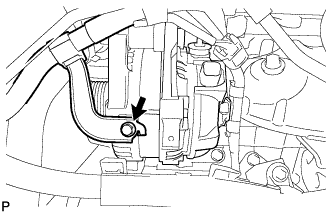 |
Remove the bolt and disconnect the wire harness bracket.
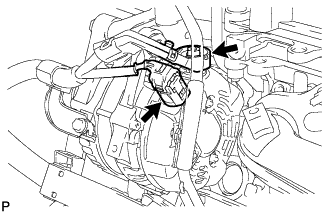 |
Open the terminal cap.
Remove the nut and disconnect the wire harness from terminal B.
Disconnect the generator connector from the generator assembly.
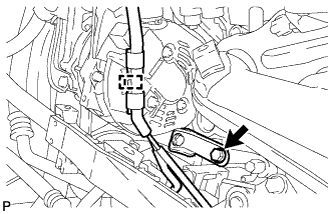 |
Disconnect the wire harness clamp.
Remove the bolt and disconnect the generator bracket.
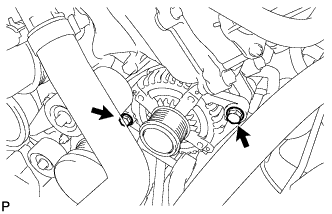 |
Remove the 2 bolts and generator assembly.
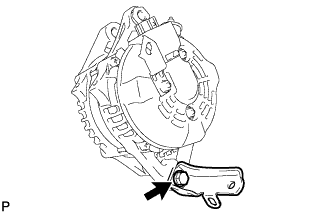 |
Remove the bolt and generator bracket.
| 23. REMOVE ENGINE OIL LEVEL DIPSTICK GUIDE |
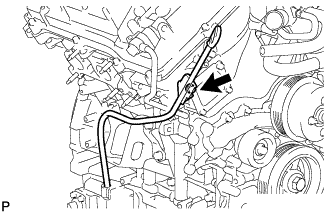 |
Remove the dipstick.
Remove the bolt and dipstick guide.
Remove the O-ring from the dipstick guide.
| 24. REMOVE WATER BY-PASS PIPE SUB-ASSEMBLY |
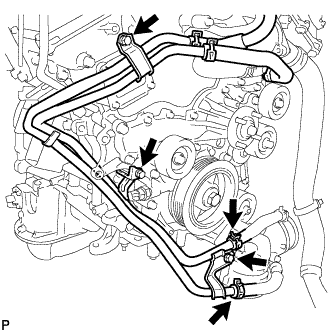 |
Disconnect the 2 hoses.
Remove the 3 bolts and water by-pass pipe.
| 25. REMOVE NO. 1 OIL PIPE |
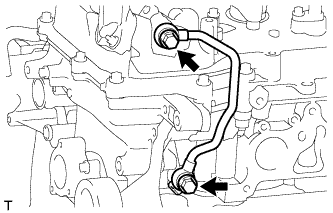 |
Remove the 2 oil pipe unions, oil control valve filter LH, 3 gaskets and No. 1 oil pipe.
| 26. REMOVE NO. 2 OIL PIPE |
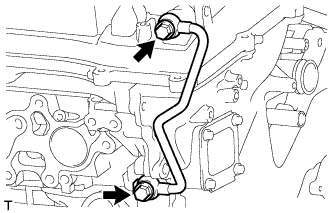 |
Remove the 2 oil pipe unions, oil control valve filter RH, 3 gaskets and No. 2 oil pipe.
| 27. DISCONNECT FUEL PIPE SUB-ASSEMBLY |
Remove the 2 bolts and disconnect the fuel pipe.
| 28. REMOVE CYLINDER HEAD COVER SUB-ASSEMBLY LH |
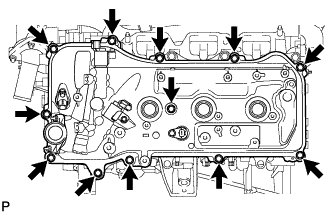 |
Remove the 12 bolts, seal washer, cylinder head cover and gasket.
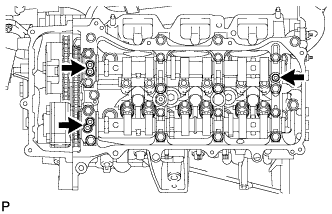 |
Remove the 3 gaskets.
| 29. REMOVE CYLINDER HEAD COVER SUB-ASSEMBLY |
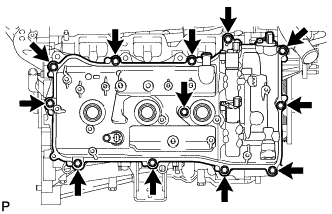 |
Remove the 12 bolts, seal washer, cylinder head cover and gasket.
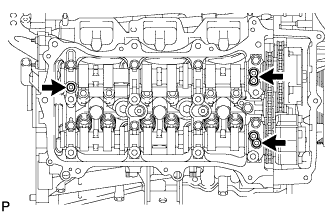 |
Remove the 3 gaskets.
| 30. REMOVE TIMING CHAIN COVER PLATE |
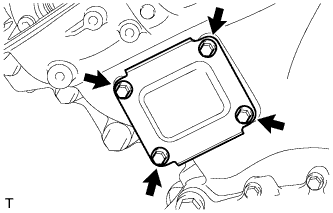 |
Remove the 4 bolts, timing chain cover plate and gasket.
| 31. SET NO. 1 CYLINDER TO TDC/COMPRESSION |
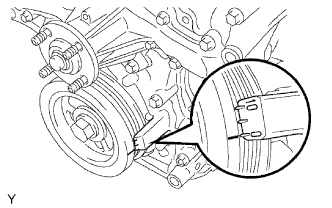 |
Turn the crankshaft pulley and align the notch with the "0" timing mark of the timing chain cover.
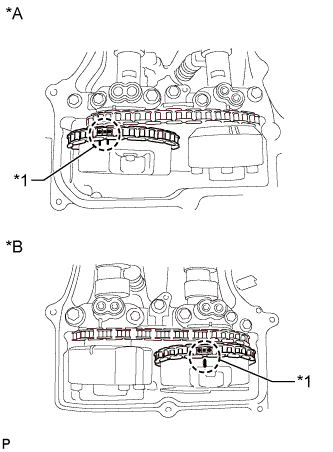 |
Check that the timing marks of the camshaft timing gears are aligned with the timing marks of the bearing caps as shown in the illustration.
| *A | for Bank 2 |
| *B | for Bank 1 |
| *1 | Paint Mark |
Place paint marks on the timing marks and sprockets of each camshaft timing gear and on the links of the No. 1 chain.
| 32. REMOVE NO. 1 CHAIN TENSIONER ASSEMBLY |
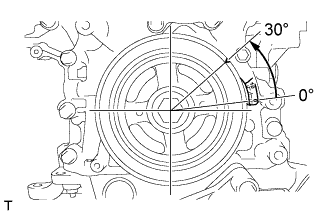 |
Turn the crankshaft approximately 30° counterclockwise so that there is some slack in the chain.
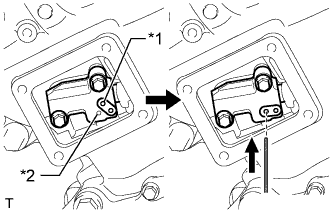 |
Align the hole in the lever of the tensioner with the hole in the tensioner body as shown in the illustration, and then insert a pin with a diameter of 1.27 mm (0.0500 in.) into the hole.
| *1 | Lever Hole |
| *2 | Tensioner Hole |
|
Turn the crankshaft clockwise and align the notch with the "0" timing mark of the timing chain cover.
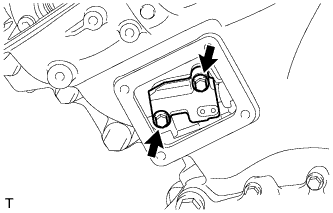 |
Remove the 2 bolts and chain tensioner.
| 33. DISCONNECT CHAIN SUB-ASSEMBLY (for Bank 1) |
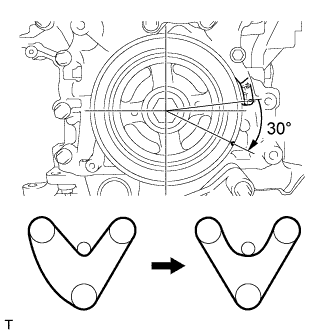 |
Turn the crankshaft clockwise until it is in the position shown in the illustration so that there is some slack in the chain between the banks.
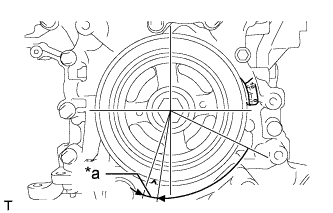 |
Turn the crankshaft clockwise until it is in the position shown in the illustration so that the chain can be removed easily.
| *a | 5° to 10° |
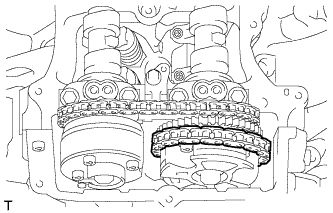 |
Remove the chain from the sprocket of the camshaft timing gear and set it on the gear.
| 34. REMOVE CAMSHAFT BEARING CAP (for Bank 1) |
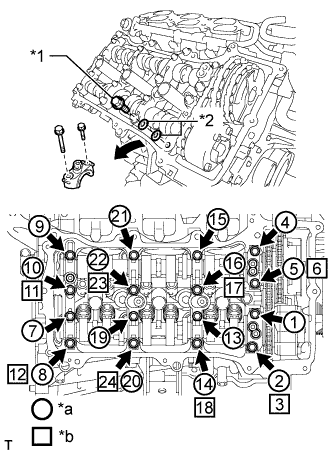 |
Remove the bolts and bearing caps in the order shown in the illustration. Immediately after removing a bearing cap, install bolts and washers for temporary installation of the camshaft housing in the order shown in the illustration.
| *1 | Bolt |
| *2 | Washer |
| *a | Part Removal |
| *b | Installation of Bolts and Washers for Temporary Installation of camshaft housing |
| 35. REMOVE NO. 2 CAMSHAFT |
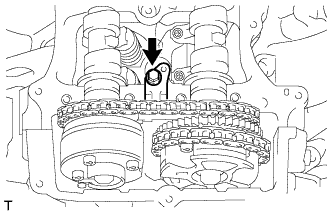 |
Remove the bolt of the No. 2 chain tensioner assembly.
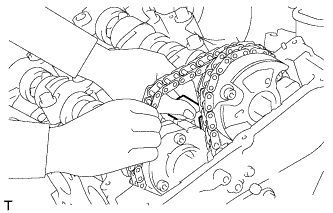 |
Remove the No. 2 chain tensioner assembly while lifting up the No. 2 camshaft.
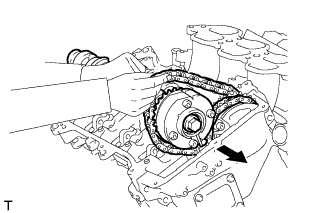 |
While lifting up the No. 2 camshaft, pass it through the No. 2 chain and pull it out towards the front of the vehicle to remove it.
| 36. REMOVE CAMSHAFT |
Lift up the rear of the camshaft so that it is at an angle.
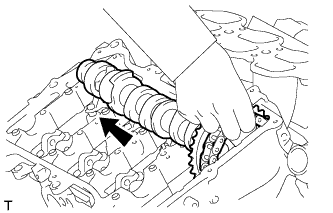 |
Remove the chain from the camshaft timing gear and pull out the camshaft and No. 2 chain towards the rear of the vehicle to remove them.
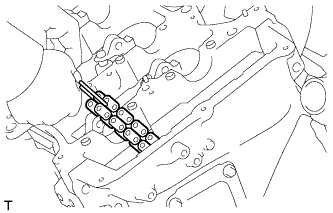 |
Suspend the chain with a string or equivalent.
| 37. DISCONNECT CHAIN SUB-ASSEMBLY (for Bank 2) |
|
Turn the crankshaft counterclockwise and align the notch with the "0" timing mark of the timing chain cover.
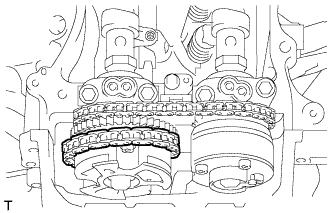 |
Remove the chain from the sprocket of the camshaft timing gear and set it on the gear.
| 38. REMOVE CAMSHAFT BEARING CAP (for Bank 2) |
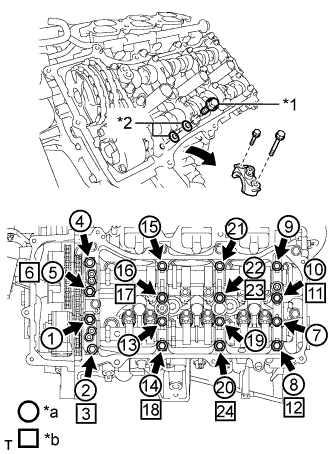 |
Remove the bolts and bearing caps in the order shown in the illustration. Immediately after removing a bearing cap, install bolts and washers for temporary installation of the camshaft housing in the order shown in the illustration.
| *1 | Bolt |
| *2 | Washer |
| *a | Part Removal |
| *b | Installation of Bolts and Washers for Temporary Installation of camshaft housing |
| 39. REMOVE NO. 4 CAMSHAFT |
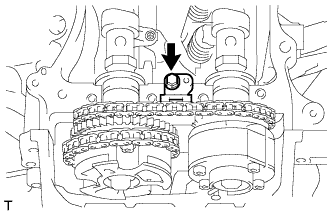 |
Remove the bolt of the No. 3 chain tensioner assembly.
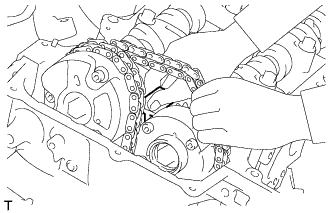 |
Remove the No. 3 chain tensioner assembly while lifting up the No. 4 camshaft.
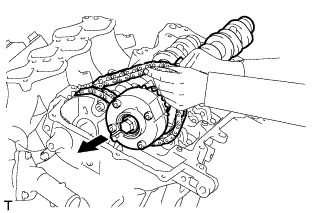 |
While lifting up the No. 4 camshaft, pass it through the No. 2 chain and pull it out towards the front of the vehicle to remove it.
| 40. REMOVE NO. 3 CAMSHAFT |
Lift up the rear of the camshaft so that it is at an angle.
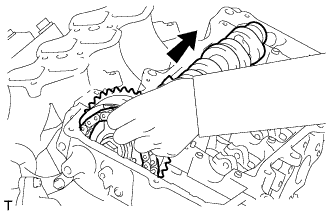 |
Remove the chain from the camshaft timing gear and pull out the No. 3 camshaft and No. 2 chain towards the rear of the vehicle to remove them.
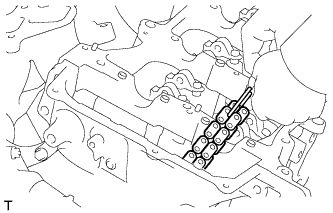 |
Suspend the chain with a string or equivalent.
| 41. REMOVE CAMSHAFT TIMING GEAR ASSEMBLY |
Fix the camshaft in place.
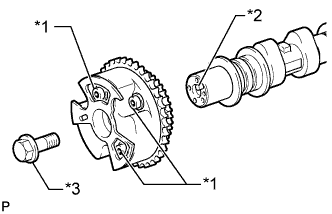 |
Remove the flange bolt and camshaft timing gear assembly.
| *1 | Do not remove |
| *2 | Straight Pin |
| *3 | Flange Bolt |
| 42. REMOVE CAMSHAFT TIMING EXHAUST GEAR ASSEMBLY |
Fix the camshaft in place.
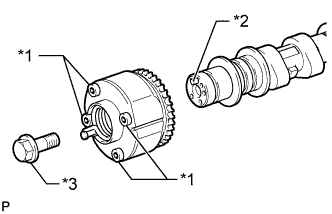 |
Remove the flange bolt and camshaft timing exhaust gear assembly.
| *1 | Do not remove |
| *2 | Straight Pin |
| *3 | Flange Bolt |
| 43. INSPECT CAMSHAFT TIMING GEAR ASSEMBLY |
Fix the camshaft in place.
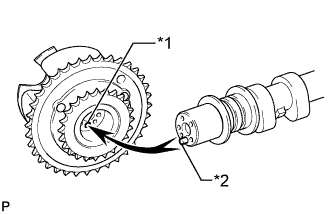 |
Put the camshaft timing gear assembly and camshaft together by aligning the pin hole and straight pin.
| *1 | Pin Hole |
| *2 | Straight Pin |
Lightly press and turn the camshaft timing gear assembly against the camshaft, and press harder after the pin enters the hole.
Check that there is no clearance between the camshaft timing gear assembly flange and camshaft.
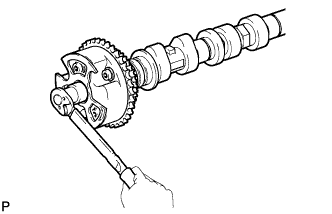 |
Tighten the flange bolt while holding the camshaft.
Check the lock of the camshaft timing gear assembly.
Fix the camshaft in place and confirm that the camshaft timing gear assembly is locked.
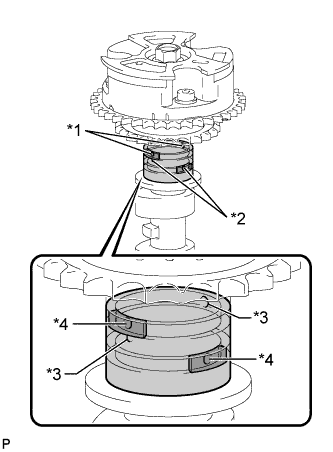 |
Release the lock pin.
Cover the 4 oil paths of the cam journal with vinyl tape as shown in the illustration.
| *1 | Advance Side Path |
| *2 | Retard Side Path |
| *3 | Open |
| *4 | Close |
 | Rubber |
 | Vinyl Tape |
Break through the tape on the advance side path and the retard side path on the opposite side of the hole of the advance side path, as shown in the illustration.
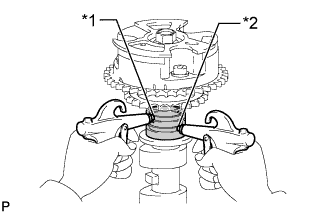 |
Apply air at approximately 200 kPa (2.0 kgf/cm2, 28 psi) to the 2 open paths.
| *1 | Advance Side Path |
| *2 | Retard Side Path |
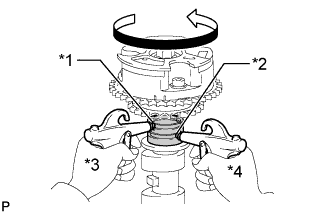 |
Check that the camshaft timing gear assembly rotates in the advance direction when reducing the air pressure applied to the retard side path.
| *1 | Advance Side Path |
| *2 | Retard Side Path |
| *3 | Hold Pressure |
| *4 | Decompress |
When the camshaft timing gear assembly reaches the most advanced position, release the air pressure first from the retard side path and next from the advance side path.
Check for smooth rotation.
Turn the camshaft timing gear assembly within its movable range (21°) 2 or 3 times, but do not turn it to the most retarded position. Make sure that the gear turns smoothly.
Check the lock in the most retarded position.
Confirm that the camshaft timing gear assembly locks at the most retarded position.
|
Remove the flange bolt and camshaft timing gear assembly.
| *1 | Do not remove |
| *2 | Straight Pin |
| *3 | Flange Bolt |
| 44. INSPECT CAMSHAFT TIMING EXHAUST GEAR ASSEMBLY |
Fix the camshaft in place.
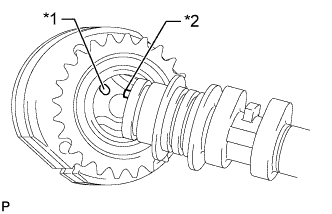 |
Put the camshaft timing exhaust gear assembly and camshaft together by aligning the pin hole and straight pin.
| *1 | Pin Hole |
| *2 | Straight Pin |
Lightly press and turn the camshaft timing gear assembly against the camshaft, and press harder after the pin enters the hole.
Check that there is no clearance between the gear flange and camshaft.
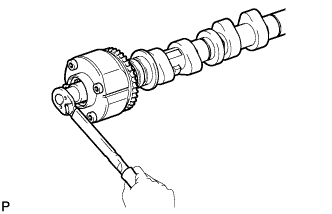 |
Tighten the flange bolt while holding the camshaft.
Check the camshaft timing exhaust gear lock.
Make sure that the camshaft timing exhaust gear assembly locks.
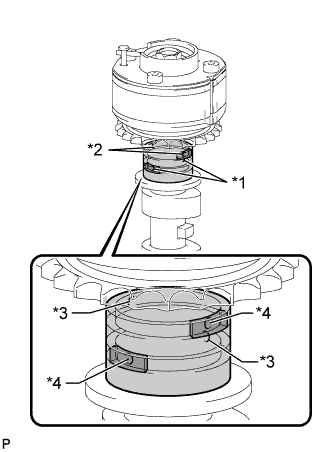 |
Release the lock pin.
Cover the 4 oil paths of the cam journal with vinyl tape as shown in the illustration.
| *1 | Advance Side Path |
| *2 | Retard Side Path |
| *3 | Open |
| *4 | Close |
| Rubber |
| Vinyl Tape |
Break through the tape on the advance side path and the retard side path on the opposite side of the hole of the advance side path, as shown in the illustration.
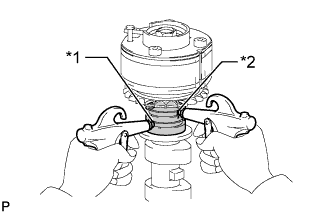 |
Apply air at approximately 200 kPa (2.0 kgf/cm2, 28 psi) to the 2 open paths (the advance side path and retard side path).
| *1 | Advance Side Path |
| *2 | Retard Side Path |
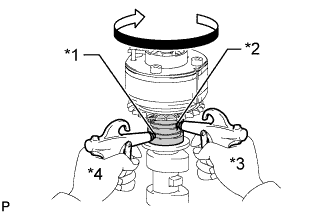 |
Make sure that the camshaft timing exhaust gear assembly rotates in the retard direction when reducing the air pressure applied to the advance side path.
| *1 | Advance Side Path |
| *2 | Retard Side Path |
| *3 | Hold Pressure |
| *4 | Decompress |
When the camshaft timing exhaust gear assembly moves to the most retarded position, release the air pressure first from the advance side path, and then release the air pressure from the retard side path.
Check for smooth rotation.
Turn the camshaft timing exhaust gear assembly within its movable range (18.5°) 2 or 3 times, but do not turn it to the most advanced position. Make sure that the gear assembly turns smoothly.
Check the lock at the most advanced position.
Make sure that the camshaft timing exhaust gear assembly locks at the most advanced position.
|
Remove the flange bolt and camshaft timing exhaust gear assembly.
| *1 | Do not remove |
| *2 | Straight Pin |
| *3 | Flange Bolt |