 |
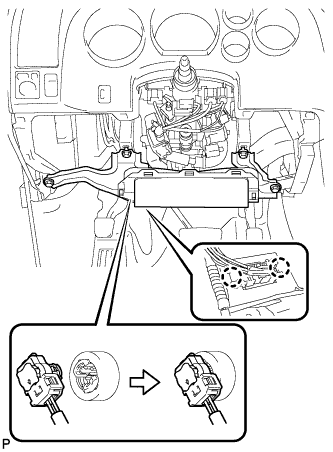
Connect the connector.
- NOTICE:
- When handling the airbag connector, take care not to damage the airbag wire harness.
DRIVER SIDE KNEE AIRBAG ASSEMBLY > INSTALLATION |
| 1. INSTALL LOWER NO. 1 INSTRUMENT PANEL AIRBAG ASSEMBLY |
|
Connect the connector.
Attach the 2 claws to install the DLC3.
Install the 4 bolts to install the instrument panel airbag.
| 2. INSTALL LOWER INSTRUMENT PANEL FINISH PANEL SUB-ASSEMBLY LH |
Connect the hood lock control cable to the hood lock control lever, rotate the hood lock control cable, and then slide and push the hood lock control cable into place.
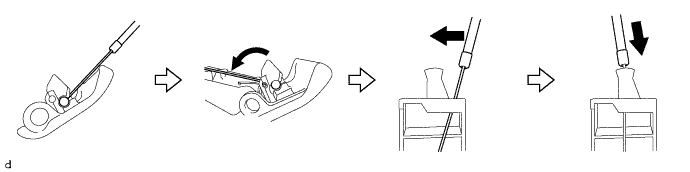
Attach the 3 hooks to connect the hood lock control lever to the lower instrument panel finish panel sub-assembly LH.
Connect each connector.
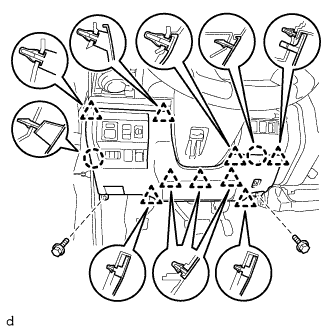 |
Attach the 9 clips and 2 claws to install the lower instrument panel finish panel sub-assembly LH.
Install the 2 bolts <A>.
| 3. INSTALL INSTRUMENT SIDE PANEL LH |
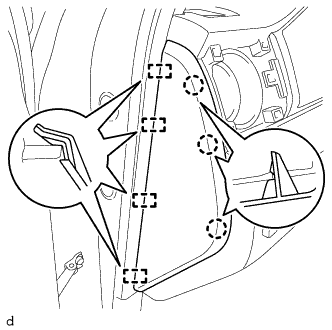 |
Attach the 4 guides and 3 claws to install the instrument side panel LH.
| 4. INSTALL COWL SIDE TRIM BOARD LH |
Attach the 2 clips to install the cowl side trim board LH.
Install the nut.
| 5. INSTALL FRONT DOOR SCUFF PLATE LH (for Regular Cab) |
Attach the 6 claws and 3 clips to install the front door scuff plate LH.
| 6. INSTALL FRONT DOOR SCUFF PLATE LH (for Double Cab, CrewMax) |
Attach the 6 claws and 3 clips to install the front door scuff plate LH.
| 7. CONNECT CABLE TO NEGATIVE BATTERY TERMINAL |
| 8. CHECK SRS WARNING LIGHT |
Check the SRS warning light (Click here).