Home › BODY ELECTRICAL › PARK ASSIST / MONITORING › BLIND SPOT MONITOR MAIN SWITCH

BLIND SPOT MONITOR MAIN SWITCH > INSPECTION

for Preparation Click here


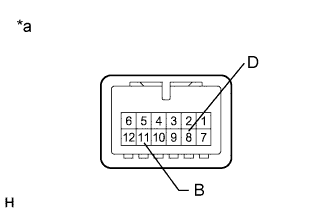
1. INSPECT BLIND SPOT MONITOR MAIN SWITCH ASSEMBLY


    E224422E05
  1. Measure the resistance according to the value(s) in the table below.

    Standard Resistance:
    Tester Connection
    Switch Condition
    Specified Condition
    11 (B) - 8 (D)
    Blind spot monitor main switch assembly on
    Below 1 Ω
    11 (B) - 8 (D)
    Blind spot monitor main switch assembly off
    10 kΩ or higher

    Text in Illustration 
    *a
    Component without harness connected
    (Blind spot monitor main switch assembly)
    If the result is not as specified, replace the blind spot monitor main switch assembly.


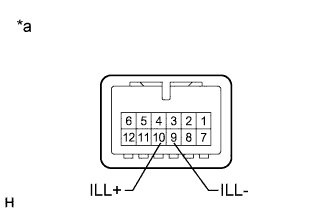
  1. Check that the switch illuminates.


      E224422E06
    1. Apply battery voltage to the blind spot monitor main switch assembly and check that the switch illuminates.

      OK:
      Connection
      Specified Condition
      Battery positive (+) → Terminal 10 (ILL+)
      Battery negative (-) → Terminal 9 (ILL-)
      Illuminates

      Text in Illustration 
      *a
      Component without harness connected
      (Blind Spot Monitor Main Switch Assembly)
      If the result is not as specified, replace the blind spot monitor main switch assembly.


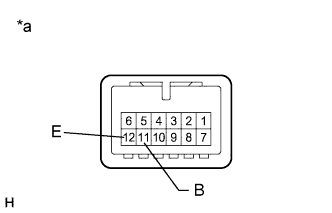
  1. Check that the switch indicator operates.


      E224422E07
    1. Apply battery voltage to the blind spot monitor main switch assembly and check the operation of the switch as shown in the table below.

      OK:
      Connection
      Switch Condition
      Specified Condition
      Battery positive (+) → Terminal 11 (B)
      Battery negative (-) → Terminal 12 (E)
      Blind spot monitor main switch assembly on
      Indicator Illuminates

      Text in Illustration 
      *a
      Component without harness connected
      (Blind Spot Monitor Main Switch Assembly)
      If the result is not as specified, replace the blind spot monitor main switch assembly.