Home › DRIVE LINE › WF1AM TRANSFER › TRANSFER SHIFT ACTUATOR ASSEMBLY

TRANSFER SHIFT ACTUATOR ASSEMBLY > INSTALLATION

for Preparation Click here


NOTICE:
Change the vehicle to 2WD mode before removing the transfer shift actuator assembly.
If the vehicle cannot be changed to 2WD mode, since the new transfer shift actuator assembly is set in the 2WD position, connect all the connectors to the vehicle side wire harnesses to set the new transfer shift actuator assembly to the drive state of the vehicle before installing the new transfer shift actuator assembly.


1. INSTALL TRANSFER SHIFT ACTUATOR ASSEMBLY


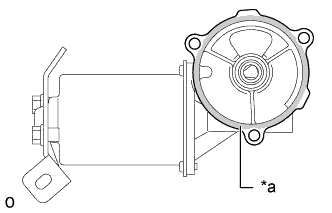
    C291221E01
  1. Apply seal packing to the transfer shift actuator assembly as shown in the illustration.

    Seal packing:
    Toyota Genuine Seal Packing 1281, Three Bond 1281 or equivalent

    Text in Illustration 
    *a
    Seal Packing

    NOTICE:
    If the removed transfer shift actuator assembly will be reused: After removing the transfer shift actuator assembly, be sure to perform the following before reinstalling it: 1) using a knife, cut off any old seal packing on the contact surface of the transfer shift actuator assembly, 2) clean off any remaining old seal packing from the contact surface of the transfer shift actuator assembly, and 3) reapply seal packing to the transfer shift actuator assembly.

  1. Install the transfer shift actuator assembly with the 4 bolts.

    Torque:
    9.5 N*m{ 97 kgf*cm , 84 in.*lbf }

    NOTICE:
    Tighten the bolts of the transfer shift actuator assembly within 10 minutes of applying the seal packing. The seal packing will dry very quickly.

  1. Connect the 3 connectors and attach the 2 clamps.