HEATING / AIR CONDITIONING SOLAR SENSOR ON-VEHICLE INSPECTION
PROCEDURE

 89120A
1.INSPECT AUTOMATIC LIGHT CONTROL SENSOR
Pre-procedure1
Disconnect the H78 automatic light control sensor.
Procedure1
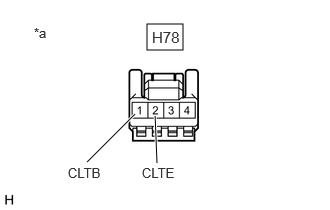
| *a | Front view of wire harness connector
(Automatic Light Control Sensor (Solar Sensor)) |
Measure the voltage according to the value(s) in the table below.
- Standard Voltage:
Tester Connection Switch Condition Specified Condition Click Location & Routing(H78)Location & Routingewd_type=routing;type=c;code=H78
Click Connector(H78)Instrument Panel>Instrument Panel Wire / Speaker Wire>Automatic Light Control Sensorewd_type=component;type=c;code=H78;pinno=1,2
H78-1 (CLTB) - H78-2 (CLTE) IG ON 11 to 14 V
- Standard Resistance:
Tester Connection Switch Condition Specified Condition Click Location & Routing(H78)Location & Routingewd_type=routing;type=c;code=H78
Click Connector(H78)Instrument Panel>Instrument Panel Wire / Speaker Wire>Automatic Light Control Sensorewd_type=component;type=c;code=H78;pinno=2
H78-2 (CLTE) - Body ground Always Below 1 Ω
If the specified condition is not met, replace the vehicle wire harness.
Post-procedure1
Connect the H78 automatic light control sensor connector.
Procedure2
Check the waveform. Use the oscilloscope and check the waveform in the terminal spaces.
- NOTICE:
-
With the connector connected as is, check from the rear side of the connector.
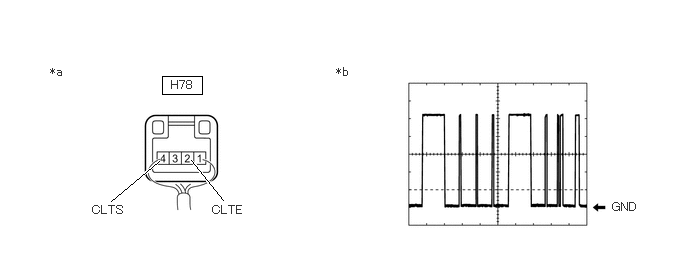
| *a | Component with harness connected
(Automatic Light Control Sensor (Solar Sensor)) |
*b | Waveform |
- OK:
Tester Connection Condition Tool Setting Specified Condition Click Location & Routing(H78)Location & Routingewd_type=routing;type=c;code=H78
Click Connector(H78)Instrument Panel>Instrument Panel Wire / Speaker Wire>Automatic Light Control Sensorewd_type=component;type=c;code=H78;pinno=4,2
H78-4 (CLTS) - H78-2 (CLTE) IG ON 2V/DIV.,10ms/DIV. Pulse generation
(See waveform)
- HINT:
-
The communication waveform changes according to the surrounding brightness.
If the result is not as specified, the automatic light control sensor may be malfunctioning.