HEATING / AIR CONDITIONING AIR CONDITIONING PANEL(for Manual Air Conditioning System) INSPECTION
PROCEDURE

 55901D
1.INSPECT NO. 1 HEATER CONTROL SUB-ASSEMBLY
Check the resistance.
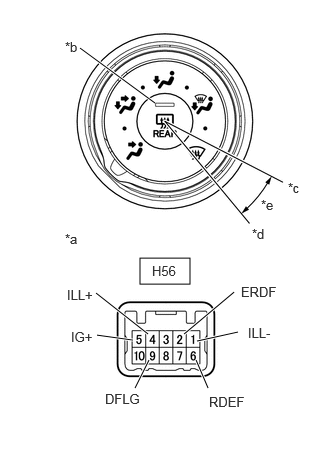
| *a | Component without harness connected
(No. 1 Heater Control Sub-assembly) |
| *b | Window Defogger Switch Indicator |
| *c | Defogger Sensing ON Position |
| *d | Knob Dial Stopper |
| *e | 17.74° to 27.74° |
Measure the resistance according to the value(s) in the table below.
- Standard Resistance:
Tester Connection Switch Position Specified Condition Click Location & Routing(H56)Location & Routingewd_type=routing;type=c;code=H56
Click Connector(H56)Instrument Panel>Instrument Panel Wire / Speaker Wire>No. 1 Heater Control Sub-Assemblyewd_type=component;type=c;code=H56;pinno=2,9
H56-2 (ERDF) - H56-9 (DFLG) Defogger sensing ON position Below 1 Ω
If the result is not as specified, replace the No. 1 heater control sub-assembly.
Check the illumination.
Apply auxiliary battery voltage to the No. 1 heater control sub-assembly and check the illumination.
- OK:
Tester Connection Specified Condition Click Location & Routing(H56)Location & Routingewd_type=routing;type=c;code=H56
Click Connector(H56)Instrument Panel>Instrument Panel Wire / Speaker Wire>No. 1 Heater Control Sub-Assemblyewd_type=component;type=c;code=H56;pinno=4,1
H56-4 (ILL+) - H56-1 (ILL-) H56-4 (ILL+) → Auxiliary battery positive (+)
H56-1 (ILL-) → Auxiliary battery negative (-)No. 1 heater control sub-assembly illuminates
If the result is not as specified, replace the No. 1 heater control sub-assembly.
Check the indicator.
Apply auxiliary battery voltage to the connector terminal and check the indicator.
- OK:
Tester Connection Measurement Condition Specified Condition Click Location & Routing(H56)Location & Routingewd_type=routing;type=c;code=H56
Click Connector(H56)Instrument Panel>Instrument Panel Wire / Speaker Wire>No. 1 Heater Control Sub-Assemblyewd_type=component;type=c;code=H56;pinno=5,6,2
H56-5 (IG+), H56-6 (RDEF) → Auxiliary battery positive (+)
H56-2 (ERDF) → Auxiliary battery negative (-)Window defogger switch ON position Indicator illuminates H56-5 (IG+), H56-6 (RDEF) → Auxiliary battery positive (+)
H56-2 (ERDF) → Auxiliary battery negative (-)Window defogger switch OFF position Indicator does not illuminate
If the result is not as specified, replace the No. 1 heater control sub-assembly.
55902E
2.INSPECT NO. 2 HEATER CONTROL SUB-ASSEMBLY
Check the resistance.
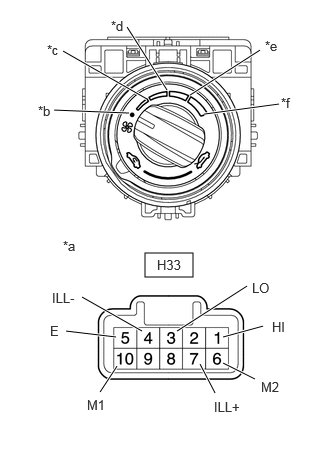
| *a | Component without harness connected
(No. 2 Heater Control Sub-assembly) |
| *b | Blower switch: OFF |
| *c | Blower switch: LO |
| *d | Blower switch: M1 |
| *e | Blower switch: M2 |
| *f | Blower switch: HI |
Measure the resistance according to the value(s) in the table below.
- Standard Resistance:
Tester Connection Switch Position Specified Condition Click Location & Routing(H33)Location & Routingewd_type=routing;type=c;code=H33
Click Connector(H33)Instrument Panel>Instrument Panel Wire / Speaker Wire>No. 2 Heater Control Sub-Assemblyewd_type=component;type=c;code=H33;pinno=3,5,10,6,1
H33-3 (LO) - H33-5 (E) Blower switch: OFF 10 kΩ or higher H33-10 (M1) - H33-5 (E) Blower switch: OFF 10 kΩ or higher H33-6 (M2) - H33-5 (E) Blower switch: OFF 10 kΩ or higher H33-1 (HI) - H33-5 (E) Blower switch: OFF 10 kΩ or higher H33-3 (LO) - H33-5 (E) Blower switch: LO Below 1 Ω H33-3 (LO) - H33-5 (E) Blower switch: LO - M1 Below 1 Ω H33-10 (M1) - H33-5 (E) Blower switch: LO - M1 Below 1 Ω H33-3 (LO) - H33-5 (E) Blower switch: M1 Below 1 Ω H33-10 (M1) - H33-5 (E) Blower switch: M1 Below 1 Ω H33-3 (LO) - H33-5 (E) Blower switch: M1 - M2 Below 1 Ω H33-10 (M1) - H33-5 (E) Blower switch: M1 - M2 Below 1 Ω H33-6 (M2) - H33-5 (E) Blower switch: M1 - M2 Below 1 Ω H33-3 (LO) - H33-5 (E) Blower switch: M2 Below 1 Ω H33-6 (M2) - H33-5 (E) Blower switch: M2 Below 1 Ω H33-3 (LO) - H33-5 (E) Blower switch: M2 - HI Below 1 Ω H33-6 (M2) - H33-5 (E) Blower switch: M2 - HI Below 1 Ω H33-1 (HI) - H33-5 (E) Blower switch: M2 - HI Below 1 Ω H33-3 (LO) - H33-5 (E) Blower switch: HI Below 1 Ω H33-1 (HI) - H33-5 (E) Blower switch: HI Below 1 Ω
If the result is not as specified, replace the No. 2 heater control sub-assembly.
Check the illumination.
Apply auxiliary battery voltage to the No. 2 heater control sub-assembly and check the illumination.
- OK:
Tester Connection Measurement Condition Specified Condition Click Location & Routing(H33)Location & Routingewd_type=routing;type=c;code=H33
Click Connector(H33)Instrument Panel>Instrument Panel Wire / Speaker Wire>No. 2 Heater Control Sub-Assemblyewd_type=component;type=c;code=H33;pinno=7,4
H33-7 (ILL+) - H33-4 (ILL-) H33-7 (ILL+) → Auxiliary battery positive (+)
H33-4 (ILL-) → Auxiliary battery negative (-)No. 2 Heater control sub-assembly illuminates
If the result is not as specified, replace the No. 2 heater control sub-assembly.
55903A
3.INSPECT NO. 3 HEATER CONTROL SUB-ASSEMBLY
Check the resistance.
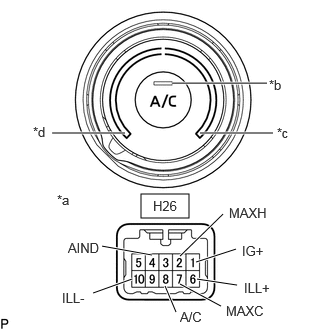
| *a | Component without harness connected
(No. 3 Heater Control Sub-assembly) |
| *b | A/C Switch Indicator |
| *c | MAX HOT |
| *d | MAX COLD |
Measure the resistance according to the value(s) in the table below.
- Standard Resistance:
Tester Connection Switch Condition Specified Condition Click Location & Routing(H26)Location & Routingewd_type=routing;type=c;code=H26
Click Connector(H26)Instrument Panel>Instrument Panel Wire / Speaker Wire>No. 3 Heater Control Sub-Assemblyewd_type=component;type=c;code=H26;pinno=1,2,7,8
H26-1 (IG+) - H26-2 (MAXH) Except MAX HOT 10 kΩ or higher H26-1 (IG+) - H26-2 (MAXH) MAX HOT Below 1 Ω H26-1 (IG+) - H26-7 (MAXC) Except MAX COLD 10 kΩ or higher H26-1 (IG+) - H26-7 (MAXC) MAX COLD Below 1 Ω H26-1 (IG+) - H26-8 (A/C) A/C switch ON position Below 1 Ω H26-1 (IG+) - H26-8 (A/C) A/C switch OFF position 10 kΩ or higher
If the result is not as specified, replace the No. 3 heater control sub-assembly.
Check the illumination.
Apply auxiliary battery voltage to the No. 3 heater control sub-assembly and check the illumination.
- OK:
Tester Connection Measurement Condition Specified Condition Click Location & Routing(H26)Location & Routingewd_type=routing;type=c;code=H26
Click Connector(H26)Instrument Panel>Instrument Panel Wire / Speaker Wire>No. 3 Heater Control Sub-Assemblyewd_type=component;type=c;code=H26;pinno=6,10
H26-6 (ILL+) - H26-10 (ILL-) H26-6 (ILL+) → Auxiliary battery positive (+)
H26-10 (ILL-) → Auxiliary battery negative (-)No. 3 heater control sub-assembly illuminates
If the result is not as specified, replace the No. 3 heater control sub-assembly.
Check the indicator.
Apply auxiliary battery voltage to the connector terminal and check the indicator.
- OK:
Tester Connection Measurement Condition Specified Condition Click Location & Routing(H26)Location & Routingewd_type=routing;type=c;code=H26
Click Connector(H26)Instrument Panel>Instrument Panel Wire / Speaker Wire>No. 3 Heater Control Sub-Assemblyewd_type=component;type=c;code=H26;pinno=1,4
H26-1 (IG+) → Auxiliary battery positive (+)
H26-4 (AIND) → Auxiliary battery negative (-)A/C switch ON position Indicator illuminates H26-1 (IG+) → Auxiliary battery positive (+)
H26-4 (AIND) → Auxiliary battery negative (-)A/C switch OFF position Indicator does not illuminate
If the result is not as specified, replace the No. 3 heater control sub-assembly.