LIGHTING (EXT) HEIGHT CONTROL SENSOR INSPECTION
PROCEDURE

 89408C
1.INSPECT REAR HEIGHT CONTROL SENSOR SUB-ASSEMBLY LH (for 2WD)
Preparation for check.
Confirm the standard, high and low positions of the link that will be used in the following inspection.
The standard position is 46° from the maximum link angle (high) and 51° from the maximum link angle (low).
The high position (+30.3°) is 55.7° from the maximum link angle (high).
The low position (-30.4°) is 15.6° from the maximum link angle (low).
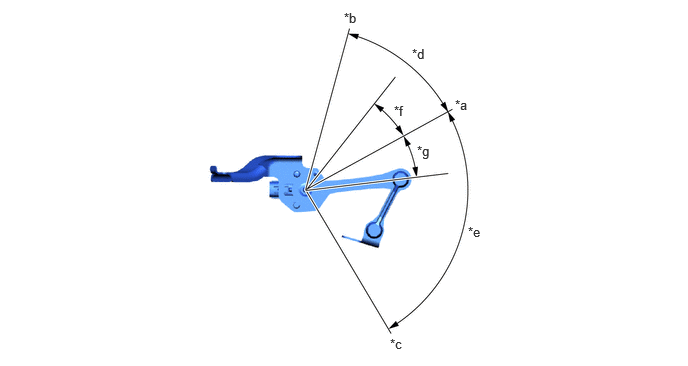
| *a | Standard Position | *b | Maximum Link Angle (Low) |
| *c | Maximum Link Angle (High) | *d | 46° |
| *e | 86° | *f | -30.4° |
| *g | +30.3° | - | - |
Check the voltage.
Connect 3 dry cell batteries (1.5 V) in series.
- NOTICE:
-
Do not use rechargeable batteries as they may not output a voltage of 1.5 V.
Connect a positive (+) lead from the batteries to O116-3 (SHB) and a negative (-) lead to O116-1 (SHG).
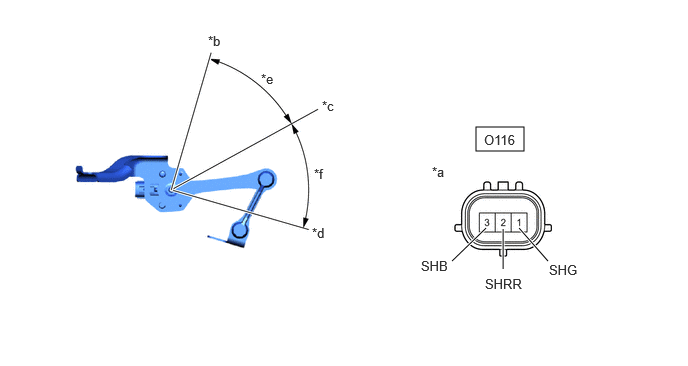
| *a | Component without harness connected
(Rear Height Control Sensor Sub-assembly LH) |
*b | Low |
| *c | Standard Position | *d | High |
| *e | -45° | *f | +45° |
Measure the voltage between O116-2 (SHRR) and O116-1 (SHG) while slowly moving the link up and down.
- Standard Voltage:
Tester Connection Condition Specified Condition Click Location & Routing(O116)Location & Routingewd_type=routing;type=c;code=O116
Click Connector(O116)Body>Floor Wire>Rear Height Control Sensor Sub-Assembly LHewd_type=component;type=c;code=O116;pinno=1,2
O116-1 (SHG) - O116-2 (SHRR) +45° (High) 4.5 V O116-1 (SHG) - O116-2 (SHRR) 0° (Standard position) 2.5 V O116-1 (SHG) - O116-2 (SHRR) -45° (Low) 0.5 V
If the result is not as specified, replace the rear height control sensor sub-assembly LH.
89408C
2.INSPECT REAR HEIGHT CONTROL SENSOR SUB-ASSEMBLY LH (for AWD)
Preparation for check.
Confirm the standard, high and low positions of the link that will be used in the following inspection.
The standard position is 75.2° from the maximum link angle (high) and 84.8° from the maximum link angle (low).
The high position (+35.9°) is 39.3° from the maximum link angle (high).
The low position (-36.3°) is 48.5° from the maximum link angle (low).
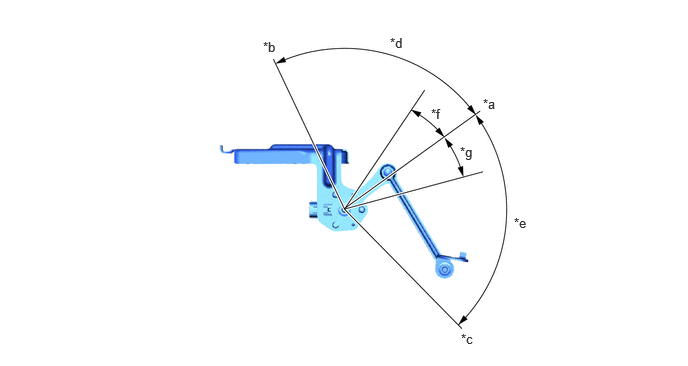
| *a | Standard Position | *b | Maximum Link Angle (Low) |
| *c | Maximum Link Angle (High) | *d | 84.8° |
| *e | 75.2° | *f | -36.3° |
| *g | +35.9° | - | - |
Check the voltage.
Connect 3 dry cell batteries (1.5 V) in series.
- NOTICE:
-
Do not use rechargeable batteries as they may not output a voltage of 1.5 V.
Connect a positive (+) lead from the batteries to O116-3 (SHB) and a negative (-) lead to O116-1 (SHG).
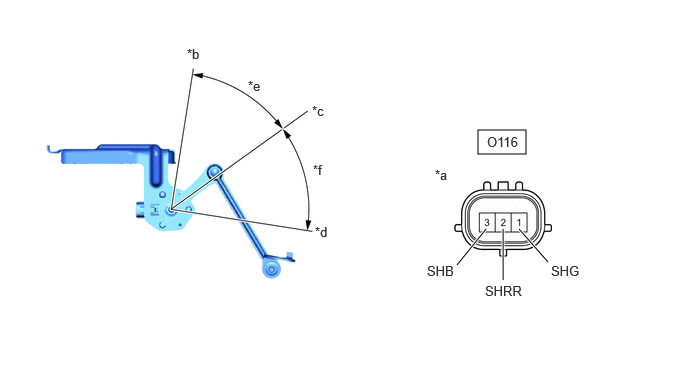
| *a | Component without harness connected
(Rear Height Control Sensor Sub-assembly LH) |
*b | Low |
| *c | Standard Position | *d | High |
| *e | -45° | *f | +45° |
Measure the voltage between O116-2 (SHRR) and O116-1 (SHG) while slowly moving the link up and down.
- Standard Voltage:
Tester Connection Condition Specified Condition Click Location & Routing(O116)Location & Routingewd_type=routing;type=c;code=O116
Click Connector(O116)Body>Floor Wire>Rear Height Control Sensor Sub-Assembly LHewd_type=component;type=c;code=O116;pinno=1,2
O116-1 (SHG) - O116-2 (SHRR) +45° (High) 4.5 V O116-1 (SHG) - O116-2 (SHRR) 0° (Standard position) 2.5 V O116-1 (SHG) - O116-2 (SHRR) -45° (Low) 0.5 V
If the result is not as specified, replace the rear height control sensor sub-assembly LH.