AUDIO / VIDEO FRONT DOOR SPEAKER INSPECTION
PROCEDURE

 86160
1.INSPECT FRONT NO. 1 SPEAKER ASSEMBLY LH (w/o Stereo Component Amplifier)
Check the visually.
With the speaker installed, check that there is no looseness or other abnormalities.
Check that there is no foreign matter in the speaker, no tears on the speaker cone or other abnormalities.
If the result is not as specified, replace the front No. 1 speaker assembly.
Check the resistance.
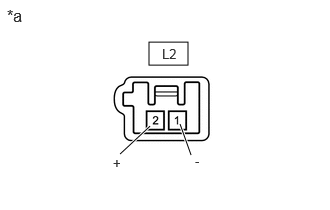
| *a | Component without harness connected
(Front No. 1 Speaker Assembly) |
Measure the resistance according to the value(s) in the table below.
- Standard Resistance:
Tester Connection Condition Specified Condition Click Location & Routing(L2)Location & Routingewd_type=routing;type=c;code=L2
Click Connector(L2)Body>Front Door Wire LH / Television Camera Wire>Front No. 1 Speaker Assembly LHewd_type=component;type=c;code=L2;pinno=2,1
L2-2(+) - L2-1(-) Always 4.0 Ω
If the result is not as specified, replace the front No. 1 speaker assembly.
86160
2.INSPECT FRONT NO. 1 SPEAKER ASSEMBLY RH (w/o Stereo Component Amplifier)
Check the visually.
With the speaker installed, check that there is no looseness or other abnormalities.
Check that there is no foreign matter in the speaker, no tears on the speaker cone or other abnormalities.
If the result is not as specified, replace the front No. 1 speaker assembly.
Check the resistance.
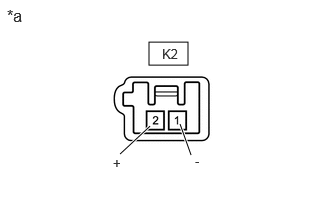
| *a | Component without harness connected
(Front No. 1 Speaker Assembly) |
Measure the resistance according to the value(s) in the table below.
- Standard Resistance:
Tester Connection Condition Specified Condition Click Location & Routing(K2)Location & Routingewd_type=routing;type=c;code=K2
Click Connector(K2)Body>Front Door Wire RH / Television Camera Wire>Front No. 1 Speaker Assembly RHewd_type=component;type=c;code=K2;pinno=2,1
K2-2(+) - K2-1(-) Always 4.0 Ω
If the result is not as specified, replace the front No. 1 speaker assembly.
86160
3.INSPECT FRONT NO. 1 SPEAKER ASSEMBLY LH (w/ Stereo Component Amplifier)
Check the visually.
With the speaker installed, check that there is no looseness or other abnormalities.
Check that there is no foreign matter in the speaker, no tears on the speaker cone or other abnormalities.
If the result is not as specified, replace the front No. 1 speaker assembly.
Check the resistance.
| *a | Component without harness connected
(Front No. 1 Speaker Assembly) |
Measure the resistance according to the value(s) in the table below.
- Standard Resistance:
Tester Connection Condition Specified Condition Click Location & Routing(L2)Location & Routingewd_type=routing;type=c;code=L2
Click Connector(L2)Body>Front Door Wire LH / Television Camera Wire>Front No. 1 Speaker Assembly LHewd_type=component;type=c;code=L2;pinno=2,1
L2-2(+) - L2-1(-) Always 4.0 to 6.0 Ω
If the result is not as specified, replace the front No. 1 speaker assembly.
86160
4.INSPECT FRONT NO. 1 SPEAKER ASSEMBLY RH (w/ Stereo Component Amplifier)
Check the visually.
With the speaker installed, check that there is no looseness or other abnormalities.
Check that there is no foreign matter in the speaker, no tears on the speaker cone or other abnormalities.
If the result is not as specified, replace the front No. 1 speaker assembly.
Check the resistance.
| *a | Component without harness connected
(Front No. 1 Speaker Assembly) |
Measure the resistance according to the value(s) in the table below.
- Standard Resistance:
Tester Connection Condition Specified Condition Click Location & Routing(K2)Location & Routingewd_type=routing;type=c;code=K2
Click Connector(K2)Body>Front Door Wire RH / Television Camera Wire>Front No. 1 Speaker Assembly RHewd_type=component;type=c;code=K2;pinno=2,1
K2-2(+) - K2-1(-) Always 4.0 to 6.0 Ω
If the result is not as specified, replace the front No. 1 speaker assembly.