WINDOW / GLASS POWER WINDOW MASTER SWITCH INSPECTION
PROCEDURE

 84040
1.INSPECT MULTIPLEX NETWORK MASTER SWITCH ASSEMBLY (for LHD)
Check the resistance.
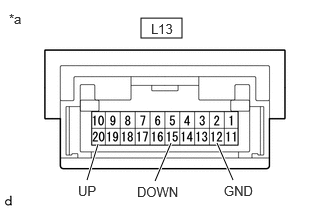
| *a | Component without harness connected
(Multiplex Network Master Switch Assembly) |
Measure the resistance according to the value(s) in the table below.
- Standard Resistance:
Tester Connection Condition Specified Condition Click Location & Routing(L13)Location & Routingewd_type=routing;type=c;code=L13
Click Connector(L13)Body>Front Door Wire LH / Television Camera Wire>Multiplex Network Master Switch Assemblyewd_type=component;type=c;code=L13;pinno=20,12,15
L13-20 (UP) - L13-12 (GND) Up position Below 100 Ω L13-15 (DOWN) - L13-12 (GND) Down position Below 100 Ω
If the result is not as specified, replace the multiplex network master switch assembly.
Check that the LED illuminates.
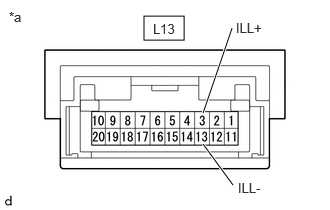
| *a | Component without harness connected
(Multiplex Network Master Switch Assembly) |
Apply auxiliary battery voltage to the multiplex network master switch assembly and check that the LED illuminate.
- OK:
Battery Connection Specified Condition Auxiliary battery positive (+) → L13-3 (ILL+)
Auxiliary battery negative (-) → L13-13 (ILL-)LED illuminate
If the result is not as specified, replace the multiplex network master switch assembly.
84040
2.INSPECT MULTIPLEX NETWORK MASTER SWITCH ASSEMBLY (for RHD)
Check the resistance.
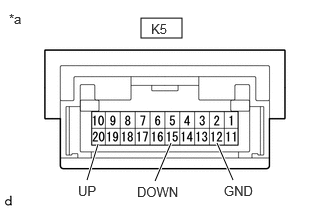
| *a | Component without harness connected
(Multiplex Network Master Switch Assembly) |
Measure the resistance according to the value(s) in the table below.
- Standard Resistance:
Tester Connection Condition Specified Condition Click Location & Routing(K5)Location & Routingewd_type=routing;type=c;code=K5
Click Connector(K5)Body>Front Door Wire RH / Television Camera Wire>Multiplex Network Master Switch Assemblyewd_type=component;type=c;code=K5;pinno=20,12,15
K5-20 (UP) - K5-12 (GND) Up position Below 100 Ω K5-15 (DOWN) - K5-12 (GND) Down position Below 100 Ω
If the result is not as specified, replace the multiplex network master switch assembly.
Check that the LED illuminates.
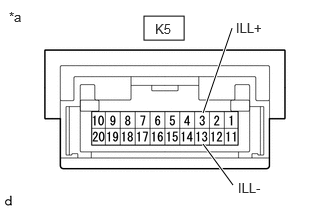
| *a | Component without harness connected
(Multiplex Network Master Switch Assembly) |
Apply auxiliary battery voltage to the multiplex network master switch assembly and check that the LED illuminate.
- OK:
Battery Connection Specified Condition Auxiliary battery positive (+) → K5-3 (ILL+)
Auxiliary battery negative (-) → K5-13 (ILL-)LED illuminate
If the result is not as specified, replace the multiplex network master switch assembly.