TELEMATICS TELEMATICS SYSTEM(for eCall) Emergency Call Switch Illumination Circuit
WIRING DIAGRAM
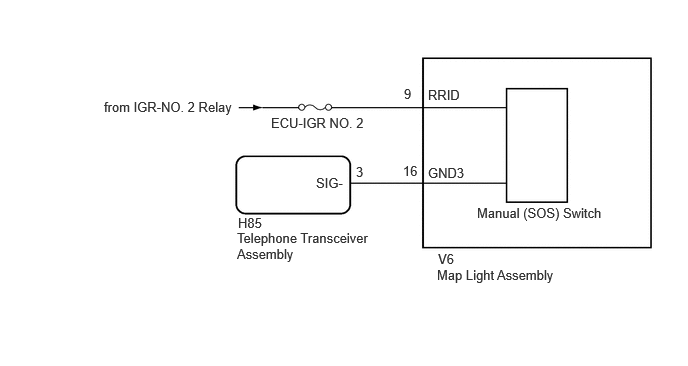
CAUTION / NOTICE / HINT
- NOTICE:
- ·
Depending on the parts that are replaced during vehicle inspection or maintenance, performing initialization, registration or calibration may be needed. Refer to Precaution for Telematics System.
Click hereAudio / Visual / Telematics>TELEMATICS>TELEMATICS SYSTEM (for eCall)>PRECAUTION
·When replacing the telephone transceiver assembly, make sure to replace it with a new one.
·Before replacing the telematics transceiver assembly, refer to Service Bulletin.
- HINT:
-
Inspect the fuses and relays related to this system before inspecting the suspected areas below.
PROCEDURE
Disconnect the H85 telephone transceiver assembly connector.
Disconnect the V6 map light assembly (manual (SOS) switch) connector.
Measure the resistance according to the value(s) in the table below.
- Standard Resistance:
Tester Connection Condition Specified Condition Click Location & Routing(H85,V6)Location & Routingewd_type=routing;type=c,c;code=H85,V6
Click Connector(H85)Instrument Panel>Instrument Panel Wire / Speaker Wire>Telematics Transceiverewd_type=component;type=c;code=H85;pinno=3
Click Connector(V6)Body>No. 1 Roof Wire>Map Light Assemblyewd_type=component;type=c;code=V6;pinno=16
H85-3 (SIG-) - V6-16 (GND3) Always Below 1 Ω H85-3 (SIG-) or V6-16 (GND3) - Body ground Always 10 kΩ or higher
Measure the voltage according to the value(s) in the table below.
- Standard Voltage:
Tester Connection Switch Condition Specified Condition Click Location & Routing(V6)Location & Routingewd_type=routing;type=c;code=V6
Click Connector(V6)Body>No. 1 Roof Wire>Map Light Assemblyewd_type=component;type=c;code=V6;pinno=9
V6-9 (RRID) - Body Ground Ignition switch ON 11 to 14 V
- Result:
Proceed to OK NG
OK
NG
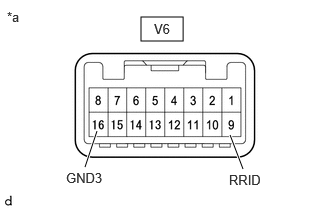
| *a | Component without harness connected
(Map Light Assembly (Manual (SOS) Switch)) |
Remove the map light assembly (manual (SOS) switch).
Click hereVehicle Interior>LIGHTING (INT)>PERSONAL LIGHT>REMOVAL
Apply auxiliary battery voltage to the connector.
| Measurement Condition | Condition | Specified Condition |
|---|---|---|
| Auxiliary battery positive (+) → V6-9 (RRID)
Auxiliary battery negative (-) → V6-16 (GND3) |
Always | Manual (SOS) switch illumination comes on |
Check if the manual (SOS) switch illumination comes on.
- OK:
The manual (SOS) switch illumination comes on.
- Result:
Proceed to OK NG
OK
NG
Replace the telephone transceiver assembly with a new one.
Click hereAudio / Visual / Telematics>TELEMATICS>TELEMATICS TRANSCEIVER (except TAS Type)>REMOVAL
- Result:
Proceed to NEXT
NEXT