NAVIGATION / MULTI INFO DISPLAY NAVIGATION SYSTEM Mute Signal Circuit between Stereo Component Amplifier and Telematics Transceiver
DESCRIPTION
The telematics transceiver sends a mute signal to the stereo component amplifier assembly.
The stereo component amplifier assembly controls the volume according to the mute signal from the telematics transceiver.
WIRING DIAGRAM
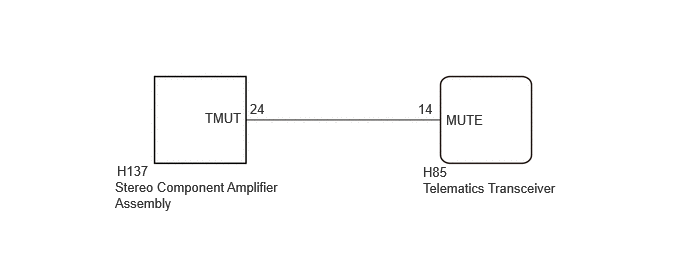
CAUTION / NOTICE / HINT
- NOTICE:
-
When replacing the telematics transceiver, make sure to replace it with a new one.
- HINT:
-
Depending on the parts that are replaced during vehicle inspection or maintenance, performing initialization, registration or calibration may be needed. Refer to Precaution for Navigation System.
-
Click hereAudio / Visual / Telematics>NAVIGATION / MULTI INFO DISPLAY>NAVIGATION SYSTEM>PRECAUTION
PROCEDURE
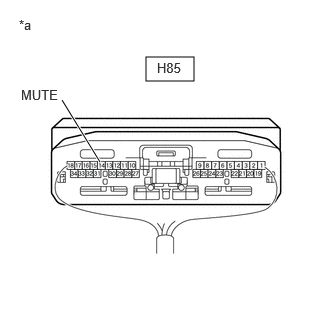
| *a | Component with harness connected
(Telematics Transceiver) |
Remove the telematics transceiver with the connector(s) still connected.
Click hereAudio / Visual / Telematics>TELEMATICS>TELEMATICS TRANSCEIVER (except TAS Type)>REMOVAL
Measure the voltage according to the value(s) in the table below.
- Standard Voltage:
Tester Connection Condition Specified Condition Click Location & Routing(H85)Location & Routingewd_type=routing;type=c;code=H85
Click Connector(H85)Instrument Panel>Instrument Panel Wire / Speaker Wire>Telematics Transceiverewd_type=component;type=c;code=H85;pinno=14
H85-14 (MUTE) - Body ground Ignition switch ON, audio system playing
→ Emergency call mode2.0 V or higher
→ Below 1 V
- Result:
Proceed to OK NG
OK
Click hereAudio / Visual / Telematics>NAVIGATION / MULTI INFO DISPLAY>NAVIGATION SYSTEM>PROBLEM SYMPTOMS TABLE
NG
Disconnect the H137 stereo component amplifier assembly connector.
Disconnect the H85 telematics transceiver connector.
Measure the resistance according to the value(s) in the table below.
- Standard Resistance:
Tester Connection Condition Specified Condition Click Location & Routing(H137,H85)Location & Routingewd_type=routing;type=c,c;code=H137,H85
Click Connector(H137)Instrument Panel>Instrument Panel Wire / Speaker Wire>Stereo Component Amplifier Assemblyewd_type=component;type=c;code=H137;pinno=24
Click Connector(H85)Instrument Panel>Instrument Panel Wire / Speaker Wire>Telematics Transceiverewd_type=component;type=c;code=H85;pinno=14
H137-24 (TMUT) - H85-14 (MUTE) Always Below 1 Ω H137-24 (TMUT) - Body ground Always 10 kΩ or higher
- Result:
Proceed to OK NG
OK
NG
Disconnect the H85 telematics transceiver connector.
Measure the voltage according to the value(s) in the table below.
- Standard Voltage:
Tester Connection Switch Condition Specified Condition Click Location & Routing(H85)Location & Routingewd_type=routing;type=c;code=H85
Click Connector(H85)Instrument Panel>Instrument Panel Wire / Speaker Wire>Telematics Transceiverewd_type=component;type=c;code=H85;pinno=14
H85-14 (MUTE) - Body ground Ignition switch ON 2.0 V or higher
- Result:
Proceed to OK NG
OK
NG