NAVIGATION / MULTI INFO DISPLAY NAVIGATION SYSTEM Radio Receiver Power Source Circuit
DESCRIPTION
This is the power source circuit to operate the radio and display receiver assembly.
WIRING DIAGRAM
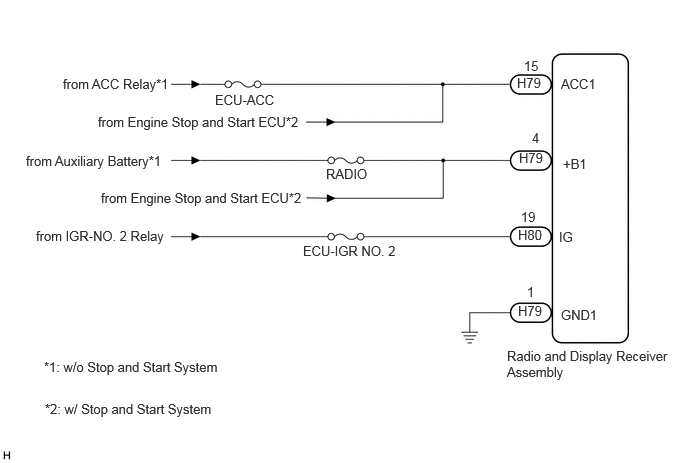
CAUTION / NOTICE / HINT
- NOTICE:
-
Inspect the fuses for circuits related to this system before performing the following procedure.
PROCEDURE
Check the vehicle type.
- Result:
Result Proceed to w/o Stop and Start System A w/ Stop and Start System B
A
B
Disconnect the H79 and H80 radio and display receiver assembly connectors.
Measure the resistance according to the value(s) in the table below.
- Standard Resistance:
Tester Connection Condition Specified Condition Click Location & Routing(H79)Location & Routingewd_type=routing;type=c;code=H79
Click Connector(H79)Instrument Panel>Instrument Panel Wire / Speaker Wire>Radio & Display Receiver Assemblyewd_type=component;type=c;code=H79;pinno=1
H79-1 (GND1) - Body ground Always Below 1 Ω
Measure the voltage according to the value(s) in the table below.
- Standard Voltage:
Tester Connection Switch Condition Specified Condition Click Location & Routing(H79,H80)Location & Routingewd_type=routing;type=c,c;code=H79,H80
Click Connector(H79)Instrument Panel>Instrument Panel Wire / Speaker Wire>Radio & Display Receiver Assemblyewd_type=component;type=c;code=H79;pinno=4,1,15
Click Connector(H80)Instrument Panel>Instrument Panel Wire / Speaker Wire>Radio & Display Receiver Assemblyewd_type=component;type=c;code=H80;pinno=19
H79-4 (+B1) - H79-1 (GND1) Ignition switch off 11 to 14 V H79-15 (ACC1) - H79-1 (GND1) Ignition switch ACC 11 to 14 V H80-19 (IG) - H79-1 (GND1) Ignition switch ON 11 to 14 V
- Result:
Proceed to OK NG
OK
Click hereAudio / Visual / Telematics>NAVIGATION / MULTI INFO DISPLAY>NAVIGATION SYSTEM>PROBLEM SYMPTOMS TABLE
NG
Disconnect the H79 and H80 radio and display receiver assembly connectors.
Measure the resistance according to the value(s) in the table below.
- Standard Resistance:
Tester Connection Condition Specified Condition Click Location & Routing(H79)Location & Routingewd_type=routing;type=c;code=H79
Click Connector(H79)Instrument Panel>Instrument Panel Wire / Speaker Wire>Radio & Display Receiver Assemblyewd_type=component;type=c;code=H79;pinno=1
H79-1 (GND1) - Body ground Always Below 1 Ω
Measure the voltage according to the value(s) in the table below.
- Standard Voltage:
Tester Connection Switch Condition Specified Condition Click Location & Routing(H79,H80)Location & Routingewd_type=routing;type=c,c;code=H79,H80
Click Connector(H79)Instrument Panel>Instrument Panel Wire / Speaker Wire>Radio & Display Receiver Assemblyewd_type=component;type=c;code=H79;pinno=4,1,15
Click Connector(H80)Instrument Panel>Instrument Panel Wire / Speaker Wire>Radio & Display Receiver Assemblyewd_type=component;type=c;code=H80;pinno=19
H79-4 (+B1) - H79-1 (GND1) Ignition switch off 10.5 to 16 V H79-15 (ACC1) - H79-1 (GND1) Ignition switch ACC 10.5 to 16 V H80-19 (IG) - H79-1 (GND1) Ignition switch ON 11 to 14 V
- Result:
Proceed to OK NG
OK
Click hereAudio / Visual / Telematics>NAVIGATION / MULTI INFO DISPLAY>NAVIGATION SYSTEM>PROBLEM SYMPTOMS TABLE
NG
Click hereEngine / Hybrid System>STOP AND START>STOP AND START SYSTEM>HOW TO PROCEED WITH TROUBLESHOOTING