NAVIGATION / MULTI INFO DISPLAY NAVIGATION SYSTEM B1579 Voice Recognition Microphone Disconnected
DESCRIPTION
The radio and display receiver assembly, map light assembly and telephone microphone assembly are connected to each other using the microphone connection detection signal lines.
This DTC is stored when a microphone connection detection signal line is disconnected.
| DTC No. | Detection Item | DTC Detection Condition | Trouble Area | DTC Output from | Priority |
|---|---|---|---|---|---|
| B1579 | Voice Recognition Microphone Disconnected | Microphone signal is lost | ·
Map light assembly ·
Telephone microphone assembly ·
Radio and display receiver assembly ·
Telematics transceiver* ·
Harness or connector |
Navigation System | A |
*: Telematics Transceiver
WIRING DIAGRAM
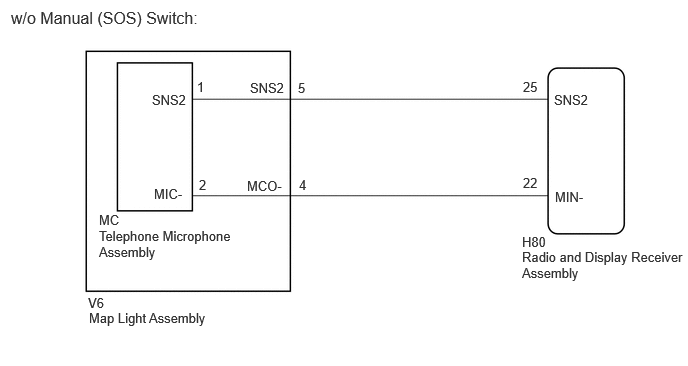
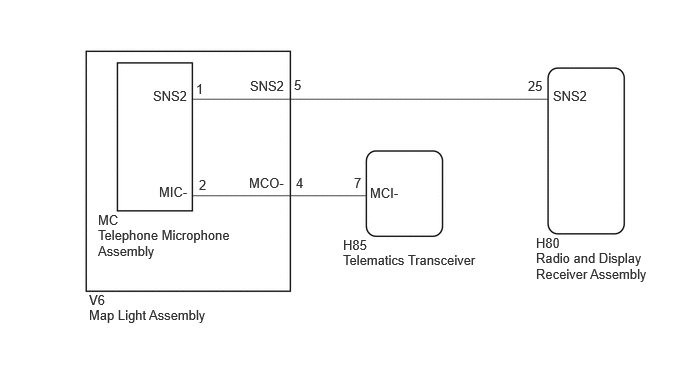
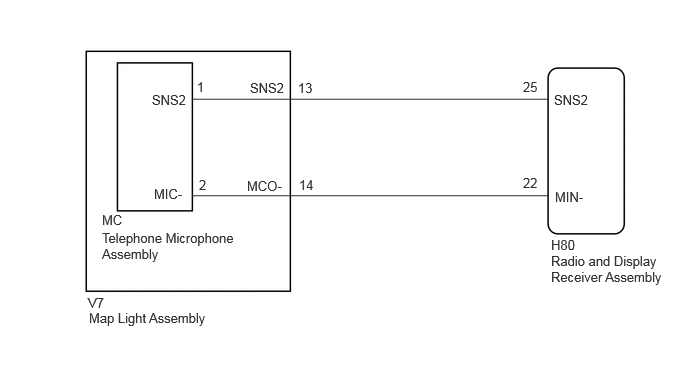
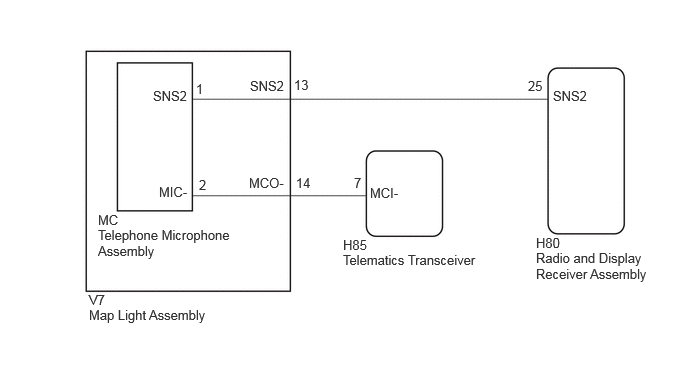
PROCEDURE
Check the vehicle type.
- Result:
Result Proceed to for TMMF Made without Telematics Transceiver A for TMMF Made with Telematics Transceiver B for TMC Made without Telematics Transceiver C for TMC Made with Telematics Transceiver D
A
B
C
D
Pre-procedure1
Disconnect the H80 radio and display receiver assembly connector.
Disconnect the V6 map light assembly connector.
Procedure1
Measure the resistance according to the value(s) in the table below.
- Standard Resistance:
Tester Connection Condition Specified Condition Click Location & Routing(H80,V6)Location & Routingewd_type=routing;type=c,c;code=H80,V6
Click Connector(H80)Instrument Panel>Instrument Panel Wire / Speaker Wire>Radio & Display Receiver Assemblyewd_type=component;type=c;code=H80;pinno=25,22
Click Connector(V6)Body>No. 1 Roof Wire>Map Light Assemblyewd_type=component;type=c;code=V6;pinno=5,4
H80-25 (SNS2) - V6-5 (SNS2) Always Below 1 Ω H80-22 (MIN-) - V6-4 (MCO-) Always Below 1 Ω H80-25 (SNS2) or V6-5 (SNS2) - Body ground Always 10 kΩ or higher H80-22 (MIN-) or V6-4 (MCO-) - Body ground Always 10 kΩ or higher
- Result:
Proceed to OK NG
Post-procedure1
None
OK
NG
Pre-procedure1
Remove the map light assembly.
- HINT:
-
Click hereVehicle Interior>LIGHTING (INT)>PERSONAL LIGHT>REMOVAL
Connect the MC telephone microphone assembly connector.
Procedure1
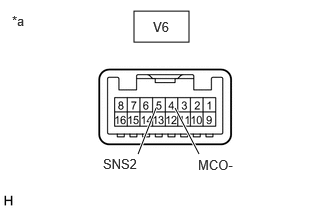
| *a | Component without harness connected
(Map Light Assembly) |
Measure the resistance according to the value(s) in the table below.
- Standard Resistance:
Tester Connection Condition Specified Condition Click Location & Routing(V6)Location & Routingewd_type=routing;type=c;code=V6
Click Connector(V6)Body>No. 1 Roof Wire>Map Light Assemblyewd_type=component;type=c;code=V6;pinno=5,4
V6-5 (SNS2) - V6-4 (MCO-) Always Below 1 Ω
- Result:
Proceed to OK NG
Post-procedure1
None
OK
NG
Pre-procedure1
Remove the map light assembly.
- HINT:
-
Click hereVehicle Interior>LIGHTING (INT)>PERSONAL LIGHT>REMOVAL
Disconnect the MC telephone microphone assembly connector.
Procedure1
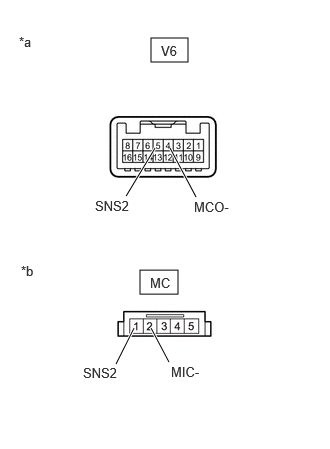
| *a | Component without harness connected
(Map Light Assembly (No. 1 Roof Wire Side)) |
| *b | Component without harness connected
(Map Light Assembly (Telephone Microphone Assembly Side)) |
Measure the resistance according to the value(s) in the table below.
- Standard Resistance:
Tester Connection Condition Specified Condition Click Location & Routing(V6)Location & Routingewd_type=routing;type=c;code=V6
Click Connector(V6)Body>No. 1 Roof Wire>Map Light Assemblyewd_type=component;type=c;code=V6;pinno=5,4
V6-5 (SNS2) - MC-1 (SNS2) Always Below 1 Ω V6-4 (MCO-) - MC-2 (MIC-) Always Below 1 Ω V6-5 (SNS2) - Body ground Always 10 kΩ or higher V6-4 (MCO-) - Body ground Always 10 kΩ or higher
- Result:
Proceed to OK NG
Post-procedure1
None
OK
NG
Pre-procedure1
Disconnect the H80 radio and display receiver assembly connector.
Disconnect the V6 map light assembly connector.
Procedure1
Measure the resistance according to the value(s) in the table below.
- Standard Resistance:
Tester Connection Condition Specified Condition Click Location & Routing(H80,V6)Location & Routingewd_type=routing;type=c,c;code=H80,V6
Click Connector(H80)Instrument Panel>Instrument Panel Wire / Speaker Wire>Radio & Display Receiver Assemblyewd_type=component;type=c;code=H80;pinno=25
Click Connector(V6)Body>No. 1 Roof Wire>Map Light Assemblyewd_type=component;type=c;code=V6;pinno=5
H80-25 (SNS2) - V6-5 (SNS2) Always Below 1 Ω H80-25 (SNS2) - Body ground Always 10 kΩ or higher
- Result:
Proceed to OK NG
Post-procedure1
None
OK
NG
Pre-procedure1
Disconnect the H85 telematics transceiver connector.
Disconnect the V6 map light assembly connector.
Procedure1
Measure the resistance according to the value(s) in the table below.
- Standard Resistance:
Tester Connection Condition Specified Condition Click Location & Routing(H85,V6)Location & Routingewd_type=routing;type=c,c;code=H85,V6
Click Connector(H85)Instrument Panel>Instrument Panel Wire / Speaker Wire>Telematics Transceiverewd_type=component;type=c;code=H85;pinno=7
Click Connector(V6)Body>No. 1 Roof Wire>Map Light Assemblyewd_type=component;type=c;code=V6;pinno=14
H85-7 (MCI-) - V6-14 (MCO-) Always Below 1 Ω H85-7 (MCI-) - Body ground Always 10 kΩ or higher
- Result:
Proceed to OK NG
Post-procedure1
None
OK
NG
Pre-procedure1
Remove the telematics transceiver with the connector(s) still connected.
- HINT:
-
Click hereAudio / Visual / Telematics>TELEMATICS>TELEMATICS TRANSCEIVER (except TAS Type)>REMOVAL
Procedure1
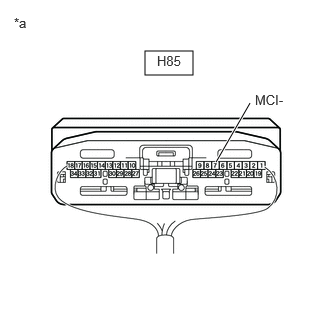
| *a | Component with harness connected
(Telematics Transceiver) |
Measure the resistance according to the value(s) in the table below.
- Standard Resistance:
Tester Connection Condition Specified Condition Click Location & Routing(H85)Location & Routingewd_type=routing;type=c;code=H85
Click Connector(H85)Instrument Panel>Instrument Panel Wire / Speaker Wire>Telematics Transceiverewd_type=component;type=c;code=H85;pinno=7
H85-7 (MCI-) - Body ground Always Below 1 Ω
- Result:
Proceed to OK NG
Post-procedure1
None
OK
NG
Pre-procedure1
Remove the map light assembly.
- HINT:
-
Click hereVehicle Interior>LIGHTING (INT)>PERSONAL LIGHT>REMOVAL
Procedure1
| *a | Component without harness connected
(Map Light Assembly) |
Measure the resistance according to the value(s) in the table below.
- Standard Resistance:
Tester Connection Condition Specified Condition Click Location & Routing(V6)Location & Routingewd_type=routing;type=c;code=V6
Click Connector(V6)Body>No. 1 Roof Wire>Map Light Assemblyewd_type=component;type=c;code=V6;pinno=5,4
V6-5 (SNS2) - V6-4 (MCO-) Always Below 1 Ω
- Result:
Proceed to OK NG
Post-procedure1
None
OK
NG
Pre-procedure1
Remove the map light assembly.
- HINT:
-
Click hereVehicle Interior>LIGHTING (INT)>PERSONAL LIGHT>REMOVAL
Disconnect the telephone microphone assembly connector.
Procedure1
| *a | Component without harness connected
(Map Light Assembly (No. 1 Roof Wire Side)) |
| *b | Component without harness connected
(Map Light Assembly (Telephone Microphone Assembly Side)) |
Measure the resistance according to the value(s) in the table below.
- Standard Resistance:
Tester Connection Condition Specified Condition Click Location & Routing(V6)Location & Routingewd_type=routing;type=c;code=V6
Click Connector(V6)Body>No. 1 Roof Wire>Map Light Assemblyewd_type=component;type=c;code=V6;pinno=5,4
V6-5 (SNS2) - MC-1 (SNS2) Always Below 1 Ω V6-4 (MCO-) - MC-2 (MIC-) Always Below 1 Ω V6-5 (SNS2) - Body ground Always 10 kΩ or higher V6-4 (MCO-) - Body ground Always 10 kΩ or higher
- Result:
Proceed to OK NG
Post-procedure1
None
OK
NG
Pre-procedure1
Disconnect the H80 radio and display receiver assembly connector.
Disconnect the V7 map light assembly connector.
Procedure1
Measure the resistance according to the value(s) in the table below.
- Standard Resistance:
Tester Connection Condition Specified Condition Click Location & Routing(H80,V7)Location & Routingewd_type=routing;type=c,c;code=H80,V7
Click Connector(H80)Instrument Panel>Instrument Panel Wire / Speaker Wire>Radio & Display Receiver Assemblyewd_type=component;type=c;code=H80;pinno=25,22
Click Connector(V7)Body>No. 1 Roof Wire>Map Light Assemblyewd_type=component;type=c;code=V7;pinno=13,14
H80-25 (SNS2) - V7-13 (SNS2) Always Below 1 Ω H80-22 (MIN-) - V7-14 (MCO-) Always Below 1 Ω H80-25 (SNS2) or V7-13 (SNS2) - Body ground Always 10 kΩ or higher H80-22 (MIN-) or V7-14 (MCO-) - Body ground Always 10 kΩ or higher
- Result:
Proceed to OK NG
Post-procedure1
None
OK
NG
Pre-procedure1
Remove the map light assembly.
- HINT:
-
Click hereVehicle Interior>LIGHTING (INT)>PERSONAL LIGHT>REMOVAL
Connect the MC telephone microphone assembly connector.
Procedure1
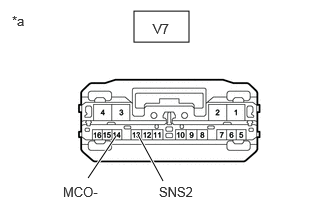
| *a | Component without harness connected
(Map Light Assembly) |
Measure the resistance according to the value(s) in the table below.
- Standard Resistance:
Tester Connection Condition Specified Condition Click Location & Routing(V7)Location & Routingewd_type=routing;type=c;code=V7
Click Connector(V7)Body>No. 1 Roof Wire>Map Light Assemblyewd_type=component;type=c;code=V7;pinno=13,14
V7-13 (SNS2) - V7-14 (MCO-) Always Below 1 Ω
- Result:
Proceed to OK NG
Post-procedure1
None
OK
NG
Pre-procedure1
Remove the map light assembly.
- HINT:
-
Click hereVehicle Interior>LIGHTING (INT)>PERSONAL LIGHT>REMOVAL
Disconnect the MC telephone microphone assembly connector.
Procedure1
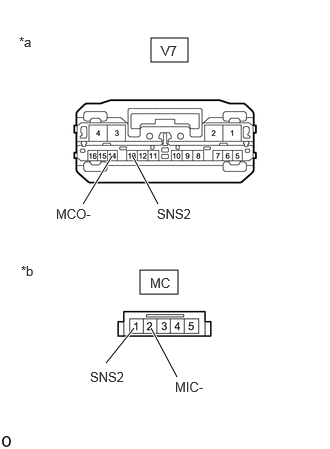
| *a | Component without harness connected
(Map Light Assembly (No. 1 Roof Wire Side)) |
| *b | Component without harness connected
(Map Light Assembly (Telephone Microphone Assembly Side)) |
Measure the resistance according to the value(s) in the table below.
- Standard Resistance:
Tester Connection Condition Specified Condition Click Location & Routing(V7)Location & Routingewd_type=routing;type=c;code=V7
Click Connector(V7)Body>No. 1 Roof Wire>Map Light Assemblyewd_type=component;type=c;code=V7;pinno=13,14
V7-13 (SNS2) - MC-1 (SNS2) Always Below 1 Ω V7-14 (MCO-) - MC-2 (MIC-) Always Below 1 Ω V7-13 (SNS2) - Body ground Always 10 kΩ or higher V7-14 (MCO-) - Body ground Always 10 kΩ or higher
- Result:
Proceed to OK NG
Post-procedure1
None
OK
NG
Pre-procedure1
Disconnect the H80 radio and display receiver assembly connector.
Disconnect the V7 map light assembly connector.
Procedure1
Measure the resistance according to the value(s) in the table below.
- Standard Resistance:
Tester Connection Condition Specified Condition Click Location & Routing(H80,V7)Location & Routingewd_type=routing;type=c,c;code=H80,V7
Click Connector(H80)Instrument Panel>Instrument Panel Wire / Speaker Wire>Radio & Display Receiver Assemblyewd_type=component;type=c;code=H80;pinno=25
Click Connector(V7)Body>No. 1 Roof Wire>Map Light Assemblyewd_type=component;type=c;code=V7;pinno=13
H80-25 (SNS2) - V7-13 (SNS2) Always Below 1 Ω H80-25 (SNS2) - Body ground Always 10 kΩ or higher
- Result:
Proceed to OK NG
Post-procedure1
None
OK
NG
Pre-procedure1
Disconnect the H85 telematics transceiver connector.
Disconnect the V7 map light assembly connector.
Procedure1
Measure the resistance according to the value(s) in the table below.
- Standard Resistance:
Tester Connection Condition Specified Condition Click Location & Routing(H85,V7)Location & Routingewd_type=routing;type=c,c;code=H85,V7
Click Connector(H85)Instrument Panel>Instrument Panel Wire / Speaker Wire>Telematics Transceiverewd_type=component;type=c;code=H85;pinno=7
Click Connector(V7)Body>No. 1 Roof Wire>Map Light Assemblyewd_type=component;type=c;code=V7;pinno=14
H85-7 (MCI-) - V7-14 (MCO-) Always Below 1 Ω H85-7 (MCI-) - Body ground Always 10 kΩ or higher
- Result:
Proceed to OK NG
Post-procedure1
None
OK
NG
Pre-procedure1
Remove the telematics transceiver with the connector(s) still connected.
- HINT:
-
Click hereAudio / Visual / Telematics>TELEMATICS>TELEMATICS TRANSCEIVER (except TAS Type)>REMOVAL
Procedure1
| *a | Component with harness connected
(Telematics Transceiver) |
Measure the resistance according to the value(s) in the table below.
- Standard Resistance:
Tester Connection Condition Specified Condition Click Location & Routing(H85)Location & Routingewd_type=routing;type=c;code=H85
Click Connector(H85)Instrument Panel>Instrument Panel Wire / Speaker Wire>Telematics Transceiverewd_type=component;type=c;code=H85;pinno=7
H85-7 (MCI-) - Body ground Always Below 1 Ω
- Result:
Proceed to OK NG
Post-procedure1
None
OK
NG
Pre-procedure1
Remove the map light assembly.
- HINT:
-
Click hereVehicle Interior>LIGHTING (INT)>PERSONAL LIGHT>REMOVAL
Procedure1
| *a | Component without harness connected
(Map Light Assembly) |
Measure the resistance according to the value(s) in the table below.
- Standard Resistance:
Tester Connection Condition Specified Condition Click Location & Routing(V7)Location & Routingewd_type=routing;type=c;code=V7
Click Connector(V7)Body>No. 1 Roof Wire>Map Light Assemblyewd_type=component;type=c;code=V7;pinno=13,14
V7-13 (SNS2) - V7-14 (MCO-) Always Below 1 Ω
- Result:
Proceed to OK NG
Post-procedure1
None
OK
NG
Pre-procedure1
Remove the map light assembly.
- HINT:
-
Click hereVehicle Interior>LIGHTING (INT)>PERSONAL LIGHT>REMOVAL
Disconnect the telephone microphone assembly connector.
Procedure1
| *a | Component without harness connected
(Map Light Assembly) |
| *b | Component without harness connected
(Map Light Assembly (Telephone Microphone Assembly Side)) |
Measure the resistance according to the value(s) in the table below.
- Standard Resistance:
Tester Connection Condition Specified Condition Click Location & Routing(V7)Location & Routingewd_type=routing;type=c;code=V7
Click Connector(V7)Body>No. 1 Roof Wire>Map Light Assemblyewd_type=component;type=c;code=V7;pinno=13,14
V7-13 (SNS2) - MC-1 (SNS2) Always Below 1 Ω V7-14 (MCO-) - MC-2 (MIC-) Always Below 1 Ω V7-13 (SNS2) - Body ground Always 10 kΩ or higher V7-14 (MCO-) - Body ground Always 10 kΩ or higher
- Result:
Proceed to OK NG
Post-procedure1
None
OK
NG