AIR CONDITIONING PANEL (for Sedan) > INSPECTION |
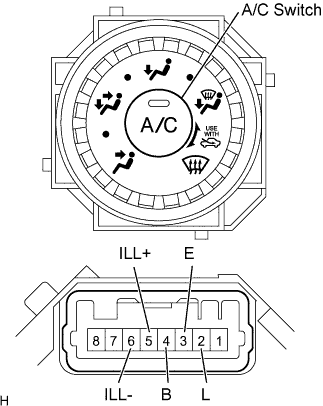
| 1. INSPECT HEATER CONTROL BASE SUB-ASSEMBLY |
|
Check the heater control base resistance.
Using an ohmmeter, measure the resistance and check the results in accordance with the values in the table below.
| Tester Connection | Condition | Specified Condition |
| 2 (L) - 3 (E) | Always | 10 kΩ or higher |
| 2 (L) - 4 (B) | A/C switch OFF | 10 kΩ or higher |
| 3 (E) - 4 (B) | Always | 10 kΩ or higher |
| 2 (L) - 4 (B) | A/C switch ON | Below 1 Ω |
| 5 (ILL+) - 6 (ILL-) | Always | Below 1 Ω |
Check the A/C indicator operation.
Connect the positive (+) lead from the battery to terminal 2 (L) and the negative (-) lead to terminal (E).
Push the A/C switch in and check that the indicator lights up.
Check the illumination operation.
Connect the positive (+) lead from the battery to terminal 5 (ILL+) and the negative (-) lead to terminal 6 (ILL-), then check that the bulb illuminates.
| 2. INSPECT HEATER CONTROL SUB-ASSEMBLY |
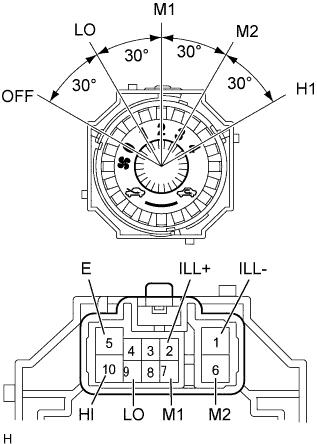 |
Check the heater control resistance.
Using an ohmmeter, measure the resistance and check the results in accordance with the values in the table below.
| Switch Position | Tester Connection | Specified Condition |
| OFF | ALL - 5 (E) | 10 kΩ or higher |
| LO | 9 (LO) - 5 (E) | Below 1 Ω |
| LO - M1 | 9 (LO) - 5 (E) - 7 (M1) | Below 1 Ω |
| M1 | 9 (LO) - 5 (E) - 7 (M1) | Below 1 Ω |
| M1 - M2 | 9 (LO) - 5 (E) - 7 (M1) - 6 (M2) | Below 1 Ω |
| M2 | 9 (LO) - 5 (E) - 6 (M2) | Below 1 Ω |
| M2 - HI | 9 (LO) - 5 (E) - 6 (M2) - 10 (HI) | Below 1 Ω |
| HI | 9 (LO) - 5 (E) - 10 (HI) | Below 1 Ω |
Check the illumination operation.
Connect the positive (+) lead from the battery to terminal 2 (ILL+) and the negative (-) lead to terminal 1 (ILL-), then check that the bulb illuminates.
| 3. INSPECT NO. 3 HEATER CONTROL KNOB |
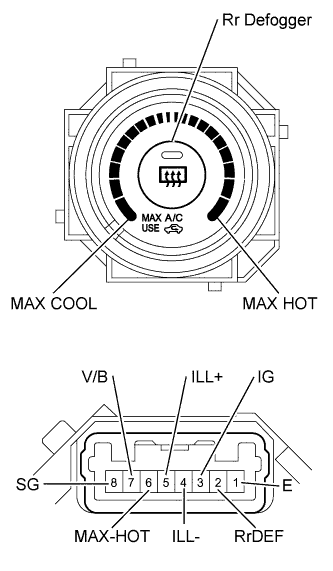 |
Check the No. 3 heater control knob resistance.
Using an ohmmeter, measure the resistance and check the results in accordance with the values in the table below.
| Tester Connection | Condition | Specified Condition |
| 2 (RrDEF) - 1 (E) | Rr. DEF switch OFF | 10 kΩ or higher |
| 2 (RrDEF) - 1 (E) | Rr. DEF switch ON | Below 1 Ω |
| 3 (IG) - 6 (MAX HOT) | Except MAX HOT | 10 kΩ or higher |
| 3 (IG) - 6 (MAX HOT) | MAX HOT | Below 1 Ω |
| 4 (ILL-) - 5 (ILL+) | Always | Below 1 Ω |
| 7 (V/B) - 8 (SG) | Always | Below 1 Ω |
Check the Rr. DEF indicator operation.
Connect the positive (+) lead from the battery to terminal 3 (IG) and the negative (-) lead to terminal 1 (E).
Push the Rr. DEF switch in and check that the indicator lights up.
Check the illumination operation.
Connect the positive (+) lead from the battery to terminal 5 (ILL+) and the negative (-) lead to terminal 4 (ILL-), then check that the bulb illuminates.