 |
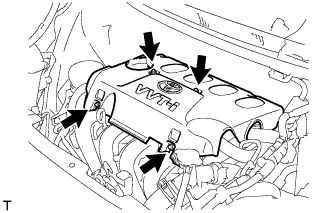
Remove the 4 nuts and No. 2 cylinder head cover.
VALVE CLEARANCE (for Hatchback) > ADJUSTMENT |
| 1. DISCONNECT CABLE FROM NEGATIVE BATTERY TERMINAL |
| 2. REMOVE ENGINE UNDER COVER RH |
| 3. REMOVE NO. 2 CYLINDER HEAD COVER |
|
Remove the 4 nuts and No. 2 cylinder head cover.
| 4. REMOVE NO. 1 IGNITION COIL |
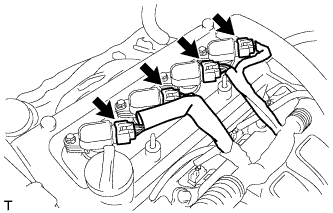 |
Disconnect the 4 No. 1 ignition coil connectors.
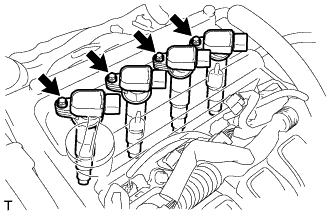 |
Remove the 4 bolts and the 4 No. 1 ignition coils.
| 5. DISCONNECT VENTILATION HOSE |
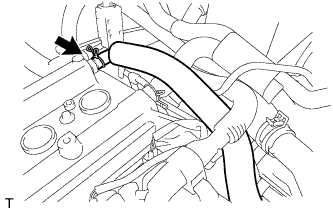 |
Disconnect the ventilation hose.
| 6. DISCONNECT FUEL VAPOR FEED HOSE ASSEMBLY |
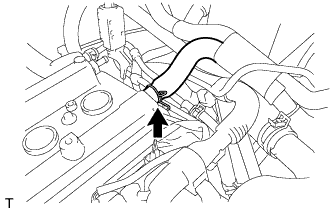 |
Disconnect the fuel vapor feed hose assembly.
| 7. REMOVE CYLINDER HEAD COVER SUB-ASSEMBLY |
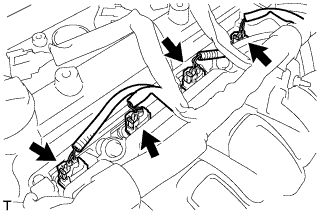 |
Disconnect the fuel injector connectors.
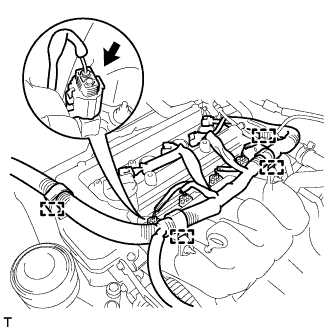 |
Disconnect the connector and 4 wire harness clamps shown in the illustration and disconnect the engine wire harness.
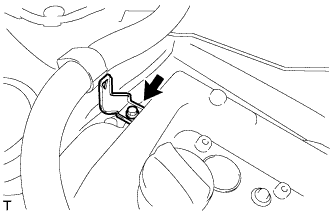 |
Remove the bolt and the wire harness bracket.
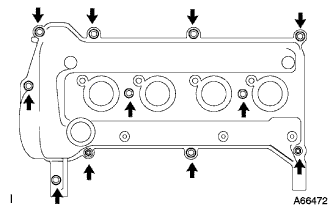 |
Remove the 9 bolts, 2 nuts and 2 seal washers and then remove the cylinder head cover sub-assembly.
| 8. INSPECT VALVE CLEARANCE |
Set the No. 1 cylinder to TDC/compression.
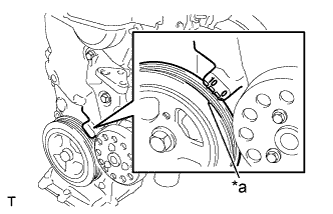 |
Turn the crankshaft damper and align its timing notch with the timing mark "0" of the oil pump.
| *a | Timing Notch |
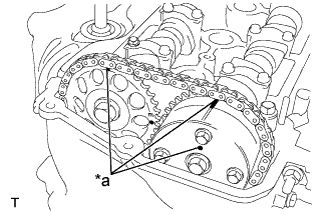 |
Check that both timing marks on the camshaft timing sprocket and camshaft timing gear are facing upward, as shown in the illustration.
| *a | Timing Marks |
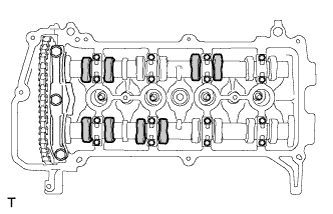 |
Check the valves indicated in the illustration.
Using a feeler gauge, measure the clearance between the valve lifter and camshaft.
Record any out-of-specification valve clearance measurements. They will be used later to determine the required replacement adjusting shim.
Turn the crankshaft 1 complete revolution (360°) and align its timing notch with the timing mark "0" of the oil pump.
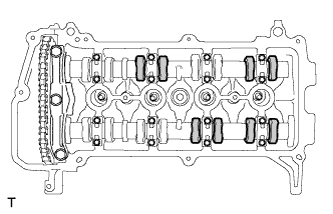 |
Check the valves indicated in the illustration.
Using a feeler gauge, measure the clearance between the valve lifter and camshaft.
Record any out-of-specification valve clearance measurements. They will be used later to determine the required replacement adjusting shim.
| 9. ADJUST VALVE CLEARANCE |
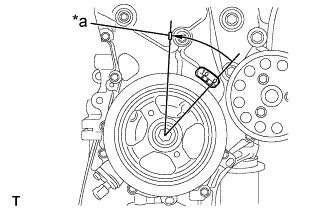 |
| *a | Matchmark |
Remove the fan and generator V belt .
Remove the engine mounting insulator sub-assembly RH .
Set the No. 1 cylinder to TDC/compression.
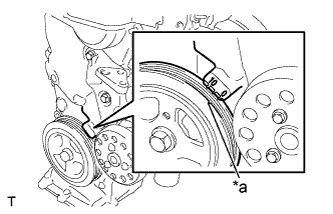 |
Turn the crankshaft damper and align its timing notch with the timing mark "0" of the oil pump.
| *a | Timing Notch |
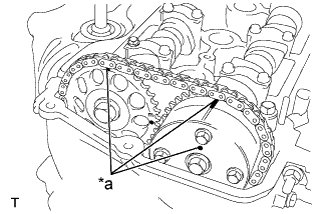 |
Check that both timing marks on the camshaft timing sprocket and camshaft timing gear are facing upward, as shown in the illustration.
| *a | Timing Marks |
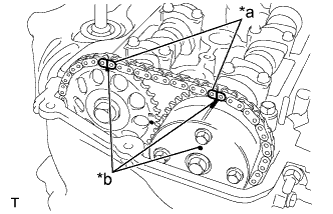 |
Place paint marks on the chain in the places where the timing marks of the camshaft timing sprocket and the camshaft timing gear are located.
| *a | Paint Marks |
| *b | Timing Marks |
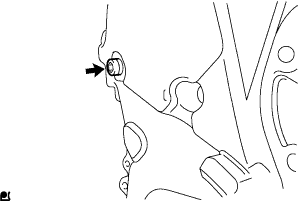 |
Using an 8 mm hexagon wrench, remove the screw plug.
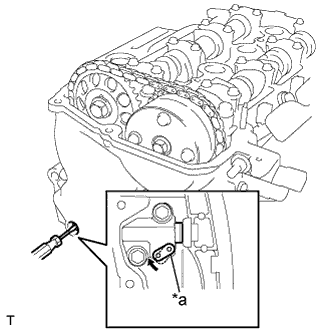 |
Insert a screwdriver into the service hole in the chain tensioner to pull the stopper plate of the chain tensioner upward.
| *a | Stopper Plate |
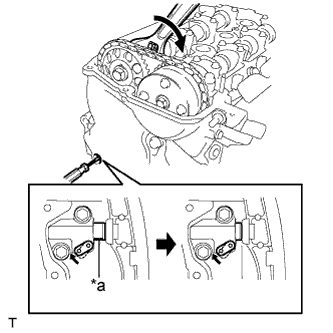 |
Using a wrench, rotate camshaft No. 2 clockwise to push in the plunger of the chain tensioner.
| *a | Plunger |
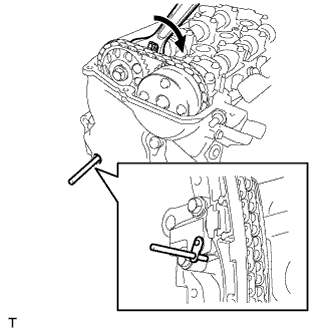 |
Remove the screwdriver from the service hole, then align the hole in the stopper plate with the service hole and insert a 3 mm (0.12 in.) diameter bar into the holes to hold the stopper plate.
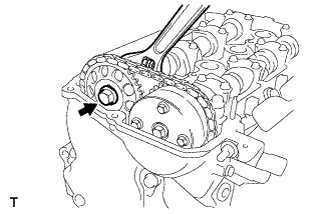 |
Using a wrench, hold the hexagonal lobe of camshaft No. 2 and remove the flange bolt.
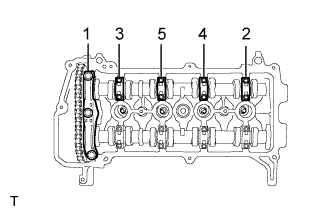 |
Using several steps, loosen and remove the 11 bearing cap bolts uniformly in the sequence shown in the illustration, then remove camshaft bearing cap No. 1 and camshaft bearing cap No. 2.
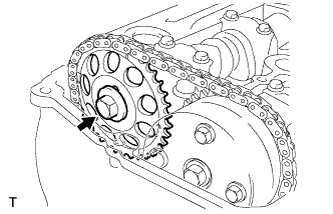 |
Remove the flange bolt and the camshaft timing sprocket.
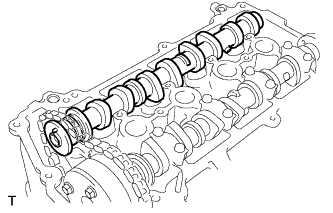 |
Remove No. 2 camshaft.
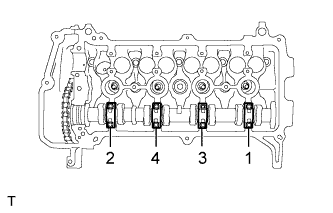 |
Using several steps, loosen and remove the 8 bearing cap bolts uniformly in the sequence shown in the illustration, then remove No. 2 camshaft bearing cap.
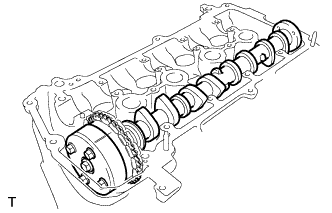 |
Hold the chain by hand and remove the camshaft and the camshaft timing gear assembly.
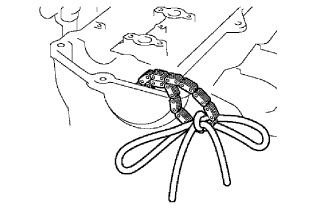 |
Tie the chain with a piece of string as shown in the illustration.
Remove the 16 valve lifters.
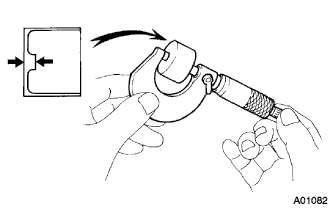 |
Using a micrometer, measure the thickness of the removed lifter.
Calculate the thickness of a new lifter so that the valve clearance comes to within the specified values.
| A | Thickness of new lifter |
| B | Thickness of used lifter |
| C | Measured valve clearance |
Select a new lifter with a thickness as close to the calculated values as possible.
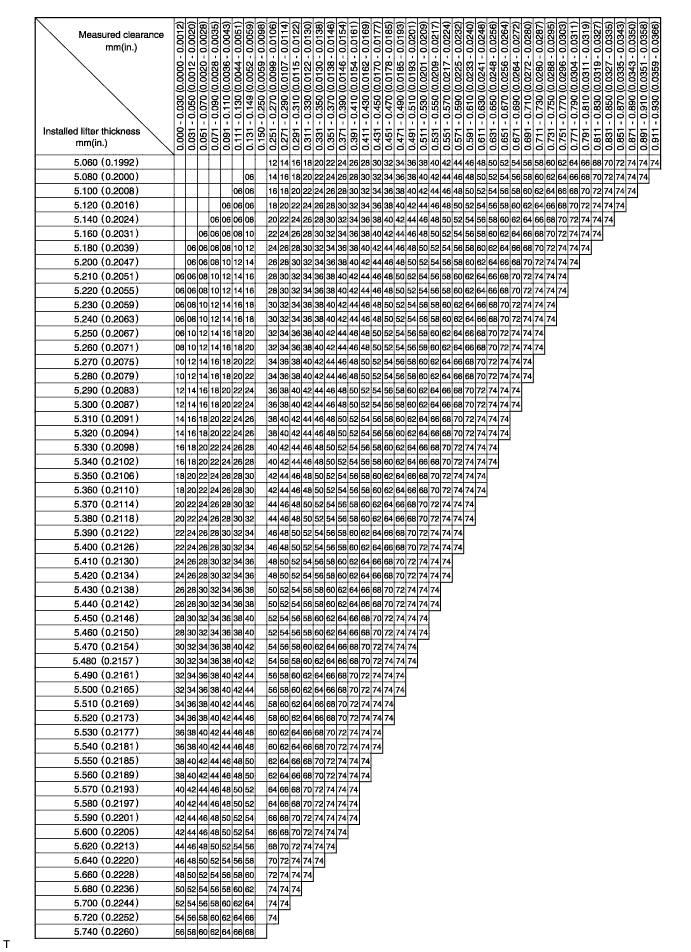
| Shim No. | Thickness | Shim No. | Thickness | Shim No. | Thickness |
| 06 | 5.060 (0.1992) | 30 | 5.300 (0.2087) | 54 | 5.540 (0.2181) |
| 08 | 5.080 (0.2000) | 32 | 5.320 (0.2094) | 56 | 5.560 (0.2189) |
| 10 | 5.100 (0.2008) | 34 | 5.340 (0.2102) | 58 | 5.580 (0.2197) |
| 12 | 5.120 (0.2016) | 36 | 5.360 (0.2110) | 60 | 5.600 (0.2205) |
| 14 | 5.140 (0.2024) | 38 | 5.380 (0.2118) | 62 | 5.620 (0.2213) |
| 16 | 5.160 (0.2031) | 40 | 5.400 (0.2126) | 64 | 5.640 (0.2220) |
| 18 | 5.180 (0.2039) | 42 | 5.420 (0.2134) | 66 | 5.660 (0.2228) |
| 20 | 5.200 (0.2047) | 44 | 5.440 (0.2142) | 68 | 5.680 (0.2236) |
| 22 | 5.220 (0.2055) | 46 | 5.460 (0.2150) | 70 | 5.700(0.2244) |
| 24 | 5.240 (0.2063) | 48 | 5.480 (0.2157) | 72 | 5.720 (0.2252) |
| 26 | 5.260 (0.2071) | 50 | 5.500 (0.2165) | 74 | 5.740 (0.2260) |
| 28 | 5.280 (0.2079) | 52 | 5.520 (0.2173) |
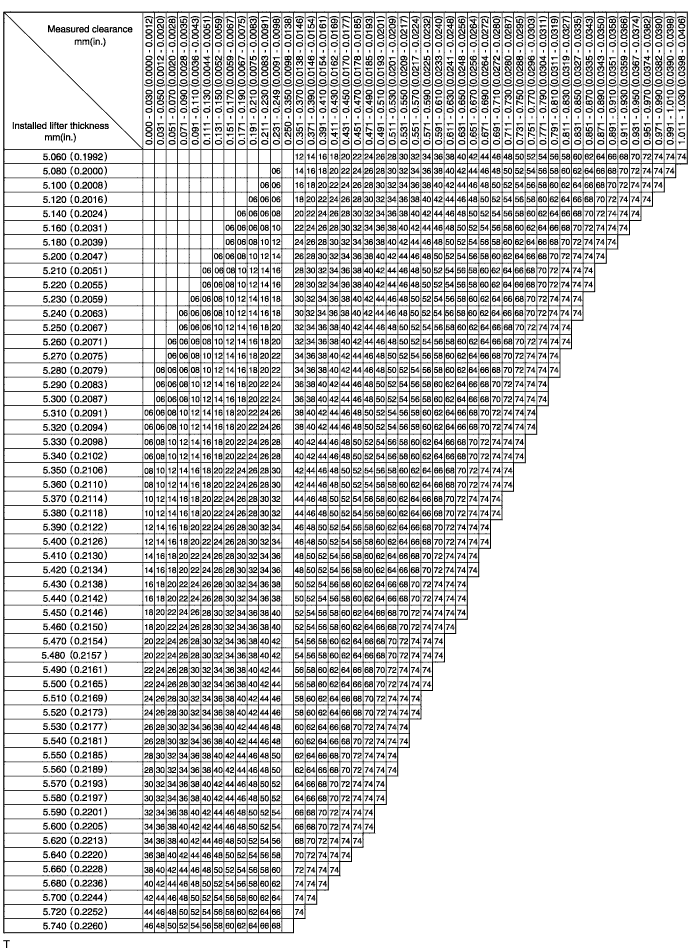
| Shim No. | Thickness | Shim No. | Thickness | Shim No. | Thickness |
| 06 | 5.060 (0.1992) | 30 | 5.300 (0.2087) | 54 | 5.540 (0.2181) |
| 08 | 5.080 (0.2000) | 32 | 5.320 (0.2094) | 56 | 5.560 (0.2189) |
| 10 | 5.100 (0.2008) | 34 | 5.340 (0.2102) | 58 | 5.580 (0.2197) |
| 12 | 5.120 (0.2016) | 36 | 5.360 (0.2110) | 60 | 5.600 (0.2205) |
| 14 | 5.140 (0.2024) | 38 | 5.380 (0.2118) | 62 | 5.620 (0.2213) |
| 16 | 5.160 (0.2031) | 40 | 5.400 (0.2126) | 64 | 5.640 (0.2220) |
| 18 | 5.180 (0.2039) | 42 | 5.420 (0.2134) | 66 | 5.660 (0.2228) |
| 20 | 5.200 (0.2047) | 44 | 5.440 (0.2142) | 68 | 5.680 (0.2236) |
| 22 | 5.220 (0.2055) | 46 | 5.460 (0.2150) | 70 | 5.700 (0.2244) |
| 24 | 5.240 (0.2063) | 48 | 5.480 (0.2157) | 72 | 5.720 (0.2252) |
| 26 | 5.260 (0.2071) | 50 | 5.500 (0.2165) | 74 | 5.740 (0.2260) |
| 28 | 5.280 (0.2079) | 52 | 5.520 (0.2173) |
Install the selected valve lifter.
Apply a light coat of engine oil to the camshaft and camshaft journals.
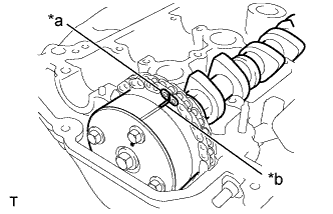 |
Install the chain onto the camshaft timing gear with the paint mark and the timing mark aligned as shown in the illustration.
| *a | Paint Mark |
| *b | Timing Mark |
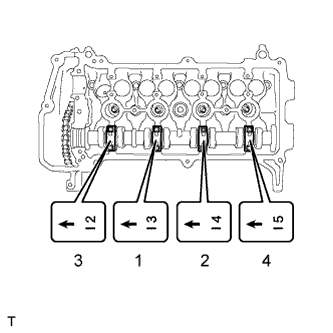 |
Examine the front marks and the numbers on No. 2 camshaft bearing cap and check that the sequence is as shown in the illustration. Then uniformly tighten the bolts in several steps in the sequence shown in the illustration.
|
Install No. 2 camshaft.
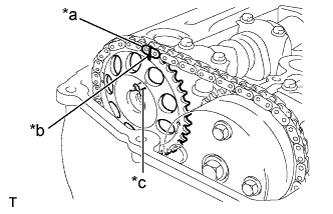 |
Hold the chain, and align the timing mark on the camshaft timing sprocket with the paint mark of the chain.
| *a | Paint Mark |
| *b | Timing Mark |
| *c | Pin |
Align the alignment pin hole in the camshaft timing sprocket with the alignment pin of the camshaft, and install the sprocket onto the camshaft.
|
Provisionally install the flange bolt.
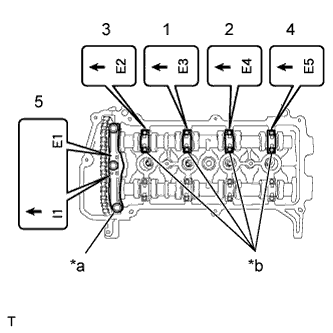 |
Examine the front marks and the numbers of camshaft No. 1 bearing cap and No. 2 camshaft bearing cap and check that the sequence is as shown in the illustration. Then uniformly tighten the bolts in several steps, in the sequence shown in the illustration.
| *a | No. 1 Bearing Cap |
| *b | No. 2 Bearing Cap |
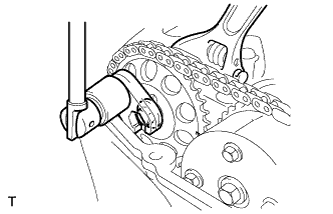 |
Using a union nut wrench 14 mm, hold the hexagonal lobe of camshaft No. 2 and install the flange bolt.
Remove the bar from the timing chain tensioner.
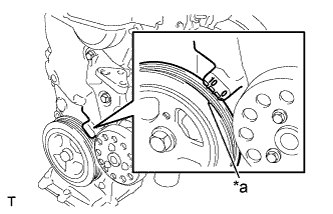 |
Turn the crankshaft damper and align its timing notch with the timing mark "0" of the oil pump.
| *a | Timing Notch |
|
Check that all the pairs of timing marks are aligned.
| *a | Paint Marks |
| *b | Timing Marks |
Apply adhesive to the 2 or 3 threads of the screw plug.
|
Using an 8 mm hexagon wrench, install the screw plug.
Install the engine mounting insulator sub-assembly RH . (for Hatchback)
Install the fan and generator V belt .
Adjust the fan and generator V belt .
Inspect the fan and generator V belt .
| 10. INSTALL CYLINDER HEAD COVER SUB-ASSEMBLY |
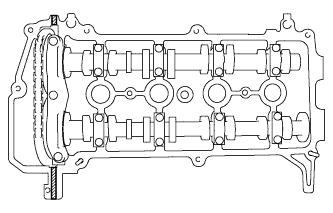 |
 | Seal Packing |
Apply seal packing to the cylinder head as shown in the illustration.
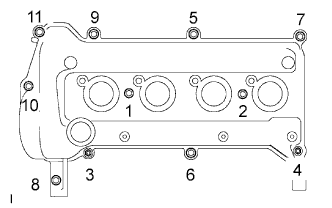 |
Install the cylinder head cover sub-assembly with the 9 bolts, 2 nuts and 2 seal washers.
Tighten the 9 bolts and 2 nuts in the sequence shown in the illustration.
Install the wire harness bracket with the bolt.
Connect the connector and 4 wire harness clamps and connect the engine wire harness.
Connect the 4 fuel injector connectors.
| 11. CONNECT FUEL VAPOR FEED HOSE ASSEMBLY |
Connect fuel vapor feed hose assembly.
| 12. CONNECT VENTILATION HOSE |
Connect the ventilation hose.
| 13. INSTALL NO. 1 IGNITION COIL |
Install the 4 No. 1 ignition coils with the 4 bolts.
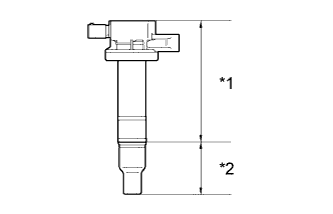 |
| *1 | Body |
| *2 | Cap |
Connect the 4 No. 1 ignition coil connectors.
| 14. CONNECT CABLE TO NEGATIVE BATTERY TERMINAL |
| 15. INSPECT FOR ENGINE OIL LEAK |
| 16. INSTALL NO. 2 CYLINDER HEAD COVER |
Install the No. 2 cylinder head cover with the 4 nuts.
| 17. INSTALL ENGINE UNDER COVER RH |