 |
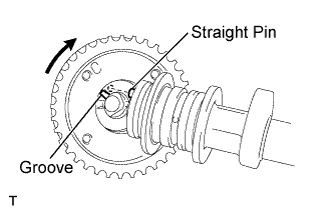
Put the camshaft timing gear assembly and camshaft together with the straight pin of the groove.
CAMSHAFT (for Sedan) > INSTALLATION |
| 1. INSTALL CAMSHAFT TIMING GEAR ASSEMBLY |
|
Put the camshaft timing gear assembly and camshaft together with the straight pin of the groove.
Turn the camshaft timing gear assembly clockwise while pushing it gently toward the camshaft. When the pin fits the groove, push to ensure a good fit.
Check that there is no clearance between the gear flange and the camshaft.
Tighten the flange bolt with the camshaft timing gear fixed.
Check that the camshaft timing gear assembly moves smoothly in the retard direction (clockwise) and is locked in the most retarded position.
| 2. INSTALL CAMSHAFT |
Apply a light coat of engine oil to the camshaft and camshaft journals.
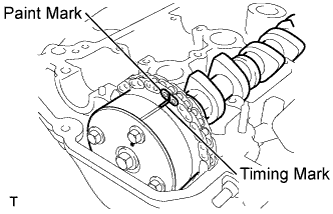 |
Install the chain onto the camshaft timing gear with the paint mark and the timing mark aligned as shown in the illustration.
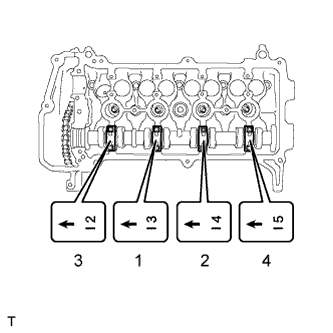 |
Examine the front marks and numbers on No. 2 camshaft bearing cap and check that the sequence is as shown in the illustration. Then uniformly tighten the bolts, in several steps, in the sequence shown in the illustration.
| 3. INSTALL NO. 2 CAMSHAFT |
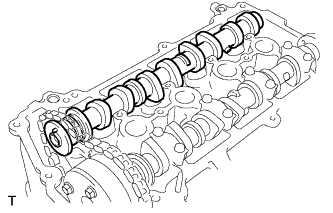 |
Install No. 2 camshaft.
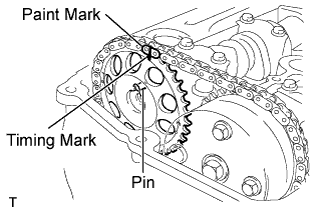 |
Hold the chain and align the timing mark on the camshaft timing sprocket with the paint mark of the chain.
Align the alignment pin hole in the camshaft timing sprocket with the alignment pin of the camshaft, and install the sprocket onto the camshaft.
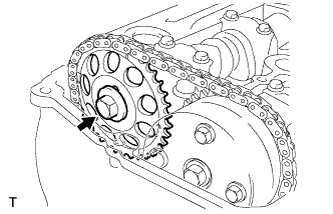 |
Provisionally install the flange bolt.
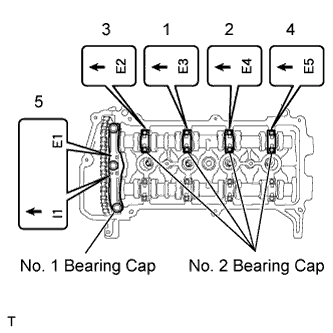 |
Examine the front marks and numbers on camshaft bearing caps No. 1 and No. 2 and check that the sequence is as shown in the illustration. Then uniformly tighten the bolts, in several steps, in the sequence shown in the illustration.
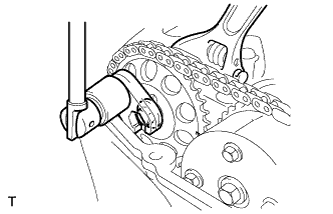 |
Using a wrench, hold the hexagonal lobe of camshaft No. 2 and install the flange bolt.
Remove the bar from the timing chain tensioner.
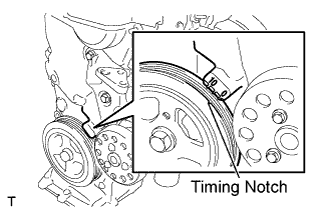 |
Turn the crankshaft damper and align its timing notch with the timing mark "0" of the oil pump.
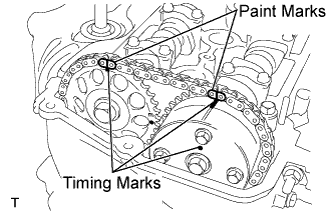 |
Check that all the pairs of timing marks are aligned.
Apply adhesive to the end 2 or 3 threads of the screw plug.
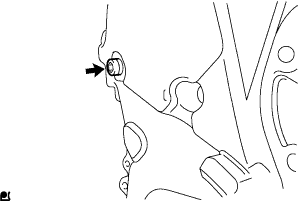 |
Using an 8 mm hexagon wrench, install the screw plug.
| 4. INSPECT VALVE CLEARANCE |
Set the No. 1 cylinder to TDC/compression.
|
Turn the crankshaft damper and align its timing notch with the timing mark "0" of the oil pump.
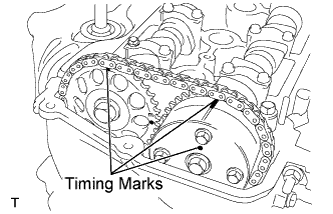 |
Check that both timing marks on the camshaft timing sprocket and camshaft timing gear are facing upward, as shown in the illustration.
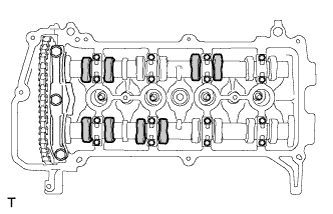 |
Check the valves indicated in the illustration.
Using a feeler gauge, measure the clearance between the valve lifter and camshaft.
Record any out-of-specification valve clearance measurements. They will be used later to determine the required replacement adjusting shim.
Turn the crankshaft 1 complete revolution (360°) and align its timing notch with the timing mark "0" of the oil pump.
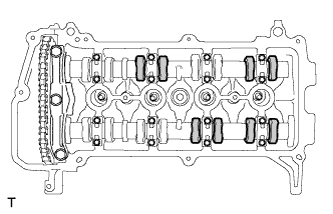 |
Check the valves indicated in the illustration.
Using a feeler gauge, measure the clearance between the valve lifter and camshaft.
Record any out-of-specification valve clearance measurements. They will be used later to determine the required replacement adjusting shim.
| 5. ADJUST VALVE CLEARANCE |
 |
Remove the fan and generator V belt .
Remove the engine mounting insulator sub-assembly RH .
Set the No. 1 cylinder to TDC/compression.
|
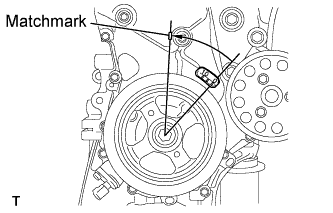
Turn the crankshaft damper and align its timing notch with the timing mark "0" of the oil pump.
|
Check that both timing marks on the camshaft timing sprocket and camshaft timing gear are facing upward, as shown in the illustration.
|
Place paint marks on the chain in the places where the timing marks of the camshaft timing sprocket and the camshaft timing gear are located.
|
Using an 8 mm hexagon wrench, remove the screw plug.
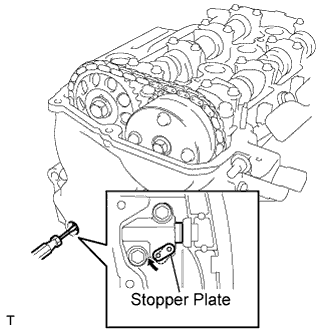 |
Insert a screwdriver into the service hole in the chain tensioner to pull the stopper plate of the chain tensioner upward.
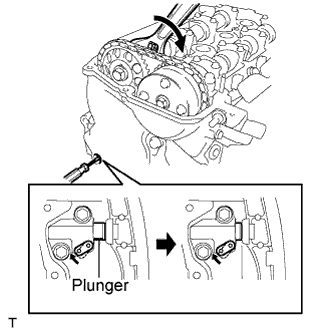 |
Using a wrench, rotate No. 2 camshaft clockwise to push in the plunger of the chain tensioner.
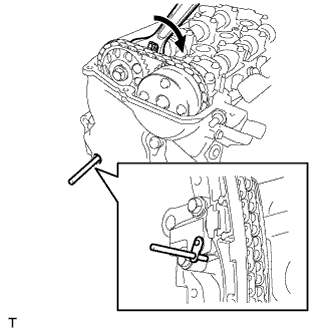 |
Remove the screwdriver from the service hole, then align the hole in the stopper plate with the service hole and insert a 3 mm (0.12 in.) diameter bar into the holes to hold the stopper plate.
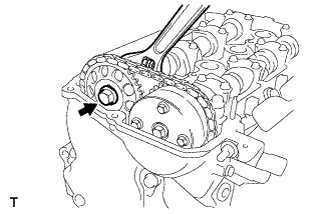 |
Using a wrench, hold the hexagonal lobe of No. 2 camshaft and remove the flange bolt.
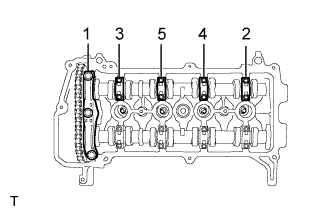 |
Using several steps, loosen and remove the 11 bearing cap bolts uniformly in the sequence shown in the illustration, then remove No. 1 camshaft bearing cap and No. 2 camshaft bearing cap.
|
Remove the flange bolt and remove the camshaft timing sprocket.
|
Remove No. 2 camshaft.
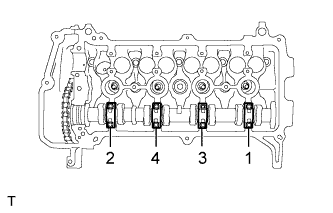 |
Using several steps, loosen and remove the 8 bearing cap bolts uniformly in the sequence shown in the illustration, then remove No. 2 camshaft bearing cap.
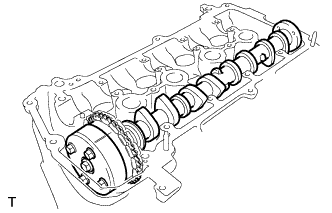 |
Hold the chain by hand and remove the camshaft and the camshaft timing gear assembly.
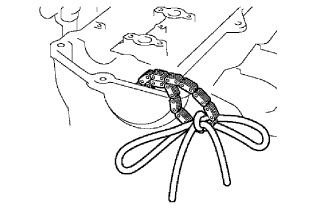 |
Tie the chain with a piece of string as shown in the illustration.
Remove the 16 valve lifters.
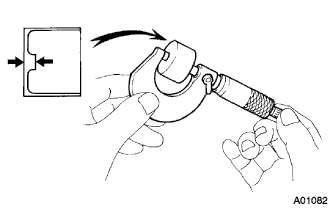 |
Using a micrometer, measure the thickness of the removed lifter.
Calculate the thickness of a new lifter so that the valve clearance comes to within the specified values.
| A | Thickness of new lifter |
| B | Thickness of used lifter |
| C | Measured valve clearance |
Select a new lifter with a thickness as close to the calculated values as possible.
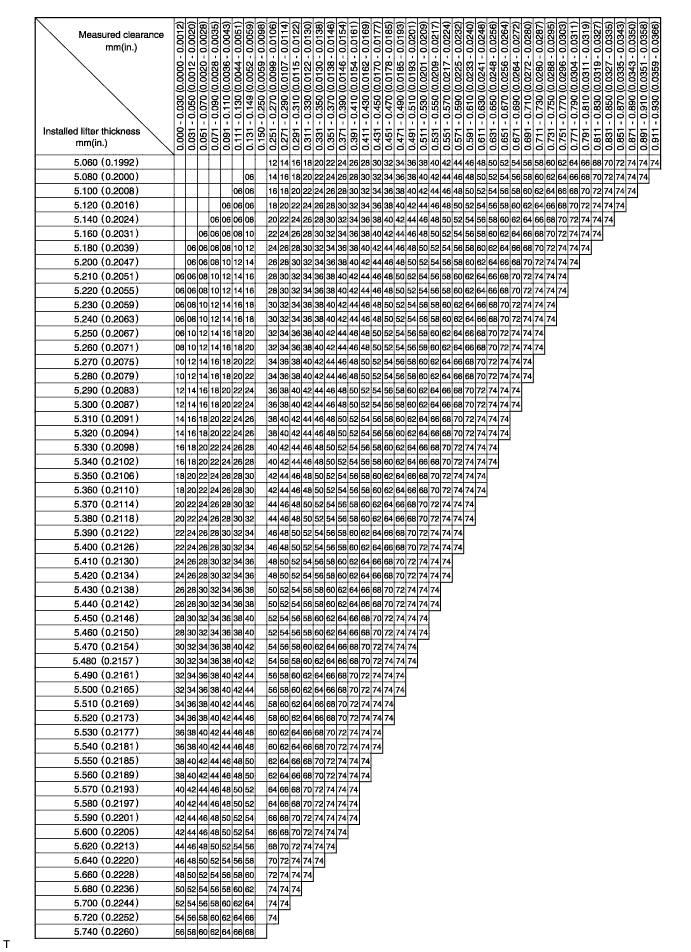
| Shim No. | Thickness | Shim No. | Thickness | Shim No. | Thickness |
| 06 | 5.060 (0.1992) | 30 | 5.300 (0.2087) | 54 | 5.540 (0.2181) |
| 08 | 5.080 (0.2000) | 32 | 5.320 (0.2094) | 56 | 5.560 (0.2189) |
| 10 | 5.100 (0.2008) | 34 | 5.340 (0.2102) | 58 | 5.580 (0.2197) |
| 12 | 5.120 (0.2016) | 36 | 5.360 (0.2110) | 60 | 5.600 (0.2205) |
| 14 | 5.140 (0.2024) | 38 | 5.380 (0.2118) | 62 | 5.620 (0.2213) |
| 16 | 5.160 (0.2031) | 40 | 5.400 (0.2126) | 64 | 5.640 (0.2220) |
| 18 | 5.180 (0.2039) | 42 | 5.420 (0.2134) | 66 | 5.660 (0.2228) |
| 20 | 5.200 (0.2047) | 44 | 5.440 (0.2142) | 68 | 5.680 (0.2236) |
| 22 | 5.220 (0.2055) | 46 | 5.460 (0.2150) | 70 | 5.700(0.2244) |
| 24 | 5.240 (0.2063) | 48 | 5.480 (0.2157) | 72 | 5.720 (0.2252) |
| 26 | 5.260 (0.2071) | 50 | 5.500 (0.2165) | 74 | 5.740 (0.2260) |
| 28 | 5.280 (0.2079) | 52 | 5.520 (0.2173) |
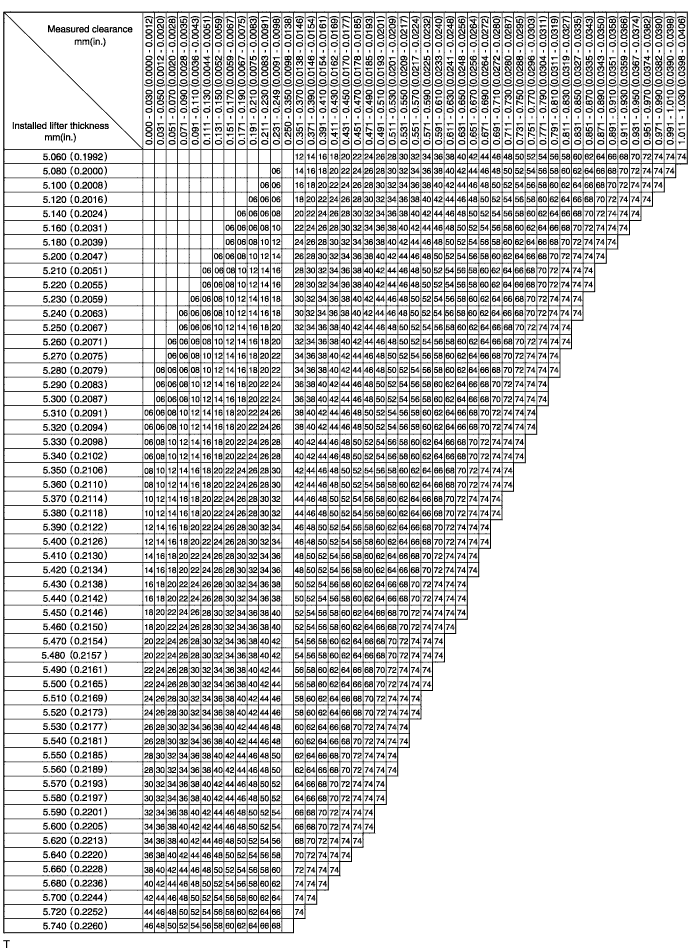
| Shim No. | Thickness | Shim No. | Thickness | Shim No. | Thickness |
| 06 | 5.060 (0.1992) | 30 | 5.300 (0.2087) | 54 | 5.540 (0.2181) |
| 08 | 5.080 (0.2000) | 32 | 5.320 (0.2094) | 56 | 5.560 (0.2189) |
| 10 | 5.100 (0.2008) | 34 | 5.340 (0.2102) | 58 | 5.580 (0.2197) |
| 12 | 5.120 (0.2016) | 36 | 5.360 (0.2110) | 60 | 5.600 (0.2205) |
| 14 | 5.140 (0.2024) | 38 | 5.380 (0.2118) | 62 | 5.620 (0.2213) |
| 16 | 5.160 (0.2031) | 40 | 5.400 (0.2126) | 64 | 5.640 (0.2220) |
| 18 | 5.180 (0.2039) | 42 | 5.420 (0.2134) | 66 | 5.660 (0.2228) |
| 20 | 5.200 (0.2047) | 44 | 5.440 (0.2142) | 68 | 5.680 (0.2236) |
| 22 | 5.220 (0.2055) | 46 | 5.460 (0.2150) | 70 | 5.700 (0.2244) |
| 24 | 5.240 (0.2063) | 48 | 5.480 (0.2157) | 72 | 5.720 (0.2252) |
| 26 | 5.260 (0.2071) | 50 | 5.500 (0.2165) | 74 | 5.740 (0.2260) |
| 28 | 5.280 (0.2079) | 52 | 5.520 (0.2173) |
Install the selected valve lifter.
Apply a light coat of engine oil to the camshaft and camshaft journals.
|
Install the chain onto the camshaft timing gear with the paint mark and the timing mark aligned as shown in the illustration.
|
Examine the front marks and the numbers on No. 2 camshaft bearing cap and check that the sequence is as shown in the illustration. Then uniformly tighten the bolts in several steps in the sequence shown in the illustration.
|
Install No. 2 camshaft.
|
Hold the chain, and align the timing mark on the camshaft timing sprocket with the paint mark of the chain.
Align the alignment pin hole in the camshaft timing sprocket with the alignment pin of the camshaft, and install the sprocket onto the camshaft.
|
Provisionally install the flange bolt.
|
Examine the front marks and the numbers of No. 1 camshaft bearing cap and No. 2 camshaft bearing cap and check that the sequence is as shown in the illustration. Then uniformly tighten the bolts in several steps, in the sequence shown in the illustration.
|
Using a wrench, hold the hexagonal lobe of No. 2 camshaft and install the flange bolt.
Remove the bar from the timing chain tensioner.
|
Turn the crankshaft damper and align its timing notch with the timing mark "0" of the oil pump.
|
Check that all the pairs of timing marks are aligned.
Apply adhesive to the 2 or 3 threads of the screw plug.
|
Using an 8 mm hexagon wrench, install the screw plug.
Install the engine mounting insulator sub-assembly RH .
Install the fan and generator V belt .
Adjust the fan and generator V belt .
Inspect the fan and generator V belt .
| 6. INSTALL ENGINE MOUNTING INSULATOR SUB-ASSEMBLY RH |
Install the engine mounting insulator sub-assembly RH to the transverse engine engine mounting bracket and vehicle with the 5 bolts and nut.
| 7. INSTALL FAN AND GENERATOR V BELT |
Provisionally install the fan and generator V belt onto each pulley.
| 8. ADJUST FAN AND GENERATOR V BELT |
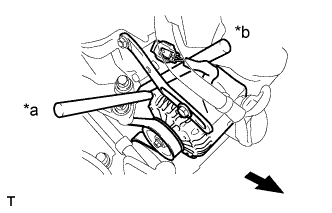 |
Insert an adjusting bar between the engine mounting bracket and generator assembly. Pull the adjusting bar toward the vehicle front to adjust the generator V belt tension .
| *a | OK |
| *b | NG |
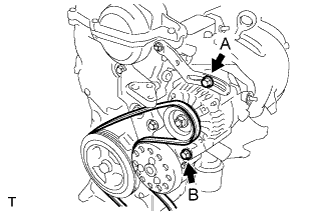 |
First tighten bolt A, then tighten bolt B.
| 9. INSPECT FAN AND GENERATOR V BELT |
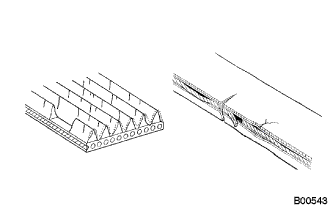 |
Check the belt for wear, cracks or other signs of damage.
If any of the following defects is found, replace the V-ribbed belt.
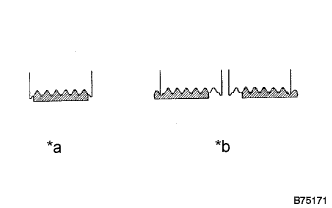 |
Check that the belt fits properly in the ribbed grooves.
| *a | CORRECT |
| *b | INCORRECT |
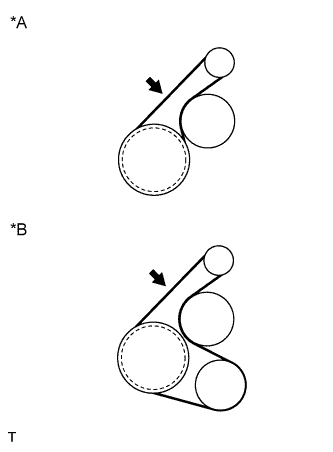 |
Inspect the V belt deflection and tension.
| *A | w/o Air Conditioner |
| *B | w/ Air Conditioner |
| Item | Specified Condition |
| New belt | 8.0 to 9.0 mm (0.31 to 0.35 in) |
| Used belt | 12.5 to 13.5 mm (0.49 to 0.53 in) |
| Item | Specified Condition |
| New belt | 700 to 800 N (71 to 82 kg, 157 to 180 lb) |
| Used belt | 300 to 400 N (31 to 41 kg, 67 to 90 lb) |
| 10. INSTALL CYLINDER HEAD COVER SUB-ASSEMBLY |
Install a new gasket to the cylinder head cover sub-assembly.
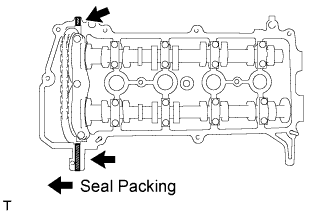 |
Apply seal packing to the cylinder head as shown in the illustration.
Install the cylinder head cover sub-assembly with the 9 bolts, 2 nuts and 2 seal washers.
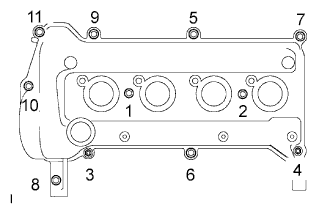 |
Tighten the 9 bolts and 2 nuts in the sequence shown in the illustration.
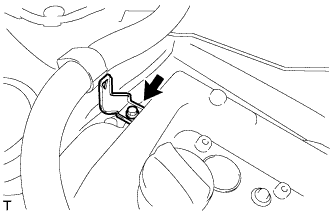 |
Install the wire harness bracket with the bolt.
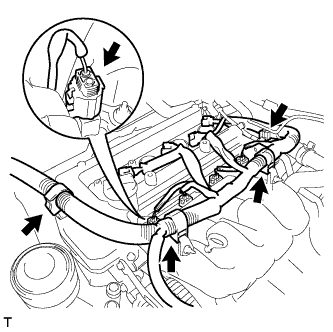 |
Connect the connector and wire harness clamp shown in the illustration and connect the engine wire harness.
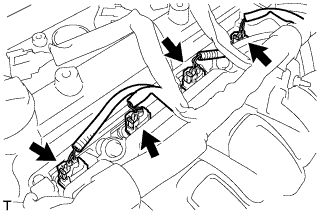 |
Connect the fuel injector connectors.
| 11. CONNECT FUEL VAPOR FEED HOSE ASSEMBLY |
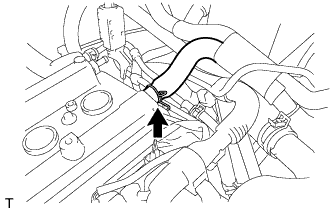 |
Connect fuel vapor feed hose assembly.
| 12. CONNECT VENTILATION HOSE |
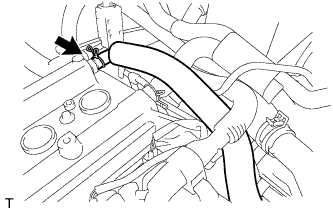 |
Connect the ventilation hose.
| 13. INSTALL NO. 1 IGNITION COIL |
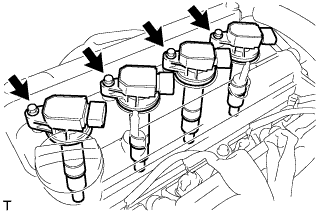 |
Install the 4 ignition coils with the 4 bolts.
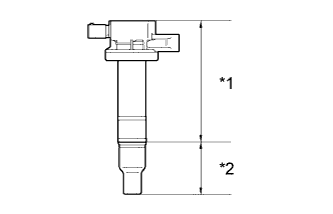 |
| *1 | Body |
| *2 | Cap |
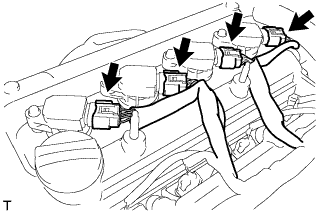 |
Connect the 4 ignition coil connectors.
| 14. CONNECT CABLE TO NEGATIVE BATTERY TERMINAL |
| 15. CHECK FOR ENGINE OIL LEAKAGE |
| 16. INSTALL NO. 2 CYLINDER HEAD COVER |
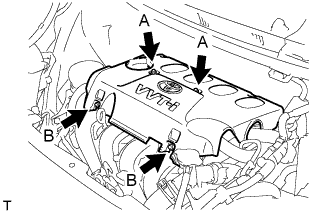 |
Tighten the 2 A nuts, then the 2 B nuts.
| 17. INSTALL ENGINE UNDER COVER RH |