CYLINDER HEAD GASKET (for Sedan) > INSTALLATION |
| 1. INSTALL CYLINDER HEAD GASKET |
|
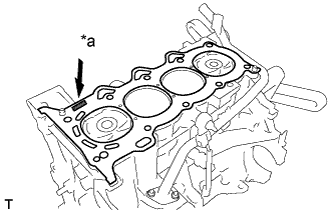
Place a new cylinder head gasket on the cylinder block with the Lot No. stamp facing upward.
| *a | Lot No. |
| 2. INSTALL CYLINDER HEAD SUB-ASSEMBLY |
Apply a light coat of engine oil to the threads of the cylinder head bolts.
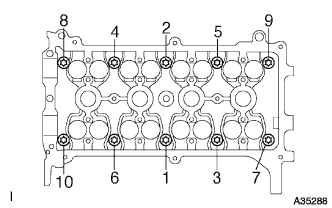 |
Using several steps, install and tighten the 10 cylinder head bolts and plate washers uniformly with an 8 mm bi-hexagon wrench, in the sequence shown in the illustration.
Mark the front of the cylinder head bolt with paint.
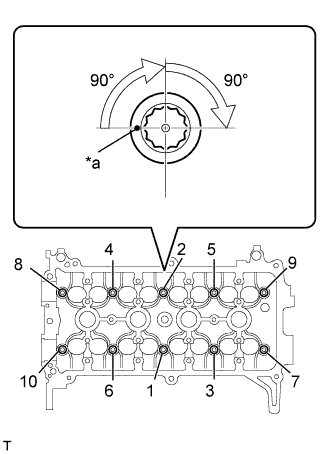 |
Retighten the cylinder head bolts 90° and then an additional by 90° as shown in the illustration.
| *a | Paint Mark |
Check that the paint mark is now at a 180° angle from the front.
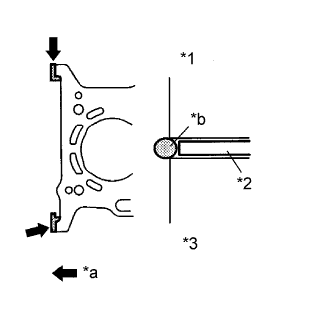 |
Apply a continuous bead of seal packing (Diameter 4.5 to 5.5 mm (0.177 to 0.217 in.)) as shown in the illustration.
| *1 | Cylinder Head |
| *2 | Cylinder Head Gasket |
| *3 | Cylinder Block |
| *a | Seal Packing |
| *b | Diameter: 4.5 to 5.5 mm |
| 3. INSTALL CAMSHAFT |
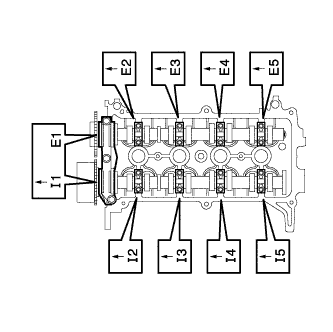 |
Examine the front marks and numbers and check that the sequence is as shown in the illustration. Then provisionally tighten the 19 bolts.
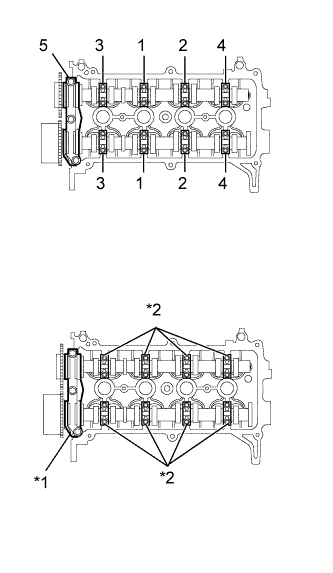 |
Uniformly tighten the bolts in several steps in the sequence shown in the illustration and install No. 1 camshaft bearing cap and No. 2 camshaft bearing cap.
| *1 | No. 1 Bearing Cap |
| *2 | No. 2 Bearing Cap |
| 4. INSTALL CHAIN SUB-ASSEMBLY |
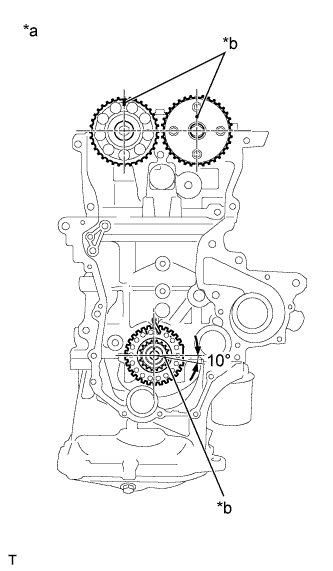 |
| *a | TDC |
| *b | Timing Mark |
Make sure that all the timing marks are in the positions (TDC) shown in the illustration.
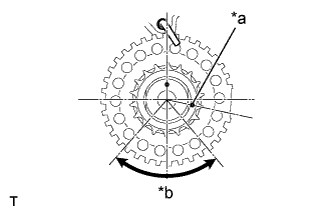 |
Set the timing mark of the crankshaft in a position between 40 and 140° ATDC, as illustrated.
| *a | Timing Mark |
| *b | 40° to 140° ATDC |
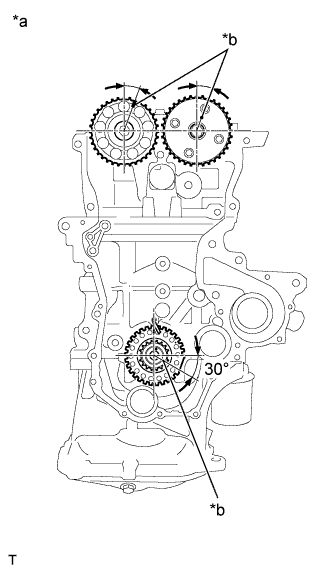 |
Set the camshaft timing gear and the camshaft timing sprocket in the positions (20° ATDC) shown in the illustration.
Set the crankshaft in the position (20° ATDC) shown in the illustration.
| *a | 20° ATDC |
| *b | Timing Mark |
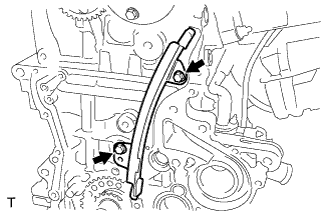 |
Install the No. 1 chain vibration damper with the 2 bolts.
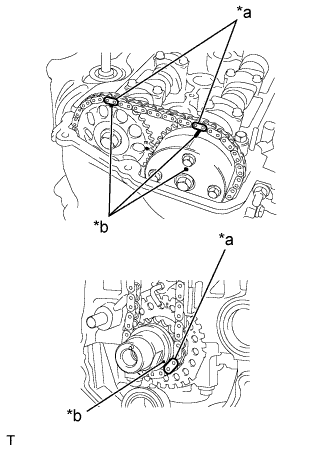 |
Align the timing marks of the camshaft with the mark plates of the timing chain and install the timing chain.
| *a | Mark Plate |
| *b | Timing Mark |
| 5. INSTALL CHAIN TENSIONER SLIPPER |
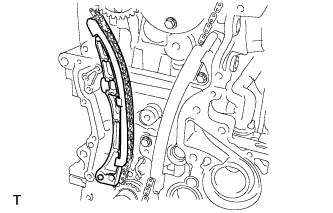 |
Install the chain tensioner slipper.
| 6. INSTALL NO. 1 CHAIN TENSIONER ASSEMBLY |
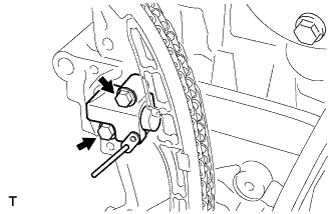 |
Install the No. 1 chain tensioner assembly with the 2 bolts.
Remove the bar from the No. 1 chain tensioner assembly.
| 7. INSTALL OIL PUMP SEAL |
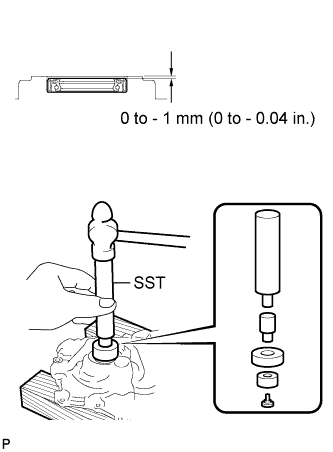 |
Using SST and a hammer, tap in a new oil seal until its surface is flush with the timing chain cover.
Apply MP grease to the oil seal lip.
| 8. INSTALL OIL PUMP ASSEMBLY |
Install 2 new O-rings to the cylinder block sub-assembly and the oil pan sub-assembly.
Apply seal packing to the oil pump assembly, cylinder head sub-assembly and the cylinder block sub-assembly as shown in the illustration.
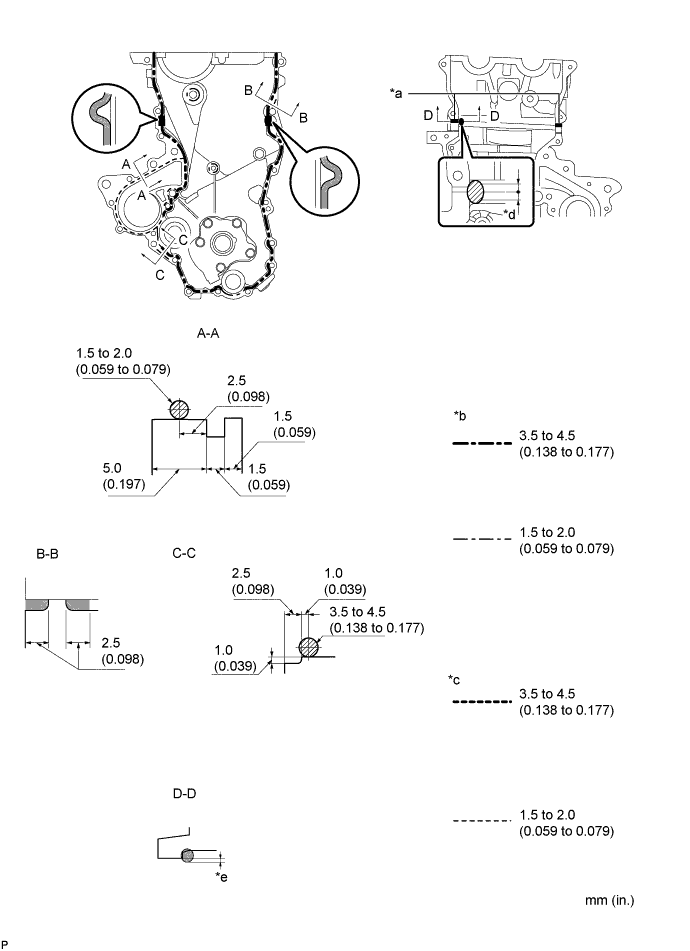
| *a | Apply Seal Packing to the Inner Corners | *b | Seal Width (Other Part) |
| *c | Seal Width (Water Pump Part) | *d | Seal Packing Application Width 10 mm or more |
| *e | Apply enough seal packing so that it will protrude beyond the timing chain cover installation surface | - | - |
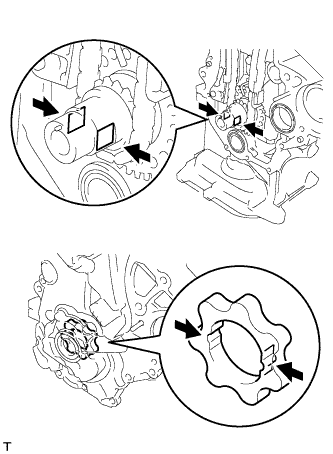 |
Align the keyway of the oil pump rotor with the rectangular portion of the crankshaft, and slide the oil pump into place.
Temporarily install the oil pump assembly with the 16 bolts and the nut.
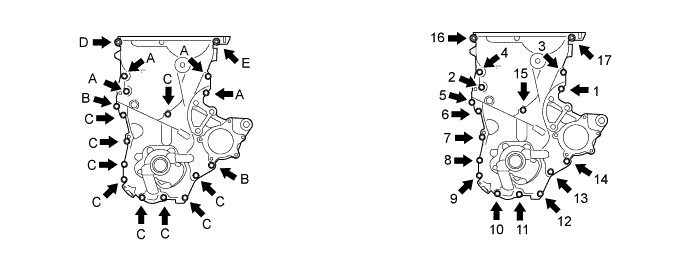
Tighten the 16 bolts and nut in the sequence shown in the illustration.
| 9. INSTALL TRANSVERSE ENGINE ENGINE MOUNTING BRACKET |
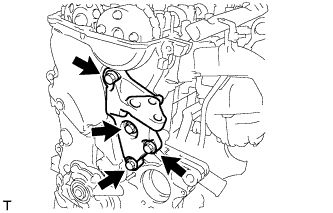 |
Install the transverse engine engine mounting bracket to the oil pump assembly with the 4 bolts.
| 10. INSTALL ENGINE WATER PUMP ASSEMBLY |
Install the engine water pump assembly through a new gasket with the 3 bolts and 2 nuts.
| 11. INSTALL WATER PUMP PULLEY |
Provisionally install the water pump pulley with the 3 bolts.
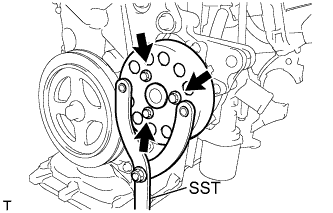 |
Using SST, hold the engine water pump pulley.
Tighten the 3 bolts to the specified torque.
| 12. INSTALL CAMSHAFT TIMING OIL CONTROL VALVE ASSEMBLY |
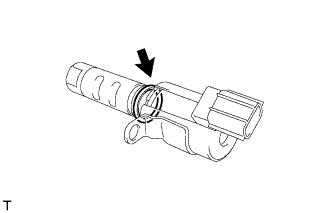 |
Apply a light coat of engine oil to a new O-ring and install it onto the camshaft timing oil control valve assembly.
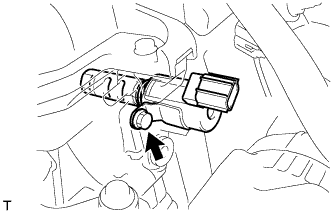 |
Install the camshaft timing oil control valve assembly with the bolt.
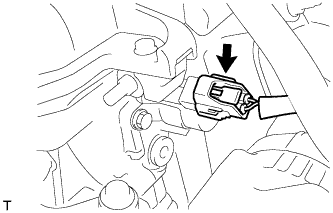 |
Connect the camshaft timing oil control valve assembly connector.
| 13. INSTALL CRANKSHAFT POSITION SENSOR |
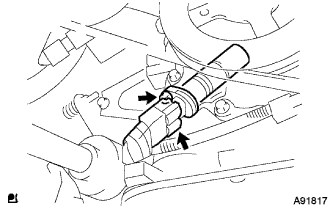 |
Apply a light coat of engine oil to the O-ring on the crankshaft position sensor.
Install the crankshaft position sensor with the bolt.
Connect the crankshaft position sensor connector.
| 14. INSTALL CRANKSHAFT DAMPER SUB-ASSEMBLY |
Align the pin hole of the crankshaft damper sub-assembly with the pin of the crankshaft and install the crankshaft damper sub-assembly.
Provisionally install the bolt.
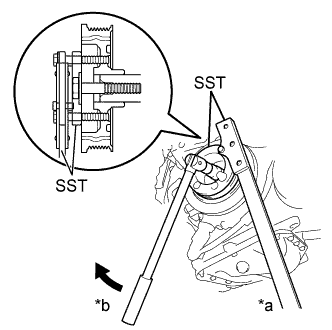 |
Using SST, tighten the bolt while holding the crankshaft damper sub-assembly.
| *a | Hold |
| *b | Turn |
| 15. INSTALL ENGINE MOUNTING INSULATOR SUB-ASSEMBLY RH |
Install the engine mounting insulator sub-assembly RH to the transverse engine engine mounting bracket and vehicle with the 5 bolts and nut.
| 16. INSTALL CYLINDER HEAD COVER SUB-ASSEMBLY |
Install a new gasket to the cylinder head cover sub-assembly.
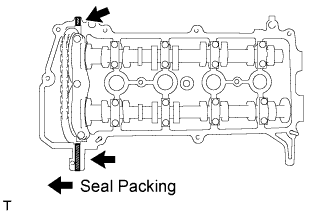 |
Apply seal packing to the cylinder head as shown in the illustration.
Install the cylinder head cover sub-assembly with the 9 bolts, 2 nuts and 2 seal washers.
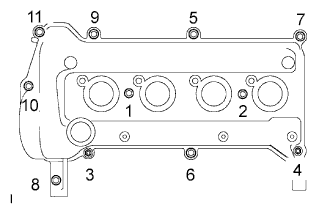 |
Tighten the 9 bolts and 2 nuts in the sequence shown in the illustration.
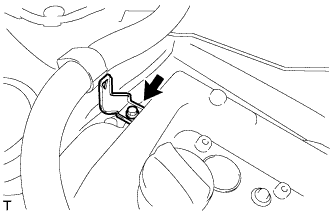 |
Install the wire harness bracket with the bolt.
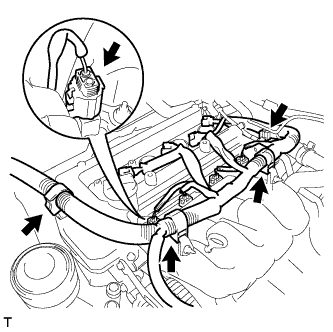 |
Connect the connector and wire harness clamp shown in the illustration and connect the engine wire harness.
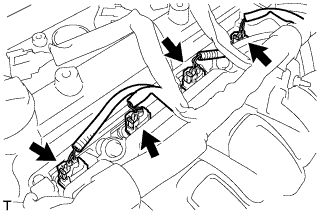 |
Connect the fuel injector connectors.
| 17. INSTALL FUEL VAPOR FEED HOSE ASSEMBLY |
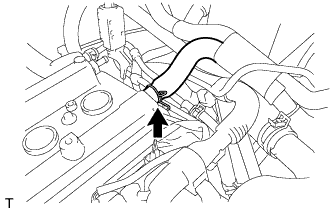 |
Connect fuel vapor feed hose assembly.
| 18. INSTALL VENTILATION HOSE |
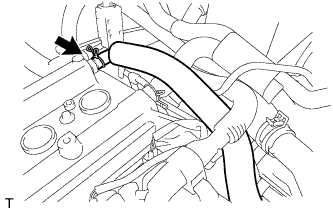 |
Connect the ventilation hose.
| 19. INSTALL NO. 1 IGNITION COIL |
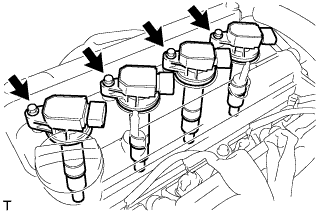 |
Install the 4 ignition coils with the 4 bolts.
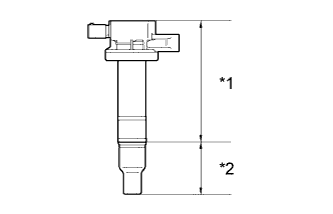 |
| *1 | Body |
| *2 | Cap |
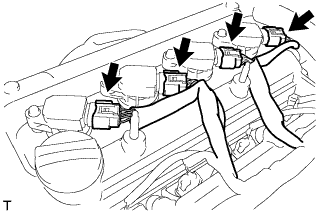 |
Connect the 4 ignition coil connectors.
| 20. INSTALL GENERATOR ASSEMBLY |
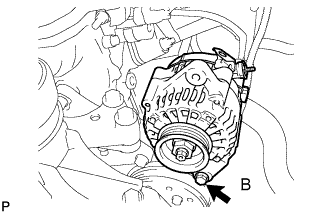 |
Provisionally install the generator with fixing bolt B.
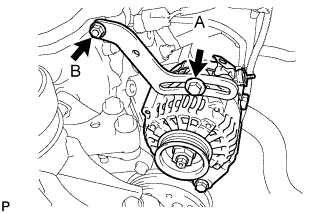 |
Provisionally install the fan belt adjusting slider with fan belt adjusting slider fixing bolts A and B, then move the generator toward the cylinder block and tighten bolt B.
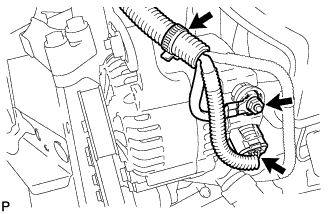 |
Install the connector and the wire harness clamp.
Install terminal B with the nut.
Install the terminal cap.
| 21. INSTALL FAN AND GENERATOR V BELT |
Provisionally install the fan and generator V belt onto each pulley.
| 22. ADJUST FAN AND GENERATOR V BELT |
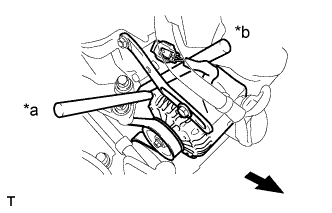 |
Insert an adjusting bar between the engine mounting bracket and generator assembly. Pull the adjusting bar toward the vehicle front to adjust the generator V belt tension .
| *a | OK |
| *b | NG |
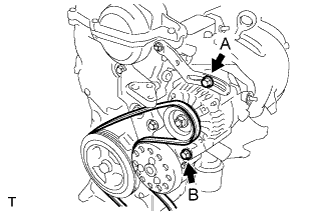 |
First tighten bolt A, then tighten bolt B.
| 23. INSPECT FAN AND GENERATOR V BELT |
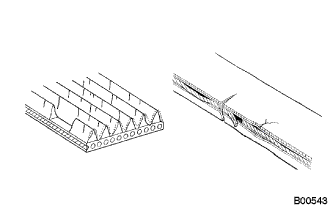 |
Check the belt for wear, cracks or other signs of damage.
If any of the following defects is found, replace the V-ribbed belt.
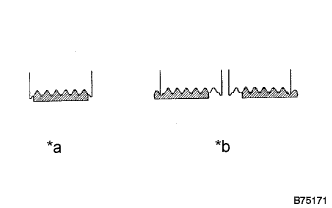 |
Check that the belt fits properly in the ribbed grooves.
| *a | CORRECT |
| *b | INCORRECT |
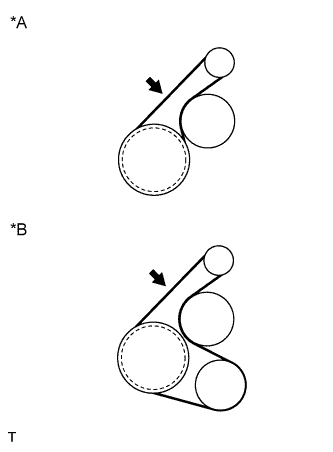 |
Inspect the V belt deflection and tension.
| *A | w/o Air Conditioner |
| *B | w/ Air Conditioner |
| Item | Specified Condition |
| New belt | 8.0 to 9.0 mm (0.31 to 0.35 in) |
| Used belt | 12.5 to 13.5 mm (0.49 to 0.53 in) |
| Item | Specified Condition |
| New belt | 700 to 800 N (71 to 82 kg, 157 to 180 lb) |
| Used belt | 300 to 400 N (31 to 41 kg, 67 to 90 lb) |
| 24. INSTALL MANIFOLD SUPPORT BRACKET |
Install the manifold support bracket with the 3 bolts.
| 25. INSTALL FRONT EXHAUST PIPE ASSEMBLY |
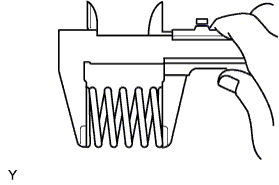 |
Using a vernier caliper, measure the free length of the compression spring.
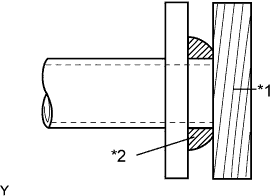 |
Using a plastic hammer and a wooden block, tap in a new exhaust pipe gasket until its surface is flush with the exhaust manifold.
| *1 | Wooden Block |
| *2 | Gasket |
Install the front exhaust pipe assembly with the 2 compression springs and 2 bolts.
| 26. CONNECT WIRE HARNESS |
Connect the wire harness with the 2 bolts.
| 27. INSTALL NO. 1 WATER BY-PASS HOSE |
Install No. 1 water by-pass pipe with the bolt.
| 28. CONNECT HEATER WATER HOSE INLET A |
Connect heater water inlet hose A.
| 29. CONNECT HEATED OXYGEN SENSOR CONNECTOR |
Connect the heated oxygen sensor connector.
Install the sensor bracket with the bolt.
| 30. CONNECT ENGINE COOLANT TEMPERATURE SENSOR CONNECTOR |
Connect the engine coolant temperature sensor connector.
| 31. CONNECT CAMSHAFT POSITION SENSOR CONNECTOR |
Connect the camshaft position sensor connector.
| 32. CONNECT BOOSTER VACUUM TUBE |
Connect the booster vacuum tube.
| 33. CONNECT FUEL TUBE SUB-ASSEMBLY |
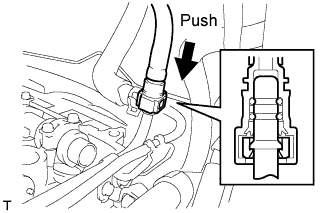 |
Insert the fuel tube connector into the fuel delivery pipe until a click sound can be heard.
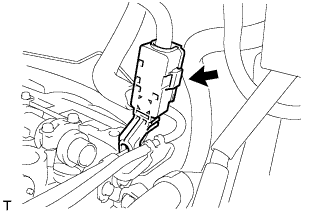 |
Install the fuel pipe clamp.
| 34. INSTALL OIL LEVEL DIPSTICK GUIDE |
Apply engine oil to a new O-ring.
Install the oil level dipstick guide with the bolt through a new O-ring.
Install the wire harness.
| 35. INSTALL INTAKE MANIFOLD |
Install a new gasket onto the intake manifold.
Install the intake manifold with the 3 bolts and 2 nuts.
Connect the 3 wire harness clamps shown in the illustration.
| 36. INSTALL OIL LEVEL DIPSTICK SUB-ASSEMBLY |
| 37. CONNECT UNION TO CONNECTOR TUBE HOSE |
Connect the union to connector tube hose.
| 38. CONNECT VENTILATION HOSE |
Connect the ventilation hose.
| 39. CONNECT THROTTLE WITH MOTOR BODY CONNECTOR |
Install the throttle with motor body connector bracket with the nut.
Connect the throttle with motor body connector.
Connect the wire harness clamp.
| 40. CONNECT WATER BY-PASS HOSE |
Connect the water by-pass hose.
| 41. CONNECT NO. 2 WATER BY-PASS HOSE |
Connect No. 2 water by-pass hose.
| 42. INSTALL WATER FILLER SUB-ASSEMBLY |
Install the water filler sub-assembly with the 2 nuts.
Connect No. 1 radiator hose to the cylinder head.
| 43. CONNECT RESERVE TANK HOSE |
Connect the reserve tank hose.
| 44. CONNECT NO. 3 RADIATOR HOSE |
Connect No. 3 radiator hose.
| 45. INSTALL NO. 1 AIR CLEANER CAP SUB-ASSEMBLY WITH AIR CLEANER HOSE |
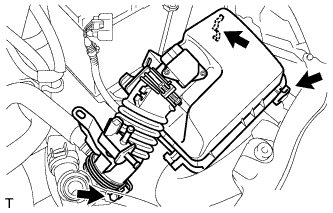 |
Install air cleaner cap sub-assembly with air cleaner hose No. 1.
Tighten the hose clamp to the specified torque.
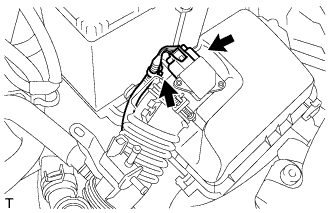 |
Connect the wire harness clamp and mass air flow meter connector.
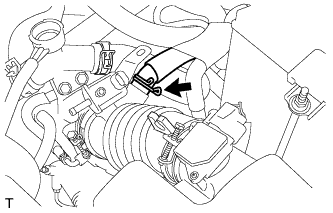 |
Connect ventilation hose No. 2.
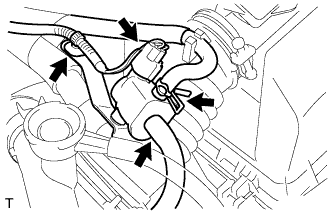 |
Connect the vacuum switching valve assembly connector and wire harness clamp.
Connect fuel vapor feed hose No. 1 and fuel vapor feed hose No. 2 to the vacuum switching valve assembly.
| 46. INSTALL BATTERY TRAY |
| 47. INSTALL BATTERY |
| 48. ADD ENGINE OIL |
Add fresh engine oil.
| Oil Grade | Oil Viscosity (SAE) |
| API grade SL "energy- conserving", SM "energy- conserving", SN "resource-conserving", or ILSAC multigrade engine oil |
|
| API grade SL, SM or SN multigrade engine oil |
|
| Item | Capacity |
| Drain and refill with oil filter change | 3.7 liters (3.9 US qts, 3.3 Imp. qts) |
| Drain and refill without oil filter change | 3.4 liters (3.6 US qts, 3.0 Imp. qts) |
| Dry fill | 4.1 liters (4.3 US qts, 3.6 Imp. qts) |
Install the oil filler cap sub-assembly.
| 49. ADD ENGINE COOLANT |
Tighten the radiator drain cock plug by hand.
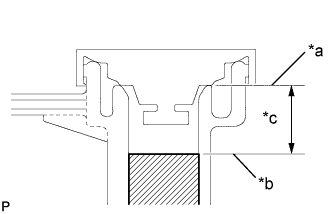 |
Slowly fill the radiator with TOYOTA Super Long Life Coolant (SLLC) from the water filler. (Coolant level should be within 20 mm (0.787 in.) from the filler tube end.)
| *a | Filler Tube End |
| *b | Coolant Level |
| *c | 20 mm (0.787 in.) |
| Transaxle Type | Coolant Capacity |
| Automatic Transaxle | 4.7 liters (5.0 US qts, 4.4 Imp. qts) |
| Manual Transaxle | 4.8 liters (5.1 US qts, 4.5 Imp. qts) |
Remove the reserve tank cap.
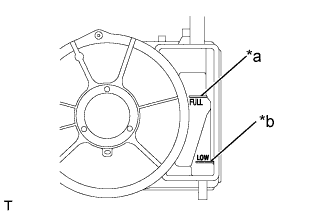 |
Slowly pour coolant into the radiator reserve tank assembly until it reaches the full line.
| *a | Full Line |
| *b | Low Line |
Install the water filler cap sub-assembly securely.
Install the reserve tank cap.
Bleed air from the cooling system.
Warm up the engine until the thermostat opens.
While the thermostat is open, circulate the coolant for several minutes.
Stop the engine and wait until the coolant cools down.
Recheck the coolant level inside the radiator reserve tank assembly. If it is below the full level, add coolant.
| 50. INSPECT ENGINE OIL LEVEL |
Warm up the engine, then stop the engine and wait for 5 minutes.
Check that the engine oil level is between the low and full marks on the engine oil level dipstick.
If the engine oil level is low, check for oil leakage and add engine oil up to the full level mark.
| 51. INSPECT FOR ENGINE OIL LEAK |
| 52. INSPECT FOR ENGINE COOLANT LEAK |
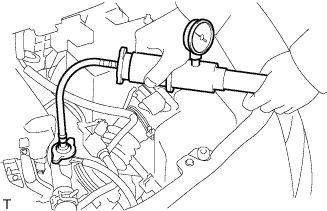 |
Fill the radiator assembly with engine coolant, and attach a radiator cap tester.
Pump the tester to 118 kPa (1.2 kgf/cm2, 17.1 psi), and then check that the pressure does not drop.
If the pressure drops, check the hoses, radiator assembly and water pump assembly for leaks. If there are no signs or traces of external engine coolant leaks, check the heater core, cylinder block and head.
| 53. INSPECT FOR EXHAUST GAS LEAK |
| 54. INSPECT FOR FUEL LEAK |
When using the Techstream.
Connect the Techstream to the DLC3.
Turn the ignition switch to ON and turn the tester ON.
Select the following menu items: Powertrain / Engine and ECT / Active Test / Control the Fuel Pump / Speed.
Check that there is no fuel leakage anywhere on the fuel system after doing maintenance.
| 55. INSTALL NO. 2 CYLINDER HEAD COVER |
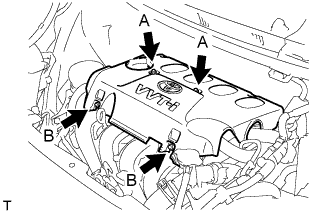 |
Tighten the 2 A nuts, then the 2 B nuts.
| 56. INSTALL ENGINE UNDER COVER RH |
| 57. INSTALL ENGINE UNDER COVER LH |
| 58. INSTALL FRONT WHEEL RH |
| 59. INSTALL COWL TOP PANEL OUTER |
Install the cowl top panel outer with the 8 bolts.
Install the cowl top to cowl inner brace with the 2 bolts.
Connect the wire harness clamp.
| 60. INSTALL FRONT AIR SHUTTER SEAL RH |
Engage the 3 claws to install the front air shutter seal RH.
| 61. INSTALL FRONT WIPER MOTOR AND LINK |
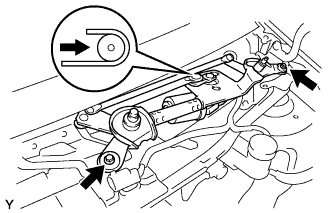 |
Connect the connector.
Slide the wiper link as shown in the illustration and engage the rubber pin with the body.
Install the front wiper motor and link with the 2 bolts.
| 62. INSTALL COWL TOP VENTILATOR LOUVER SUB-ASSEMBLY |
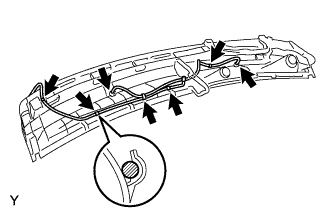 |
Connect the washer hoses.
Engage the 5 hooks.
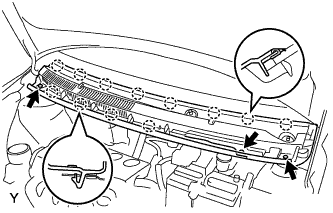 |
Engage the 8 hooks and the 4 claws.
Install the cowl top ventilator louver sub-assembly with the 3 clips.
| 63. INSTALL COWL SIDE VENTILATOR SUB-ASSEMBLY LH |
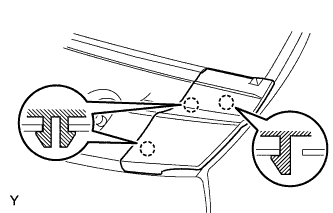 |
Engage the 3 claws and install the cowl side ventilator sub-assembly LH.
| 64. INSTALL COWL SIDE VENTILATOR SUB-ASSEMBLY RH |
| 65. INSTALL FRONT WIPER ARM AND BLADE ASSEMBLY LH |
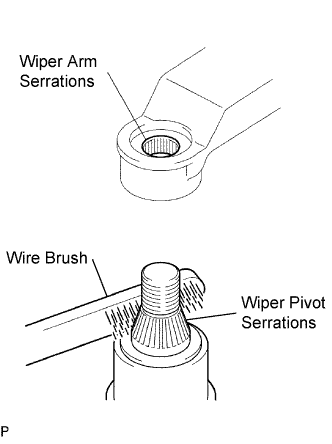 |
Scrape any metal powder off the serrated part of the wiper arm with a round file or the equivalent (when reinstalling).
Clean the wiper pivot serrations with a wire brush.
Operate the wiper, then stop the windshield wiper motor in the automatic stop position.
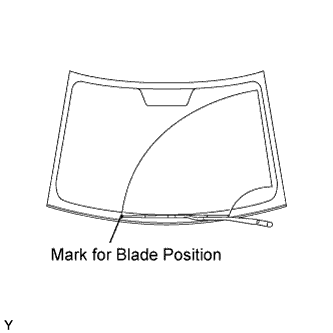 |
Align the blade tip with the mark on the windshield glass, as shown in the illustration.
Tighten the nut of the front wiper arm.
| 66. INSTALL FRONT WIPER ARM AND BLADE ASSEMBLY RH |
|
Scrape any metal powder off the serrated part of the wiper arm with a round file or the equivalent (when reinstalling).
Clean the wiper pivot serrations with a wire brush.
Operate the wiper, then stop the windshield wiper motor in the automatic stop position.
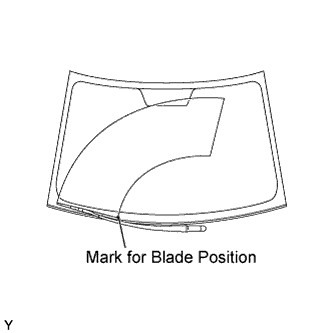 |
Align the blade tip with the mark on the windshield glass, as shown in the illustration.
Tighten the nut of the front wiper arm.
| 67. INSTALL FRONT WIPER ARM HEAD CAP |
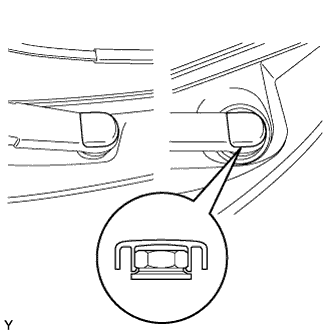 |
Engage the claw and install the 2 front wiper arm head caps.