Home › Engine / Hybrid System › 1NZ-FE ENGINE MECHANICAL › ENGINE UNIT (for Hatchback)

ENGINE UNIT (for Hatchback) > INSPECTION


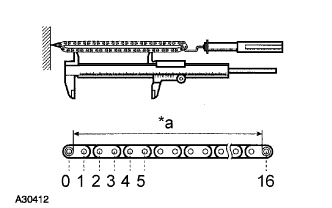
1. INSPECT CHAIN SUB-ASSEMBLY


    A032117E06
  1. Using a spring scale, apply 140 N (14.3 kgf, 31.5 lb) to the timing chain and measure its length.
    Text in Illustration 
    *a
    Measuring Area

    Maximum chain elongation:
    123.2 mm (4.850 in.)

    If the elongation is greater than the maximum, replace the chain.

    HINT:
    Perform the same measurement at 3 or more random places and calculate the average length.


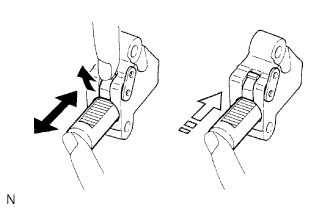
2. INSPECT NO. 1 CHAIN TENSIONER ASSEMBLY


    A011223E01
  1. Check that the plunger moves smoothly when the ratchet pawl is raised with your finger.

  1. Release the ratchet pawl and check that the plunger is locked in place by the ratchet pawl and does not move when pushed with your finger.


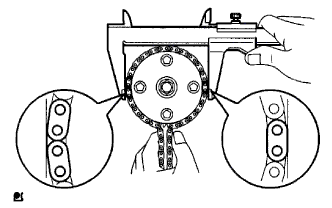
3. INSPECT CAMSHAFT TIMING GEAR ASSEMBLY


    A037071E01
  1. Wrap the chain around the camshaft timing gear.

  1. Using a vernier caliper, measure the diameter of the camshaft timing gear with the chain.

    Minimum gear diameter (with chain):
    96.2 mm (3.787 in.)

    If the diameter is less than the minimum, replace the camshaft timing gear.

    NOTICE:
    Make sure that the vernier caliper is in contact with the chain link when measuring.


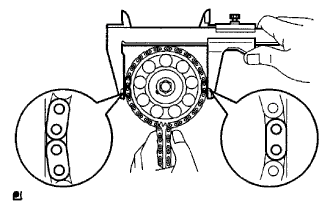
4. INSPECT CAMSHAFT TIMING SPROCKET


    A037072E01
  1. Wrap the chain around the camshaft timing sprocket.

  1. Using a vernier caliper, measure the diameter of the camshaft timing sprocket with the chain.

    Minimum gear diameter (with chain):
    96.2 mm (3.787 in.)

    If the diameter is less than the minimum, replace the camshaft timing sprocket.

    NOTICE:
    Make sure that the vernier caliper is in contact with the chain link when measuring.


5. INSPECT CAMSHAFT TIMING GEAR ASSEMBLY
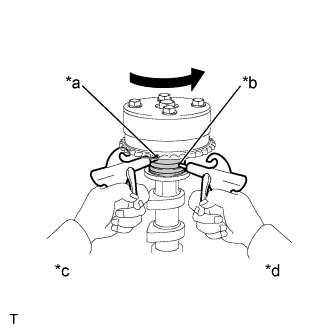
  1. Check the lock of camshaft timing gear.

    1. Clamp the camshaft in a vise, and check that the camshaft timing gear is locked.

      NOTICE:
      Do not damage the camshaft.


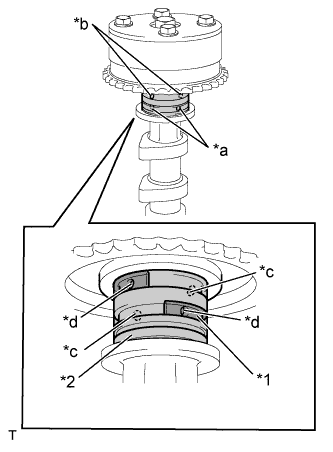
    A116226E10
  1. Release the lock pin.
    Text in Illustration 
    *1
    Rubber Piece
    *2
    Vinyl Tape
    *a
    Advance Side Path
    *b
    Retard Side Path
    *c
    Open
    *d
    Close

    1. Cover the 4 oil paths of the cam journal with tape as shown in the illustration.

      HINT:
      One of the 2 grooves located on the cam journal is for retarding cam timing (upper) and the other is for advancing cam timing (lower). Each groove has 2 oil paths. Plug one of the oil paths for each groove with a piece of rubber before wrapping the cam journal with the tape.

    2. Puncture the tape covering the advance oil path and the retard oil path on the opposite side from the advance oil path.


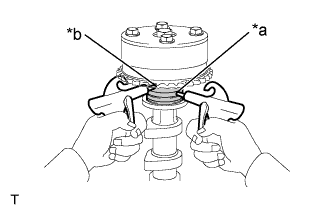
    3. A116227E06
    4. Apply air at about 150 kPa (1.5 kgf/cm2) pressure into the 2 broken paths (the advance side path and the retard side path).
      Text in Illustration 
      *a
      Advance Side Path
      *b
      Retard Side Path

      NOTICE:
      Cover the paths with a piece of cloth to prevent oil splashes.


    5. A116228E05
    6. Confirm that the camshaft timing gear assembly revolves in the timing advance direction when the air pressure on the timing retard path is reduced.
      Text in Illustration 
      *a
      Retard Side Path
      *b
      Advance Side Path
      *c
      Decompress
      *d
      Hold Pressure

      HINT:
      The lock pin is released and the camshaft timing gear revolves in the advance direction.

    7. When the camshaft timing gear reaches the most advanced position, release the air pressure on the timing retard side path, and then release the air pressure on the timing advance side path.

      NOTICE:
      Camshaft timing gear assembly occasionally shifts to the retard side abruptly if the air pressure on the advance side path is released first. This often results in breakage of the lock pin.
  1. Check the revolution.

    1. Rotate the valve timing assembly back and forth several times, except where the lock pin meets it at the most retarded angle. Check the movable range and that it rotates smoothly.

      Standard:
      Smooth movable range is about 22.5°

      NOTICE:
      Perform this check by hand, instead of using air pressure.

  1. Check the lock in the most retarded position.

    1. Confirm that the camshaft timing gear assembly is locked in the most retarded position.


6. INSPECT CAMSHAFT


EM01628E01
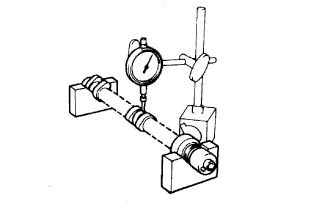
  1. Inspect the camshaft for runout.

    1. Place the camshaft on V-blocks.

    2. Using a dial indicator, measure the circle runout at the center journal.

      Maximum circle runout:
      0.03 mm (0.0012 in.)

      If the circle runout is greater than the maximum, replace the camshaft.


    A037113E01
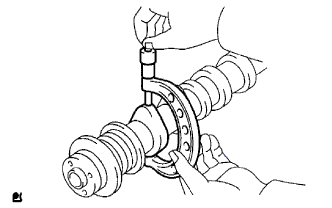
  1. Inspect the cam lobes.

    1. Using a micrometer, measure the cam lobe height.

      Standard cam lobe height:
      44.617 to 44.717 mm (1.7566 to 1.7605 in.)

      Minimum cam lobe height:
      43.16 mm (1.66962 in.)

      If the cam lobe height is less than the minimum, replace the camshaft.


    A037114E01
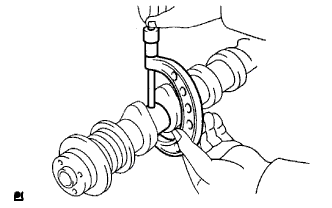
  1. Inspect the camshaft journals.

    1. Using a micrometer, measure the journal diameter.

      Standard journal diameter:
      Journal
      Specified Condition
      No. 1 journal
      34.449 to 34.465 mm
      (1.3563 to 1.3569 in.)
      Other journals
      22.959 to 22.975 mm
      (0.9038 to 0.9045 in.)

      If the journal diameter is not as specified, check the oil clearance.


7. INSPECT NO. 2 CAMSHAFT
  1. Inspect the camshaft for runout.

    1. Place the camshaft on V-blocks.

    2. Using a dial indicator, measure the circle runout at the center journal.

      Maximum circle runout:
      0.03 mm (0.0012 in.)

      If the circle runout is greater than the maximum, replace the camshaft.

  1. Inspect the cam lobes.

    1. Using a micrometer, measure the cam lobe height.

      Standard cam lobe height:
      44.666 to 44.766 (1.7585 to 1.7624 in.)

      Minimum cam lobe height:
      44.52 mm (1.7528 in.)

      If the cam lobe height is less than the minimum, replace the camshaft.

  1. Inspect the camshaft journals.

    1. Using a micrometer, measure the journal diameter.

      Standard journal diameter:
      Journal
      Specified Condition
      No. 1 journal
      34.449 to 34.465 mm
      (1.3563 to 1.3569 in.)
      Other journals
      22.959 to 22.975 mm
      (0.9038 to 0.9045 in.)

      If the journal diameter is not as specified, check the oil clearance.


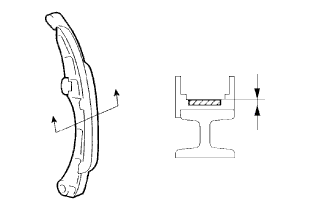
8. INSPECT CHAIN TENSIONER SLIPPER


    A037065E01
  1. Using a vernier caliper, measure the chain tensioner slipper wear.

    Minimum wear:
    1.0 mm (0.039 in.)

    If the wear is less than the minimum, replace the chain tensioner slipper.


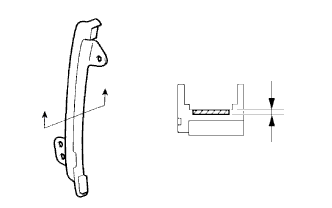
9. INSPECT NO. 1 CHAIN VIBRATION DAMPER


    A037066E01
  1. Using a vernier caliper, measure the No. 1 chain vibration damper wear.

    Minimum wear:
    1.0 mm (0.039 in.)

    If the wear is less than the minimum, replace the No. 1 chain vibration damper.


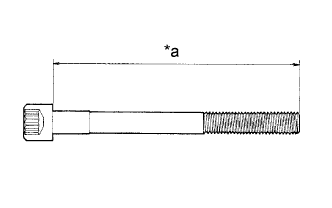
10. INSPECT CYLINDER HEAD SET BOLT


    A098332E03
  1. Using a vernier caliper, measure the length of the cylinder head set bolt from the seat to the end.
    Text in Illustration 
    *a
    Measurement Length

    Standard length:
    143.5 mm (5.6496 in.)

    Maximum length:
    145 mm (5.7087 in.)

    If the bolt length is greater than the maximum, replace the cylinder head set bolt.