ENGINE UNIT (for Sedan) > DISASSEMBLY |
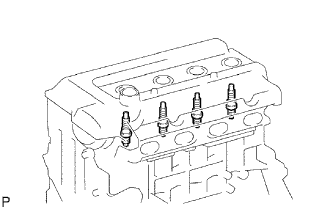
| 1. REMOVE SPARK PLUG |
|
Using a 16 mm spark plug wrench, remove the 4 spark plugs.
| 2. REMOVE KNOCK SENSOR |
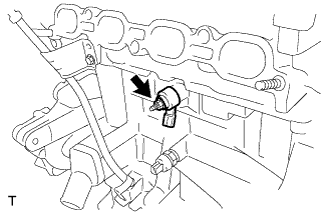 |
Remove the nut and remove the knock sensor.
| 3. REMOVE ENGINE OIL PRESSURE SWITCH ASSEMBLY |
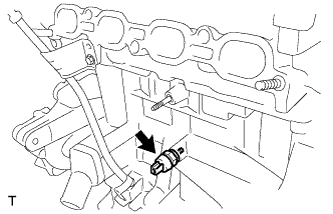 |
Using a 24 mm (0.94 in.) deep socket wrench, remove the oil pressure switch.
| 4. REMOVE ENGINE COOLANT TEMPERATURE SENSOR |
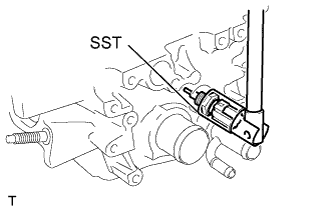 |
Using SST, remove the engine coolant temperature sensor.
| 5. REMOVE WATER INLET |
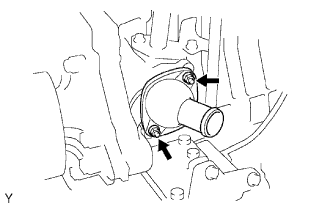 |
Remove the 2 nuts and remove the water inlet.
| 6. REMOVE THERMOSTAT |
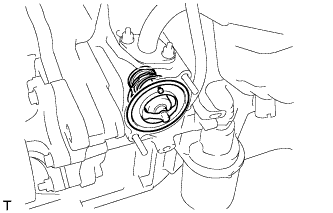 |
Remove the thermostat from the cylinder block.
Remove the gasket from the thermostat.
| 7. REMOVE OIL FILLER CAP SUB-ASSEMBLY |
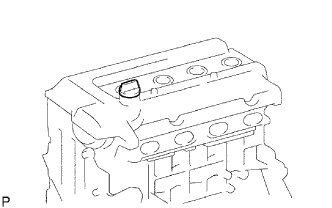 |
Remove the oil filler cap from the cylinder head cover.
| 8. REMOVE OIL FILLER CAP GASKET |
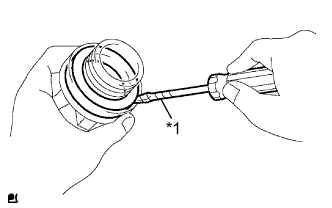 |
Using a screwdriver with its tip wrapped in protective tape, remove the gasket from the oil filler cap.
| *1 | Protective Tape |
| 9. REMOVE CRANKSHAFT POSITION SENSOR |
Remove the bolt and the crankshaft position sensor.
| 10. REMOVE VENTILATION VALVE SUB-ASSEMBLY |
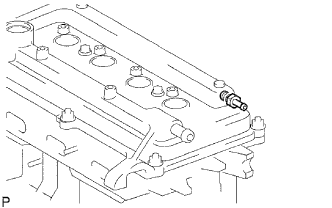 |
Remove the ventilation valve from the cylinder head cover.
| 11. REMOVE CYLINDER HEAD COVER SUB-ASSEMBLY |
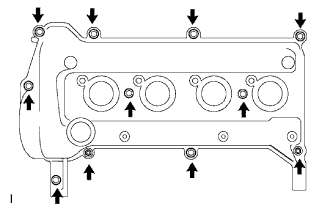 |
Remove the 9 bolts, 2 nuts and 2 seal washers and then remove the cylinder head cover sub-assembly.
Remove the gasket from the cylinder head cover.
| 12. REMOVE CAMSHAFT TIMING OIL CONTROL VALVE ASSEMBLY |
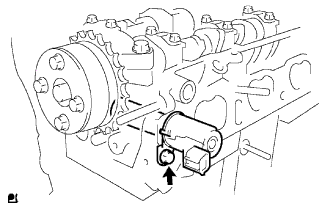 |
Remove the bolt and the camshaft timing oil control valve.
| 13. REMOVE OIL LEVEL DIPSTICK GUIDE |
Remove the bolt and the oil level dipstick guide.
| 14. REMOVE WATER PUMP PULLEY |
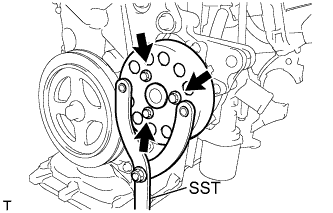 |
Using SST, hold the water pump pulley.
Remove the 3 bolts and remove the water pump pulley.
| 15. REMOVE CRANKSHAFT DAMPER SUB-ASSEMBLY |
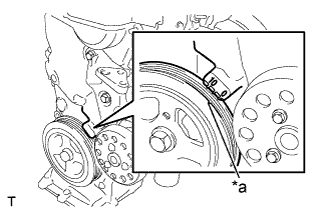 |
Set the No. 1 cylinder to TDC/compression.
Turn the crankshaft damper sub-assembly, and align its timing notch with timing mark "0" of the oil pump.
| *a | Timing Notch |
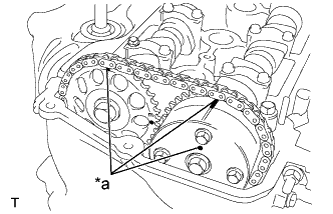 |
Check that the timing marks on the camshaft timing sprocket and the camshaft timing gear are all facing upward, as shown in the illustration.
If not, turn the crankshaft 1 complete revolution (360°) and align the marks as above.
| *a | Timing Mark |
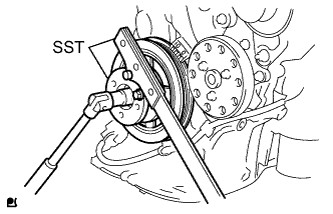 |
Using 2 SST, loosen the bolt while holding the crankshaft damper sub-assembly.
Remove the SST and the bolt.
Remove the crankshaft damper sub-assembly.
| 16. REMOVE TRANSVERSE ENGINE ENGINE MOUNTING BRACKET |
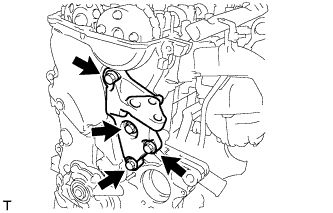 |
Remove the 4 bolts and the transverse engine engine mounting bracket from the oil pump assembly.
| 17. REMOVE ENGINE WATER PUMP ASSEMBLY |
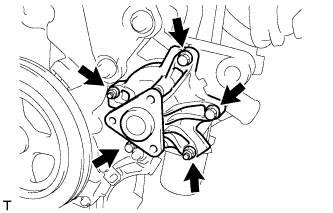 |
Remove the 3 bolts and 2 nuts and remove the engine water pump assembly and gasket.
| 18. REMOVE OIL PUMP ASSEMBLY |
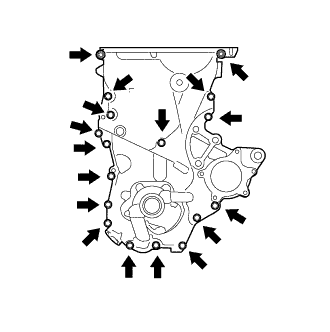 |
Remove the 16 bolts and the nut from the oil pump assembly.
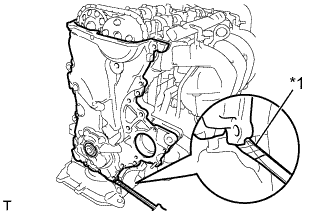 |
Using a screwdriver with its tip wrapped in protective tape, remove the oil pump assembly by prying between the cylinder head sub-assembly and cylinder block sub-assembly.
| *1 | Protective Tape |
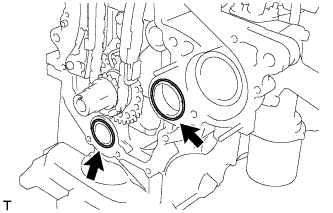 |
Remove the 2 O-rings from the cylinder block sub-assembly and the oil pan sub-assembly.
| 19. REMOVE OIL PUMP SEAL |
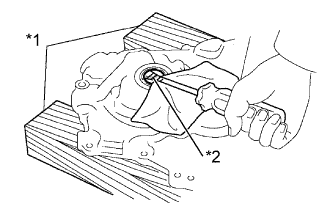 |
Using a screwdriver with its tip wrapped in protective tape, remove the oil seal.
| *1 | Wooden Block |
| *2 | Protective Tape |
| 20. REMOVE NO. 1 CHAIN TENSIONER ASSEMBLY |
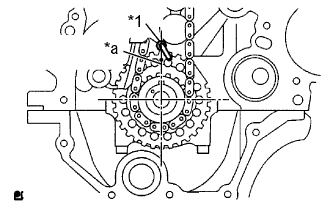 |
| *1 | Oil Jet |
| *a | Timing Mark (1dot) |
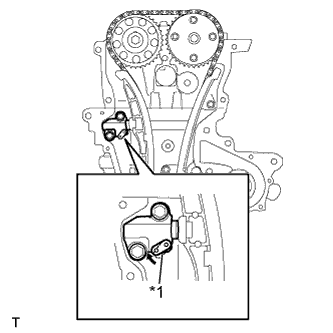 |
Pull up the stopper plate and hold it with its lock released.
| *1 | Stopper Plate |
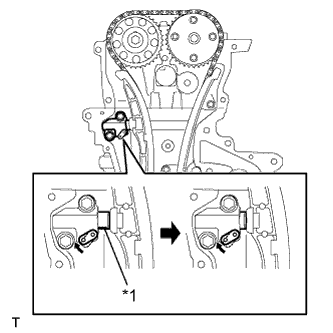 |
Unlock the plunger of the tensioner and push it in to the end.
| *1 | Plunger |
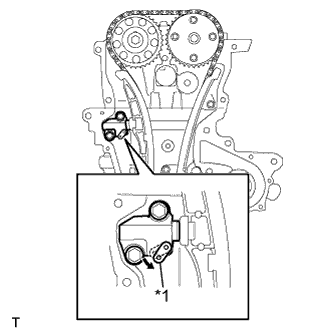 |
Pull down the stopper plate with the plunger pushed to the end and lock the plunger.
| *1 | Stopper Plate |
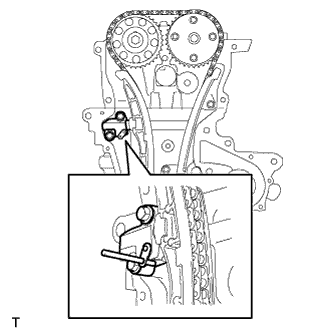 |
Insert a 3 mm (0.12 in.) diameter bar into the hole in the stopper plate and lock the plunger.
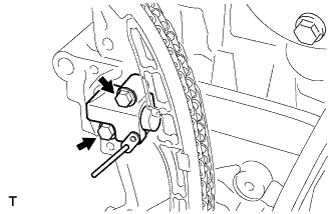 |
Remove the 2 bolts and remove the No. 1 chain tensioner assembly.
| 21. REMOVE CHAIN TENSIONER SLIPPER |
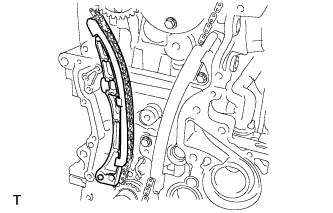 |
Remove the chain tensioner slipper.
| 22. REMOVE NO. 1 CHAIN VIBRATION DAMPER |
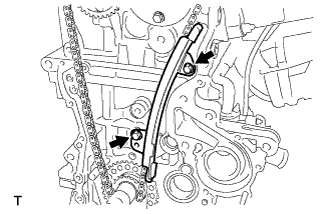 |
Remove the 2 bolts and remove the No. 1 chain vibration damper.
| 23. REMOVE CHAIN SUB-ASSEMBLY |
| 24. REMOVE FUEL DELIVERY PIPE SUB-ASSEMBLY |
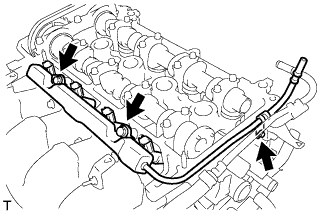 |
Remove the 3 bolts and remove the fuel delivery pipe sub-assembly with 4 fuel injectors.
| 25. REMOVE NO. 1 DELIVERY PIPE SPACER |
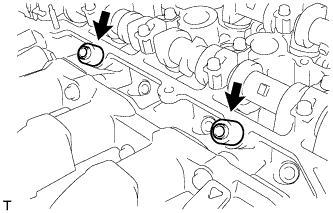 |
Remove the 2 delivery pipe No. 1 spacers.
| 26. REMOVE INJECTOR VIBRATION INSULATOR |
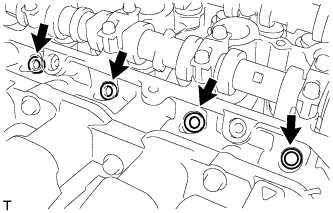 |
Remove the 4 injector vibration insulators.
| 27. REMOVE FUEL INJECTOR ASSEMBLY |
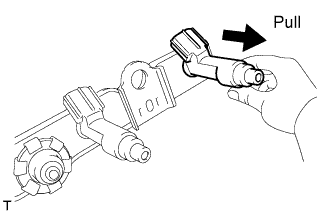 |
Pull the 4 fuel injector assemblies out of the fuel delivery pipe sub-assembly.
| 28. REMOVE CAMSHAFT POSITION SENSOR |
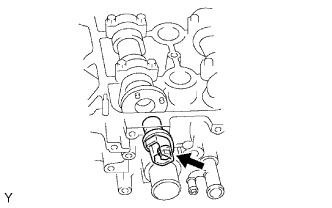 |
Remove the bolt and the camshaft position sensor.
| 29. REMOVE NO. 2 CAMSHAFT |
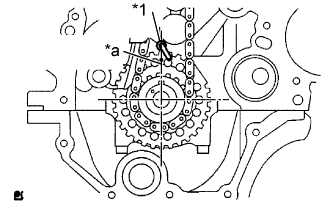 |
| *1 | Oil Jet |
| *a | Timing Mark (1 dot) |
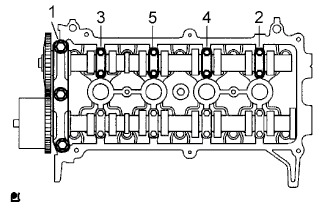 |
Using several steps, loosen and remove the 11 bearing cap bolts uniformly in the sequence shown in the illustration, then remove the No. 1 camshaft bearing cap, No. 2 camshaft bearing cap and No. 2 camshaft.
| 30. REMOVE CAMSHAFT TIMING SPROCKET |
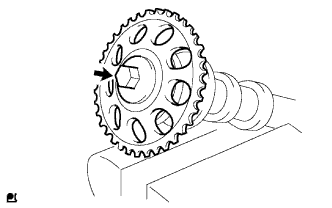 |
Clamp the camshaft in a vise.
Remove the flange bolt and the camshaft timing sprocket.
| 31. REMOVE CAMSHAFT |
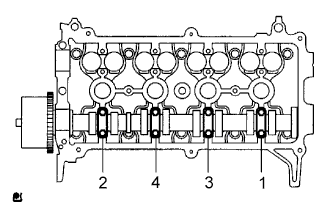 |
Using several steps, loosen and remove the 8 bearing cap bolts uniformly in the sequence shown in the illustration, then remove the No. 2 camshaft bearing cap and the camshaft.
| 32. REMOVE CAMSHAFT TIMING GEAR ASSEMBLY |
Clamp the camshaft in a vise, and confirm that it is locked.
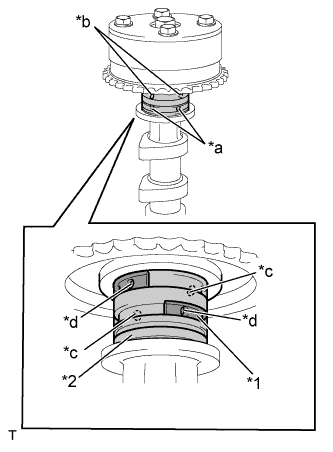 |
Cover the 4 oil paths of the cam journal with tape as shown in the illustration.
| *1 | Rubber Piece |
| *2 | Vinyl Tape |
| *a | Advance Side Paths |
| *b | Retard Side Paths |
| *c | Open |
| *d | Closed |
Puncture the tape covering the advance oil path and the retard oil path on the opposite side from the advance oil path.
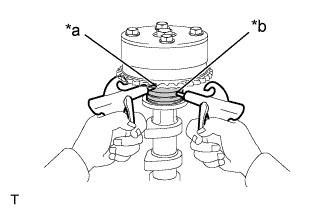 |
Apply compressed air at about 150 kPa (1.5 kgf/cm2) pressure into the 2 broken paths (the advance side path and the retard side path).
| *a | Retard Side Paths |
| *b | Advance Side Paths |
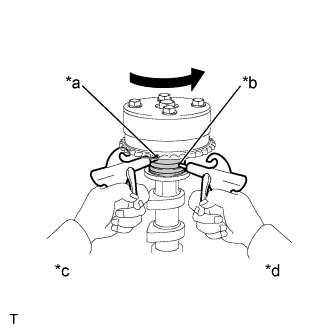 |
Confirm that the camshaft timing gear assembly revolves in the timing advance direction when the air pressure on the timing retard path is reduced.
| *a | Retard Side Paths |
| *b | Advance Side Paths |
| *c | Decompress |
| *d | Hold Pressure |
When the camshaft timing gear reaches the most advanced position, release the air pressure on the timing retard side path, and then release the air pressure on the timing advance side path.
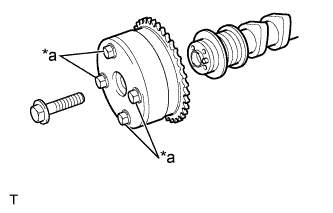 |
Remove the flange bolt and remove the camshaft timing gear assembly.
| *a | Do not remove |
| 33. REMOVE CYLINDER HEAD SUB-ASSEMBLY |
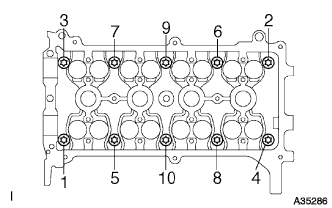 |
Using several steps, uniformly loosen and remove the 10 cylinder head bolts with an 8 mm bi-hexagon wrench in the sequence shown in the illustration. Remove the 10 plate washers.
| 34. REMOVE CYLINDER HEAD GASKET |
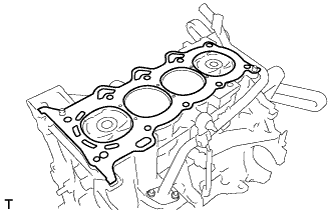 |
Remove the cylinder head gasket.
| 35. REMOVE OIL FILTER SUB-ASSEMBLY |
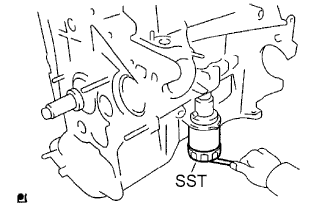 |
Using SST, remove the oil filter.
| 36. REMOVE OIL FILTER UNION |
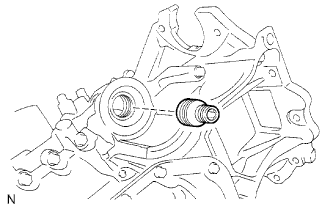 |
Using a 12 mm (0.47 in.) hexagon wrench, remove the oil filter union.
| 37. REMOVE ENGINE REAR OIL SEAL |
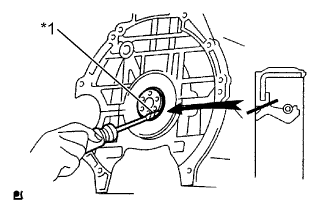 |
Using a knife, cut off the oil seal lip.
| *1 | Protective Tape |
Using a screwdriver with its tip wrapped in protective tape, pry out the oil seal.
| 38. REMOVE NO. 2 OIL PAN SUB-ASSEMBLY |
Remove the oil pan drain plug and gasket.
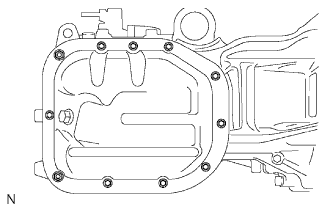 |
Remove the 9 bolts and 2 nuts.
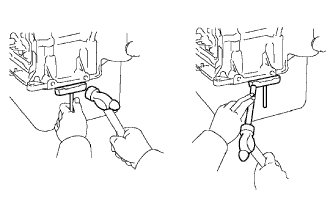 |
Insert the blade of oil pan seal cutter between the No. 1 oil pan and No. 2 oil pan, and cut off the applied sealer and remove No. 2 oil pan.
| 39. REMOVE OIL STRAINER SUB-ASSEMBLY |
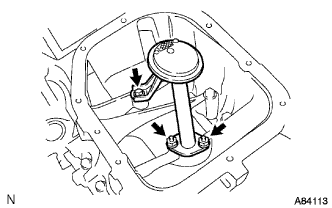 |
Remove the bolt and 2 nuts.
Remove the oil strainer and the gasket.
| 40. REMOVE OIL PAN SUB-ASSEMBLY |
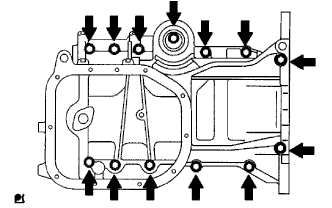 |
Loosen and remove the 13 bolts uniformly in several steps.
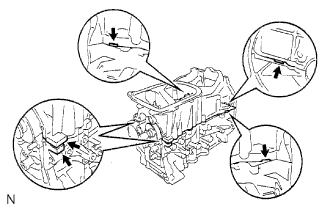 |
Using a screwdriver, remove the No. 1 oil pan by prying between the cylinder block and No. 1 oil pan.
Remove the 2 O-rings from the cylinder block.
| 41. REMOVE STUD BOLT |
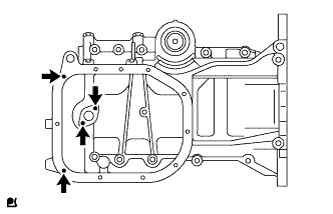 |
Remove the 4 stud bolts.