CYLINDER BLOCK (for Sedan) > DISASSEMBLY |
| 1. INSPECT CONNECTING ROD THRUST CLEARANCE |
|
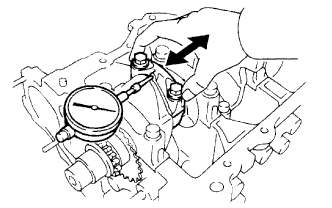
Using a dial indicator, measure the thrust clearance while moving the connecting rod back and forth.
| 2. INSPECT CONNECTING ROD OIL CLEARANCE |
Check that the matchmarks on the connecting rod and connecting rod cap are aligned to ensure correct reassembly.
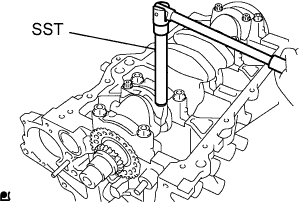 |
Using SST, remove the 2 connecting rod bolts.
Clean the crank pin and connecting rod bearing.
Check the crank pin and connecting rod bearing for pitting and scratches.
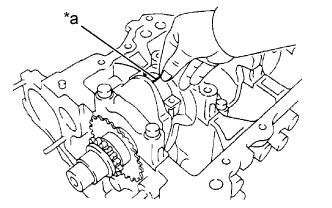 |
Lay a strip of Plastigage across the crank pin.
| *a | Plastigage |
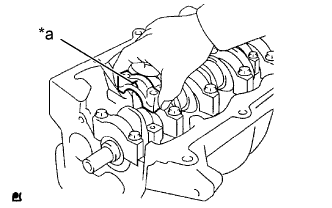 |
Make sure that the connecting rod and connecting rod cap are in the correct combination and that the front mark on the connecting rod cap is facing in the correct mounting orientation, then install the connecting rod cap to the connecting rod.
| *a | Front Mark |
Apply a light coat of engine oil to the threads of the connecting rod bolts.
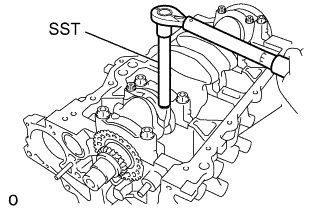 |
Using SST, tighten the 2 connecting rod bolts in several steps to the specified torque.
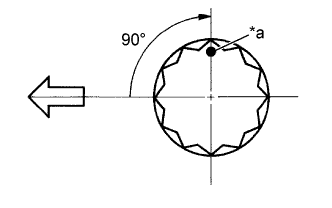 |
Mark the front of the connecting rod bolts with paint.
| *a | Paint Mark |
 | Engine Front |
Further tighten the connecting rod bolts by 90° as shown in the illustration.
Remove the 2 connecting rod bolts, connecting rod cap and connecting rod bearing.
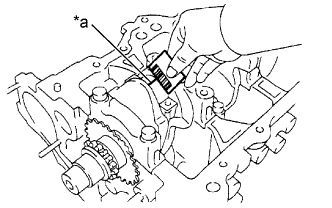 |
Measure the Plastigage at its widest point.
| *a | Plastigage |
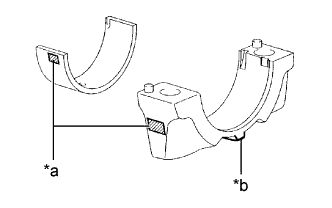 |
When replacing a connecting rod bearing, replace it with one with the same number as marked on the connecting rod. There are 3 sizes of standard connecting rod bearings, marked 1, 2 and 3 accordingly.
| *a | Mark 1, 2 or 3 |
| *b | Front Mark |
| Mark | mm (in.) |
| 1 | 1.491 to 1.494 (0.0587 to 0.0588) |
| 2 | 1.494 to 1.497 (0.0588 to 0.0589) |
| 3 | 1.497 to 1.500 (0.0589 to 0.0591) |
| 3. REMOVE PISTON WITH PIN SUB-ASSEMBLY WITH CONNECTING ROD SUB-ASSEMBLY |
Using a ridge reamer, remove all the carbon from the top of the cylinder.
|
Using SST, remove the connecting rod bolts and connecting rod cap.
Push the piston, connecting rod and connecting rod bearing through the top of the cylinder block sub-assembly to remove them.
| 4. REMOVE CONNECTING ROD BEARING |
Remove the connecting rod bearings from the connecting rod and connecting rod cap.
| 5. INSPECT CRANKSHAFT THRUST CLEARANCE |
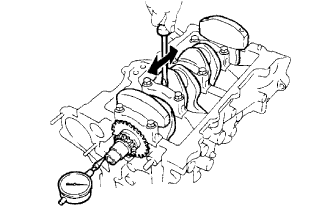 |
Using a dial indicator, measure the thrust clearance while moving the crankshaft back and forth with a screwdriver.
| 6. INSPECT CRANKSHAFT OIL CLEARANCE |
Clean each main journal and crankshaft bearing.
Install the crankshaft bearing to the cylinder block sub-assembly and crankshaft bearing cap.
Place the crankshaft to the cylinder block sub-assembly.
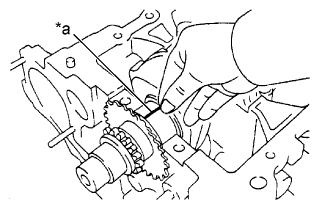 |
Lay a strip of Plastigage across each journal.
| *a | Plastigage |
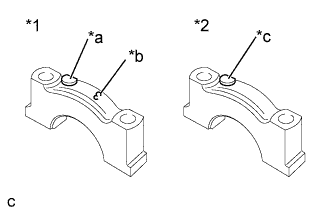 |
Examine the front marks and numbers and install the crankshaft bearing cap to the cylinder block sub-assembly.
| *1 | No. 3 Crankshaft Bearing Cap |
| *2 | No. 1, 2, 4, 5 Crankshaft Bearing Cap |
| *a | Front Mark |
| *b | Number |
| *c | Front Mark and Number |
Apply a light coat of engine oil to the threads of the crankshaft bearing cap set bolts.
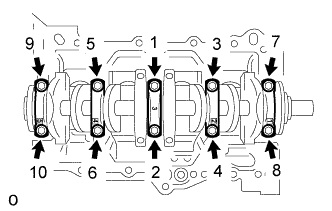 |
Using 12 mm socket wrench, tighten the 10 crankshaft bearing cap set bolts in several steps to the specified torque in the sequence shown in the illustration. (*1)
|
Mark the front of the crankshaft bearing cap set bolts with paint.
| *a | Paint Mark |
| Engine Front |
Further tighten the crankshaft bearing cap set bolts by 90° in the same sequence as step (*1).
Check that the painted mark is now at a 90° angle from the front.
Remove the crankshaft bearing caps.
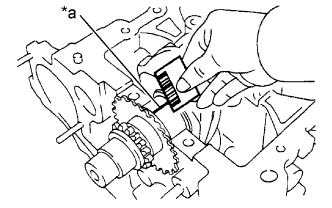 |
Measure the Plastigage at its widest point.
| *a | Plastigage |
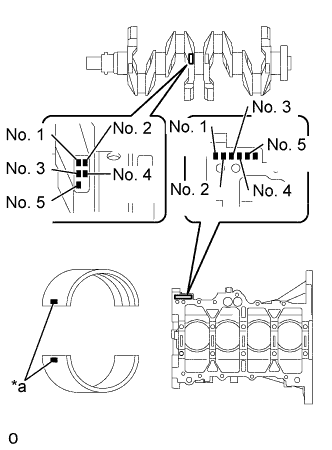 |
When replacing a standard bearing, replace it with one with the same number. If the number of the bearing cannot be found, select the correct bearing by adding together the numbers imprinted on the cylinder block sub-assembly and crankshaft, then select the bearing with the same number as the total. There are 4 sizes of standard bearings, marked 1, 2, 3 and 4 accordingly.
| *a | Mark |
| Cylinder Block (A) + Crankshaft (B) | 0 to 2 | 3 to 5 | 6 to 8 | 9 to 11 |
| Use Bearing | 1 | 2 | 3 | 4 |
| Item | Mark | mm (in.) |
| Cylinder block main journal bore diameter (A) | 0 1 2 3 4 5 6 | 50.000 to 50.003 (1.96850 to 1.96862) 50.003 to 50.005 (1.96862 to 1.96870) 50.005 to 50.007 (1.96870 to 1.96878) 50.007 to 50.010 (1.96878 to 1.96890) 50.010 to 50.012 (1.96890 to 1.96898) 50.012 to 50.014 (1.96898 to 1.96906) 50.014 to 50.016 (1.96906 to 1.96913) |
| Crankshaft main journal diameter (B) | 0 1 2 3 4 5 | 45.998 to 46.000 (1.81094 to 1.81102) 45.996 to 45.998 (1.81087 to 1.81094) 45.994 to 45.996 (1.81079 to 1.81087) 45.992 to 45.994 (1.81071 to 1.81079) 45.990 to 45.992 (1.81063 to 1.81071) 45.988 to 45.990 (1.81055 to 1.81063) |
| Standard bearing center wall thickness | 1 2 3 4 | 1.992 to 1.995 (0.07843 to 0.07854) 1.995 to 1.998 (0.07854 to 0.07866) 1.998 to 2.001 (0.07866 to 0.07878) 2.001 to 2.004 (0.07878 to 0.07890) |
| 7. REMOVE CRANKSHAFT |
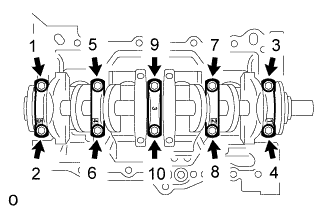 |
Using several steps, loosen and remove the 10 crankshaft bearing cap set bolts uniformly in the sequence shown in the illustration.
Remove the 5 crankshaft bearing caps and the crankshaft.
| 8. REMOVE CRANKSHAFT BEARING |
Remove the 10 crankshaft bearings from the cylinder block sub-assembly and crankshaft bearing caps.
| 9. REMOVE UPPER CRANKSHAFT THRUST WASHER |
Remove the 2 upper crankshaft thrust washers from the cylinder block sub-assembly.
| 10. REMOVE PISTON RING SET |
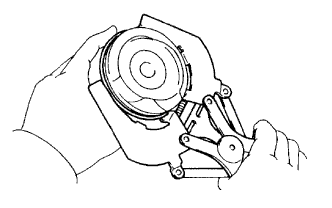 |
Using a piston ring expander, remove the No. 1 compression ring and No. 2 compression ring from the piston.
Remove the 2 side rails and the oil ring from the piston by hand.
| 11. REMOVE WITH PIN PISTON SUB-ASSEMBLY |
Using SST, press the piston pin out of the piston.
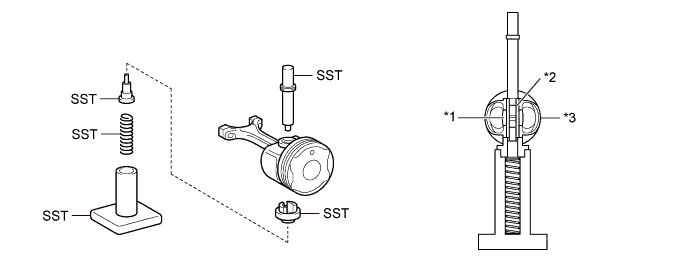
| *1 | Connecting Rod | *2 | Piston Pin |
| *3 | Piston | - | - |
| 12. REMOVE NO. 1 HEAD TAPER SCREW PLUG |
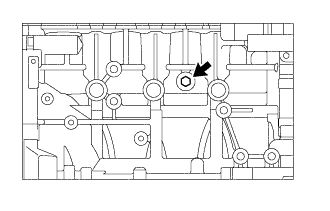 |
Remove the No. 1 head taper screw plug from the cylinder block sub-assembly.
| 13. REMOVE STUD BOLT |
Using an E5 and E7 "TORX" wrench, remove the 7 stud bolts from the cylinder block sub-assembly.
| 14. REMOVE OIL PUMP SET RING PIN |
Remove the 2 oil pump set ring pins from the cylinder block sub-assembly.
| 15. REMOVE STRAIGHT PIN |
Remove the 7 straight pins from the cylinder block sub-assembly.
| 16. REMOVE OIL JET |
Remove the oil jet from the cylinder block sub-assembly.