WATER PUMP (for Hatchback) > INSTALLATION |
| 1. INSTALL WATER PUMP ASSEMBLY |
Install the water pump assembly through a new water pump gasket with the 3 bolts and 2 nuts.
| 2. INSTALL WATER PUMP PULLEY |
Provisionally install the water pump pulley with the 3 bolts.
Using SST, hold the water pump pulley.
Tighten the 3 bolts to the specified torque.
| 3. INSTALL ENGINE MOUNTING INSULATOR SUB-ASSEMBLY RH |
Install the engine mounting insulator RH with the 5 bolts.
| 4. INSTALL GENERATOR ASSEMBLY |
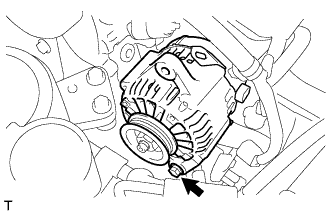
|
Temporarily install the generator assembly with the fixing bolt.
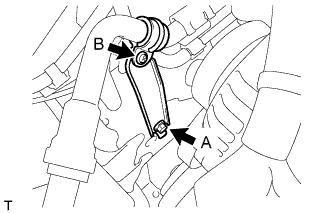 |
Install the piping clamp with the bolt A and screw B.
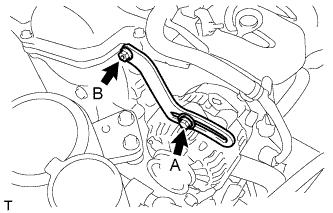 |
Temporarily install the fan belt adjusting slider with fan belt adjusting slider fixing bolt A and nut B.
Move generator assembly toward the cylinder block and tighten nut B.
Connect the connector and engage the clamp.
Install the wire harness to terminal B with the nut.
Install the terminal cap.
| 5. INSTALL FAN AND GENERATOR V BELT |
Provisionally install the fan and generator V belt onto each pulley.
| 6. ADJUST FAN AND GENERATOR V BELT |
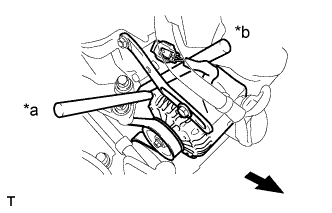 |
Insert an adjusting bar between the engine mounting bracket and generator assembly. Pull the adjusting bar toward the vehicle front to adjust the generator V belt tension.
| *a | OK |
| *b | NG |
 | Front of Vehicle |
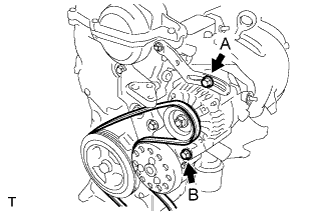 |
First tighten bolt A, then tighten bolt B.
| 7. INSPECT FAN AND GENERATOR V BELT |
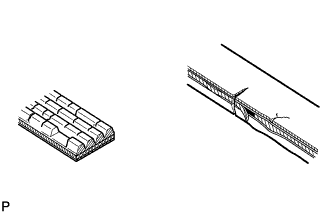 |
Check the fan and generator V belt for wear, cracks or other signs of damage.
If any of the following defects is found, replace the fan and generator V belt.
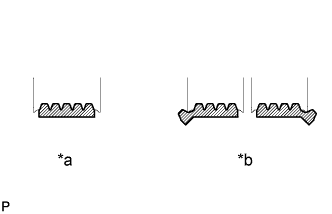 |
Check that the fan and generator V belt fits properly in the ribbed grooves.
| *a | Correct |
| *b | Incorrect |
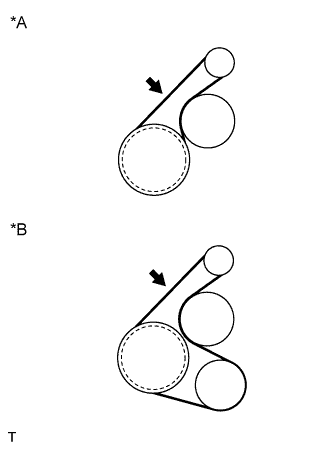 |
Inspect the V belt deflection and tension.
| *A | w/o Air Conditioner |
| *B | w/ Air Conditioner |
| Item | Specified Condition | |
| New belt | 8.0 to 9.0 mm (0.31 to 0.35 in) | |
| Used belt | 12.5 to 13.5 mm (0.49 to 0.53 in) | |
| Item | Specified Condition | |
| New belt | 700 to 800 N (71 to 82 kg, 157 to 180 lb) | |
| Used belt | 300 to 400 N (31 to 41 kg, 67 to 90 lb) | |
| 8. CONNECT CABLE TO NEGATIVE BATTERY TERMINAL |
| 9. ADD COOLANT |
Tighten the radiator drain cock plug by hand.
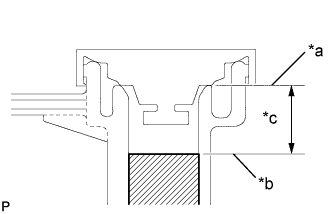 |
Slowly fill the radiator with TOYOTA Super Long Life Coolant (SLLC) from the water filler. (Coolant level should be within 20 mm (0.787 in.) from the filler tube end.)
| *a | Filler Tube End |
| *b | Coolant Level |
| *c | 20 mm (0.787 in.) |
| Transaxle Type | Coolant Capacity |
| Automatic Transaxle | 4.6 liters (4.9 US qts, 4.0 Imp. qts) |
| Manual Transaxle | 4.7 liters (5.0 US qts, 4.1 Imp. qts) |
Remove the reserve tank cap.
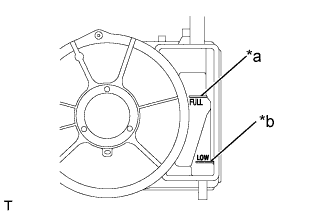 |
Slowly pour coolant into the radiator reserve tank assembly until it reaches the full line.
| *a | Full Line |
| *b | Low Line |
Install the water filler cap sub-assembly securely.
Install the reserve tank cap.
Bleed air from the cooling system.
Warm up the engine until the thermostat opens.
While the thermostat is open, circulate the coolant for several minutes.
Stop the engine and wait until the coolant cools down.
Recheck the coolant level inside the radiator reserve tank assembly. If it is below the full level, add coolant.
| 10. INSPECT FOR COOLANT LEAK |
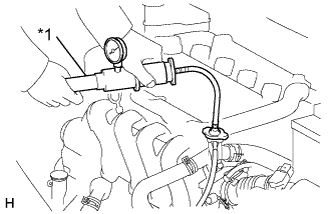 |
Fill the radiator assembly with engine coolant, then attach a radiator cap tester.
| *1 | Radiator Cap Tester |
Pump the tester to 137 kPa (1.4 kgf/cm2, 19.9 psi), then check that the pressure does not drop.
If the pressure drops, check the hoses, radiator assembly and water pump assembly for leakage. If there are no signs or traces of external engine coolant leakage, check the heater core, cylinder block and head.
| 11. INSTALL ENGINE UNDER COVER RH |
Install the engine under cover RH with the 3 screws and 2 bolts.