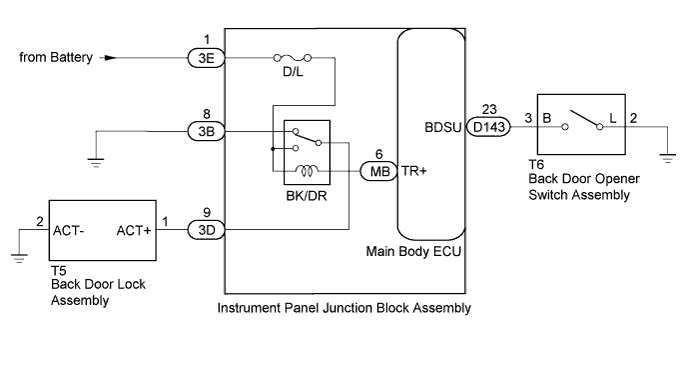
POWER DOOR LOCK CONTROL SYSTEM (for Hatchback) > Only Back Door cannot be Opened |
| 1.READ VALUE USING TECHSTREAM (DOOR LOCK STATUS) |
Unlock all doors.
Connect the Techstream to the DLC3.
Turn the ignition switch to ON.
Turn the Techstream on.
Enter the following menus: Body Electrical / Main Body / Data List.
According to the display on the Techstream, read the Data List.
| Tester Display | Measurement Item/Range | Normal Condition | Diagnostic Note |
| Back Door Open | Back door open status / Prohibit or Permit | Prohibit: Back door locked Permit: Back door unlocked | - |
|
| ||||
| OK | |
 |
| 2.PERFORM ACTIVE TEST USING TECHSTREAM |
Connect the Techstream to the DLC3.
Turn the ignition switch to ON.
Turn the Techstream on.
Enter the following menus: Body Electrical / Main Body / Active Test.
According to the display on the Techstream, perform the Active Test.
| Tester Display | Test Part | Control Range | Diagnostic Note |
| Trunk and Back-Door Open | Back door lock motor | OFF / ON | - |
|
| ||||
| OK | |
|
| 3.READ VALUE USING TECHSTREAM |
Connect the Techstream to the DLC3.
Turn the ignition switch to ON.
Turn the Techstream on.
Enter the following menus: Body Electrical / Main Body / Data List.
According to the display on the Techstream, read the Data List.
| Tester Display | Measurement Item/Range | Normal Condition | Diagnostic Note |
| Back Door Open Handle SW | Back door opener switch signal / OFF or ON | OFF: Back door opener switch not pushed ON: Back door opener switch pushed | - |
|
| ||||
| OK | ||
 | ||
| ||
| 4.INSPECT BACK DOOR LOCK ASSEMBLY |
Inspect the back door lock assembly (Click here).
|
| ||||
| OK | |
|
| 5.CHECK HARNESS AND CONNECTOR (BACK DOOR LOCK ASSEMBLY - INSTRUMENT PANEL JUNCTION BLOCK ASSEMBLY) |
Disconnect the T5 back door lock assembly connector.
Disconnect the 3D instrument panel junction block assembly connector.
Measure the resistance according to the value(s) in the table below.
| Tester Connection | Condition | Specified Condition |
| T5-1 (ACT+) - 3D-9 | Always | Below 1 Ω |
| T5-2 (ACT-) - Body ground | Always | Below 1 Ω |
| T5-1 (ACT+) - Body ground | Always | 10 kΩ or higher |
|
| ||||
| OK | |
|
| 6.INSPECT INSTRUMENT PANEL JUNCTION BLOCK ASSEMBLY |
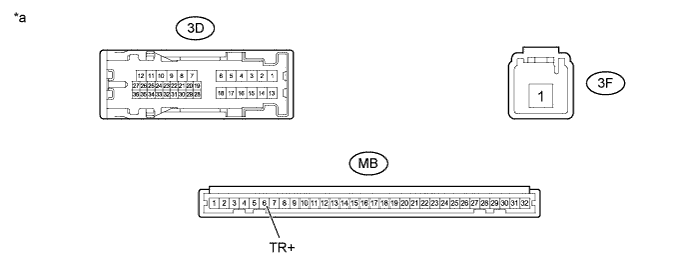
| *a | Component without harness connected (Instrument Panel Junction Block Assembly) | - | - |
Remove the instrument panel junction block assembly (Click here).
Remove the main body ECU (Click here).
Measure the resistance according to the value(s) in the table below.
| Tester Connection | Condition | Specified Condition |
| 3E-1 - 3D-9 | Always | 10 kΩ or higher |
| 3E-1 - MB-6 (TR+) | Always | Below 1 Ω |
Measure the voltage according to the value(s) in the table below.
| Tester Connection | Condition | Specified Condition |
| 3D-9 - Body ground | Battery positive (+) → 3E-1 Battery negative (-) → MB-6 | 11 to 14 V |
|
| ||||
| OK | ||
| ||
| ||
| 7.INSPECT BACK DOOR OPENER SWITCH ASSEMBLY |
Inspect the back door opener switch assembly (Click here).
|
| ||||
| OK | |
|
| 8.CHECK HARNESS AND CONNECTOR (MAIN BODY ECU - BACK DOOR OPENER SWITCH ASSEMBLY) |
Disconnect the D143 main body ECU connector.
Measure the resistance according to the value(s) in the table below.
| Tester Connection | Condition | Specified Condition |
| D143-23 (BDSU) - T6-3 (B) | Always | Below 1 Ω |
| T6-2 (L) - Body ground | Always | Below 1 Ω |
| T6-3 (B) - Body ground | Always | 10 kΩ or higher |
|
| ||||
| OK | ||
| ||
| ||

