FUEL TANK (for Hatchback) > INSTALLATION |
| 1. INSTALL BREATHER TUBE CLAMP |
Engage the claw and pipe clamp and install the breather tube clamp.
| 2. INSTALL FUEL TANK FILLER PIPE PROTECTOR |
Engage the 2 claws and install the fuel tank filler pipe protector.
Engage the 2 claws and install the No. 2 fuel tube support protector.
Install the clip to the fuel tank filler pipe protector.
| 3. INSTALL FUEL TANK VENT HOSE |
Install the fuel tank vent hose sub-assembly onto the fuel tank assembly.
| 4. INSTALL FUEL TANK MAIN TUBE SUB-ASSEMBLY |
Install the fuel tank main tube onto the fuel tank assembly.
| 5. INSTALL FUEL TANK ASSEMBLY |
Clean and degrease the bolt holes.
Using an engine lifter, set the fuel tank assembly in the installation position.
Install the fuel tank assembly with 4 new bolts.
Install the parking brake cable with the bolt.
Engage the claw and install the fuel tank filler pipe.
Install the bolt.
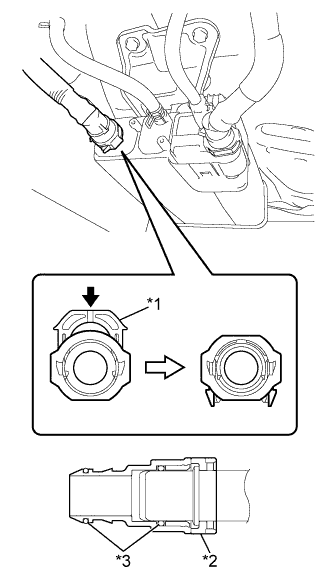
| 6. CONNECT FUEL TANK VENT HOSE |
![]() |
Connect the fuel tank vent hose and lock it by pushing in the retainer.
| *1 | Retainer |
| *2 | Fuel Tank Vent Hose Connector |
| *3 | O-ring |
![]() | Push |
| 7. CONNECT FUEL TANK MAIN TUBE SUB-ASSEMBLY |
Connect the fuel tank main tube sub-assembly and lock it by pushing in the retainer.
After connecting the fuel tube connector, pull on the fuel tube connector and the pipe to make sure they are firmly connected.
| 8. INSTALL FUEL TANK COVER VENT CASE SUB-ASSEMBLY |
Install the fuel tank cover vent case sub-assembly with the bolt and clip.
| 9. INSTALL FRONT NO. 4 FLOOR HEAT INSULATOR |
Install the front No. 4 floor heat insulator with the 2 nuts.
| 10. INSTALL EXHAUST PIPE GASKET |
![]() |
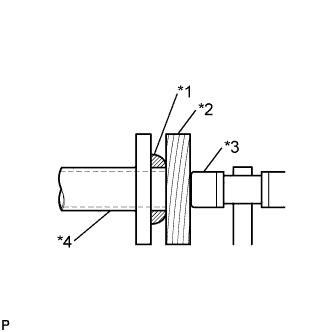
Using a plastic hammer and a wooden block, tap in a new exhaust pipe gasket until its surface is flush with the exhaust manifold.
| *1 | Exhaust Pipe Gasket |
| *2 | Wooden Block |
| *3 | Plastic Hammer |
| *4 | Exhaust Manifold |
| 11. INSTALL NO. 2 EXHAUST PIPE GASKET |
![]() |
Using a plastic hammer and a wooden block, tap in a new No. 2 exhaust pipe gasket until its surface is flush with the front exhaust pipe assembly.
| *1 | No. 2 Exhaust Pipe Gasket |
| *2 | Wooden Block |
| *3 | Plastic Hammer |
| *4 | Front Exhaust Pipe Assembly |
| 12. INSTALL FRONT EXHAUST PIPE ASSEMBLY |
![]() |
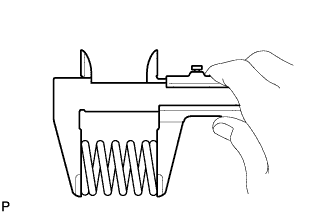
Using a vernier caliper, measure the free length of the compression spring.
Hang the front exhaust pipe assembly with the 3 exhaust pipe supports.
![]() |
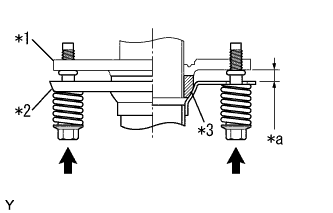
Install the front exhaust pipe assembly onto the exhaust manifold with the 2 compression springs and 2 bolts.
| *1 | Exhaust Manifold |
| *2 | Front Exhaust Pipe Assembly |
| *3 | Exhaust Pipe Gasket |
| *a | Space between flanges: 8.5 mm (0.335 in.) |
![]() |
Using a vernier caliper, measure the free length of the compression spring.
![]() |
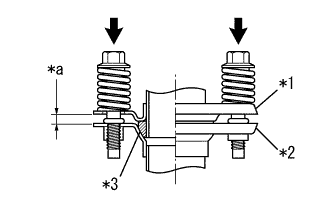
Connect the tail exhaust pipe assembly to the front exhaust pipe assembly with the 2 compression springs and 2 bolts.
| *1 | Front Exhaust Pipe Assembly |
| *2 | Tail Exhaust Pipe Assembly |
| *3 | No. 2 Exhaust Pipe Gasket |
| *a | Space between flanges: 6.5 mm (0.256 in.) |
Pass the connector through the hole into the inside of the vehicle and install the oxygen sensor wire grommet.
Connect the oxygen sensor connector.
| 13. INSTALL FRONT FLOOR CENTER BRACE |
Install the front floor center brace onto the body with the 2 bolts.
| 14. INSTALL REAR CONSOLE BOX ASSEMBLY |
| 15. ADD FUEL |
| 16. INSTALL FUEL SUCTION TUBE ASSEMBLY WITH PUMP AND GAUGE |