 |
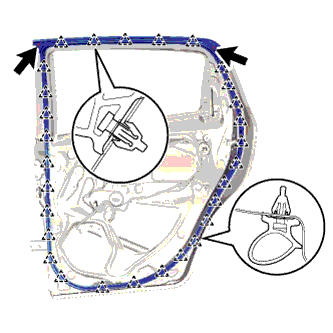
Engage the 29 clips and install the rear door weatherstrip.
REAR DOOR (for Hatchback) > REASSEMBLY |
| 1. INSTALL NO. 2 BLACK OUT TAPE |
| 2. INSTALL REAR DOOR WEATHERSTRIP |
|
Engage the 29 clips and install the rear door weatherstrip.
Install the 2 clips.
| 3. INSTALL REAR DOOR CHECK ASSEMBLY |
Apply MP grease to the sliding areas of the rear door check assembly.
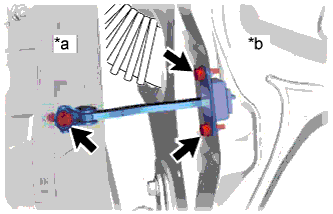 |
Install the rear door check assembly onto the door panel with the 2 bolts.
| *a | Body Panel |
| *b | Door Panel |
Apply adhesive to the threads of the bolt.
Install the rear door check assembly onto the body panel with the bolt.
| 4. INSTALL REAR DOOR OUTSIDE HANDLE FRAME SUB-ASSEMBLY |
Apply MP grease to the sliding areas of the rear door outside handle frame sub-assembly.
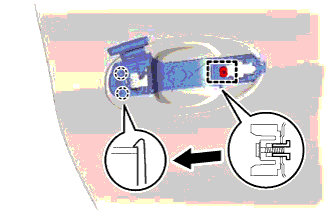 |
Engage the grommet and 2 claws, and install the rear door outside handle frame sub-assembly in the direction indicated by the arrow as shown in the illustration.
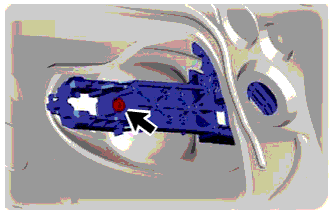 |
Using a T30 "TORX" socket wrench, install the rear door outside handle frame sub-assembly with the screw.
| 5. INSTALL REAR DOOR OUTSIDE HANDLE REAR PAD |
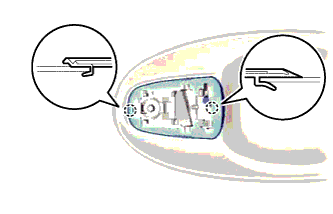 |
Engage the 2 claws and install the rear door outside handle rear pad.
| 6. INSTALL REAR DOOR OUTSIDE HANDLE FRONT PAD |
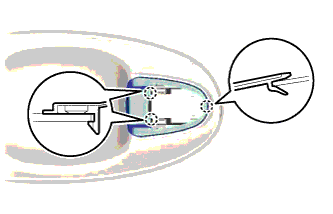 |
Engage the 3 claws and install the rear door outside handle front pad.
| 7. INSTALL REAR DOOR OUTSIDE HANDLE ASSEMBLY |
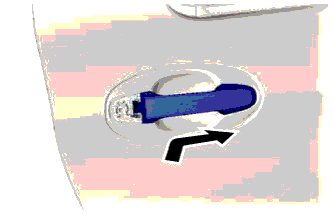 |
Install the rear door outside handle assembly in the direction of the arrow shown in the illustration.
| 8. INSTALL REAR DOOR OUTSIDE HANDLE COVER |
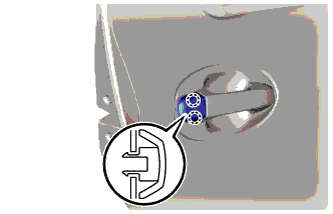 |
Engage the 2 claws and install the front door outside handle cover.
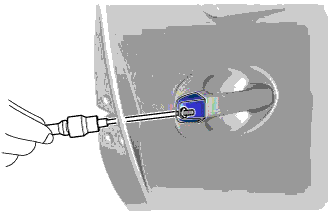 |
Using a T30 "TORX" socket wrench, tighten the screw.
| 9. INSTALL REAR DOOR LOCK ASSEMBLY (w/ Power Door Lock) |
Install a new door lock wire harness seal to the rear door lock.
Apply MP grease to the sliding parts of the rear door lock.
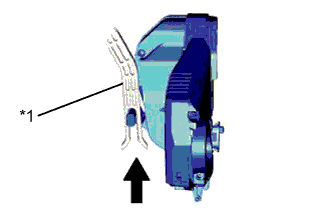 |
Insert the rear door lock to the release plate.
| *1 | Release Plate |
 | Slide Direction |
Using a "TORX" socket wrench T30, install the rear door lock assembly with the 3 screws.
Connect the connector.
| 10. INSTALL REAR DOOR LOCK ASSEMBLY (w/o Power Door Lock) |
Install a new door lock wire harness seal to the rear door lock.
Apply MP grease to the sliding parts of the rear door lock.
|
Insert the rear door lock to the release plate.
| *1 | Release Plate |
| Slide Direction |
Using a "TORX" socket wrench T30, install the rear door lock assembly with the 3 screws.
| 11. INSTALL REAR DOOR GLASS OUTER WEATHERSTRIP ASSEMBLY |
| 12. INSTALL NO. 1 SEPARATOR DOOR STIFFENER CUSHION |
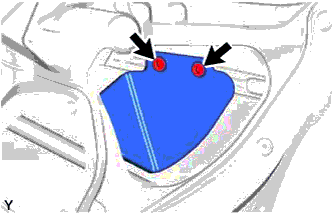 |
Install the No. 1 separator door stiffener cushion and the 2 collars with the 2 bolts.
| 13. INSTALL REAR DOOR GLASS RUN |
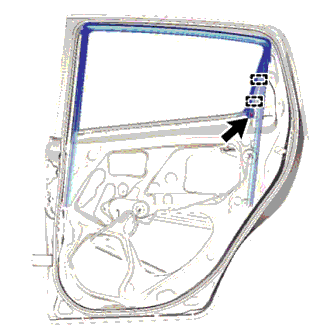 |
Engage the 2 guides and install the rear door glass run.
Install the clip.
| 14. INSTALL REAR DOOR WINDOW REGULATOR SUB-ASSEMBLY (w/ Power Window) |
Apply MP grease to the sliding parts of the rear door window regulator sub-assembly.
Temporarily install the temporary bolt to the rear door window regulator sub-assembly.
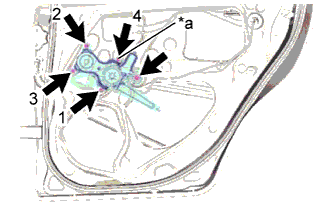 |
Insert the rear door window regulator sub-assembly into the door panel. Use the temporary bolt to hang the rear door window regulator sub-assembly on the door panel.
| *a | Temporary Bolt |
Install the 3 bolts and tighten the temporary bolt in the order shown in the illustration.
Connect the connector.
| 15. INSTALL REAR DOOR WINDOW REGULATOR SUB-ASSEMBLY (w/o Power Window) |
Apply MP grease to the sliding parts of the rear door window regulator sub-assembly.
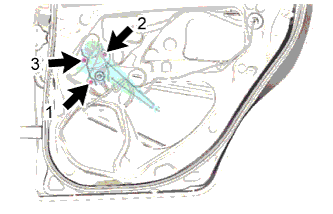 |
Install the rear door window regulator sub-assembly with the 3 bolts in the order shown in the illustration.
| 16. INSTALL REAR DOOR GLASS CHANNEL FILLER (for TMC Made) |
Apply soapy water to a new rear door glass channel filler.
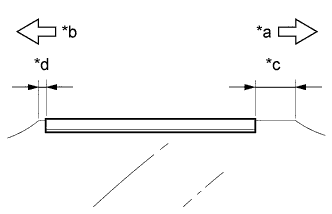 |
Install the new rear door glass channel filler as shown in the illustration.
| *a | Front Side |
| *b | Rear Side |
| *c | 37.3 mm (1.47 in.) |
| *d | 5.1 mm (0.201 in.) |
| 17. INSTALL REAR DOOR GLASS CHANNEL SUB-ASSEMBLY (for TMC Made) |
Apply soapy water to a rear door glass channel sub-assembly.
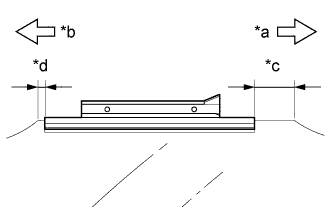 |
Using a plastic-faced hammer, tap the rear door glass channel sub-assembly onto the rear door glass sub-assembly to install the rear door glass channel sub-assembly.
| *a | Front Side |
| *b | Rear Side |
| *c | 37.3 mm (1.47 in.) |
| *d | 5.1 mm (0.201 in.) |
| 18. INSTALL REAR DOOR GLASS SUB-ASSEMBLY |
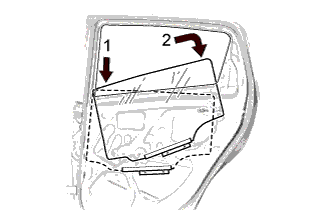 |
Insert the rear door glass sub-assembly into the rear door panel along the rear door glass run as indicated by the arrows in the order shown in the illustration.
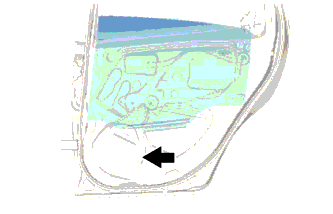 |
Slide the lower section of the rear door glass sub-assembly as indicated by the arrow as shown in the illustration.
| 19. INSTALL REAR DOOR WINDOW DIVISION BAR SUB-ASSEMBLY |
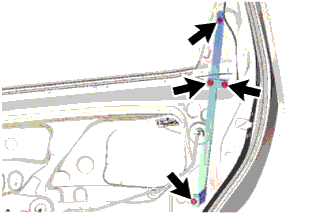 |
Engage the rear door window division bar sub-assembly to the rear door glass run.
Install the rear door window division bar sub-assembly with the 3 bolts and nut.
| 20. INSTALL REAR DOOR SERVICE HOLE COVER |
Apply butyl tape to the rear door panel.
Pass the rear door lock remote control cable assembly, rear door inside locking cable assembly and each connector through a new rear door service hole cover.
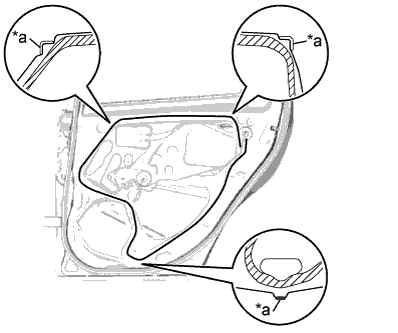 |
Install the new rear door service hole cover according to the reference points on the rear door panel.
| *a | Reference Point |
| 21. INSTALL REAR SPEAKER ASSEMBLY (w/ Rear Speaker) |
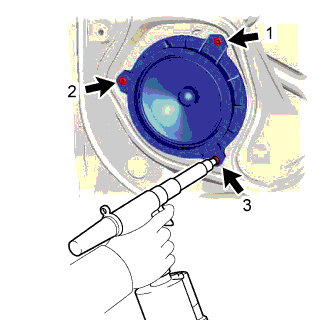 |
Using an air riveter or hand riveter, install the rear speaker assembly onto the rear door panel with 3 new strike rivets.
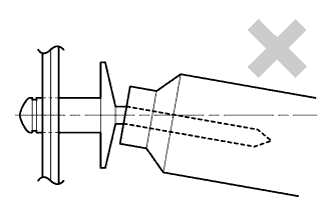 |
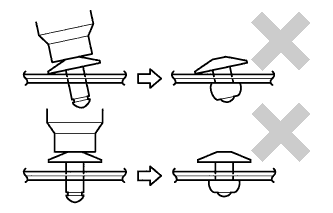 |
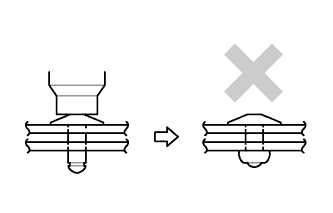 |
Connect the connector.
| 22. INSTALL REAR DOOR GLASS INNER WEATHERSTRIP |
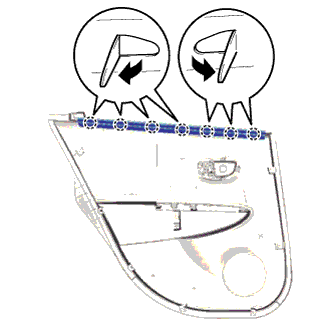 |
Engage the 7 claws and install the rear door glass inner weatherstrip as shown in the illustration.
| 23. INSTALL REAR DOOR INSIDE HANDLE SUB-ASSEMBLY |
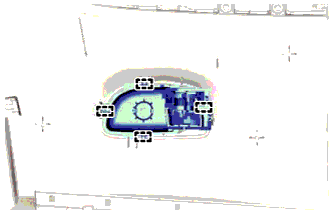 |
Engage the 4 guides and install the rear door inside handle sub-assembly.
| 24. INSTALL REAR DOOR TRIM BOARD SUB-ASSEMBLY |
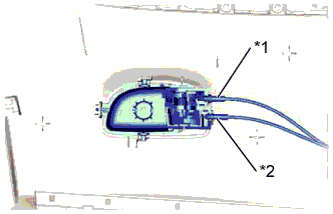 |
Connect the rear door lock remote control cable assembly and the rear door inside locking cable assembly to the rear door inside handle sub-assembly.
| *1 | Rear Door Lock Remote Control Cable Assembly |
| *2 | Rear Door Inside Locking Cable Assembly |
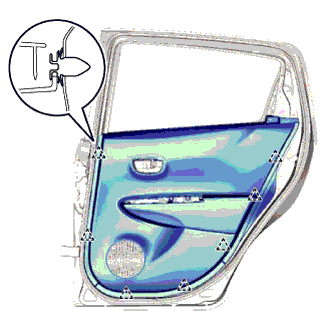 |
Engage the 7 clips and install the rear door trim board sub-assembly.
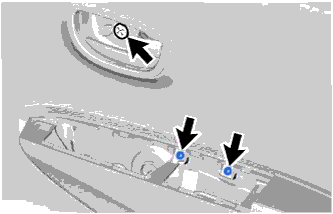 |
Install the 3 screws.
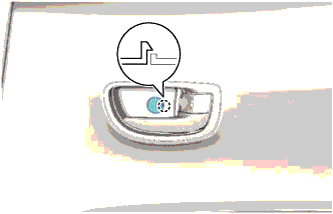 |
Engage the claw and close the cover.
| 25. INSTALL REAR DOOR ARMREST BASE UPPER PANEL (w/ Power Window) |
 |
Connect the connector.
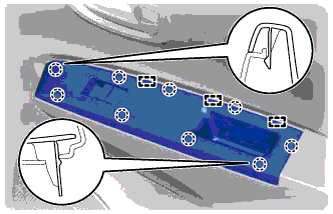
Engage the 9 claws and the 3 guides, and install the rear door armrest base upper panel.
| 26. INSTALL REAR DOOR ARMREST BASE UPPER PANEL (w/o Power Window) |
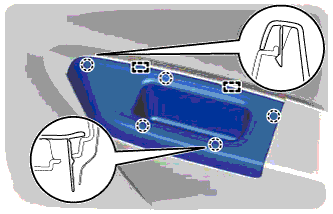 |
Engage the 5 claws and 2 guides, and install the rear door armrest base upper panel.
| 27. INSTALL REAR DOOR WINDOW REGULATOR HANDLE ASSEMBLY (w/o Power Window) |
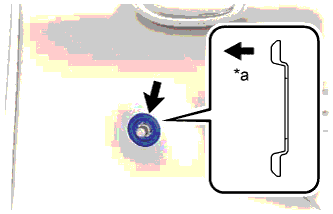 |
Install the window regulator handle plate.
| *a | Inside of Vehicle |
Open all the windows.
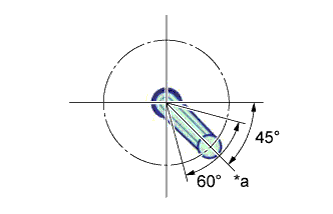 |
Install the rear door window regulator handle assembly with the clip at the angle shown in the illustration.
| *a | Assemble with Glass in Fully Open Position |
| 28. INSTALL REAR DOOR FRAME GARNISH |
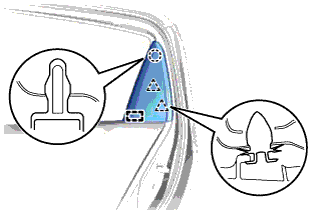 |
Engage the guide.
Engage the 2 clips and the claw, and install the rear door frame garnish.
| 29. CONNECT CABLE TO NEGATIVE BATTERY TERMINAL (w/ Power Window) |
| 30. INSPECT POWER WINDOW OPERATION (w/ Power Window) |