THROTTLE BODY (for Hatchback) > INSTALLATION |
| 1. INSTALL THROTTLE BODY ASSEMBLY |
Install a new gasket to the intake manifold.
Install the throttle body assembly with the bolt and 3 nuts.
Install the wire harness bracket with the nut.
Connect the throttle body assembly connector.
Engage the clamp and connect the wire harness to the wire harness bracket.
Connect the water by-pass hose to the throttle body assembly with the hose clamp.
Connect the No. 2 water by-pass hose to the throttle body assembly with the hose clamp.
Install the water filter bracket with the 2 nuts.
| 2. INSTALL AIR CLEANER CAP SUB-ASSEMBLY WITH NO. 1 AIR CLEANER HOSE |
Install the air cleaner cap sub-assembly with No. 1 air cleaner hose onto the throttle body assembly
Engage the 2 clamps and connect the air cleaner cap sub-assembly to the air cleaner case sub-assembly.
Tighten the hose clamp.
Connect the vacuum switching valve assembly connector.
Connect the mass air flow meter connector.
Engage the 2 clamps and connect the wire harness to the air cleaner cap sub-assembly and vacuum switching valve assembly.
Connect the No. 2 fuel vapor feed hose to the intake manifold.
Connect the fuel vapor feed hose assembly to the No. 1 air cleaner hose and vacuum switching valve assembly with the 2 hose clamps.
Engage the clamp and connect the fuel vapor feed hose assembly to the No. 1 air cleaner hose.
| 3. ADD ENGINE COOLANT |
Tighten the radiator drain cock plug by hand.
![]() |
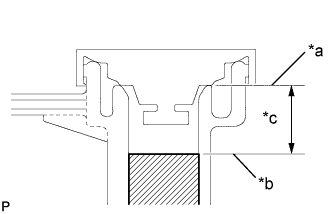
Slowly fill the radiator with TOYOTA Super Long Life Coolant (SLLC) from the water filler. (Coolant level should be within 20 mm (0.787 in.) from the filler tube end.)
| *a | Filler Tube End |
| *b | Coolant Level |
| *c | 20 mm (0.787 in.) |
| Transaxle Type | Coolant Capacity |
| Automatic Transaxle | 4.6 liters (4.9 US qts, 4.0 Imp. qts) |
| Manual Transaxle | 4.7 liters (5.0 US qts, 4.1 Imp. qts) |
Remove the reserve tank cap.
![]() |
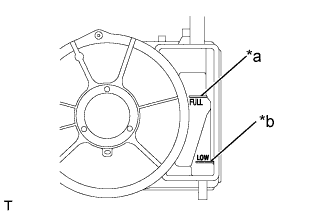
Slowly pour coolant into the radiator reserve tank assembly until it reaches the full line.
| *a | Full Line |
| *b | Low Line |
Install the water filler cap sub-assembly securely.
Install the reserve tank cap.
Bleed air from the cooling system.
Warm up the engine until the thermostat opens.
While the thermostat is open, circulate the coolant for several minutes.
Stop the engine and wait until the coolant cools down.
Recheck the coolant level inside the radiator reserve tank assembly. If it is below the full level, add coolant.
| 4. INSPECT FOR COOLANT LEAK |
![]() |
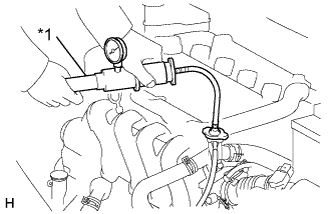
Fill the radiator assembly with engine coolant, then attach a radiator cap tester.
| *1 | Radiator Cap Tester |
Pump the tester to 137 kPa (1.4 kgf/cm2, 19.9 psi), then check that the pressure does not drop.
If the pressure drops, check the hoses, radiator assembly and water pump assembly for leakage. If there are no signs or traces of external engine coolant leakage, check the heater core, cylinder block and head.
| 5. PERFORM INITIALIZATION |
Turn the ignition switch to ON without operating the accelerator pedal.
Connect the Techstream to the DLC3 and clear the DTCs (Click here).
Perform the "Inspection After Repairs" (Click here).
Start the engine and check that the MIL is not illuminated and that the idle speed is within the specified range when the A/C is switched off after the engine is warmed up.
| Transaxle | Condition | Engine Idle Speed |
| Automatic Transaxle | A/C switched off | 650 to 750 rpm |
| Manual Transaxle | 600 to 700 rpm |
Enter the following menus: Powertrain / Engine and ECT / Data List / Accel Sens. No. 1 Volt %. Fully depress the accelerator pedal and check that the value is 52 to 90%.
Perform a road test and confirm that there are no abnormalities.