Home › Engine / Hybrid System › 1NZ-FE ENGINE CONTROL › ENGINE COOLANT TEMPERATURE SENSOR (for Hatchback)

ENGINE COOLANT TEMPERATURE SENSOR (for Hatchback) > INSTALLATION


1. INSTALL ENGINE COOLANT TEMPERATURE SENSOR
  1. Install a new gasket onto the engine coolant temperature sensor.

  1. Using a 19 mm deep socket wrench, install the engine coolant temperature sensor.

    Torque:
    20 N*m{ 204 kgf*cm , 15 ft.*lbf }

    NOTICE:
    If a component has been dropped or subjected to a strong impact, replace it.

    HINT:
    Perform "Inspection After Repairs" after replacing the engine coolant temperature sensor (Click here).

  1. Connect the engine coolant temperature sensor connector.


2. INSTALL BATTERY
  1. Install the battery.

  1. Install the battery clamp with the 2 nuts.

    Torque:
    3.5 N*m{ 36 kgf*cm , 31 in.*lbf }


3. INSTALL AIR CLEANER CAP SUB-ASSEMBLY WITH NO. 1 AIR CLEANER HOSE
  1. Install the air cleaner cap sub-assembly with No. 1 air cleaner hose onto the throttle body assembly

  1. Engage the 2 clamps and connect the air cleaner cap sub-assembly to the air cleaner case sub-assembly.

  1. Tighten the hose clamp.

    Torque:
    3.0 N*m{ 31 kgf*cm , 27 in.*lbf }

  1. Connect the vacuum switching valve assembly connector.

  1. Connect the mass air flow meter connector.

  1. Engage the 2 clamps and connect the wire harness to the air cleaner cap sub-assembly and vacuum switching valve assembly.

  1. Connect the No. 2 fuel vapor feed hose to the intake manifold.

  1. Connect the fuel vapor feed hose assembly to the No. 1 air cleaner hose and vacuum switching valve assembly with the 2 hose clamps.

  1. Engage the clamp and connect the fuel vapor feed hose assembly to the No. 1 air cleaner hose.


4. ADD ENGINE COOLANT
  1. Tighten the radiator drain cock plug by hand.


    A206788E06
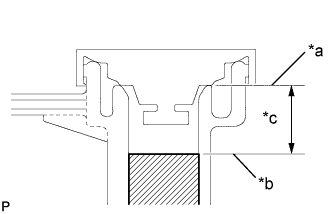
  1. Slowly fill the radiator with TOYOTA Super Long Life Coolant (SLLC) from the water filler. (Coolant level should be within 20 mm (0.787 in.) from the filler tube end.)
    Text in Illustration 
    *a
    Filler Tube End
    *b
    Coolant Level
    *c
    20 mm (0.787 in.)

    Capacity:
    Transaxle Type
    Coolant Capacity
    Automatic Transaxle
    4.6 liters (4.9 US qts, 4.0 Imp. qts)
    Manual Transaxle
    4.7 liters (5.0 US qts, 4.1 Imp. qts)

    NOTICE:
    Do not substitute water for coolant.

    HINT:
    TOYOTA vehicle are filled with TOYOTA SLLC at the factory. In order to avoid damage to the engine cooling system and other technical problems, only use TOYOTA SLLC or similar high quality ethylene glycol based non-silicate, non-amine, non-nitrite, non-borate coolant with long-life hybrid organic acid technology (coolant with long-life hybrid organic acid technology is a combination of low phosphates and organic acids).
  1. Remove the reserve tank cap.


    A246002E04
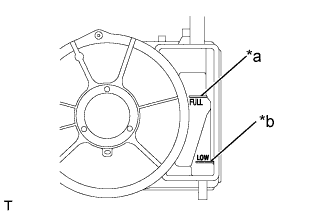
  1. Slowly pour coolant into the radiator reserve tank assembly until it reaches the full line.
    Text in Illustration 
    *a
    Full Line
    *b
    Low Line

  1. Install the water filler cap sub-assembly securely.

  1. Install the reserve tank cap.

  1. Bleed air from the cooling system.

    1. Warm up the engine until the thermostat opens.
      While the thermostat is open, circulate the coolant for several minutes.

      NOTICE:
      1. Make sure that the radiator reserve tank assembly still has some coolant in it.
      2. If the coolant temperature gauge indicates an excessive temperature, turn off the engine and let it cool.
      3. If there is not enough coolant, the engine may overheat or be seriously damaged.
      4. If the radiator reserve tank assembly does not have enough coolant, perform the following stop the engine, and wait until the coolant has cooled down, and add coolant until the radiator reserve tank assembly is filled to the full line.

      HINT:
      The thermostat open timing can be confirmed by pressing the No. 2 radiator hose by hand, and checking when the coolant starts to flow inside the hose.

  1. Stop the engine and wait until the coolant cools down.

  1. Recheck the coolant level inside the radiator reserve tank assembly. If it is below the full level, add coolant.


5. INSPECT FOR ENGINE COOLANT LEAK

CAUTION:
To avoid the danger of being burned, do not remove the water filler cap sub-assembly while the engine and radiator assembly are still hot. Thermal expansion will cause hot engine coolant and steam to blow out from the radiator assembly.


    A250661E01
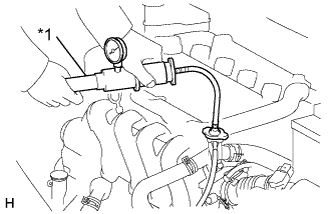
  1. Fill the radiator assembly with engine coolant, then attach a radiator cap tester.
    Text in Illustration 
    *1
    Radiator Cap Tester

  1. Pump the tester to 137 kPa (1.4 kgf/cm2, 19.9 psi), then check that the pressure does not drop.
    If the pressure drops, check the hoses, radiator assembly and water pump assembly for leakage. If there are no signs or traces of external engine coolant leakage, check the heater core, cylinder block and head.


6. INSTALL NO. 2 CYLINDER HEAD COVER
  1. Install the No. 2 cylinder head cover with the 4 nuts.

    Torque:
    7.0 N*m{ 71 kgf*cm , 62 in.*lbf }